Mobile First, Cloud First -- A Mobile Azure Stack
Merry Christmas!
In my previous post "Smallest Azure Stack PoC Box w/o Hacking the Code", I introduced how I built a mini Azure Stack. I can put it into a small backpack and take it with me all the day.
But when I tried to demo that to my friend a coffee shop, I found a little problem. How to connect the mini Azure Stack to Coffee Shop's wireless hot spot? As you probably know once deployed, Azure Stack assumes its IP range and DNS servers remains unchanged. Obviously that's not the case if you need to move among different networks. I don't want to sit in the coffee shop for 3 hours and wait a new deployment complete.
Now let's translate the above requirements to the technical questions below:
- How to keep Azure Stack's IP range and DNS server unchanged when it's roaming among different networks?
- How to connect my mini Azure Stack to a wireless network? (You don't expect have cable connection in coffee shop, do you?)
The first one is simple. Prepare a Windows 10 laptop and:
- Connect the laptop to the mini Azure Stack with a network cable.
- Install Hyper-V role on it.
- Create an internal virtual switch and an external virtual switch. Bind the external virtual switch to the physical NIC which used to connect to mini Azure Stack.
- Created a VM with two vNICs (one connect to the internal virtual switch, the other connect to the external virtual switch) on the laptop.
- Assign the IP addresses to the above two vNICs, In my case, I use 192.168.2.1/24 and default gateway 192.168.2.254 on the vNIC which connect to Internal vSwitch and 192.168.20.1/24 on the vNIC which connect to external vSwitch.
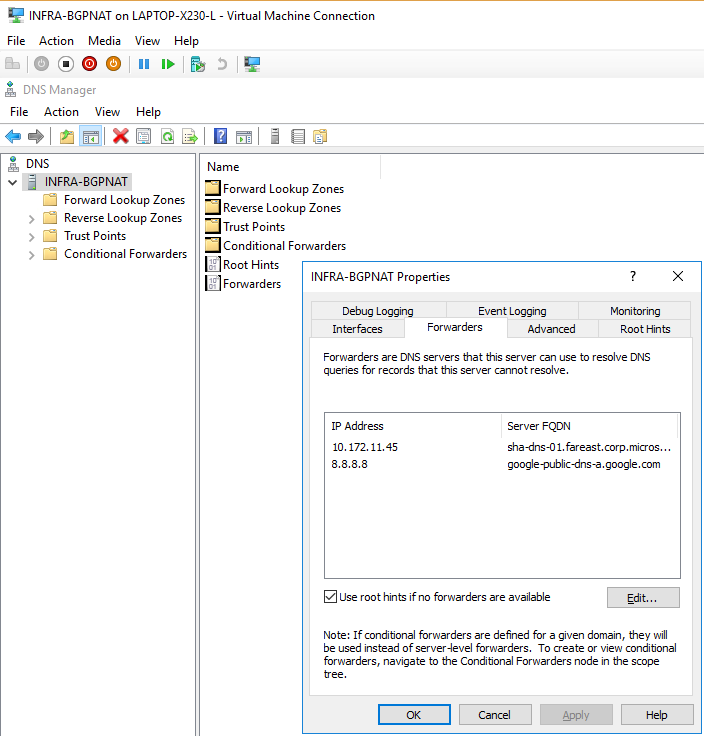
- Install DNS role on the VM and configure DNS forwarding on the DNS server. For example, forward all the DNS queries to external DNS server (say, 8.8.8.8).
- Configure the physical NIC on mini Azure Stack to use IP address: 192.168.20.253/24; default gateway: 192.168.20.1; DNS server: 192.168.2.1. Later on I can deploy Azure Stack with static IP and fixed DNS server IP (192.168.2.1). (I use an intermediate DNS server here because in some networks, you might not be able to access the previous designated DNS server (say, 8.8.8.8). When that happened, you only need to update the DNS forwarding here.)
Now let's focus on how to configure the mobile Azure Stack to access Internet. If you have used Hyper-V on your laptop, probably you know Hyper-V virtual switch doesn't support binding to a wireless network adapter. Ben Armstrong had a great blog talking about how to workaround that.
If you're using Window 10 (build 14295 or later) on your laptop just like me, we have a better option, configure the above internal virutal switch as a NAT network. Here is the detailed steps.
- Open a PowerShell windows with administrative privilege.
- Run cmdlet "Get-NetAdapter" and identify the index number of the above internal virtual switch you created. In my case, it's 10.
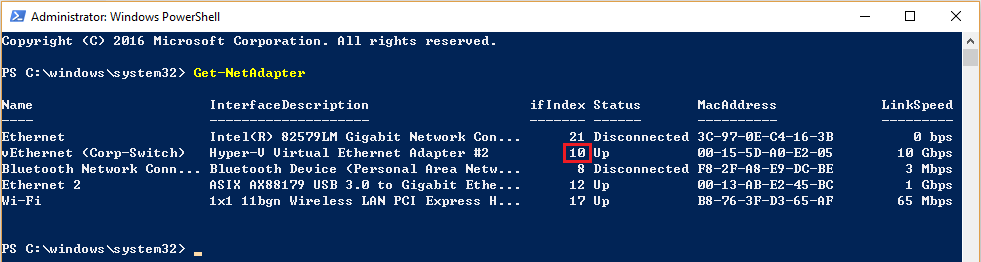
- Run the cmdlets below to configure that virtual switch to use NAT.
 New-NetIPAddress -IPAddress 192.168.2.254 -PrefixLength 24 -InterfaceIndex 10
New-NetNat -Name NATnetwork -InternalIPInterfaceAddressPrefix 192.168.2.0/24
Now the above DNS VM is supposed to able to access Internet. For more information regarding how to setup virtual switches for virtual machines that use NAT, please refer to the link below.
/en-us/virtualization/hyper-v-on-windows/user-guide/setup-nat-network
As next step, we need to configure DNS server as the second NAT gateway.
- Install RRAS role on the above VM.
- Configure NAT on the above VM, use vNIC which connect to internal virtual switch as the external network and use vNIC which connect to the external virtual switch as the internal network. (I know it's a little bit confusing here. Actually from DNS/NAT VM's point of view, the vNIC which connect to the external virtual switch is used to connect to mini Azure Stack and the vNIC which connect to the NAT enabled internal virtual switch is used to access Internet.)
- Now you may validate and see if mini Azure Stack is able to access Internet (192.168.20.253 -> 192.168.20.1 -> 192.168.2.1 -> 192.168.2.254 -> <ip of laptop wireless network gateway> ->...)
Finally, I can install Azure Stack with.
 $adminpass = ConvertTo-SecureString "xxx" -AsPlainText -Force
$aadpass = ConvertTo-SecureString "yyy" -AsPlainText -Force
$aadcred = New-Object System.Management.Automation.PSCredential ("serviceadmin@azurestack.onmicrosoft.com", $aadpass)
.\InstallAzureStackPOC.ps1 -AdminPassword $adminpass -AADAdminCredential $aadcred -NATIPv4Subnet 192.168.20.0/24 -NATIPv4Address 192.168.20.254 -NATIPv4DefaultGateway 192.168.20.1 -EnvironmentDNS 192.168.2.1