AD RMS: Upgrade Migration with a Named SQL Instance
The Scenario:
You read my previous article but it does not cover how to do an upgrade migration if you are moving to a new named instance in SQL. Although it is very similar to the Version 2, there are some important call-outs if you want to have a pain free upgrade experience. I have tested these in my lab using AD RMS on Windows Server 2012 R2 and a new named instance of SQL Server 2012 SP3 called ADRMS running on a static port of 1414.
Upgrading AD RMS (Version 3):
- If a CNAME does not yet exist for SQL, create a new CNAME in DNS to use for the AD RMS SQL server
- Restore the AD RMS databases to the new SQL server named instance
- Open SQL Server Managment Studio on the new SQL server and connect to the new named instance
- Expand Security
- Right-click on Logins and select New Login...
- Click Search...
- Change the Locations... to Entire Directory
- Enter the name of your AD RMS Service Account and click Check Names then OK
- Click OK to complete adding the service account
- Expand Databases
- Expand the Configruation Database (Should be similar to DRMS_Config_adrms_contoso_com_443)
- Expand Tables
- Right-click on dbo.DRMS_ClusterPolicies and select Edit Top 200 Rows
- Modify the PolicyData corresponding to the following entries in the PolicyName column removing the existing SQL Server and adding the CNAME created for the new SQL server plus "\<InstanceName>" (In my case it would be SQL.CONTOSO.COM\ADRMS)
- LoggingDatabaseServer
- CertificationUserKeyStorageConnectionString
- DirectoryServicesCacheDatabase
- Close Sql Server Management Studio
- Open SQL Server Configuration Manager (this is only if you are setting a static port for the named instance)
- Expand SQL Server Network Configuration
- Click on Protocols for <InstanceName>
- Ensure TCP has a status of Enabled
- Right-click on TCP and select Properties
- Select the IP Addresses tab
- Scroll down to the IPAll section, enter your port number, then click Apply and OK.
- Click on SQL Server Services
- Verify that the SQL Server Browser Service is running and is set to a Start Mode of Automatic
- Right-click on SQL Server (<InstanceName>), and select Restart
- Open a command prompt on the SQL server and run Netstat -ano > %Temp%\netstat.txt
- Type Start %Temp%\netstat.txt and verify that you see an entry like "TCP 0.0.0.0:1414 0.0.0.0:0 LISTENING <PID>"
- Verify that the Windows Firewall and any firewalls between the SQL Server and the new AD RMS server allow your new port over TCP and the SQL Server Browser Service (1434) over UDP
- On the new AD RMS server, import the SSL Certificate to the Local Computer>Personal store
- Open an administrative Notepad.exe and browse to C:\Windows\System32\drivers\etc and open the hosts file
- Create an entry in the hosts file redirecting the CNAME for AD RMS to the local server (Actual IP, not loopback)
- Create an entry in the hosts file redirecting the CNAME for the SQL server to the new SQL server (Actual IP, not loopback)
e.g.
adrms.contoso.com 10.0.0.25
sqladrms.contoso.com 10.0.0.26
- Install the AD RMS Role on the new 2012 R2 server
- After installation completes, select the link to Perform additional configuration
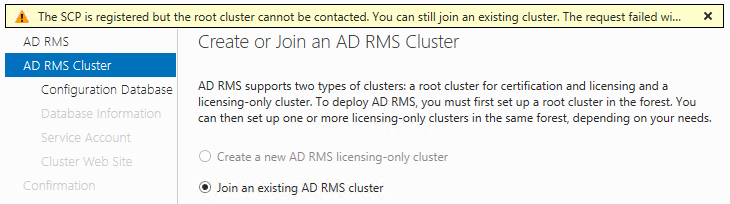
- The server will detect the SCP in Active Directory and default to Join an existing AD RMS cluster. There is a warning that it cannot contact the root cluster. This is because the SCP is being redirected to this server via the hosts file. Leave this as is and click next.
- On the Select Configuration Database page, enter the CNAME you specified in the hosts file for the new SQL server (FQDN)
- Click List on the second line and select the DefaultInstance from the drop-down
- Drop down the Configuration Database Name selection box and select your configuration database
- Enter the private key password corresponding to the old database
- Enter credentials for the original AD RMS service account
- Select Default Website
- On the Choose a Server Authentication Certificate page, select the imported SSL certificate and click Next
- Click Install to begin the installation
- After configuration completes, you will need to log off and back on to administer AD RMS
- If you are using primarily Kerberos based authentication, you may need to follow the instructions at https://technet.microsoft.com/en-us/library/dd759186(v=ws.11).aspx to modify your application pool and set Service Principal Names.
- Modify the hosts file on several clients to point to the new AD RMS server
- Test consuming existing content and protecting new content against the new server
- After you are satisfied that the 2012 R2 AD RMS server is doing what you want it to do, you can add any additional nodes to the 2012 R2 AD RMS cluster you now have
- Open SQL Server Managment Studio on the new SQL server and navigate to the configuration Database
- Expand Tables
- Right-click on dbo.DRMS_ClusterServers and select Edit Top 200 Rows
- Remove any old servers from the table by deleting each row
- Finally, switch over the CNAMEs in DNS and all your clients will start talking to the new servers
- When you are comfortable with the new environment, you can gracefully shut down and reallocate the old resources.
Wrapping Up:
As you can see, there is a reason I didn't dive into all of that in the first article. There are a lot of little things that you have to touch when moving to a new SQL Server Named Instance and static port. Please let me know if you notice anything I have missed. Like I said above, I tested this in my lab environment several times so it should work without any issues, but I know production environments can sometimes be more challenging.
Kevin McKinnerney
PREMIER FIELD ENGINEER – PLATFORMS/SECURITY