AD RMS: Side-by-Side Migration from AD RMS on 2008 R2 to 2012 R2
The Scenario:
You are an AD RMS administrator running your AD RMS infrastructure on Windows Server 2008 R2. You have finally been given the go ahead to upgrade to Windows Server 2012 R2 or 2016 for all your AD RMS farms, but you want to be able to do it with little to no user impact and have full fallback capabilities. Additionally, the SQL administrators have informed you that they will be decommissioning the SQL server housing your AD RMS databases so you have to figure out how to migrate the databases to a new location.
You think about the best way to go about this and find yourself browsing the TechNet documentation at https://technet.microsoft.com/library/cc754277.aspx. This is the RMS to AD RMS Migration and Upgrade Guide, but also covers what is necessary for an upgrade from AD RMS 2008 R2 to 2012 R2. The only problem is that this would require you to add a 2012 R2 server to the cluster which would upgrade the database and immediately render the other AD RMS servers in the cluster useless. For many companies this is not an issue, but if you have a heavy user load or simply want to be able to test first or fallback to the old infrastructure there is a better way.
The (unofficial) Solution:
I have worked with many companies to do side-by-side migrations and they have gone off without a hitch. That being said, it is easiest when you have an environment with the following items in place.
- AD RMS using HTTPS for all endpoints
- CNAME record in DNS for the AD RMS cluster URL
- CNAME record in DNS for the SQL server (Many companies do not have this though, so I will cover how to work around that)
- Know your current private key password (or reset it before backing up the databases)
- Not using an HSM or third-party extensions to AD RMS
You will need a few prerequisite items as well.
- Previously mentioned AD RMS cluster private key password
- Full backup of all AD RMS databases
- New SQL server or instance to restore databases to (I am assuming the default instance in this guide. See my next article for details on named instances/static ports)
- Export of SSL Certificate with Private Key for the cluster URL
- New Windows Server 2012 R2 server to install your first AD RMS cluster node
If you are still with me, then you are in for a treat. With those items in place, you have a very easy road for migration to AD RMS on Windows Server 2012 R2. This migration scenario is very similar to the standard upgrade, but you are duplicating the databases and then joining the new 2012 R2 (or 2016 if you are really fancy) AD RMS server to the cluster pointing at the new SQL server. The new node will believe that it is joining the existing cluster and will be able to license existing and new content. Follow the steps below in your environment to perform the side-by-side migration. Version 1 assumes CNAMEs for both AD RMS and SQL. Version 2 details how to set up a CNAME for the new SQL server and the necessary database modifications.
Upgrading AD RMS (Version 1):
- Restore the AD RMS databases to the new SQL server
- On the new AD RMS server, import the SSL Certificate to the Local Computer>Personal store
- Open an administrative Notepad.exe and browse to C:\Windows\System32\drivers\etc and open the hosts file
- Create an entry in the hosts file redirecting the CNAME for AD RMS to the local server (Actual IP, not loopback)
- Create an entry in the hosts file redirecting the CNAME for the SQL server to the new SQL server (Actual IP, not loopback)
e.g.
adrms.contoso.com 10.0.0.25
sqladrms.contoso.com 10.0.0.26
- Install the AD RMS Role on the new 2012 R2 server
- After installation completes, select the link to Perform additional configuration
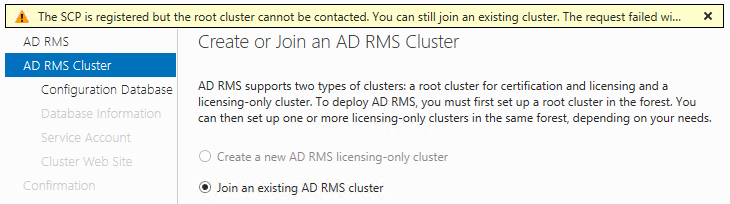
- The server will detect the SCP in Active Directory and default to Join an existing AD RMS cluster. There is a warning that it cannot contact the root cluster. This is because the SCP is being redirected to this server via the hosts file. Leave this as is and click next.
- On the Select Configuration Database page, enter the CNAME you specified in the hosts file for the new SQL server (FQDN)
- Click List on the second line and select the DefaultInstance from the drop-down
- Drop down the Configuration Database Name selection box and select your configuration database
- Enter the private key password corresponding to the old database
- Enter credentials for the original AD RMS service account
- Select Default Website
- On the Choose a Server Authentication Certificate page, select the imported SSL certificate and click Next
- Click Install to begin the installation
- After configuration completes, you will need to log off and back on to administer AD RMS
- If you are using primarily Kerberos based authentication, you may need to follow the instructions at https://technet.microsoft.com/en-us/library/dd759186(v=ws.11).aspx to modify your application pool and set Service Principal Names.
- Modify the hosts file on several clients to point to the new AD RMS server
- Test consuming existing content and protecting new content against the new server
- After you are satisfied that the 2012 R2 AD RMS server is doing what you want it to do, you can add any additional nodes to the 2012 R2 AD RMS cluster you now have
- Open SQL Server Managment Studio on the new SQL server and navigate to the configuration Database (Should be similar to DRMS_Config_adrms_contoso_com_443)
- Expand Tables
- Right-click on dbo.DRMS_ClusterServers
- Remove any old servers from the table by deleting each row
- Finally, switch over the CNAMEs in DNS and all your clients will start talking to the new servers
- When you are comfortable with the new environment, you can gracefully shut down and reallocate the old resources.
Upgrading AD RMS (Version 2):
- Create a new CNAME in DNS to use for the AD RMS SQL server
- Restore the AD RMS databases to the new SQL server
- Open SQL Server Managment Studio on the new SQL server and navigate to the configuration Database (Should be similar to DRMS_Config_adrms_contoso_com_443)
- Expand Tables
- Right-click on dbo.DRMS_ClusterPolicies and select Edit Top 200 Rows
- Modify the PolicyData corresponding to the following entries in the PolicyName column to match the CNAME created for the new SQL server
- LoggingDatabaseServer
- CertificationUserKeyStorageConnectionString
- DirectoryServicesCacheDatabase
- Close Sql Server Management Studio
- On the new AD RMS server, import the SSL Certificate to the Local Computer>Personal store
- Open an administrative Notepad.exe and browse to C:\Windows\System32\drivers\etc and open the hosts file
- Create an entry in the hosts file redirecting the CNAME for AD RMS to the local server (Actual IP, not loopback)
- Create an entry in the hosts file redirecting the CNAME for the SQL server to the new SQL server (Actual IP, not loopback)
e.g.
adrms.contoso.com 10.0.0.25
sqladrms.contoso.com 10.0.0.26
- Install the AD RMS Role on the new 2012 R2 server
- After installation completes, select the link to Perform additional configuration
- The server will detect the SCP in Active Directory and default to Join an existing AD RMS cluster. There is a warning that it cannot contact the root cluster. This is because the SCP is being redirected to this server via the hosts file. Leave this as is and click next.
- On the Select Configuration Database page, enter the CNAME you specified in the hosts file for the new SQL server (FQDN)
- Click List on the second line and select the DefaultInstance from the drop-down
- Drop down the Configuration Database Name selection box and select your configuration database
- Enter the private key password corresponding to the old database
- Enter credentials for the original AD RMS service account
- Select Default Website
- On the Choose a Server Authentication Certificate page, select the imported SSL certificate and click Next
- Click Install to begin the installation
- After configuration completes, you will need to log off and back on to administer AD RMS
- If you are using primarily Kerberos based authentication, you may need to follow the instructions at https://technet.microsoft.com/en-us/library/dd759186(v=ws.11).aspx to modify your application pool and set Service Principal Names.
- Modify the hosts file on several clients to point to the new AD RMS server
- Test consuming existing content and protecting new content against the new server
- After you are satisfied that the 2012 R2 AD RMS server is doing what you want it to do, you can add any additional nodes to the 2012 R2 AD RMS cluster you now have
- Open SQL Server Managment Studio on the new SQL server and navigate to the configuration Database (Should be similar to DRMS_Config_adrms_contoso_com_443)
- Expand Tables
- Right-click on dbo.DRMS_ClusterServers and select Edit Top 200 Rows
- Remove any old servers from the table by deleting each row
- Finally, switch over the CNAMEs in DNS and all your clients will start talking to the new servers
- When you are comfortable with the new environment, you can gracefully shut down and reallocate the old resources.
Wrapping Up:
OK, so maybe that wasn't super easy, but it is effective and allows for a seamless migration from an older version of AD RMS to a newer version. I know people do this all the time because I have assisted with dozens of migrations exactly like this. I am fairly certain that I did not leave anything out, but if you find something I missed please leave me a comment and I will correct it as quickly as possible.
Update:
I have written a followup article detailing how to do this if you are moving to a Named Instance for SQL and using a static port.
Kevin McKinnerney
PREMIER FIELD ENGINEER – PLATFORMS/SECURITY