Step-by-Step: Automate Building Outbound Network Security Groups Rules via Azure Resource Manager (ARM) and PowerShell
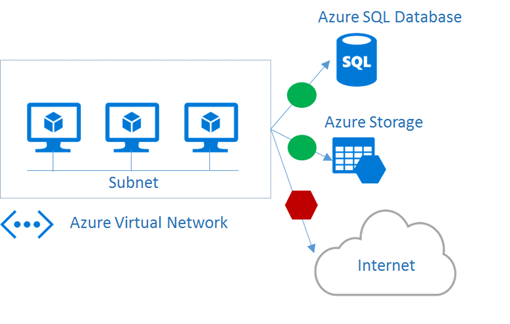
Lately, I’ve been working with several organizations that need to selectively restrict outbound Internet access from within their Azure Virtual Networks (VNETs) to conform to their own internal security policies. However, at the same time, the applications within their VNET may need to legitimately access several other Azure services, such as Azure Storage, Azure SQL Database, and others, that live outside a VNET in the same Azure datacenter region.
In this article, we’ll walk through a process that can be leveraged to easily define and control outbound network access to Azure services in the same region as your VNET using Network Security Groups (NSGs). You can also download the complete set of code snippets referenced in this article from GitHub.
Network Security Groups to the rescue!
To selectively permit inbound and outbound network access to/from the subnets in an Azure VNET, you can use Network Security Groups (NSGs) - a native Azure security feature.
- Learn more! What is a Network Security Group?
By limiting outbound access to only Azure public IP address ranges in the same region as a VNET, you can meet related security requirements in many organizations, because this network traffic within Azure traverses the Azure network backbone and does not transit across the public Internet.
But… That’s A LOT of rules!
Once you start exploring this approach, you’ll quickly realize that you’ll need to define A LOT of NSG rules to achieve the desired result – the public IP address ranges used by an entire Azure region could easily require over 100 rules in some cases! Luckily, each NSG can contain up to 400 rules to accommodate whitelisting an entire Azure region and still have room left for additional custom rules.
To automate the process for defining these rules, you can leverage the regularly updated list of Azure public IP address ranges (provided in XML format) along with a bit of Azure PowerShell code from this article.
To get started, you’ll need to install and configure Azure PowerShell.
Azure PowerShell – A Few Basics …
After installing Azure PowerShell, you’ll first need to authenticate to your Azure account and select the appropriate subscription and resource group in which your VNET currently resides.
# Sign-in with Azure account credentials
Login-AzureRmAccount
# Select Azure Subscription
$subscriptionId =
(Get-AzureRmSubscription |
Out-GridView `
-Title "Select an Azure Subscription ..." `
-PassThru).SubscriptionIdSelect-AzureRmSubscription `
-SubscriptionId $subscriptionId# Select Azure Resource Group
$rgName =
(Get-AzureRmResourceGroup |
Out-GridView `
-Title "Select an Azure Resource Group ..." `
-PassThru).ResourceGroupName
Download Azure Public IP Address Ranges
Next, you’ll need to download the list of Azure public IP address ranges in XML format. From this raw XML, you can then extract the list of Azure regions and corresponding public IP address blocks.
# Download current list of Azure Public IP ranges
# See this link for latest list$downloadUri =
"https://www.microsoft.com/en-in/download/
confirmation.aspx?id=41653"$downloadPage =
Invoke-WebRequest -Uri $downloadUri$xmlFileUri =
($downloadPage.RawContent.Split('"')
-like "https://*PublicIps*")[0]$response =
Invoke-WebRequest -Uri $xmlFileUri# Get list of regions & public IP ranges
[xml]$xmlResponse =
[System.Text.Encoding]::UTF8.GetString($response.Content)$regions =
$xmlResponse.AzurePublicIpAddresses.Region
Define NSG rules for Allowed Outbound Access
Now that you have the raw Public IP Address ranges in a list that you can leverage, it’s pretty easy to select the appropriate Azure region and loop through creating an outbound rule for each related public IP address range.
# Select Azure regions for which to define NSG rules
$selectedRegions =
$regions.Name |
Out-GridView `
-Title "Select Azure Datacenter Regions ..." `
-PassThru$ipRange =
( $regions |
where-object Name -In $selectedRegions ).IpRange# Build NSG rules
$rules = @()
$rulePriority = 100
ForEach ($subnet in $ipRange.Subnet) {
$ruleName = "Allow_Azure_Out_" + $subnet.Replace("/","-")
$rules +=
New-AzureRmNetworkSecurityRuleConfig `
-Name $ruleName `
-Description "Allow outbound to Azure $subnet" `
-Access Allow `
-Protocol * `
-Direction Outbound `
-Priority $rulePriority `
-SourceAddressPrefix VirtualNetwork `
-SourcePortRange * `
-DestinationAddressPrefix "$subnet" `
-DestinationPortRange *$rulePriority++
}
Note: After defining these Azure-related outbound rules, you may need to add some additional rules to permit outbound access to other legitimate non-Azure services, such as public DNS servers, email services, APIs, etc, that your applications may also need to access.
Deny All Other Outbound Access to Internet
After the “allow” rules are defined, you can add a final “deny” rule to block all other outbound Internet access – just make sure that this rule is created with a larger priority value than your “allow” rules above so that it doesn’t block legitimate outbound traffic.
# Define deny rule for all other traffic to Internet
$rules +=
New-AzureRmNetworkSecurityRuleConfig `
-Name "Deny_Internet_Out" `
-Description "Deny outbound to Internet" `
-Access Deny `
-Protocol * `
-Direction Outbound `
-Priority 4001 `
-SourceAddressPrefix VirtualNetwork `
-SourcePortRange * `
-DestinationAddressPrefix Internet `
-DestinationPortRange *
Create the Network Security Group
After you’ve defined all the necessary rules, create the Network Security Group to include all of the rules as a single NSG. This makes it easy to apply all of these rules, as a group, to the necessary subnets and/or network interfaces.
# Set Azure region in which to create NSG
$location = "southeastasia"
# Create Network Security Group
$nsgName = "Allow_Azure_Out"
$nsg =
New-AzureRmNetworkSecurityGroup `
-Name "$nsgName" `
-ResourceGroupName $rgName `
-Location $location `
-SecurityRules $rules
Associate the Network Security Group
You’ve created a new custom NSG, and now you can use either the Azure Portal or Azure PowerShell to associate this NSG with the appropriate subnets or network interfaces within your VNET to restrict outbound access to only permitted public IP address ranges for Azure services in the selected region.
# Select VNET
$vnetName =
(Get-AzureRmVirtualNetwork `
-ResourceGroupName $rgName).Name |
Out-GridView `
-Title "Select an Azure VNET ..." `
-PassThru$vnet = Get-AzureRmVirtualNetwork `
-ResourceGroupName $rgName `
-Name $vnetName# Select Subnet
$subnetName =
$vnet.Subnets.Name |
Out-GridView `
-Title "Select an Azure Subnet ..." `
-PassThru$subnet = $vnet.Subnets |
Where-Object Name -eq $subnetName# Associate NSG to selected Subnet
Set-AzureRmVirtualNetworkSubnetConfig `
-VirtualNetwork $vnet `
-Name $subnetName `
-AddressPrefix $subnet.AddressPrefix `
-NetworkSecurityGroup $nsg |
Set-AzureRmVirtualNetwork
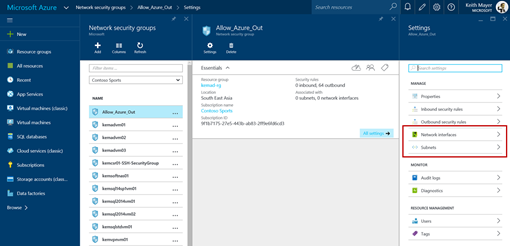
Alternatively, to associate the new NSG with a subnet or network interface via the Azure Portal, select Browse > Network Security Groups > select your NSG > All Settings, and then select either the Subnets blade to associate the NSG to a subnet or the Network interfaces blade to associate the NSG to a particular VM network interface.

