Step-by-Step: Build a FREE SharePoint 2013 Dev/Test Lab in the Cloud with Windows Azure Infrastructure Services
RECENT UPDATES:
- This Step-by-Step Guide has been leveraged to define a new Windows Azure Deployment Planning Service ( AZDPS ) for Microsoft Partners and Customers: Implementing Develop and Test Scenarios on Windows Azure Virtual Machines. Customers can now engage authorized partners for planning and delivery of this solution AND customers with Software Assurance ( SA ) benefits attached to a Volume Licensing ( VL ) agreement can leverage SA to pay for all or part of this partner engagement. You can find full details on this new AZDPS offer at:
Windows Azure Deployment Planning Service: Implementing Develop and Test Scenarios on Windows Azure Virtual Machines
You can find a partner that is authorized to deliver this service at the Software Assurance Planning Service Providers portal page below:
Software Assurance Planning Service Providers
- At the end of this step-by-step article, I've also included a downloadable lab guide and a 130-line PowerShell script for initial provisioning. The PowerShell script helps to reduce the initial configuration time by automating the provisioning of a new Windows Azure Storage account, Virtual Network and Virtual Machines - after running the script, you'll just need to Remote Desktop into each VM to finish the OS and application-level configuration tasks.
Hope you enjoy!
Get Started with your Lab in the Cloud for FREE!
Now that Windows Azure Infrastructure Services has been released, I frequently get asked about ways in which a SharePoint 2013 lab environment can be easily built in the cloud for studying, testing, demos, developer environments and/or performing a proof-of-concept for production usage. You could certainly build this lab environment on your own hardware, but due to the level of SharePoint 2013 hardware requirements, a lot of us may not have sufficient spare hardware to implement an on-premise lab environment.
This makes a great scenario for leveraging our Windows Azure FREE Trial Offer to get started building a free Dev/Test lab environment for SharePoint 2013 in the cloud. Using the process outlined in this article, you’ll be able to build a basic functional farm environment for SharePoint 2013 with your free trial subscription for Windows Azure.
Note: If you are testing advanced SharePoint 2013 scenarios and need more resources than available in the lab configuration below, you can certainly scale-up or scale-out elastically by provisioning larger VMs or additional SharePoint web and application server VMs. To determine the specific costs associated with higher resource levels after your free trial has concluded, please visit the Windows Azure Pricing Calculator for Virtual Machines.
Configuring SharePoint Server 2013 on Windows Azure Infrastructure Services
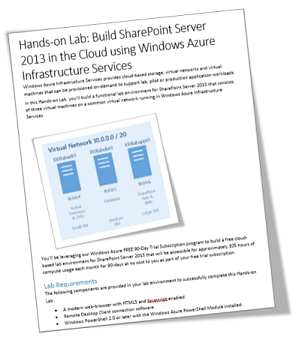
To deliver a functional and expandable lab environment, this article provides step-by-step details for provisioning SharePoint Server 2013 on Windows Azure VMs that will require three (3) VMs on a common Windows Azure Virtual Network. Watch this short video for a quick primer on the configuration we'll be using:
In this lab, we’ll be using a naming convention of XXXlabYYY01, where XXX will be replaced with your unique initials and YYY will be replaced with an abbreviation representing the function of a virtual machine or Windows Azure configuration component (ie., ad, db or app).
Prerequisites
The following is required to complete this step-by-step guide:
- A Windows Azure subscription with the Virtual Machines Preview enabled.
DO IT: Sign up for a FREE Trial of Windows Azure
NOTE: When activating your FREE Trial for Windows Azure, you will be prompted for credit card information. This information is used only to validate your identity and your credit card will not be charged, unless you explicitly convert your FREE Trial account to a paid subscription at a later point in time.
- Completion of the Getting Started tasks in the following article:
DO IT: Getting Started with Servers in the Cloud
- This step-by-step guide assumes that the reader is already somewhat familiar with configuring Windows Server Active Directory, SQL Server and SharePoint Server in an on-premise installation. This guide focuses on the unique aspects associated with configuring these components on the Windows Azure cloud platform.
Let’s Get Started!
In this step-by-step guide, you will learn how to:
- Register a DNS Server in Windows Azure
- Define a Virtual Network in Windows Azure
- Configure Windows Server Active Directory in a Windows Azure VM
- Configure SQL Server 2012 in a Windows Azure VM
- Configure SharePoint Server 2013 in a Windows Azure VM
Exercise 1: Register a DNS Server in Windows Azure
Register the internal IP address that our domain controller VM will be using for Active Directory-integrated Dynamic DNS services by performing the following steps:
- Sign in at the Windows Azure Management Portal with the logon credentials used when you signed up for your Free Windows Azure Trial.
- Select Networks located on the side navigation panel on the Windows Azure Management Portal page.
- Click the +NEW button located on the bottom navigation bar and select Networks | Virtual Network | Register DNS Server.
- Complete the DNS Server fields as follows:
- NAME: XXXlabdns01
- DNS Server IP Address: 10.0.0.4
- Click the REGISTER DNS SERVER button.
Exercise 2: Define a Virtual Network in Windows Azure
Define a common virtual network in Windows Azure for running Active Directory, Database and SharePoint virtual machines by performing the following steps:
- Sign in at the Windows Azure Management Portal with the logon credentials used when you signed up for your Free Windows Azure Trial.
- Select Networks located on the side navigation panel on the Windows Azure Management Portal page.
- Click the +NEW button located on the bottom navigation bar and select Networks | Virtual Network | Quick Create.
- Complete the Virtual Network fields as follows:
- NAME: XXXlabnet01
- Address Space: 10.---.---.---
- Maximum VM Count: 4096 [CIDR: /20]
- Affinity Group: Select the Affinity Group defined in the Getting Started steps from the Prerequisites section above.
- Connect to Existing DNS: Select XXXlabdns01 – the DNS Server registered in Exercise 1 above.
- Click the CREATE A VIRTUAL NETWORK button.
Exercise 3: Configure Windows Server Active Directory in a Windows Azure VM
Provision a new Windows Azure VM to run a Windows Server Active Directory domain controller in a new Active Directory forest by performing the following steps:
Sign in at the Windows Azure Management Portal with the logon credentials used when you signed up for your Free Windows Azure Trial.
Select Virtual Machines located on the side navigation panel on the Windows Azure Management Portal page.
Click the +NEW button located on the bottom navigation bar and select Compute | Virtual Machines | From Gallery.
In the Virtual Machine Operating System Selection list, select Windows Server 2012 Datacenter and click the
 button.
On the Virtual Machine Configuration page, complete the fields as follows:
- Version Release Date: Select the latest version release date to build a new VM with the latest OS updates applied.
- Virtual Machine Name: XXXlabad01
- New User Name: Choose a secure local Administrator user account to provision.
- New Password and Confirm Password fields: Choose and confirm a new local Administrator password.
- Size: Small (1 core, 1.75GB Memory)
Click the button to continue.
Note: It is suggested to use secure passwords for Administrator users and service accounts, as Windows Azure virtual machines could be accessible from the Internet knowing just their DNS. You can also read this document on the Microsoft Security website that will help you select a secure password: https://www.microsoft.com/security/online-privacy/passwords-create.aspx.
On the Virtual Machine Mode page, complete the fields as follows:
- Standalone Virtual Machine: Selected
- DNS Name: XXXlabad01.cloudapp.net
- Storage Account: Select the Storage Account defined in the Getting Started steps from the Prerequisites section above.
- Region/Affinity Group/Virtual Network: Select XXXlabnet01 – the Virtual Network defined in Exercise 2 above.
- Virtual Network Subnets: Select Subnet-1 (10.0.0.0/23)
Click the button to continue.
On the Virtual Machine Options page, click the
 button to begin provisioning the new virtual machine.
As the new virtual machine is being provisioned, you will see the Status column on the Virtual Machines page of the Windows Azure Management Portal cycle through several values including Stopped, Stopped (Provisioning), and Running (Provisioning) . When provisioning for this new Virtual Machine is completed, the Status column will display a value of Running and you may continue with the next step in this guide.
After the new virtual machine has finished provisioning, click on the name ( XXXlabad01 ) of the new Virtual Machine displayed on the Virtual Machines page of the Windows Azure Management Portal.
On the virtual machine Dashboard page for XXXlabad01, make note of the Internal IP Address displayed on this page located on the right-side of the page. This IP address should be listed as 10.0.0.4.
If a different internal IP address is displayed, the virtual network and/or virtual machine configuration was not completed correctly. In this case, click the DELETE button located on the bottom toolbar of the virtual machine details page for XXXlabad01, and go back to Exercise 2 and Exercise 3 to confirm that all steps were completed correctly.
On the virtual machine Dashboard page for XXXlabad01, click the Attach button located on the bottom navigation toolbar and select Attach Empty Disk. Complete the following fields on the Attach an empty disk to the virtual machine form:
- Name: XXXlabad01-data01
- Size: 10 GB
- Host Cache Preference: None
Click the button to create and attach the a new virtual hard disk to virtual machine XXXlabad01.
On the virtual machine Dashboard page for XXXlabad01, click the Connect button located on the bottom navigation toolbar and click the Open button to launch a Remote Desktop Connection to the console of this virtual machine. Logon at the console of your virtual machine with the local Administrator credentials defined in Step 5 above.
From the Remote Desktop console of XXXlabad01, create a new partition on the additional data disk attached above in Step 10 and format this partition as a new F: NTFSvolume. This volume will be used for NTDS DIT database, log and SYSVOL folder locations.
If you need additional guidance to complete this step, feel free to leverage the following study guide for assistance: Windows Server 2012 “Early Experts” Challenge – Configure Local Storage
Using the Server Manager tool, install Active Directory Domain Services and promote this server to a domain controller in a new forest with the following parameters:
- Active Directory Forest name: contoso.com
- Volume Location for NTDS database, log and SYSVOL folders: F:
If you need additional guidance to complete this step, feel free to leverage the following study guide for assistance: Windows Server 2012 “Early Experts” Challenge – Install and Administer Active Directory
After Active Directory has been installed, create the following user accounts that will be used when installing and configuring SharePoint Server 2013 later in this step-by-step guide:
- CONTOSO\sp_farm – SharePoint Farm Data Access Account
- CONTOSO\sp_serviceapps – SharePoint Farm Service Applications Account
If you need additional guidance to complete this step, feel free to leverage the following study guide for assistance: Windows Server 2012 “Early Experts” Challenge – Install and Administer Active Directory


The configuration for this virtual machine is now complete, and you may continue with the next exercise in this step-by-step guide.
Exercise 4: Configure SQL Server 2012 in a Windows Azure VM
Provision a new Windows Azure VM to run SQL Server 2012 by performing the following steps:
Sign in at the Windows Azure Management Portal with the logon credentials used when you signed up for your Free Windows Azure Trial.
Select Virtual Machines located on the side navigation panel on the Windows Azure Management Portal page.
Click the +NEW button located on the bottom navigation bar and select Compute | Virtual Machines | From Gallery.
In the Virtual Machine Operating System Selection list, select SQL Server 2012 SP1 Enterprise and click the
 button.
On the Virtual Machine Configuration page, complete the fields as follows:
- Virtual Machine Name: XXXlabdb01
- New User Name: Choose a secure local Administrator user account to provision.
- New Password and Confirm Password fields: Choose and confirm a new local Administrator password.
- Size: Medium (2 cores, 3.5GB Memory)
Click the button to continue.
On the Virtual Machine Mode page, complete the fields as follows:
- Standalone Virtual Machine: Selected
- DNS Name: XXXlabdb01.cloudapp.net
- Storage Account: Select the Storage Account defined in the Getting Started steps from the Prerequisites section above.
- Region/Affinity Group/Virtual Network: Select XXXlabnet01 – the Virtual Network defined in Exercise 2 above.
- Virtual Network Subnets: Select Subnet-1 (10.0.0.0/23)
Click the button to continue.
On the Virtual Machine Options page, click the
 button to begin provisioning the new virtual machine.
As the new virtual machine is being provisioned, you will see the Status column on the Virtual Machines page of the Windows Azure Management Portal cycle through several values including Stopped, Stopped (Provisioning), and Running (Provisioning) . When provisioning for this new Virtual Machine is completed, the Status column will display a value of Running and you may continue with the next step in this guide.
After the new virtual machine has finished provisioning, click on the name ( XXXlabdb01 ) of the new Virtual Machine displayed on the Virtual Machines page of the Windows Azure Management Portal.
On the virtual machine Dashboard page for XXXlabdb01, make note of the Internal IP Address displayed on this page. This IP address should be listed as 10.0.0.5.
If a different internal IP address is displayed, the virtual network and/or virtual machine configuration was not completed correctly. In this case, click the DELETE button located on the bottom toolbar of the virtual machine details page for XXXlabdb01, and go back to Exercise 2 and Exercise 3 to confirm that all steps were completed correctly.
On the virtual machine Dashboard page for XXXlabdb01, click the Attach button located on the bottom navigation toolbar and select Attach Empty Disk. Complete the following fields on the Attach an empty disk to the virtual machine form:
- Name: XXXlabdb01-data01
- Size: 50 GB
- Host Cache Preference: None
Click the button to create and attach the a new virtual hard disk to virtual machine XXXlabdb01.
On the virtual machine Dashboard page for XXXlabdb01, click the Connect button located on the bottom navigation toolbar and click the Open button to launch a Remote Desktop Connection to the console of this virtual machine. Logon at the console of your virtual machine with the local Administrator credentials defined in Step 5 above.
From the Remote Desktop console of XXXlabdb01, create a new partition on the additional data disk attached above in Step 10 and format this partition as a new F: NTFSvolume. After formatting this new volume, create the following folders:
- Create F:\MSSQL folder
- Create F:\MSSQL\DATA folder
- Create F:\MSSQL\LOGS folder
- Create F:\MSSQL\BACKUP folder
- Create F:\MSSQL folder
Open SQL Server Management Studio from Start | All Programs | Microsoft SQL Server 2012 | SQL Server Management Studio and update default folder locations to the F: volume.
- Connect to the SQL Server 2012 default instance using your Windows Account.
- Now, you will update the database's default locations for DATA, LOGS and BACKUP folders. To do this, right click on your SQL Server instance and select Properties.
- Select Database Settings from the left side pane.
- Locate the Database default locations section and update the default values for each path to point to the new folder paths defined above in Step 12.
- Close SQL Server Management Studio.
- Connect to the SQL Server 2012 default instance using your Windows Account.
In order to allow SharePoint to connect to the SQL Server, you will need to add an Inbound Rule for the SQL Server requests in the Windows Firewall. To do this, open Windows Firewall with Advanced Security from Start | All Programs | Administrative Tools.
Select Inbound Rules node, right-click it and select New Rule to open the New Inbound Rule Wizard.
In the Rule Type page, select Port and click Next.
In Protocols and Ports page, leave TCP selected, select Specific local ports, and set its value to 1433. Click Next to continue.
In the Action page, make sure that Allow the connection is selected and click Next.
In the Profile page, leave the default values and click Next.
In the Name page, set the Inbound Rule's Name to SQLServerRule and click Finish
Close Windows Firewall with Advanced Security window.
Using the Server Manager tool, join this server to the contoso.com domain and restart the server to complete the domain join operation.
After the server restarts, connect again via Remote Desktop to the server’s console and login with the local Administrator credentials defined above in Step 5.
Open SQL Server Management Studio from Start | All Programs | Microsoft SQL Server 2012 | SQL Server Management Studio and add the CONTOSO\Administrator user to SQL Server with the Sysadmin server role selected.
Expand Security folder within the SQL Server instance. Right-click Logins folder and select New Login.
In the General section, set the Login name to CONTOSO\Administrator, and select the Windows Authentication option.
Click Server Roles on the left pane. Select the checkbox for the Sysadmin server role.
Click the OK button and close SQL Server Management Studio.


The configuration for this virtual machine is now complete, and you may continue with the next exercise in this step-by-step guide.
Exercise 5: Configure SharePoint Server 2013 in a Windows Azure VM
Provision a new Windows Azure VM to run SharePoint Server 2013 by performing the following steps:
Sign in at the Windows Azure Management Portal with the logon credentials used when you signed up for your Free Windows Azure Trial.
Select Virtual Machines located on the side navigation panel on the Windows Azure Management Portal page.
Click the +NEW button located on the bottom navigation bar and select Compute | Virtual Machines | From Gallery.
In the Virtual Machine Operating System Selection list, select SharePoint Server 2013 Trial and click the
 button.
On the Virtual Machine Configuration page, complete the fields as follows:
- Virtual Machine Name: XXXlabapp01
- New User Name: Choose a secure local Administrator user account to provision.
- New Password and Confirm Password fields: Choose and confirm a new local Administrator password.
- Size: Large (4 cores, 7GB Memory)
Click the button to continue.
On the Virtual Machine Mode page, complete the fields as follows:
- Standalone Virtual Machine: Selected
- DNS Name: XXXlabapp01.cloudapp.net
- Storage Account: Select the Storage Account defined in the Getting Started steps from the Prerequisites section above.
- Region/Affinity Group/Virtual Network: Select XXXlabnet01 – the Virtual Network defined in Exercise 2 above.
- Virtual Network Subnets: Select Subnet-1 (10.0.0.0/23)
Click the button to continue.
On the Virtual Machine Options page, click the
 button to begin provisioning the new virtual machine.
As the new virtual machine is being provisioned, you will see the Status column on the Virtual Machines page of the Windows Azure Management Portal cycle through several values including Stopped, Stopped (Provisioning), and Running (Provisioning) . When provisioning for this new Virtual Machine is completed, the Status column will display a value of Running and you may continue with the next step in this guide.
After the new virtual machine has finished provisioning, click on the name ( XXXlabapp01 ) of the new Virtual Machine displayed on the Virtual Machines page of the Windows Azure Management Portal.
On the virtual machine Dashboard page for XXXlabapp01, make note of the Internal IP Address displayed on this page. This IP address should be listed as 10.0.0.6.
If a different internal IP address is displayed, the virtual network and/or virtual machine configuration was not completed correctly. In this case, click the DELETE button located on the bottom toolbar of the virtual machine details page for XXXlabapp01, and go back to Exercise 2, Exercise 3 and Exercise 4 to confirm that all steps were completed correctly.
On the virtual machine Dashboard page for XXXlabapp01, click the Connect button located on the bottom navigation toolbar and click the Open button to launch a Remote Desktop Connection to the console of this virtual machine. Logon at the console of your virtual machine with the local Administrator credentials defined in Step 5 above.
In the Server Manager tool, click on Local Server in the left navigation pane and click on the Workgroup option. Join this server to the contoso.com domain and restart the server to complete the domain join operation.
After the server restarts, re-establish a Remote Desktop connection to the server and logon with the CONTOSO\Administrator domain user credentials defined earlier in Exercise 3.
In the Server Manager tool, click on Local Server in the left navigation pane and select IE Enhanced Security Configuration. Turn off enhanced security for Administrators and click the OK button.
Note: Modifying Internet Explorer Enhanced Security configurations is not good practice for production environments and is only for the purpose of this particular step-by-step lab guide.On the Desktop, double-click on the SharePoint 2013 Products Configuration Wizard shortcut to launch the configuration wizard. Click the Next button to continue. If prompted to start or reset services, click the Yes button.
In the SharePoint Products Configuration Wizard, when prompted on the Connect to server farm dialog, select the option to Create a new server farm.
On the Specify Configuration Database Settings, specify the following values for each field:
- Database Server: XXXlabdb01
- Username: CONTOSO\sp_farm
- Password: Type the password specified when the sp_farm domain user account was created earlier in Exercise 3, Step 14.
Click the Next > button and accept all other default values in the SharePoint Products Configuration Wizard. Click the Finish button when prompted to complete the wizard.
The SharePoint 2013 Central Administration web page should launch automatically. When prompted, click the Start the Wizard button to begin the Initial Farm Configuration Wizard.
When prompted for Service Account, type the CONTOSO\sp_serviceapps domain username and password specified when this account was created earlier in Exercise 3, Step 14.
Accept all other default values and click the Next > button to continue.
On the Create a Site Collection page, create a new top-level Intranet site collection using the following field values:
- Title and Description: Enter your preferred Title and Description for the new site collection
- URL: Select the root URL path – https://XXXlabapp01/
- Select experience version: 2013
- Select a template: Publishing | Publishing Portal
Click the OK button to provision a new top-level Intranet site collection.
After the new top-level Intranet site collection is provisioned, test navigating to the URL for this site collection from within the Remote Desktop session to the server.
On the SharePoint 2013 Central Administration site, configure a Public URL alternate access mapping for accessing the new top-level Intranet site collection from the Internet.
- On the Central Administration site home page, click the Configure alternate access mappings link.
- On the Alternate Access Mappings page, click the Edit Public URLs link.
- On the Edit Public Zone URLs page, select and specify the following values:
- Alternate Access Mapping Collection: SharePoint - 80
- Internet: https://XXXlabapp01.cloudapp.net
Click the Save button to complete the Alternate Access Mapping configuration.
- On the Central Administration site home page, click the Configure alternate access mappings link.
Close the Remote Desktop session to the server.
Sign in at the Windows Azure Management Portal with the logon credentials used when you signed up for your Free Windows Azure Trial.
Select Virtual Machines located on the side navigation panel on the Windows Azure Management Portal page.
On the Virtual Machines page, click on the name of the SharePoint virtual machine – XXXlabapp01.
On the XXXlabapp01 virtual machine details page, click on Endpoints in the top navigation area of the page.
Click the +Add Endpoint button in the bottom navigation bar of the page to define a new virtual machine endpoint that will permit HTTP web traffic inbound to the SharePoint virtual machine.
On the Add an endpoint to a virtual machine form, select the Add Endpoint option and click the
 button to continue.
On the Specify the details of the endpoint form, specify the following field values:
- Name: WebHTTP
- Protocol: TCP
- Public Port: 80
- Private Port: 80
Click the button to create a new endpoint definition that will permit inbound web traffic to the SharePoint virtual machine.
After the endpoint configuration has been successfully applied, test browsing to the following public URL to confirm that you are able to access the Intranet site collection that is configured on SharePoint:
- URL: https://XXXlabapp01.cloudapp.net


The configuration for this virtual machine is now complete, and you may continue with the next exercise in this step-by-step guide. Be sure to shutdown your lab VMs from the Windows Azure Management Portal when not in use to save on compute charges.
Get the associated 16-Page Step-by-Step Lab Guide and 130-line PowerShell Provisioning Script for FREE ...
If you'd like a copy of the 16-Page Step-by-Step Lab Guide and 130-line PowerShell Provisioning Script that is associated with this article for reference when building our your own SharePoint Server 2013 Lab in the Cloud ... just follow the easy steps below to get it sent to you!
 |
|
You'll receive an email in response with your 16-Page Lab Guide Attached, the 130-line PowerShell Provisioning Script and additional FREE resources for continued learning about Windows Azure Infrastructure Services.
What’s Next? Keep Learning!
Now that your SharePoint Server 2013 lab environment is running in the cloud, be sure to explore the resources below to continue your learning:
- SharePoint 2013 Early Training & Resources for IT Pros
Includes 14 modules of detailed technical training for IT Pros on the enhancements and new features in SharePoint Server 2013.
- Windows Server 2012 “Early Experts” Challenge online study group
MCSA certification on Windows Server 2012 is a requirement for the new MCSE: SharePoint certification track. If you’re interested in preparing for Microsoft certification on SharePoint 2013, the “Early Experts” study group is a great place to start!