A Match Made in the Clouds - Windows Server 2012 Server Core & Windows Azure VMs
Windows Azure Virtual Machines and Virtual Networks provides the ability to securely extend the network perimeter of our data center into the Windows Azure cloud platform for many useful scenarios – backup, disaster recovery, accelerated cloud storage, dev/test/pilot, remote access, Internet applications … and MORE!
- To learn more about Windows Azure Virtual Machines and Virtual Networks, check out our FREE Online Training course.
Windows Azure provides a Pay-As-You-Go cost model, so that you cost effectively pay for just the compute, storage and network resources you need – when you need them. Virtual Machines start at an “Extra Small” size ( 1GHz CPU, 768MB RAM ) and can be scaled up to larger CPU and memory sizes as needed. Extra Small VMs cost just $ 0.013 USD per compute hour – That’s right! Just 1.3 cents per hour or $9.36 USD per month for an Extra Small VM running continuously 24x7.
Can you run a server inside your data center for less than $10 per month? Nope!
Best of all, you can try this all out for FREE with a Windows Azure 90-Day Free Subscription.
OK … But what could I possibly run inside an Extra Small VM?
Great question! That where Windows Server 2012 Server Core enters our scenario. Server Core provides a super-efficient Windows Server core operating system without the extra requirements of a GUI interface and GUI management tools. It uses approximately 4GB less disk space and historically has about 45% less patches required due to this smaller OS footprint. Server Core also runs comfortably in less that 512MB RAM.
- Learn more about Windows Server 2012 Server Core
In addition, Windows Server 2012 gives us the added capabilities to run many more roles and features in Server Core install mode than prior versions of Windows Server and allows us to uninstall the Server GUI post-install and scale down to a Server Core footprint.
Wait! I can install with a GUI and then scale back to Server Core?
Yep! This means you can initially provision your Windows Server 2012 server just how you’d like it using the full Server GUI and, once everything is fully configured, uninstall the GUI and reduce your footprint down to Server Core. If you running Windows Server 2012 Server Core in a VM on Windows Azure, it also means you can scale back to the Extra Small VM size we mentioned above.
What are good scenarios for using Extra Small VMs with Core?
Lots! Many IT Pros already take the approach of isolating separate Windows Server roles into different VMs to make management and upgrades easier. If you’re using this approach, then you can experience great results on Windows Azure with Extra Small VMs with various server roles such as:
- DNS Servers
- IIS Web Servers
- File Services
- SMTP Servers for mail relay
- Active Directory DC’s and/or RODC’s for small networks
NOTE: Prior to moving to the Extra Small VM size, be sure to check your memory requirements in Task Manager on Server Core to make sure it will comfortably fit in 768MB RAM.
How do I run Core in an Extra Small VM on Windows Azure?
First, you’ll need to build a VM on Windows Azure using Windows Server 2012 with GUI. For a Step-by-Step walkthrough on how to do this, check out the link below
Once your VM is up and running, follow these steps to configure Windows Server 2012 running inside your VM for Server Core and move to an Extra Small VM size on Windows Azure.
Start this exercise after establishing a Remote Desktop connection to your Windows Azure VM and logging in as Administrator.
- Remove the GUI from Windows Server 2012.
- Using the Server Manager tool, select the Manage menu located on the top menu bar and click Remove Roles and Features.
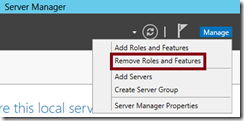
Remove Roles and Features
This will launch the Remove Roles and Features Wizard
- In the Remove Roles and Features Wizard, click the Next button until you advance to the Features page in the wizard.
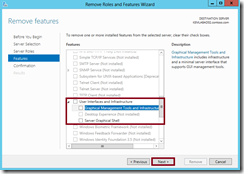
Uncheck User Interfaces and Infrastructure Features
Expand the User Interfaces and Infrastructure features category in the list and uncheck all features listed below it.
Click the Next button to continue to the next page.
- On the Confirm removal selections page, check the option to Restart the destination server automatically if required.
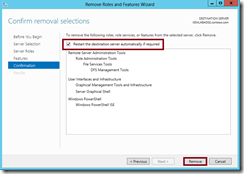
Confirm Removal Selections Page
Click the Remove button to begin the removal of the Server GUI.
After the first stage of the removal process is complete, the server will automatically restart. Wait a few minutes and re-establish your Remote Desktop Connection.
- After completing the removal and restart process, upon logging back in you can confirm that Server Core mode is now active. If the removal process completed successfully, you will see only a command prompt.
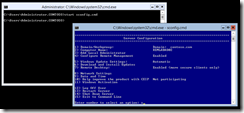
Server Core in Windows Server 2012
To manage your server console from the command prompt, you can still launch PowerShell and the SCONFIG menu tool as shown in the figure above. In addition, you can press Ctrl-Alt-End to logout and/or launch Task Manager.
When finished, you may close your Remote Desktop Connection before continuing with the next step.
- Using the Server Manager tool, select the Manage menu located on the top menu bar and click Remove Roles and Features.
- Configure your Windows Azure VM Size to Extra Small.
After configuring your Windows Server 2012 OS for Server Core, open a web browser and navigate to the Windows Azure Management Portal. When prompted to sign-in, login with the same credentials that you used originally when activating your free 90-Day Windows Azure subscription.
In the left navigation bar, click Virtual Machines and then click on the name of your virtual machine. This will open a details page for your virtual machine.
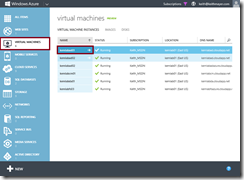
Virtual Machines Page in Windows Azure Management Portal
On the details page for your virtual machine, select the Configure tab in the top navigation bar.
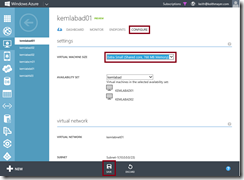
Configure tab in Virtual Machine Details
On the Configure tab, set the Virtual Machine Size to Extra Small as shown in the figure above.
Click the Save button to save this change.NOTE: Saving this VM configuration change will take a few minutes to complete. After the status of your VM is again listed in a Running state, you can reconnect to your VM to verify operation.
Completed! What other scenarios can I build in the cloud?
In addition to the above scenario, also check out our growing list of free Cloud Lab scenarios for additional step-by-step Lab Guides.
I look forward to seeing you in the Clouds!
- Keith

