Step-by-Step: Build Windows Server 2012 and SQL Server 2012 VMs in the Cloud with Windows Azure
With Windows Azure, you can easily deploy and run Windows Server and Linux virtual machines on your own virtual network in the cloud. These capabilities can be really useful for several scenarios, such as: building virtual lab environments, piloting new software in the cloud, deploying hybrid IT applications that connect on-premises datacenter workloads with cloud-based VM’s … and MORE!
In this step-by-step guide, you will learn how to deploy and support a common two-tier web application architecture using Windows Server 2012 web servers and SQL Server 2012 database servers hosted in Windows Azure in a load-balanced configuration. Once you've complete this step-by-step guide, you'll have a cloud-based virtual SQL Server 2012 lab environment that you can use to explore the other new DBA and BI capabilities in this latest version of SQL Server!
Objectives
In this step-by-step guide, you will learn how to:
- Create virtual machines in a Web Farm using Windows Azure Management Portal
- Configure Load Balancing in Windows Azure
- Deploy a simple web application that consumes SQL Server 2012 databases
- Create a virtual machine with the SQL Server 2012 Full-Text Search feature to be consumed by the web application
Prerequisites
The following is required to complete this step-by-step guide:
- A copy of the CloudShop sample web application
DO IT: Download the CloudShop sample web application
- A Windows Azure subscription with the Virtual Machines Preview enabled.
DO IT: Sign up for a FREE Trial of Windows Azure
NOTE: When activating your FREE Trial for Windows Azure, you will be prompted for credit card information. This information is used only to validate your identity and your credit card will not be charged, unless you explicitly convert your FREE Trial account to a paid subscription at a later point in time.
Exercises
This step-by-step guide includes the following exercises:
- Creating VMs for Windows Server 2012 IIS
- Creating a SQL Server 2012 VM
- Deploying a Simple Web Application
Estimated time to complete: 45 minutes.
Exercise 1: Creating VMs for Windows Server 2012 IIS
In this exercise, you will learn how to create a Virtual Machine in Windows Azure. Then, you will configure an Internet Information Server adding roles to use later on in this guide.
Task 1.1 - Creating IIS VMs
In this task, you will provision a Virtual Machine and configure the Load Balancing to host a web application.
Open Internet Explorer and browse https://manage.windowsazure.com/ to enter the Windows Azure portal. Then, log in with your credentials.
In the menu located at the bottom, select New | Compute | Virtual Machine | From Gallery to start creating a new virtual machine.

Creating a new Virtual Machine
In the VM OS Selection page, click Platform Images on the left menu and select the Windows Server 2012, October 2012 OS image from the list. Click the arrow to continue.
In the VM Configuration page, enter the Virtual Machine Name (i.e. "iisvm1") and the administrator user's Password. This password needs to contain three of these - lower case characters, uppercase characters, numbers and special characters. Make sure you remember your choice. Click the right arrow to continue.

Creating a VM - Configuration
Note: It is suggested to use secure passwords for admin users, as Windows Azure virtual machines could be accessible from the Internet knowing just their DNS.
You can also read this document on the Microsoft Security website that will help you select a secure password: https://www.microsoft.com/security/online-privacy/passwords-create.aspx
In the VM Mode page, select Standalone Virtual Machine, enter the DNS Name, select a Storage Account or leave the default value Use Automatically Generated Storage Account, and select a Region/Affinity Group/Virtual Network. Click the right arrow to continue.
Note that when selecting a DNS Name, you will need to specify a Unique DNS Name in the public cloudapp.net DNS namespace. When a unique name has been specified, you will be notified with a green checkmark icon in this field, as shown below.

Creating a VM - VM Mode
In the VM Options page, leave the default values and click the Finish button to create a new VM.

Creating a VM - VM Options
In the Virtual Machines section, you will see the VM you created with a Starting (provisioning) status. Wait until it changes to Running in order to continue with the following step as you will need a provisioned VM on the following steps.

Creating VM for IIS Web Farm
Note: It will take from 8 to 10 minutes for the Virtual Machine to complete the provisioning process.
You will now add the second VM for the IIS Load Balancing. In the portal, select New | Compute | Virtual Machine | From Gallery.
In the VM OS Selection page, click Platform Images on the left menu and select the Windows Server 2012, October 2012 OS image from the list. Click the arrow to continue.
In the VM Configuration page, enter the Virtual Machine Name (i.e. "iisvm2"), the administrator user's Password and the Size. Click the right arrow to continue.
In the VM Mode page, select Connect to existing Virtual Machine and choose the first VM you created from the drop down list. Select a Storage Account or leave the default value Use Automatically Generated Storage Account and click the right arrow to continue. This step adds the new virtual machine to the cloud service created in the previous step. This allows the virtual machines to be on the same virtual network.

Creating a VM - VM Mode
In the VM Options page, leave the default values and click the button to create a new VM.
Wait until the second VM is created. You can check the VM status from the Virtual Machines section within the portal.
Note: It will take from 8 to 10 minutes for the Virtual Machine to complete the provisioning process.
After creating the second VM, you will create an endpoint in the port 80 in the Virtual Machine you created first. To do this, click on the first VM Name (iisvm1) to go to the Dashboard page and then click Endpoints. Click Add Endpoint on the bottom pane.

Selecting Add Endpoint in the dashboard
Make sure that Add Endpoint option is selected and then click the right arrow button to continue.

Adding a new Endpoint
In the Specify endpoint details page, set the Name to webport, the Protocol to TCP and the Public Port and Private Port to 80. Click the button to create the endpoint. Wait until the Endpoint is created before continue to the following steps.

New Endpoint Details
Note: It will take some minutes to create a new endpoint.
Now, create a new Endpoint in the second VM in order to enable Load Balancing between both VMs. To do this, click Virtual Machines and then select the second VM you created. Then, click Endpoints.
Click Add Endpoint, select Load Balance Traffic On An Existing Endpoint option. Select the endpoint you created for the first VM from the drop down list and then click the right arrow to continue.

Load Balance Traffic An Existing Endpoint
In the New Endpoint Details page, set the Name to webport and the Private Port to 80. Click the button to create the endpoint.
Note: It will take some minutes to create a new endpoint.
In the Virtual Machines section, click on the first VM Name (iisvm1) and then click Endpoints.
Select the webport endpoint you have created. Make sure the Load Balancer column value is Yes.

Verification: enabling IIS Load Balancing
Click the Edit Endpoint button in the bottom bar to enter the endpoint details and verify the load balancing is enabled. Repeat this step in the second VM.

Verification: enabling IIS Load Balancing, details


Task 1.2 - Configuring IIS VMs
In this task, you will configure the IIS VMs by adding the necessary roles to deploy the web application.
In the Portal, click Virtual Machines on the left menu.
You will see a list with your existing VMs. Select the first one you created in Task 1 and click the Connect button in the bottom bar. If you used the proposed name, this VM should be named iisvm1.
You will be asked to download the remote desktop settings file. Click Open and log on using the Administrator credentials you defined when creating the VM.
In the Azure VM, open Server Manager using the first icon on the taskbar. .
In the Server Manager window, select the Manage menu in the top-right navigation bar and select Add Roles and Features.

Server Manager
On the Before You Begin page of the Add Roles and Features Wizard, read the content and click Next.
Step through the Add Roles and Features Wizard with the following selections:
- Installation Type: Select Role-based or feature-based installation and click the Next button.
- Select destination server: Select a server from the server pool, and select the local server name (iisvm1 or iisvm2). Click the Next button.
- Roles: Select Application Server and Web Server (IIS). Click the Next button. A warning will show, informing the Required Role Services that are missing. Click Add Required Features to install them and then click Next.
- Features: Accept the default selections and click the Next button
- Application Server Role services: Select .NET Framework 4.5 and Web Server (IIS) Support. Click the Next button.
- Web Server (IIS) Role Services: Accept the default selections and click the Nextbutton.On the Confirm installation selections page of the Add Roles and Features Wizard, click the Install button to install the selected roles, role services and features.
Close the Remote Desktop Connection.
Repeat this task on the second VM to install IIS. If you used the proposed name, the second VM should be named iisvm2.

Exercise 2: Creating a SQL Server 2012 VM
In this exercise, you will create a new VM and learn how to install SQL Server. You will add disk images to the existing VM in order to split the data from the logs generated by SQL Server.
Task 2.1 - Creating a SQL Server VM
In this task, you will create a new VM using the Windows Azure portal in the same Cloud App you deployed the IIS VMs.
In the menu located at the bottom, select New | Compute | Virtual Machine | From Gallery to start creating a new virtual machine.
In the VM OS Selection page, click Platform Images on the left menu and select the Microsoft SQL Server 2012 image from the list. Click the arrow to continue.
In the VM Configuration page, enter the Virtual Machine Name (i.e. "sqlvm1"), the administrator user's Password and the Size. Click the right arrow to continue.
In the VM Mode page, select Connect to existing Virtual Machine and choose the first IIS VM you created from the drop down list (iisvm1). Click the right arrow to continue.
In the VM Options page, leave the default values and click the button to create a new VM.
In the Virtual Machines section, you will see the VM you created with a provisioning status. Wait until it changes to Running in order to continue with the following step.
Note: It will take from 8 to 10 minutes for the Virtual Machine to complete the provisioning process.
Task 2.2 - Attaching Empty Disk Images
In this task, you will create two empty data disks and attach them to an existing VM using the Windows Azure Management Portal. You will use these data disks to split SQL Server Data and Logs.
Now, you will create and attach empty data disks to store the SQL Server logs and data files, and you will also add an endpoint. To do this, in the Virtual Machines section, select the SQL Server VM you created in the previous task.
In the VM's Dashboard, click Attach in the menu at the bottom of the page and select Attach Empty Disk.

Attach Empty Disk
In the Attach Empty Disk page, set the Size to 50 GB and create the Disk.
Wait until the process to attach the disk finishes. Repeat the steps 1 to 3 to create a second disk.
Open the VM's Dashboard. You will see three disks: one for the OS and other two for Data and Logs.
Note: It might take a few minutes until the data disks appear in the VM's dashboard within the Azure Portal.

Attached Data Disks
Finally, you need to format the disks in order to access them from the Virtual Machine. To do this, click Connect to connect to the VM using Remote Desktop connection.
It will ask you to download the remote desktop settings file. Click Open and log on using the Admin credentials you defined when creating the VM.
In the Virtual Machine, open Server Manager from Start | All Programs | Administrative Tools.
Expand Storage node and select Disk Management option.

Disks Management
The Initialize Disk dialog will appear. Leave the default values and click OK.
Right-click the first disk unallocated space and select New Simple Volume.

Disks Management
Follow the New Simple Volume Wizard. When asked for the Volume Label use SQLData.
Wait until the process for the first disk is completed. Repeat the steps 11 to 12 but this time using the second disk. Set the Volume Label to SQLLogs.
The Disk Management list of available disks should now show the SQLData and SQLLogs disks like in the following figure:

Disk Management
Note: Do not close the Remote Desktop Connection. You will use it in the following task.


Task 2.3 - Configuring SQL Server in the VM
In this task, you will configure SQL Server 2012. You will create the database that will be used by the web application and add Full-Text Search capabilities to it. Additionally, you will create a SQL Server user for the website.
Open Windows Explorer and create the following folders: F:\Data, G:\Logs and G:\Backups.
Open the SQL Server Management Studio from Start | All Programs | Microsoft SQL Server 2012 | SQL Server Management Studio.
Connect to the SQL Server 2012 default instance using your Windows Account.
Now, you will update the database's default locations in order to split the DATA from the LOGS. To do this, right click on your SQL Server instance and select Properties.
Select Database Settings from the left side pane.
Locate the Database default locations section and update the default values to point to the disks you attached in the previous task and then click "Ok".

Setting Database Default Locations
Now, a service restart is necessary for the changes to take effect. In order to restart the service, right click on your SQL Server instance and select Restart from the context menu.
Restart SQL Server. In the Object Explorer, right-click on the server node and select Restart.
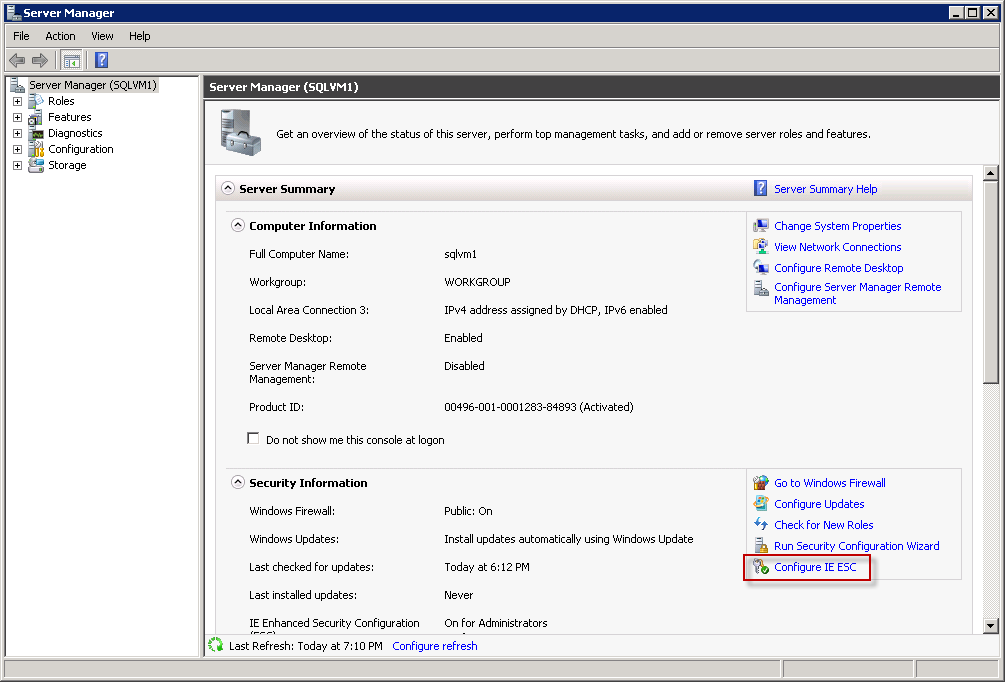
In order to enable downloads from Internet Explorer you will need to update Internet Explorer Enhanced Security Configuration. In the Azure VM, open Server Manager from Start | All Programs | Administrative Tools.
In the Server Manager, click Configure IE ESC within Security Information section.
Configuring IE ESC
In the Internet explorer Enhanced Security configuration, turn off the enhanced security for Administrators and click OK.

Internet Explorer Enhanced Security
Note: Modifying Internet Explorer Enhanced Security configurations is not good practice and is only for the purpose of this particular step-by-step guide. The correct approach should be to download the files locally and then copy them to a shared folder or directly to the VM.
This guide uses the AdventureWorks database. Open an Internet Explorer browser and go to https://msftdbprodsamples.codeplex.com/ to download the SQL Server 2012 sample databases. Once on the page click SQL Server 2012 DW and then download Adventure Works 2012 Data File. Download the file to F:\Data.
Note: The AdventureWorks database can also be downloaded as a .zip file. If you choose this format, right-click the file to open its properties window and then click Unblock. Then, extract the database to F:\Data.
Add the AdventureWorks sample database to your SQL Server. To do this, in the SQL Server Management Studio, locate your SQL Server instance node and expand it. Right click the Databases folder and select Attach.

Attaching the database
In the Attach Databases dialog, press Add. Browse to the data disk and select the Adventure Works data file.
Select the AdventureWorks2012 Log entry and click Remove.

Removing AdventureWorks2012 Log entry
Press OK to add the database.
In the Databases folder, locate the new AdventureWorks2012 database and explore its tables.

AdventureWorks Sample Database
Expand Storage node within AdventureWorks database, right-click Full Text Catalogs folder and select New Full-Text Catalog.
Note: You are creating a Full Text Catalog for the database that will be used later by the web application.

Create New Full-Text Catalog
In the New Full-Text Catalog dialog, set the Name value to AdventureWorksCatalog and press OK.

Create New Full-Text Catalog
Check that the Full-Text Catalog you created appears in the Full-Text Catalogs folder.

Create New Full-Text Catalog
Right-click AdventureWorksCatalog and select Properties. In the Full-Text Catalog Properties dialog, switch to Tables/Views page.
Add the Production.Product table to the Table/View objects assigned to the Catalog list. Then, check the Name column and click OK.

Create New Full-Text Catalog
Add a new user for the web application you will deploy in the following exercise. To do this, expand Security folder within the SQL Server instance. Right-click Logins folder and select New Login.

Creating a New Login
In the General section, set the Login name to CloudShop. Select SQL Server authentication option and set the Password to Azure$123.
Note: If you enter a different username or password than those suggested in this step, do not forget in the next exercise to update the web.config file of the web application to match those values.
Unselect Enforce password policy checkbox to avoid having to change the password the first time you log on, and set the Default database to AdventureWorks.

Creating a New Login
Click User Mapping on the left pane. Select the map checkbox in the AdventureWorks database row and click OK.

Mapping the new User to the AdventureWorks Database
Expand AdventureWorks database within Databases folder. In the Security/Users folder, double-click CloudShop user.
Select the Membership page, and select the db_owner role checkbox for the CloudShop user and click OK.

Adding Database role membership to CloudShop user
Note: The application you will deploy in the next exercise uses Universal Providers to manage sessions. The first time the application runs, the provider will create the Sessions table within the database. For that reason, you are assigning a db_owner role to the CloudShop user. Once you run the application for the first time, you can remove this role as these permissions will not be needed.
Now, enable Mixed Mode Authentication to the SQL Server instance. To do this, in the SQL Server Management Studio, right-click the server instance and click Properties.
Click Security in the left side pane and then select SQL Server and Windows Authentication mode under Server Authentication section. Click OK to save changes.
Restart the SQL Server instance. To do this, right-click the SQL Server instance and click Restart.
Close the SQL Server Management Studio.
In order to allow the web application access the SQL Server database you will need to add an Inbound Rule for the SQL Server requests in the Windows Firewall. To do this, open Windows Firewall with Advanced Security from Start | All Programs | Administrative Tools.
Select Inbound Rules node, right-click it and select New Rule to open the New Inbound Rule Wizard.

Creating an Inbound Rule
In the Rule Type page, select Port and click Next.

New Inbound Rule Wizard
In Protocols and Ports page, leave TCP selected, select Specific local ports, and set its value to 1433. Click Next to continue.

New Inbound Rule Wizard
In the Action page, make sure that Allow the connection is selected and click Next.

New Inbound Rule Wizard
In the Profile page, leave the default values and click Next.
In the Name page, set the Inbound Rule's Name to SQLServerRule and click Finish

New Inbound Rule Wizard
Close Windows Firewall with Advanced Security window.
Note: Make sure the Named Pipes and TCP/IP protocols are enabled for the Server Instance. You can verify this by going to the SQL Server Configuration Manager and within SQL Server Network Configuration node check that these protocols' status are set to enable.
Remember to restart the SQL Server instance after enabling a protocol.
Close the Remote Desktop Connection.


Exercise 3: Deploying a Simple Web Application
In this exercise, you will learn how to deploy a simple web application in the IIS of the Azure Virtual Machine you have previously configured.
Note: To make this solution highly available, you need to configure the SQL Servers in an availability set and set up SQL Server Mirroring between the instances.
Task 3.1 - Deploying a Simple Web Application
In this task, you will deploy the web application to the IIS VMs.
In the Azure Portal, Click Virtual Machines on the left menu.
You will see a list with your existing VMs. Select the first one you created in Exercise 1 and click Connect. If you used the proposed name, this VM's should be named iisvm1.
You will be prompted to download the remote desktop client. Click Open and log on using the Administrator credentials you defined when creating the VM.
Open wwwroot folder located at C:\inetpub\wwwroot and copy the CloudShop.zip file that you downloaded at the beginning of this step-by-step guide to this folder. To do this, copy CloudShop.zip (Ctrl + C) and paste it (Ctrl + V) in the VM's wwwroot folder. Extract all files to C:\inetpub\wwwroot\CloudShop folder.

wwwroot folderOpen with Notepad the Web.config file located in C:\inetpub\wwwroot\CloudShop. At the end of the file, replace the connection strings placeholder with the name of your SQL Server (by default, is the VM's name).
XML
  <connectionStrings><br>…
data source=[ENTER YOUR SQL SERVER NAME];<br>initial catalog=AdventureWorks2012;<br>Uid=CloudShop;<br>Password=Azure$123;<br>…
 </connectionStrings>
Open the Internet Information Services (IIS) Manager from the Server Manager –> Tools menu.
In the Connections pane, expand Default Web Site within your IIS Server's node. You will see the CloudShop folder you copied in the wwwroot folder.

IIS Manager
Right-click CloudShop folder and select Convert to Application.

IIS Manager - Convert to Application
In the Add Application dialog, click OK.

Add Application dialog
Finally, select the Application Pools node and double-click DefaultAppPool application pool.

Updating Default Application Pool
In the Edit Application Pool dialog, confirm that the .Net Framework version is set to v4.0 and click OK.

Editing Application Pool
Close the Internet Information Server (IIS) Manager window.
Close the Remote Desktop Connection.
Repeat this task in the second VM you created in Exercise 1 -Task 1.1. If you used the proposed name, this VM should be named iisvm2.


Task 3.2 - Verification
In this task, you will test the Cloud Shop web application you deployed in the previous task.
On your local machine, open Internet Explorer.
Go to https://[YOUR-SERVICE-NAME].cloudapp.net/CloudShop. The Service Name is the one you used when creating the IIS VMs (you can also check it in the Azure Portal, within VM's dashboard).

CloudShop Web Application running in the Web Farm
In the Search box, write Classic and click Search. It will show all the products that have a product name that match the search criteria.


What’s Next? Keep Learning!
Now that your SQL Server 2012 lab environment is running in the cloud, be sure to explore the resources below to continue your learning and follow along in your lab environment:
- FREE eBook: Introducing Microsoft SQL Server 2012
Includes 10 chapters of detailed technical information for IT Pros on the new DBA and BI features in SQL Server 2012.
- Windows Server 2012 “Early Experts” Challenge online study group
Learn more about the latest version of the Windows Server operating system that supports running SQL Server 2012 workloads in this free online study group.