VLAN Tricks with NICs - Teaming & Hyper-V in Windows Server 2012
After I wrote my prior post on our new natively supported NIC Teaming in Windows Server 2012 and our FREE Hyper-V Server 2012 product, there’s been a ton of questions around how VLANs work with NIC Teaming and Hyper-V. In this article, I’ll build upon my prior post and cover configuring VLAN traffic segregation for physical and virtualized workloads.
In addition, my friend and colleague, Kevin Remde, has written a great article on his "Full of I.T." blog that provides a detailed technical overview of NIC teaming features. Be sure to check it out!
How do VLANs work with NIC Teaming?
When you create a NIC Team, a single team interface is defined with the name of the new NIC team. This team interface is used to present the teamed network adapters as what appears to be a single NIC to the IP stack in the operating system. This team interface is configured for “default” mode which passes traffic from all VLANs.
Each NIC Team can include up to a total of 32 team interfaces – the additional team interfaces are intended for configurations in which you want to pull off traffic for a particular VLAN to another team interface that is presented to the server. When additional team interfaces are created within a team, each additional interface is configured with a particular VLAN ID. Once configured, any VLAN traffic that matches the VLAN ID of a team interface is segregated to that team interface. All other VLAN traffic that doesn’t match the VLAN ID of a particular team interface will be passed to the original team interface operating in “default” mode.
If you reconfigure the original team interface on a NIC team for a specific VLAN, such as VLAN 99 as shown in the second example above, instead of “default” mode, then any traffic destined for a VLAN that doesn’t match the VLAN ID on a specific team interface will be dropped (ie., sent to a black hole).
How can I add another Team Interface and VLAN to my NIC Team?
To add a new Team Interface to an existing team, launch the NIC Teaming wizard from the Local Server page in Server Manager, as instructed in Kevin’s prior post and follow these steps:
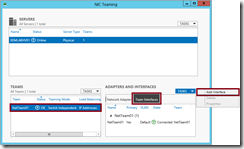
- Select your existing NIC Team in the “Teams” list box, and then select the “Team Interfaces” tab in the “Adapters and Interfaces” list box. Click on the Tasks menu and click Add Interface.
- In the New team interface dialog box, type the VLAN ID to assign to the new interface in the Specific VLAN field and click the OK button.
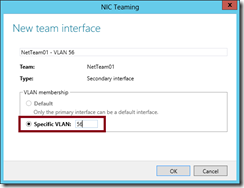
- You will now see two team interfaces associated with a single NIC team – the original team interface still operating in “default” mode and the new team interface that is assigned to a specific VLAN ID.
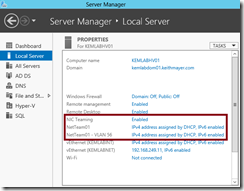
Alternatively, the Add-NetLbfoTeamNIC PowerShell 3.0 cmdlet can be used to configure a new team interface on an existing NIC team using the following command line:
Add-NetLbfoTeamNIC -Team NetTeam01 -VlanID 56
Should I use VLANs with NIC Teaming in Hyper-V?
No. When using Hyper-V to virtualize workloads, our recommendation is to configure all VLANs for VMs within the Hyper-V Virtual Network Switch instead of configuring VLANs on team interfaces. Taking this approach ensures that virtual machines are capable of being configured for any VLAN traffic that is passed to the NIC team and prevents confusing configurations that can occur when certain VLAN traffic is split off on a separate VLAN from the Hyper-V Virtual Switch.
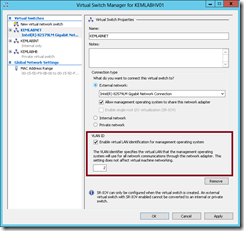
To configure a particular VLAN ID for Hyper-V management traffic, specify that VLAN ID in the Virtual Switch properties in Hyper-V Manager using the Virtual Switch Manager dialog.
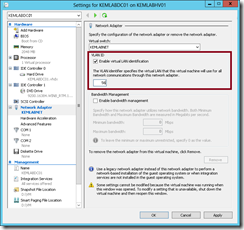
To configure a particular VLAN ID for a virtual machine, specify that VLAN ID in the VM Network Adapter properties in Hyper-V Manager in the Settings of that virtual machine.
How do I configure my network switch for VLANs with NIC Teaming or Hyper-V?
To setup your network switch for VLANs with NIC teaming, you’ll need to configure your teamed switch port and each underlying physical switch port for VLAN trunk mode. Building on the network switch configuration example that I provided in my prior post, here are the additional configuration commands that I’ve used on one of my lab network switches:
kemlabsw01(config)# int port-channel1
kemlabsw01(config-if)# switchport trunk encapsulation dot1q
kemlabsw01(config-if)# switchport trunk allowed vlan all
kemlabsw01(config-if)# switchport mode trunk
kemlabsw01(config-if)# switchport trunk native vlan 2kemlabsw01(config-if)# int gi0/23
kemlabsw01(config-if)# switchport trunk encapsulation dot1q
kemlabsw01(config-if)# switchport trunk allowed vlan all
kemlabsw01(config-if)# switchport mode trunk
kemlabsw01(config-if)# switchport trunk native vlan 2kemlabsw01(config-if)# int gi0/24
kemlabsw01(config-if)# switchport trunk encapsulation dot1q
kemlabsw01(config-if)# switchport trunk allowed vlan all
kemlabsw01(config-if)# switchport mode trunk
kemlabsw01(config-if)# switchport trunk native vlan 2
Note that I’m using VLAN ID 2 as a special VLAN ID in the example above. Normally, the native VLAN is the “default” VLAN which causes native traffic to be passed across a trunk port in an untagged fashion. By using the “switchport trunk native vlan 2” command, it causes all native traffic to be passed across the trunk with a VLAN ID 2 tag. In this case, this passes native traffic to my Hyper-V management interface on the Virtual Network Switch and presents another alternative for handling management traffic on a separate VLAN instead of configuring VLAN ID 2 in the Hyper-V Switch properties.
Note that you’ll need to also define the native VLAN ID in the switch configuration. For example:
kemlabsw01(config)# int vlan 2
kemlabsw01(config-if)# no ip address
Based on your network configuration, you may or may not want to include an alternate native VLAN ID in your switch configuration.
Your Turn ... Now You Try It!
As part of our Windows Server 2012 "Early Experts" Installer Quest, we have additional study resources and a hands-on lab available where you can practice NIC teaming and VLAN tagging for FREE. Join us and begin the Installer Quest today!
Share Your Experiences!
Are you using NIC Teaming and/or VLAN tagging in your environment? Share your experiences in the comments below!
Hope this helps,
Keith

