Top 3 New Tricks with Active Directory Admin Center – 31 Days of Favorite Features in #WinServ 2012 ( Part 25 of 31 )
This article is Part 25 in a series of articles on the "Top 31 Favorite Features in Windows Server 2012" with my fellow IT Pro Technical Evangelists. Be sure to follow them on Twitter and check out their blogs this month for the other parts of this series:
- Kevin Remde - Read Kevin's Full of I.T. blog
- Brian Lewis - Read Brian's My Thoughts on IT blog
- Matt Hester - Read Matt Hester's WebLog
Looking to Streamline Active Directory Administration?
When we were designing the new version of the Active Directory Administration Center (ADAC) tool, we talked with lots of IT Pros to understand the day-to-day Active Directory (AD) tasks that were the most time consuming. The top feedback that we received included:
- Make batch operations on AD objects ( ie., create, delete, rename, set properties ) much easier to script and execute.
- Improve the process of recovering deleted AD objects.
- Provide the ability to quickly set unique password policies for subsets of users within a single domain.
We took this feedback and incorporated GUI-based features into ADAC to address each area. Learn these new tricks to make some of your IT Admin headaches disappear!
NOTE: The new ADAC tool is included with Windows Server 2012 and can also be installed on Windows 8 IT Admin workstations by downloading the updated Remote Server Administration Toolkit for FREE!
Trick #1 - Easy Batch Operations on AD Objects
The new ADAC in Windows Server 2012 makes scripting PowerShell batch operations on AD objects easier than ever – even if you’re not a PowerShell pro! ADAC is built on top of PowerShell 3.0, and we’ve added a new feature that interactively shows you the PowerShell code it’s running behind the scenes for leveraging in your own scripts.
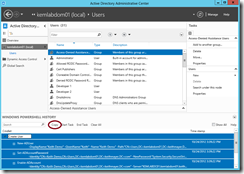
- When launching the new ADAC tool, you’ll notice a new PowerShell History Viewer panel down at the bottom of the window …
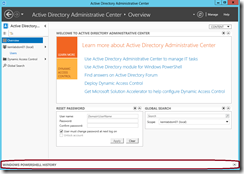
- By clicking on the Expand/Collapse triangle located at the right edge of this panel, you can expand this panel to see the script code that ADAC is using for any administrative tasks you perform in the tool.
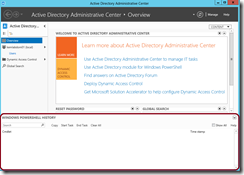
- Before performing your first administrative task, click the Start Task button in the PowerShell History Viewer panel to define a new task definition and type in a descriptive name to associate with your task …
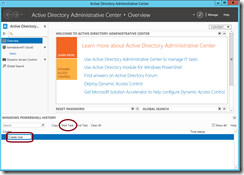
- Now, let’s perform our admin task normally in the ADAC graphical tool – in this example, we’ll create a new Active Directory user object. After creating the new user object in ADAC using the normal GUI-based steps, ADAC generates and runs the PowerShell code to perform that task. The PowerShell History Viewer lets us watch what ADAC is doing …
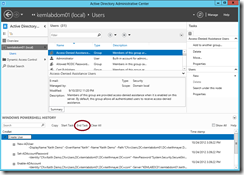
- Click the End Task buttonin the PowerShell History Viewer to end our task definition, and VOILA! … We’ve now got the PowerShell code in a reusable snippet. Just highlight the command lines associated with the task and click the Copy button to copy, paste and customize in your script editor to easily create a PowerShell script that performs this same task for an entire batch of AD objects.
Trick #2 – Quickly Recovering Deleted AD Objects
In Windows Server 2008 R2, we introduced the concept of an Active Directory Recycle Bin to help with deleted object recovery. However, the Recycle Bin in R2 was administered exclusively via PowerShell and didn’t have a GUI-based interface. In Windows Server 2012, ADAC now includes a full GUI-based process for enabling the Recycle Bin and also restoring deleted objects! If you love PowerShell, all the prior PowerShell functionality for the Recycle Bin is still there and is unchanged from R2.
NOTE: To use the Active Directory Recycle Bin feature, your AD Forest must be at the Windows Server 2008 R2 Functional Level or later and you must be a member of the Enterprise Admins group.
To use the Recycle Bin, we first need to enable it by right-clicking on our forest name in ADAC and selecting the Enable Recycle Bin option.
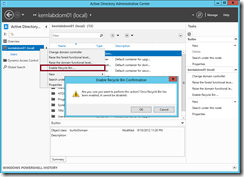
Once enabled, you’ll find a new Deleted Objects container in your AD Domain structure. As AD objects are deleted after enabling the Recycle Bin, they will be temporarily stored in the Deleted Objects container for up to the object tombstone lifetime ( 180-days by default for Windows Server 2003 and later domains ) for easy recovery.NOTE: You can customize this deleted object lifetime to meet your organization’s business policies by setting an alternate value ( in days ) for the msDS-DeletedObjectLifetime attribute on the CN=Directory Service,CN=Windows NT,CN=Services container in your AD Configuration partition with ADSIEdit.
To enable the Active Directory Recycle Bin using PowerShell, use the following command line example:
Enable-ADOptionalFeature –Identity 'CN=Recycle Bin Feature,CN=Optional Features,CN=Directory Service,CN=Windows NT,CN=Services,CN=Configuration,DC=contoso,DC=com' –Scope ForestOrConfigurationSet –Target 'contoso.com'
To recover a deleted AD object from the Recycle Bin, find the deleted object in the Deleted Objects container, right-click and select the Restore option …
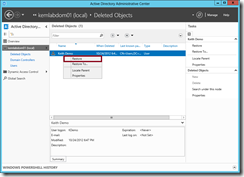
NOTE: The Active Directory Recycle Bin GUI-based functionality provided by the ADAC tool can only be used to restore AD objects from the Domain naming context where your normal AD users, groups, etc would be stored. If you have a need to recover special AD objects from other naming contexts, such as the Configuration context, you can use the Restore-ADObject PowerShell Cmdlet.
Trick #3 – Multiple Password Policies in One Domain
One of the most common security requirements I’ve seen in enterprise organizations is setting unique password policies for different subsets of user accounts on the network. Some user accounts need to have very restrictive password policies – such as powerful IT Admin user accounts and user accounts with access to sensitive information. Other accounts often don’t have these same requirements. If we try to force very strict passwords on all user accounts to support the needs of just a few, most users will probably resort to writing down their passwords – which defeats our security practices all-together!
In the old days ( prior to Windows Server 2008 ), we resorted to complex AD configurations with multiple domains because of the “one password policy per domain” restriction. In Windows Server 2008, we provided functionality for creating multiple password policies within a single domain via Password Settings objects ( Yay! ), but it was only accessible via ADSIEdit ( Yuck! ) and, as a result, many IT Admins weren’t aware of it and didn’t leverage it.
NOTE: To configure Password Settings objects, your AD Domain must be at the Windows Server 2008 Domain Functional Level or later.
In the new ADAC in Windows Server 2012, we can now define and assign multiple password policies within a single AD domain entirely from within the GUI-based ADAC console! Here’s how …
- In the ADAC console, navigate to the System –> Password Settings Container and select the New –> Password Settings action to create a new Password Settings object.
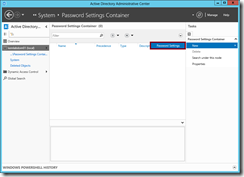
- Complete your unique AD password policy settings in the Password Settings dialog box as appropriate. Click the Add button to add one or more AD Groups or Users to which this policy should be assigned.
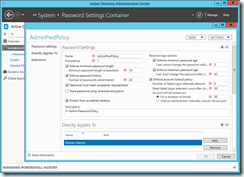
- Click the OK button to save your new password policy. Test your new policy by trying to modify the password for one of the assigned users to confirm that your new password policy is effective.
Do It: Try It In Your Own Lab
Try these steps in your own lab environment, by following these steps:
- Build your Windows Server 2012 server lab.
- Configure Active Directory in your Windows Server 2012 server lab.
- Leverage the above steps in your server lab to test AD batch operations, AD object recovery and multiple AD password policies.
What do you think of the new ADAC?
Are you excited about using the new ADAC in your environment? Feel free to share your feedback and stories in the comments below!
Hope this helps,
Keith