12 Steps to NTFS Shared Folders in Windows Server 2012
In the past, managing and sharing NTFS folders could be a real ordeal – there were different tools for managing NTFS permissions vs shared folders and most IT Pros generally used these tools on a server-by-server basis from each server’s console.
Server Manager to the rescue!
In Windows Server 2012, Server Manager provides a management facelift on top of the disconnected process that we’ve used in the past for sharing folders and setting NTFS permissions. In addition, Server Manager can easily manage these folders on a local server or any remote servers that you’ve previously added to the Server Manager dashboard.
NOTE: For details on using and customizing Server Manager for your servers and network environment, check out this post on that topic.
Along with the new SMB 3.0 performance and availability features for shared folders, Server Manager provides a powerful management tool for taking advantages of these features in your network environment.
How can I share new folders with Server Manager?
You can start the process of sharing NTFS folders in Server Manager by launching the New Share Wizard from the File and Storage Services details page. This new wizard integrates the steps involved with creating a new folder, sharing the folder and setting NTFS permissions into a single continuous workstream for local and remote servers.
NOTE: To be able to share folders on Windows Server 2012, you must first use the Add Roles and Features wizard to install the File Server role service.
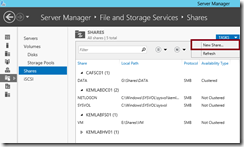
On the File and Storage Services page, select Shares and then click Tasks –> New Share … to begin the New Share Wizard.
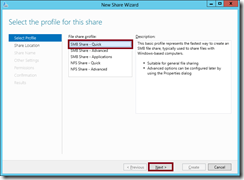
On the Select the profile for this share page, select SMB Share – Quick and click the Next button. Note that in addition to creating new SMB shares for NTFS folders that are sharing documents, we also have options for creating shared folders for applications, such as SQL databases or Hyper-V virtual machines, as well as creating new NFS shares for non-Windows client devices.
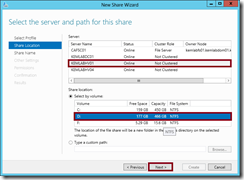
On the Select the server and path for this share page, select the server on which to create the new share ( local or remote server ) and the volume on which to create the new shared folder. Click the Next button to continue.
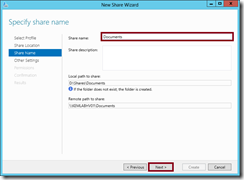
On the Specify share name page, type the name of your new Share name and click the Next button to continue.
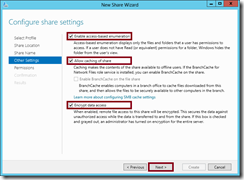
On the Configure share settings page, you will find advanced options for configuring Access-Based Enumeration (ABE), Offline folder caching, and Encryption of end-to-end SMB network traffic. Let’s select all three options and then click the Next button.
NOTE: If BranchCache is enabled on your server to optimize shared folder access over a WAN, you can also enable BranchCache for this new folder on this page. To learn more about the new simplified BranchCache features in Windows Server 2012 … check out Brian Lewis’ My Thoughts on IT blog.
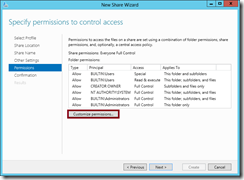
On the Specify permissions to control access page, review the default permissions for the new NTFS folder and click the Customize permissions… button to further customize these permissions as necessary. When finished, click the Next button to continue.
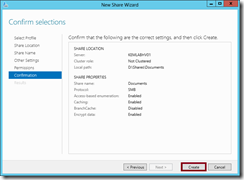
On the Confirm selections page, review the currently selected settings for sharing the new folder and click the Create button to begin the process of creating the new folder, applying NTFS permissions, and sharing the folder with the selected share settings.
How can I automate the process of sharing new folders?
You can automate the process of sharing new folders using PowerShell 3.0 and the new SMB Share Cmdlets. For example, to create and share the same folder as demonstrated above, we could use the following commands in PowerShell:
MD D:\Shares\Documents
New-SMBShare -Name Documents -Path D:\Shares\Documents -FolderEnumerationMode AccessBased
-CachingMode Documents -EncryptData $True -FullAccess Everyone
In addition to the new SMB Share Cmdlets, you can also use the Set-Acl and Get-Acl PowerShell cmdlets for automating NTFS folder permissions.
Has anything changed with NTFS permissions in Windows Server 2012?
NTFS access list permissions work the same in Windows Server 2012, but there is an improved user interface for setting and viewing NTFS permissions that can make implementing advanced security scenarios much easier.
What is an NTFS “advanced security scenario”?
For example, a common NTFS folder requirement in many organizations is to set permissions such that users can create, update, delete and rename files, but not delete or rename folders or sub-folders. Many organizations implement this approach to provide a consistent network folder structure for users to store their files, without being concerned about users inadvertently moving or renaming (ie., pruning and grafting) whole sections of that folder structure. In the past, this custom combination of file and folder permissions was confusing and difficult to implement.
To implement this scenario in Windows Server 2012, we can click on the Customize permissions… button referenced above in Step 6 and walk through the following process:
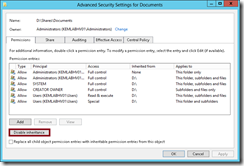
- In the Advanced Security Settings dialog box, click the Disable Inheritance button to disable inherited permissions from the parent folder in preparation of setting an explicit set of folder permissions.
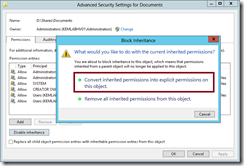
- When prompted, click the option to Convert inherited permissions into explicit permissions on this object. This will create a copy of each inherited permission access list entry into an explicit entry for this folder that we’ll be able to edit or remove.
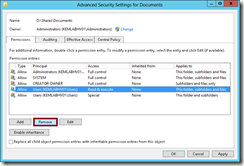
- In this case, we want to modify the default permissions granted to the Users group for this folder. Use the Remove button to remove each of the existing access list entries granted to the Users group.
- Then use the Add button to grant a new set of file permissions to the Users group. In this scenario, we want users to have read, write and delete permissions to files ( and only files ) inside this folder, so we’ll select the following permission options for files:
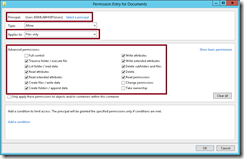
- Once we’re done adding file permissions, we’ll use the Add button again to grant a new set of folder permissions to the Users group. In this scenario, we want users to have the ability to see folders and create new files, so we’ll select the following permission options for folders:
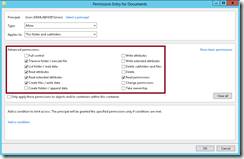
That’s it! Now we’ve got our shared folder all set for this advanced security scenario in just a few clicks! Of course, if we wanted to automate this process, we could’ve used the Set-Acl and Get-Acl PowerShell Cmdlets to set NTFS permissions via a script as well.
Are there any other changes related to NTFS permissions?
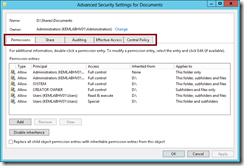
As we were working through the last set of steps, you may have noticed a few new tabs in the new NTFS Advanced Security Settings dialog.
The tabs that are new or improved for the NTFS Security Dialog in Windows Server 2012 include:
- Share – integrates Share permissions into a separate tab on the NTFS security dialog, so that NTFS and Share permissions can be compared side-by-side
- Effective Access – improved to provide an easier user interface to work with for evaluating the effective permissions for a user, group, device or claim.
- Central Policy – used with the new Dynamic Access Control (DAC) feature of Windows Server 2012 to centralize folder permissions into security policies that can be dynamically applied to files and folders based on Active Directory claims.
Dynamic Access Control (DAC), in particular, is a powerful feature in Windows Server 2012 to reduce the administrative load of managing standard permission access lists across lots of file servers. I’ll be writing a separate article in the near future that steps through the process of using DAC.
Do It: Implementing Shared Folders and NTFS Permissions
Your turn! Build your own Windows Server 2012 server lab and use the steps outlined above to create and share your own shared folder with the following properties:
- Shared folder path: C:\Shares\Documents
- Shared folder name: Documents
- Shared folder settings: Access-based Enumeration
- NTFS Permissions: Use the permissions shown in the example above.
What's Next?
In this article, we've walked through the benefits of the improvements offered by Windows Server 2012 for sharing and configuring NTFS folders using Server Manager and PowerShell 3.0
Learn more! To gain more experience with Windows Server 2012 in your lab, feel free to join our FREE Windows Server 2012 "Early Experts" Challenge online study group and become one of the 1,000+ IT Pros that are now studying as "Early Experts" on Windows Server 2012.
What do you think of Server Manager in Windows Server 2012?
Are you excited about using Server Manager in your environment for shared folder scenarios? Feel free to share your feedback and stories in the comments below!
Hope this helps,
Keith
