Right-size IT Budgets with "Storage Spaces" in Windows Server 2012 - 31 Days of Favorite Features in #WinServ 2012 ( Part 6 of 31 )
This article is Part 6 in a series of articles of the "Top 31 Favorite Features in Windows Server 2012" with my fellow IT Pro Technical Evangelists. Be sure to follow them on Twitter and check out their blogs this month for the other parts of this series:
- Kevin Remde - Read Kevin's Full of I.T. blog
- Brian Lewis - Read Brian's My Thoughts on IT blog
- Matt Hester - Read Matt Hester's WebLog
What is the Largest Single Cost Category in Your IT Hardware Budget?
If you're like most of the enterprise customer organizations that were surveyed when we were designing Windows Server 2012, your answer is probably the same as theirs: STORAGE! For the organizations we surveyed, we found that as much as 60% of their annual hardware budgets were allocated to expensive hardware SAN solutions due to ever-increasing storage requirements.
Wouldn't it be nice to have some of that budget back for other IT projects? YES! We agree too ... that's why the server team included "Storage Spaces" in Windows Server 2012!
Get Ready for "Storage Spaces"!
"Storage Spaces" is a new storage virtualization technology that's included in Windows Server 2012 and our FREE Hyper-V Server 2012 to provide SAN-like storage capabilities and performance using commodity hardware components, such as industry standard servers and JBODs (ie., "Just a Bunch Of Disks"). When designing the Storage Spaces feature, we leveraged the storage expertise we've gained with our public cloud offerings (Windows Live, Live@Edu, Bing, Office 365 and Windows Azure) where we've been supporting scalable, world-wide storage solutions on commodity hardware for the past several years. The result is a software-driven solution that provides storage features like pooling, abstraction, fault tolerance and thin provisioning for a fraction of traditional storage hardware costs.
You mentioned "Thin Provisioning" ... How Does That Work?
Thin provisioning allows you to easily abstract the size of a virtualized disk away from the underlying physical disk storage capacity. It gives you great flexibility in that you can setup your volumes with the capacity that you know you're going to need over the next several years without requiring an equal upfront hardware investment in disk capacity. So ... you say that you know you're going need 3TB of storage on a volume in the next three years, but only have 1TB of physical disk capacity right now? No problem! Thin provision your virtualized disk space today for 3TB and just incrementally add more physical disks into the underlying Storage Pool down the road when you need them!
NOTE: Thin provisioning works great for production workloads and provides us with new flexibility for managing long-term storage needs, BUT if you are using Failover Clustering there are special requirements to ensure that clustered storage is always accessible when needed. When setting up Storage Spaces for clustering scenarios, you'll need to use Fixed Provisioning, rather than Thin Provisioning. You can read about the complete requirements when clustering Storage Spaces here.
Disk IO Performance Must Be Pretty Sloowww ... Right?
Actually, the disk IO performance achievable with Storage Spaces can be quite comparable to dedicated storage hardware solutions! Storage Spaces gives you, as an IT Pro, the ability to engineer a storage solution for the right balance of performance and capacity that your applications require. However, it might require you to rethink some of your storage architecture a bit - instead of using expensive intelligent RAID controllers, storage processors and SAN switches to achieve high performance, Storage Spaces requires that you think about disk IO a bit differently to gain maximum performance. With Storage Spaces, the storage "intelligence" is handled by software components, so the best thing you can do to increase overall disk throughput is to increase the # of IO channels with multiple disk HBAs (ie., "Host Bus Adapters") and spread IOs across a large number of fast disk spindles.
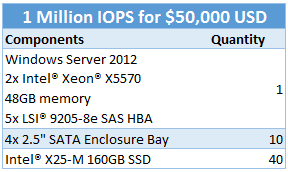
In fact, we recently demonstrated a solution that leveraged 5 SAS HBAs and 40 SSD disks in a single industry standard server to achieve over 1 million IOPS in disk performance ... for $50,000 USD including the server hardware, software and all storage components!
Of course, performance is not always the main driving factor in storage needs - many Tier-2 or Tier-3 storage requirements favor economical storage capacity over raw performance. In these scenarios, even if you already have a dedicated Tier-1 hardware storage solution, you may still consider Storage Spaces for your other Tier-2 and Tier-3 storage needs. I see a lot of IT Pros looking at Storage Spaces as a storage solution for Disaster Recovery, Archiving and Backup scenarios.
Very Cool! How can I build my own "Storage Spaces"?
"Storage Spaces" can be easily configured locally or remotely on servers running Windows Server 2012 or Hyper-V Server 2012. Pick your tools - Use the new Server Manager GUI management tool, or a new set of 74 PowerShell Storage Cmdlets if you're more inclined towards the command-line. In my case, I find myself constantly provisioning and re-provisioning storage for my lab environment, so I prefer PowerShell 3.0 as my tool of choice.
Setting up a new Storage Space involves three components: A storage pool that serves as a container, or resource pool, of your physical disks; A virtual disk, or LUN as we call it in the SAN world, that carves out a portion of your raw capacity in the storage pool to present as a disk to the operating system; and a volume, which becomes the formatted space that we can mount as a filesystem and, ultimately, store our files within.
Let's step through the basics of configuring each of these items one-by-one using the new PowerShell 3.0 Cmdlets:
Grab a "bunch of disks" into a new PowerShell object variable, such as $PhysicalDisks:
$PhysicalDisks = Get-StorageSubSystem -FriendlyName "Storage Spaces*" | Get-PhysicalDisk -CanPool $TrueThis command identifies all physical disks that are not currently part of an existing Storage Pool on the server and stores them in the $PhysicalDisks object array. If we look at the contents of the $PhysicalDisks variable now, we'll see an enumeration of each physical disk as follows:

Using our new $PhysicalDisks object array , now we'll create a new storage pool named "MyStoragePool01" and then pass this newly created storage pool down the PowerShell object pipeline to the command line in Step 3.
New-StoragePool -FriendlyName MyStoragePool01 -StorageSubsystemFriendlyName "Storage Spaces*" -PhysicalDisks $PhysicalDisks |
Using the newly created storage pool that we passed from Step 2 into the PowerShell object pipeline ... create a new 100GB virtual disk named "MyVirtualDisk01" that is thin provisioned. Pass this newly created virtual disk down the PowerShell object pipeline to Step 4.
New-VirtualDisk -FriendlyName MyVirtualDisk01 -Size 100GB -ProvisioningType Thin |Note that, by default, a "Simple" virtual disk will be created with no disk fault tolerance. You can also use the -ResiliencySettingName parameter with the New-VirtualDisk Cmdlet to choose either "Mirrored" or "Parity" virtual disk configurations for fault tolerant scenarios. Of course, choosing a fault tolerant scenario will cause a higher volume of disk writes to occur, which can impact overall performance - so you'll want to do some testing with your hardware and applications. In my testing, Mirrored provides the best balance of performance and fault tolerance for me and also works nicely with the file system resiliency features in the new ReFS filesystem for large data volumes.
Using the newly created virtual disk that we passed from Step 3 into the PowerShell object pipeline ... initialize the new disk, create a new partition mounted with the next available drive letter and format a volume within the new partition.
Initialize-Disk -PassThru | New-Partition -AssignDriveLetter -UseMaximumSize | Format-Volume
Done! If you didn't quite catch it as we were going through steps 2, 3 and 4 above ... those commands are all part of one continuous command line! That's right ... in one line of code, we created a new storage pool, virtual disk and formatted volume! PowerShell 3.0 ROCKS! :-)
Your Turn ... Build Your Own "Storage Spaces"!
As part of our FREE Windows Server 2012 "Early Experts" study program, we have a structured set of step-by-step study materials and lab exercises for watching, learning and implementing Storage Spaces in Windows Server 2012. Join us and become our next "Early Expert" at https://EarlyExperts.net! When you're ready to try the Storage Spaces lab, you'll find it here.
What's Next?
In this article, we walked through usage scenarios and step-by-step examples of configuring SAN-like storage solutions on commodity hardware using Windows Server 2012 Storage Spaces. To continue your learning on Windows Server 2012, check out these resources next ...
- You've got Storage! Now learn how to use it for storage capacity in Hyper-V Replica Disaster Recovery scenarios or Shared Nothing Live Migration scenarios
- Server Management: Interested in learning more about server management in Windows Server 2012? Check out this post on Brian's blog!
- PowerShell: Get up to speed on PowerShell 3.0 in this post on Matt's blog!
- Want to Get Certified on Windows Server 2012? Become an "Early Expert" for FREE at https://EarlyExperts.net!
How Are You Planning to Use "Storage Spaces"?
Have you found an interesting use case for Storage Spaces and/or PowerShell 3.0 in your shop? Be sure to share your story in the comments below!
HTH,
Keith