Live Migrate Your VMs in One Line of PowerShell - 31 Days of Favorite Features in #WinServ 2012 ( Part 4 of 31 )
This article is Part 4 in a series of articles of the "Top 31 Favorite Features in Windows Server 2012" with my fellow IT Pro Technical Evangelists. Be sure to follow them on Twitter and check out their blogs this month for the other parts of this series:
- Kevin Remde - Read Kevin's Full of I.T. blog
- Brian Lewis - Read Brian's My Thoughts on IT blog
- Matt Hester - Read Matt Hester's WebLog
Today's Favorite Feature is ... Hyper-V Live Migration!
Woohoo! Applause! ... Wait! You say that Windows Server 2008 R2 also had Live Migration? Well, hmm ... you're absolutely correct! BUT, in Windows Server 2012, Live Migration of Virtual Machines has been dramatically enhanced to support several new capabilities. Two of my most favorite new Live Migration capabilities are:
- Shared Nothing Live Migration, and ...
- Simultaneous Live Migrations
What is "Shared Nothing" Live Migration of Virtual Machines?
First, a few quick definitions ...
- Live Migration provides the ability to move running Virtual Machines from one Hyper-V host to another with ZERO network downtime to the VM. It's great for planned downtime scenarios where you need to move running VMs off a host to do physical maintenance on it.
- Shared Nothing in this case means that we're not using any shared storage between Hyper-V Hosts - the servers no longer need to be part of a cluster with shared storage for Live Migration to work.
In fact, the Hyper-V "hosts" in this scenario can be Windows Server 2012 or the FREE Hyper-V Server 2012! Yes, that's right - we can now Live Migrate running VM's to/from:
- Hyper-V Host <-> Hyper-V Host
- Hyper-V Host <-> Hyper-V Cluster
- And even Hyper-V Cluster <-> Hyper-V Cluster.
As you think about the full lifecycle of VMs in your environment - from development to pilot to production - you'll begin to appreciate the flexibility this can provide in terms of being able to easily move VMs between appropriate hardware platforms for each stage of the lifecycle with no-fuss or reconfiguration.
Sounds Great! How do I Enable "Shared Nothing" Live Migration?
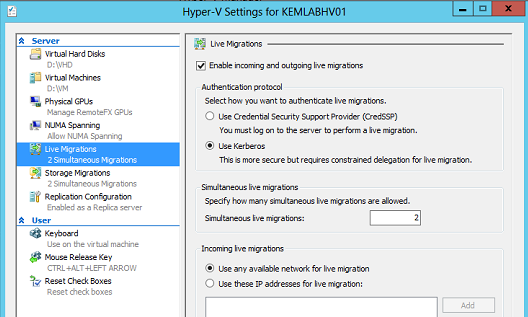
To enable Shared Nothing Live Migration, use Hyper-V Manager to set the following properties in the Hyper-V Settings of each host:
Enable incoming and outgoing live migrations (Checked)
Authentication protocol (Select either CredSSP or Kerberos)
I prefer using Kerberos authentication because it permits the ability to Live Migrate VMs without needing to login to the source host's server console first. However, Kerberos does require an additional step to configure constrained delegation in Active Directory (see below for details)
Simultaneous Live Migrations (Default = 2)
You can specify as many simultaneous Live Migrations as your network and storage hardware will reasonably support.
Incoming Live Migrations (Default is to use any network for Live Migrations)
I prefer to select the IP Address of a dedicated NIC or NIC Team for Live Migrations. This makes Live Migrations move as fast as possible without impacting normal VM network traffic.
Click the OK button to save your settings.
Apply these Hyper-V Settings to every other Hyper-V host.
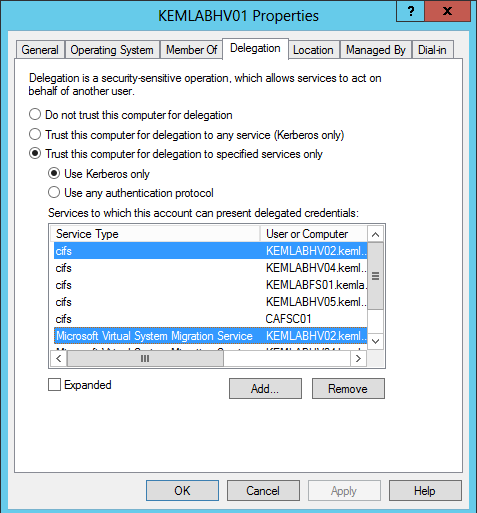
If you selected "Kerberos" as your authentication protocol above, you'll also need to setup constrained delegation in Active Directory for each Hyper-V host. To do this, launch the Active Directory Users & Computers tool and modify the following properties in the computer object of each Hyper-V host:
- On the Delegation tab, select "Trust this computer for delegation to specified services only" and then select the "Use Kerberos only" authentication option.
- Click the Add button and add your other Hyper-V hosts for the "cifs" and "Microsoft Virtual System Migration Service" service types.
- Click the OK button to save these changes.
- Repeat these steps for the computer objects of every other Hyper-V host
All done! Now, how do I Live Migrate VMs with "Shared Nothing"?
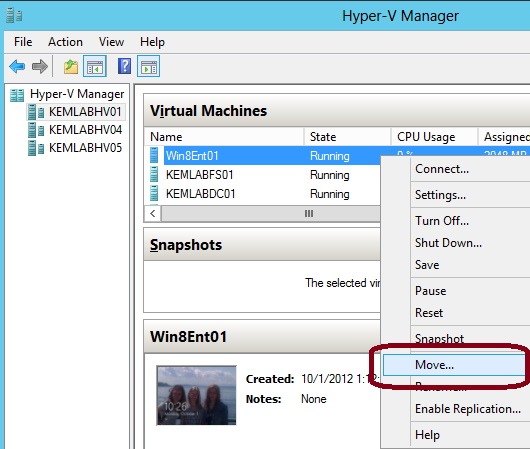
Easy! Once you've configured Live Migration for each Hyper-V host, you can quickly Live Migrate selected Virtual Machines by using Hyper-V Manager.
- In Hyper-V Manager, right-click on the VM you'd like to Live Migrate and click the Move option.
- You'll be walked through a wizard where you can select the destination Hyper-V host to which you'll Live Migrate and where to store the VM on that Hyper-V host.
- When ready, click the Finish button to begin the Live Migration process.
NOTE: Keep in mind that with "Shared Nothing" Live Migration, you are moving the Virtual Machine and it's Virtual Hard Disk (VHD) storage files. If you're Live Migrating a VM with large VHD storage files, the process may take a while to complete based on your available network and storage bandwidth. But, during the process, the VM will always be reachable on the network - from either the original source Hyper-V host or the new destination Hyper-V host - so, no network downtime will be experienced!
Hey! What about Live Migrating Multiple Virtual Machines Simultaneously?
Right-o ... back to the topic of this article! When we configured Live Migration above, we saw that we could specify the maximum number of simultaneous Live Migrations to/from each Hyper-V host. This comes in really useful if you have busy Hyper-V hosts with many running VMs and you find that you need to quickly evacuate all VMs from one host to perform hardware maintenance or upgrades. However, as a GUI management tool, Hyper-V Manager can be used to only Live Migrate one VM at-a-time between hosts interactively. If we want to Live Migrate multiple VM's simultaneously, we can use ... drum roll, please ... PowerShell 3.0!
NOTE: If you're looking for a full Enterprise GUI management solution that can build Private Clouds, Live Migrate multiple VM's concurrently, and a whole lot more, be sure to check out System Center 2012. However, PowerShell 3.0 is included with Windows Server 2012 and, as such, provides a scripted solution for no additional cost!
PowerShell 3.0 to the Rescue!
In Windows Server 2012, PowerShell 3.0 provides over 2,400 cmdlets to script and automate nearly every aspect of the underlying OS. When it comes to Hyper-V automation, PowerShell is no stranger - there's 163 PowerShell Cmdlets for Hyper-V alone! :-) To perform a batch Live Migration of multiple VMs, we'll leverage three PowerShell Cmdlets to quickly get the job done:
- Get-VM - to get the list of running VMs from the source Hyper-V host
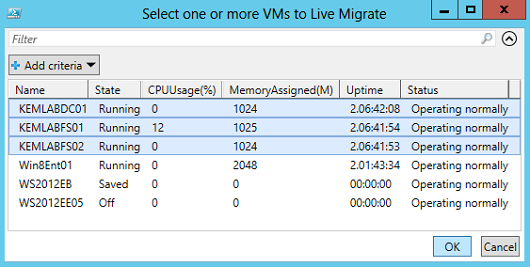
- Out-Grid with the new -PassThru parameter - to display an interactive list of VM's from which you can select the VM's to Live Migrate
- Move-VM - to perform the actual Live Migration
The resulting single line of PowerShell 3.0 code looks like this:
Get-VM -ComputerName SOURCE_HOST | Out-GridView
-Title "Select one or more VMs to Live Migrate" -PassThru |
Move-VM -DestinationHost DEST_HOST -DestinationStoragePath DRIVE:\FOLDER
Using the Out-Grid Cmdlet, we are presented with a list of VM's from which to select, and when we click the OK button, the Move-VM Cmdlet performs the Live Migrations in sequence.
Almost There!
As cool as the above single line of PowerShell 3.0 code is, it falls just a little short of what we ultimately wanted to accomplish ... each Live Migration operation occurs above, but they occur in sequence one-after-the-other, instead of simultaneously like we really wanted. To run the Live Migrations simultaneously, we can use another new feature in PowerShell 3.0 - Workflows with Parallel execution!
OK - I know, I know ... this sounds like a Developer topic, but it really is EASY in PowerShell 3.0. All we need to do is create a custom workflow that runs a ForEach loop with the -Parallel parameter. Here's the PowerShell 3.0 code that we need to create the workflow:
Workflow Invoke-ParallelLiveMigrate
{
Param (
[parameter(Mandatory=$true)][String[]] $VMList,
[parameter(Mandatory=$true)][String] $SourceHost,
[parameter(Mandatory=$true)][String] $DestHost,
[parameter(Mandatory=$true)][String] $DestPath
)
ForEach -Parallel ($VM in $VMList)
{
Move-VM -ComputerName $SourceHost -Name $VM -DestinationHost $DestHost -DestinationStoragePath $DestPath
}
}
Once this code is run, the custom workflow will be created and "Invoke-ParallelLiveMigrate" can be called like any other PowerShell Cmdlet. This workflow accepts four mandatory parameters for VMList, SourceHost, DestHost and DestPath. To use this custom workflow to perform true simultaneous Live Migrations, we just need to grab the list of selected VMs into an object variable and then run our new custom workflow. Here's an example of the code:
$VMList = Get-VM -ComputerName SOURCE_HOST | Out-GridView -Title "Select one or more VMs to Live Migrate" -PassThru
Invoke-ParallelLiveMigrate -VMList $VMList.Name -SourceHost SOURCE_HOST -DestHost DEST_HOST -DestPath DRIVE:\FOLDER
And ... that's it! See? I told you it was EASY with PowerShell 3.0 and Windows Server 2012! ;-)
What's Next? Keep Learning!
Here's some great resources that you may wish to leverage to continue your learning:
- Hands-on: Looking for more Hands-On opportunities with Windows Server 2012? Attend one of our upcoming IT Camp events in a city near you!
- PowerShell: Do you need to brush up on your PowerShell 3.0 scripting skills? Check out this post on Matt's blog for a great set of resources to get started!
- Join Us: Want to learn more about Windows Server 2012 and prepare for certification? Become an Early Expert for FREE!
Be sure to check back daily for our next round of Favorite Features in Windows Server 2012!
HTH,
Keith