How to Build Your ADFS Lab on Server 2012, Part2: Web SSO
Mark and Tom here again, continuing our series on ADFS. In this post, we'll show you how to use some sample-code to configure a web application for Web Single Sign-On (Web SSO) with ADFS.
What's Web SSO?
While Federated Web Single Sign-on (henceforth, SSO) is when two organizations create a federation trust between each other for the purpose of sharing applications while still using their own credentials, most of our customers are setting up ADFS for using Web SSO.
Web SSO is when a claims-aware web application, either on-premise or off-premise, is configured to enable users to login to the application using their existing Active Directory credentials. Great examples of these are ServiceNow for your helpdesk, Dynamics CRM Online for CRM, or an Office 365 SharePoint site for collaboration. In a typical Web SSO transaction, the end-user will navigate directly to the web application and the web application will determine that the user is not authorized and redirect them to their ADFS server. There, they authenticate using integrated Windows authentication or by typing in their credentials. Finally, they get redirected back to the application with a SAML token. The application will then verify the SAML token and the web application will then load.
The key to remember here is that the claims-aware application never communicates with the ADFS server directly. The client's browser handles the responsibility of authenticating against the ADFS server and then the browser receives the SAML token, which it submits to the application. This is the reason that Web SSO is described as a passive request; the browser isn't truly SSO-aware but is still capable of brokering the transaction.
Having a sample claims-aware website that you can install, that also shows the claims that are being sent, can immensely help in understanding Web SSO, how to configure the ADFS components, and how to troubleshoot the claims that are being sent. Once you have this solid foundation, onboarding more Web SSO applications for your users should be much easier.
What Do I Need for Web SSO?
The requirements are pretty simple. You need:
- An ADFS Server. More than one, load balanced and using a SQL backend for prod. But, since this is all about building a lab, one is just fine. For the purposes of this series, it should be on Windows Server 2012 or 2012 R2.
- An attribute store. This will be Active Directory, SQL Server, or an LDAP provider. Since 99.9% of you (completely scientific statistic) will likely use Active Directory Domain Services, we'll talk about that. We also won't talk about deploying AD, since you're probably already done with that.
- A claims-aware web application that has been configured to point to your security token service. This should be on its own IIS server. We'll point out some sample code, share a sample test application (Disclaimer: We aren't developers), and use Message Analyzer to highlight the authentication flow.
Let's get to it!
The Lab
The forest we'll be using is called corp.milt0r.com. The ADFS service URL is https://sts.milt0r.com. Finally, the test application will live on an IIS server at https://adfstest.corp.milt0r.com. In checklist form, you'll need:
- A working Domain Controller
- A working ADFS member server. All of our examples refer to ADFS 2.1 on Server 2012, but should apply to 2.0 on 2008 R2 as well, with the exception of the script. (See our previous article to get ADFS setup)
- A working IIS member server, running Windows Server 2012 or Windows Server 2012 R2
- A client machine that is joined to your lab domain.
- The URL of your web application
- *Optional* An SSL certificate for your web application from a trusted CA
The Web Application
We started by grabbing some sample code from MSDN. You can find that code here. Then we were shown some much nicer looking code (Thanks Dave) and used that instead. Since our primary focus in this post is configuring web SSO from an infrastructure standpoint, we aren't going to cover the code itself. To make it even easier, we included a PowerShell script that will set it all up for you. Both are attached at the bottom of this post. Make sure to read the disclaimer…
Setup Script
The setup script is going to do the following:
- Create a self-signed certificate
- Configure IIS (app pool, new site, HTTPS binding)
- Modify the application's web.config file and federation metadata document to contain your STS URL and application URL.
The script requires Windows Server 2012 or 2012 R2. It will not work on Windows Server 2008 R2. Before running it, you'll need to collect some information. Those items are:
- The fully qualified domain name of your test app. (ex: MyTestApp.corp.contoso.com)
- The name of your ADFS server
You will need to manually perform the following:
- Register an A record in your DNS zone for the test application
- Ensure the PowerShell execution policy on your IIS server is set to remotesigned, and you've run Unblock-File on the script, or set the policy to unrestricted.
Once you've got that, copy the ZIP file contents up to the IIS server. Unzip the script to a folder, and move the entire deploy folder from the zip file to a location on the system drive. Now, run the script. The parameters are pretty straightforward:
The parameters are as follows:
- SourcePath: This should be the path to the web site code we've provided. In the example, we had copied the site data from the zip file to c:\temp\deploy.
- SiteName: This will be the name of the test site in IIS, as well as the application pool
- SitePhysicalPath: The location on disk where the template site will be copied. We used C:\sites\adfstest.
- ADFSServer: The hostname/FQDN of your ADFS server (not the friendly name, but actual hostname).
- AppFQDN: The full qualified domain name of your test application. This will be set as a binding on the site in IIS.
The script will install everything you need, including the necessary features and roles.
Creating the Relying Party Trust
A term you should be very familiar within ADFS is "Relying Party." But what's a relying party? Who's relying on what? The RP can be a couple of things, so simply saying "Relying Party" is vague. Relying Party can refer to:
- Relying Party Application
- This is the application or service that relies on the claims for authentication.
- Relying Party Trust
- The relying party trust is the connection between the relying party application and our ADFS infrastructure. It's what we configure in ADFS to make the whole thing work.
We've already got our relying party application configured, thanks to the script and files above. Next, we'll need to setup the relying party trust between the application and the ADFS server. To setup the trust, you'll need the following information:
- Path to the relying party application's federation metadata document.
- Or, the UNC path to the federation metadata document. This will be under the test application's site path.
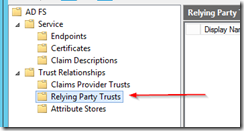
Open up the ADFS Management console and right-click on "Relying Party Trusts" then "Add Relying Party Trust."
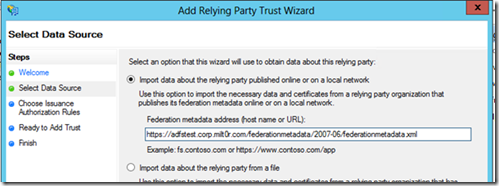
Click start in the first screen. On the "Welcome" step is where we'll specify the location for the federation metadata document. Here, you should be able to enter the URL to the metadata document. If the certificate you used in the app isn't trusted by the ADFS server, and you use the Import data about the relying party published online or on a local network option , it will fail. So, if you used our handy script above, you can either 1) trust the self-signed SSL cert on the ADFS server or 2) Use the 2nd option – Import data about the relying party from a file.
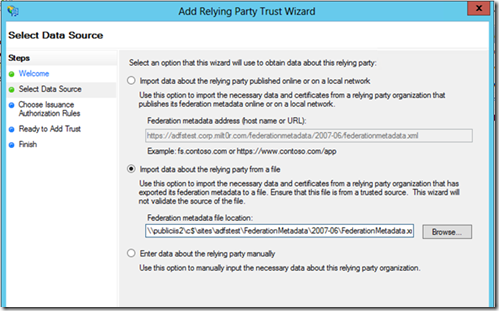
If you had to use the 2nd option, it should look something like this:
Notice that we had to use the UNC path to the file, instead of the URL. If the federation metadata isn't published or available, this is also a valid way to configure the relying party trust.
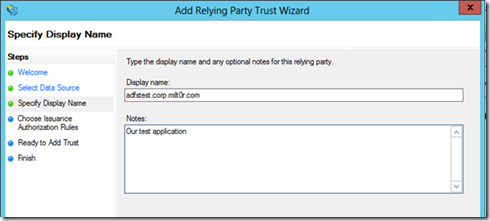
Click next. On the following screen, enter a descriptive name for the application, as well as any notes on why this particular relying party trusts exists (process owner, app owner, related processes, etc).
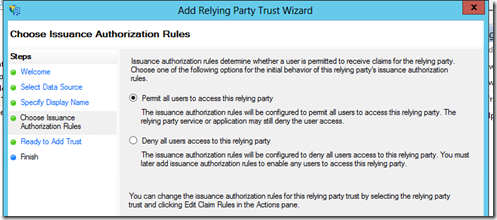
Click Next. On the Choose Issuance Authorization Rules screen, make sure Permit all users to access the relying party is selected. If you didn't want users to have access, you could deny all by default, then go back and add "Allow" rules after. We'll cover that later.
On the Ready to Add Trust screen, review the settings and click Next. Finally, click Close. Congratulations, you've configured the relying party trust! Now let's test!
Caveat: If your STS is in a domain that is NOT in the same domain as your machine, for example the STS URL in this post is sts.milt0r.com, but the client workstation is in corp.milt0r.com, you'll need to add sts.milt0r.com to your intranet zone in IE to permit Windows Authentication. To do that, in IE go to Internet Options -> Security tab -> Local Intranet -> Click the Sites button -> Advanced. There, add your STS URL (ie, https://sts.milt0r.com) to the list. Click OK.
On your client machine, navigate to your application URL. You should see something like this:
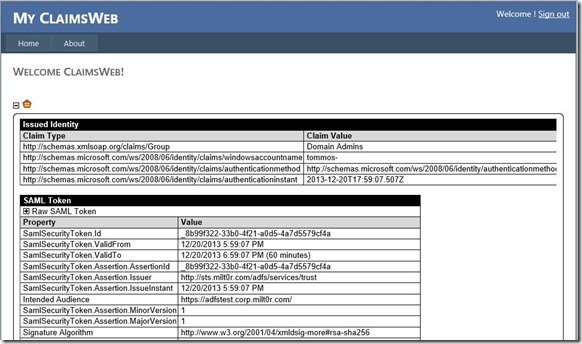
You might end up with a certificate error if you didn't trust the certificate. But, if you see this screen, you've successfully configured web single sign-on between your application and ADFS. The box that says "Issued Identity" is where you'll see any configured claims. We'll cover that more in the next post in this series.
Under the Hood
Now, let's take a look at what the authentication flow looks like in Message Analyzer.
First, we ran klist purge on the client machine, and opened an In-Private browser session, just to make sure we didn't use any old cookies. Using Message Analyzer's web proxy and NDIS providers, we're able to view the unencrypted traffic as captured on the client. Navigating to the application URL, the conversation looks like the image below.
1) The browser connects to the web application. Since we're using passive claims, the web app provides a 302 redirect to the browser, pointing it to the ADFS service (Frame 114)
If we dig in to the frame details, we can pull out the entire redirect URL:
2) In the next frames, we can see the browser connect to the ADFS service and receives a 401 challenge.
3) Having purged our Kerberos tickets, we see the full AS/TGS exchange. In 262-275, we see the authentication service requests and replies. In 284 and 288, we see the ticket granting service request for our STS – http/sts.milt0r.com. We've authenticated and received a Kerberos ticket.
4) We present the service ticket to the STS and are authorized. The ADFS service processes our request and, assuming the relying party trust is in place, knows whether or not to issue any claims and what those claims should be. The security token is packaged up and returned in the HTTP reply.
5) Finally, the browser provides the SAML token to the relying party application. Based on the contents of the token, the user may or may not be authorized. In our test app, we get a reply back from the server that contains all of the claims in our token.
Wrap-Up
We hope this post takes you one step further in the process of getting your ADFS lab built and configured. At this point in the series, you've built an ADFS server, installed a test application on the IIS server, and configured a relying party trust between the test application and the ADFS service. In the next few posts in the series we'll cover federating between two organizations, claim rules, and more. Stay tuned!
A huge thanks to Dave Gregory for providing the much-nicer-than-we-built ClaimsWeb application and some invaluable feedback.
Tom Moser & Mark Morowczynski

