How To Split and Migrate Child Domain DNS Records To a Dedicated DNS Zone
Hello, my name is Pierre Ricca, and I am a Premier Field Engineer focused on Active Directory and PowerShell scripting. I started working at Microsoft France as PFE in November 2010. An important part of my job consists of delivering health checks, risk assessments, and knowledge transfer around those technologies for our Premier customers in France.
Introduction
From the field, I have been asked many times by our customers to provide advices and best practices on how to optimize their DNS resolution. Even if each customers DNS topology is unique, we have some common recommendations.
You are probably aware that hosting DNS zones on the Active Directory instance is possible if you install the DNS server on a Domain Controller. Hosting DNS zones in Active Directory has several benefits: it permits taking advantage of the Active Directory replication and permits having multiple “master” DNS servers (SOA) for the same DNS zone.
I have seen some customer environments in which the customer has only one DNS zone hosting every DNS records for the entire forest. The customer environment was made of a root domain “contoso.com” and a few child domains “child1.contoso.com”, “child2.contoso.com”, “child3.contoso.com” and “child4.contoso.com”.
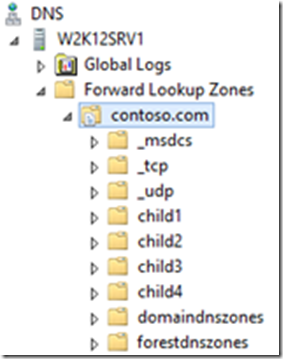
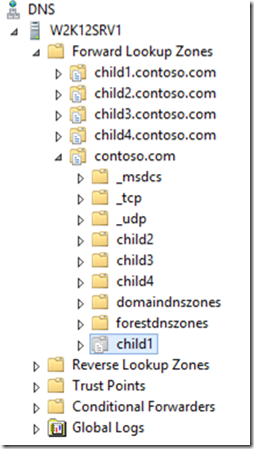
Here is a screenshot of what it looks like in the DNS server management console.
As you can see in this example, there is only one forward lookup zone (“contoso.com”), in which every child domain is a sub-namespace for that zone. This kind of configuration will typically appear if you did not install the “DNS server” role before running the DCPROMO for the creation of a new child domain. You notice that the “_MSDCS” sub-namespace is hosted in the parent DNS zone as well.
This configuration has a main disadvantage: if you install a DNS server in a child domain, you will not be able to select hosting DNS records specific for that child domain, you will only be able to host the entire “contoso.com” zone, affecting the Active Directory replication performances and the size of the Active Directory instance.
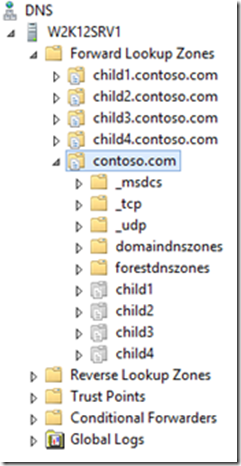
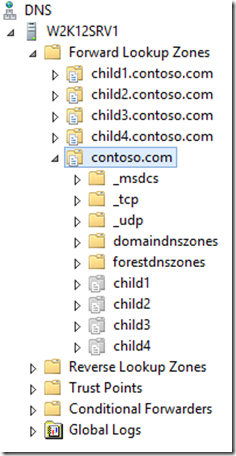
Most of the time, for this kind of environment, we will recommend to split each child domains DNS records into a separated DNS zone, and using a delegation from the root DNS zone for each child zones. The screenshot below shows an example of this “recommended” configuration.
This article will present a solution for splitting the big “contoso.com” DNS domain into specific DNS sub-domains for each child domains.
History of DNS zones splitting
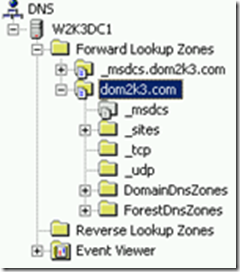
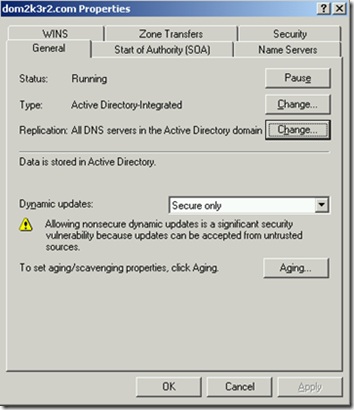
Starting from Windows Server 2003, when you start a new installation of an Active Directory forest, DCPROMO will create two separated DNS zones, which will be “_MSDCS.yourDomain.com” and “yourDomain.com”. Here is an example with my “dom2k3.com” domain:
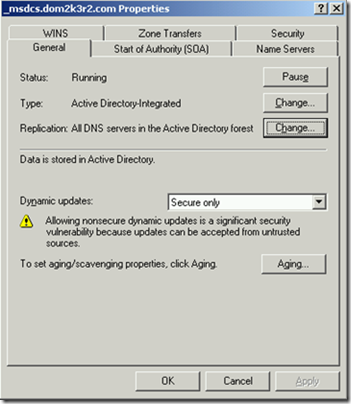
This behavior permits having a different replication scope for those different DNS zones. By default, the “_MSDCS” zone of the root domain, will be replicated to “All DNS servers in the Active Directory forest”, while the domain DNS zone will only be replicated to “All DNS servers in the Active Directory domain”. You can review and change those settings in the “General” tab of the zone properties:
With forests created by Windows 2000 Server, the DCPROMO did not separated the “_MSDCS” zone from the root domain zone, and this zone was hosted directly in the root domain zone. If you want to split your “_MSDCS” zone and be compliant with the “Windows Server 2003” default behavior, you will have to split those zones manually. This technical article details this process: “How to reconfigure a _MSDCS subdomain to a forest-wide DNS application directory partition when you upgrade from Windows 2000 to Windows Server 2003” https://support.microsoft.com/kb/817470/en-us.
The migration of child domains DNS records
The technical article mentioned below (KB 817470) permits splitting the “_MSDCS” by creating a new empty “_MSDCS” DNS zone, and forcing each Domain Controllers to register their DNS records into that new zone.
Unfortunately, we cannot use the same method for our current customer scenario, because we need to migrate all existing records of child domains (including static records), to the newly dedicated child domain zone. In our scenario, each child domain have been running in production for a few years, and represents many thousands of DNS records for each child domain. A manual re-creation of those DNS records would have been far too complicated and time consuming. The only solution we had was scripting!
Here is the method we used.
Please be aware that the scripts presented in this article are provided as an example, and are not supported by Microsoft. Before applying this solution, be sure to back up your DNS zones, and to be able to recover them in case of something unexpected append. From my experience, this solution can take few hours from beginning to end. I strongly recommend applying this solution during off-work hours. The DNS dynamic registration will not be available during the time of the migration.
Step 1: Export the DNS zone.
First, we need to export the current DNS zone to a file. Fortunately, the “DNSCMD” command permits exporting a DNS zone to a file. Here is an example of usage:
Dnscmd /zoneexport contoso.com export.dns
This command will create a file named “export.dns” in the “%SYSTEMROOT%\DNS\” folder (example: “C:\Windows\system32\dns\export.dns”).
Step 2: Create a specific DNS file for each child domains.
Now we will need to split our flat “export.dns” file into specific files for each child domain, and we need to export the DNS records of child domains to the corresponding file.
Here is an example of content from “export.dns”:
…
MyComputer1234.child1 [AGE:3606209] 1200 A 172.2.3.4
MyComputer5678 [AGE:1782367] 1200 A 172.5.6.7
MyComputer90AB.child2 [AGE:2457912] 1200 A 172.9.0.1
MyComputerCDEF.child2 [AGE:1982627] 1200 A 172.10.11.12
…
We should parse the “export.dns” to filter on DNS record corresponding on child domains, and create a new dns file specific for each child domain.
From the example above, we should extract the following information for “child1.dns”:
…
MyComputer1234 [AGE:3606209] 1200 A 172.2.3.4
…
We should extract the following information for “child2.dns”:
…
MyComputer90AB [AGE:2457912] 1200 A 172.9.0.1
MyComputerCDEF [AGE:1982627] 1200 A 172.10.11.12
…
Note that “MyComputer1234.child1” from “export.dns” should be convert to “MyComputer” (without “.child1”) when extracted to “child1.dns” (same remark for records in child2). Note also that “MyComputer5678” from “export.dns” is a record directly present to the root of “contoso.com” and will not be extracted to any child domains DNS file.
I have created a sample script that can automatically extract and convert those DNS records, and export the result in “child.dns” files. Please note that this script is provided as an example, and is not supported by Microsoft. Here is an example of how to use it:
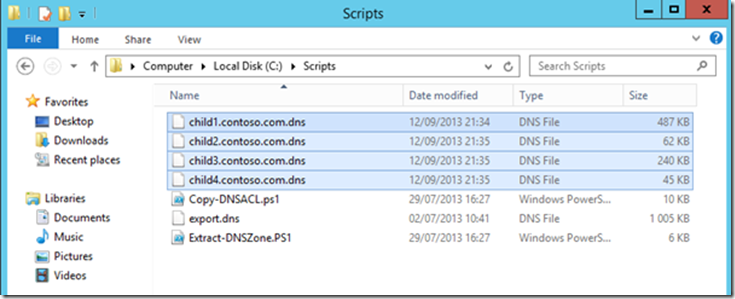
.\Extract-DNSZone.PS1 -inputFile “C:\Scripts\export.dns” -outputFile “C:\Scripts\child1.contoso.com.ns” -extractZoneName "child1"
You can repeat this operation for each child domain.
Step 3: Import child DNS zones
Now, we should have a specific DNS files for each child zone (generated in the previous step).
We need to import those “child” files to the DNS server. First, copy those files into the “%SYSTEMROOT%\DNS\” folder (example: “C:\Windows\system32\dns\”).
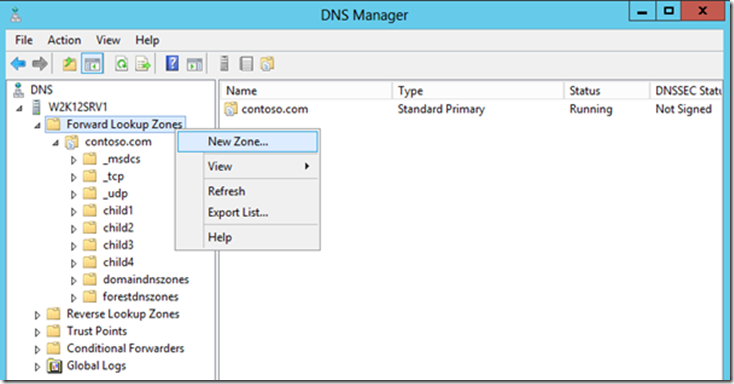
Then, open the DNS server management console. Right click on “Forward Lookup Zones” and select “New Zone…”.
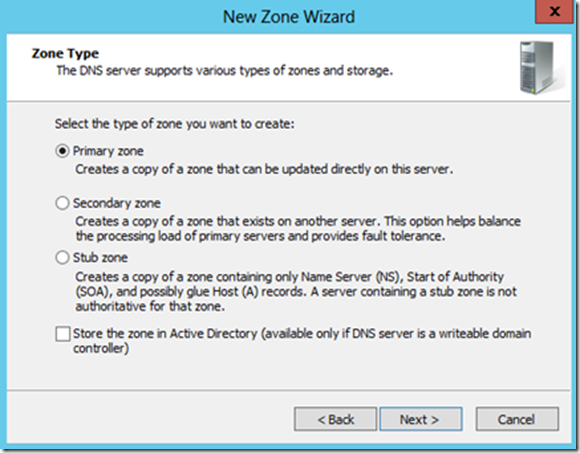
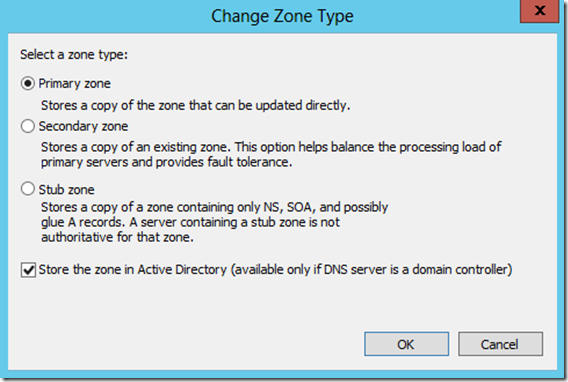
Click “Next”, then select “Primary zone” and be sure to uncheck “Store the zone in Active Directory” (because we want to load the zone from a file) and click “Next.
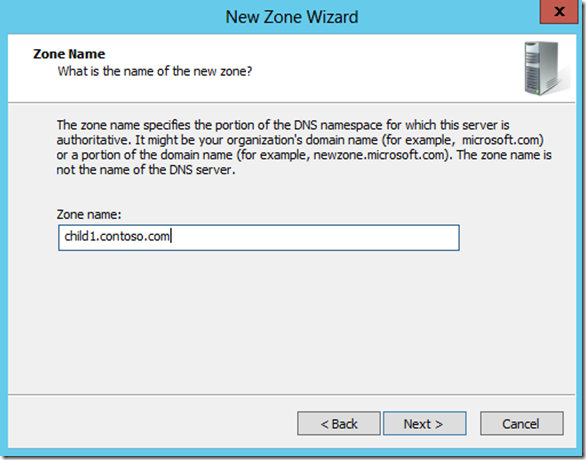
Enter the name of the child zone to import (example: child1.contoso.com) and click “Next”.
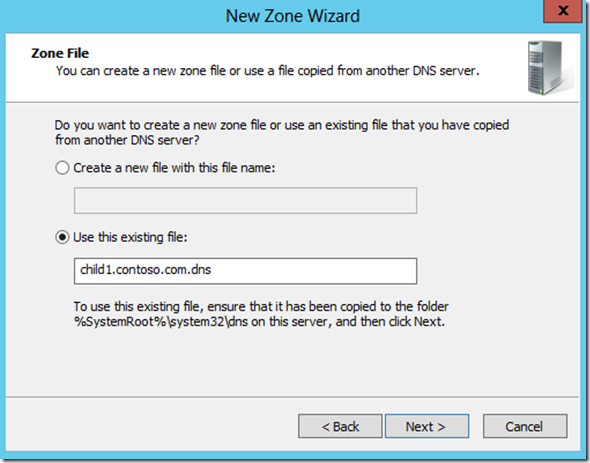
Select “Use this existing file” and be verify that the name correspond to the name of the child DNS file to import, then click “Next”.
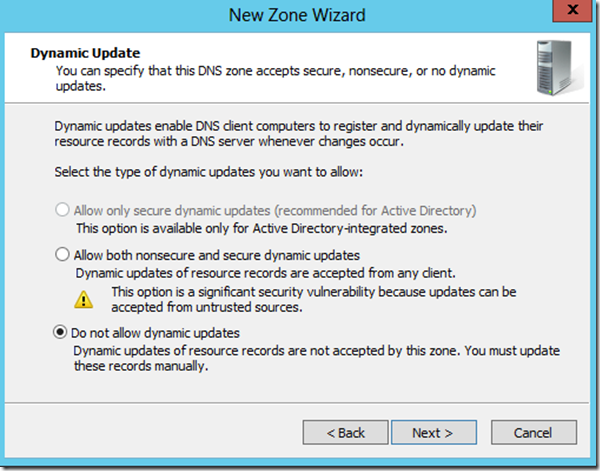
Select “Do not allow dynamic updates” (we do not want to allow dynamic updates while our migration process is not finished) then click “Next” and “Finish”. You will be able to re-enable dynamic updates at the end of the DNS migration.
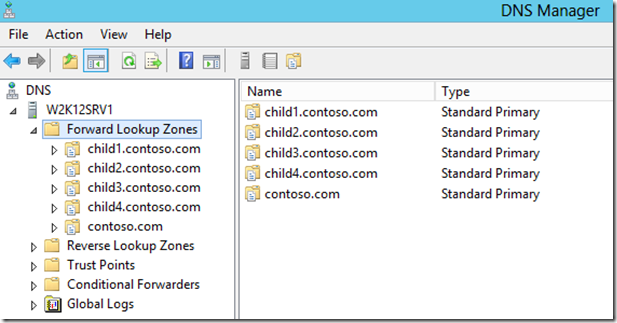
Repeat this operation for each child domain. You should now see your root domain and your child domains have a separate zone from the DNS server management console.
Step 4: Replicate child DNS zones to all DNS servers in the forest
In this step, we are going to enable child zone replication to all DNS servers in the forest. You will able to switch the replication scope to “domain wide” at the end of the migration.
From the DNS management console, right click on a child DNS zone, and open the zone properties.
Next to the text “Type: Primary”, click change. Check the box “Store the zone in Active Directory” and click “OK”. When asked, click “Yes” to confirm the Active Directory integration.
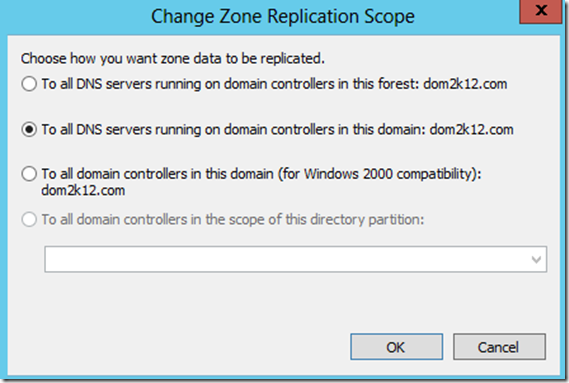
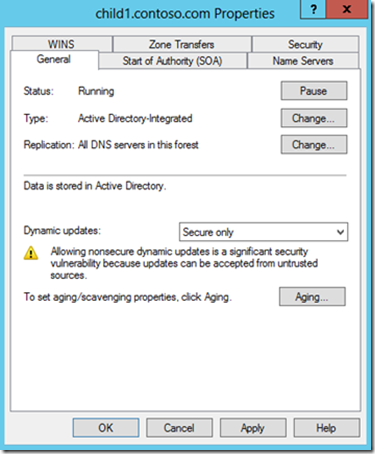
Then, next to the text “Replication: All DNS servers in this domain” click “Change”. Select “To all DNS servers running on domain controllers in the forest” and click “OK”.
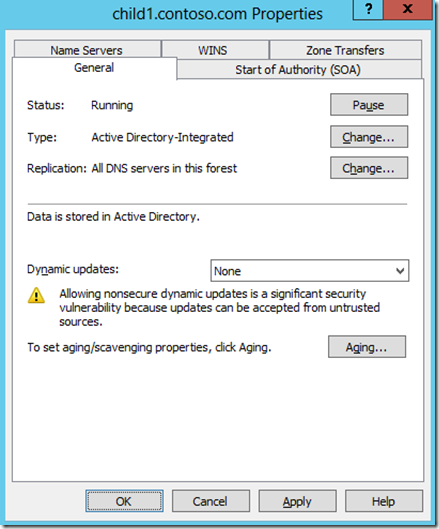
Here is a summary of the configuration you should have:
Click “OK” and repeat this operation for each child domain.
Step 5: Restore DNS records’ ACL
Now we need to restore the DNS records’ ACL. This is especially important if you want to secure dynamic DNS updates. When the dynamics DNS updates are set to “secure”, the DNS server will check DNS records’ ACL, in order to verify if the member server have the permission to modify the DNS record.
Unfortunately, the “DNSCMD /zoneexport” did not export ACLs information. We need to copy each DNS record ACL from the “old” parent zone, to the corresponding DNS record in the new child zone. Again, I have created a sample script for that. This script requires “Active Directory module for PowerShell” which can be installed as an optional feature of Windows Server, or can be installed on Windows client as part of the “Remote Server Administration Tools”. Please note that this script is provided as an example, and is not supported by Microsoft. Here is an example of how to use it:
.\Copy-DNSACL.ps1 -SourceZoneDN "DC=contoso.com,CN=MicrosoftDNS,DC=ForestDnsZones,DC=contoso,DC=com" -TargetZoneDN "DC=child1.contoso.com,CN=MicrosoftDNS,DC=ForestDnsZones,DC=contoso,DC=com" -TargetDNSZoneShortName "child1"
Here is an example of script result:
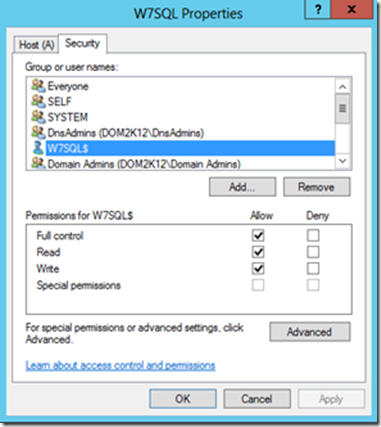
You should repeat this step for each child domain. Now, if you go the Security tab from a DNS record, you should see that member servers have full access right on their records.
Step 6: Re-enable dynamic updates
If your environment use dynamic DNS updates, it is time to re-enable it. Go to the child DNS zones properties and select dynamic updates: “Secure only” or “Nonsecure and secure” (if you are not sure, re-use the same setting than the root DNS zone has).
Step 7: Cleanup old DNS records and delegate child domain zone.
Before cleaning the old DNS records, be sure:
- To have a backup of your “old” root DNS zone and to be able to restore it.
- DNS resolution is working properly regarding root DNS records, as well as for child DNS records.
- Dynamics updates are working properly.
- You did not identify any problems so far.
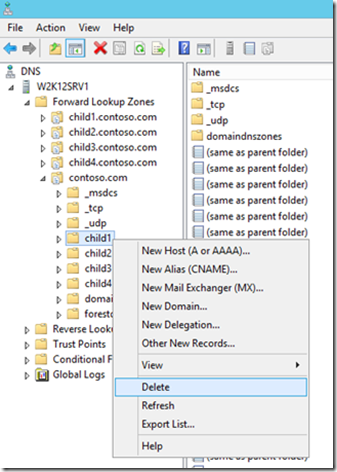
To cleanup old DNS records, open the DNS server console and browse the “old” root DNS zone. Be sure that you are not going to delete the new child zone! Right click on the sub-zone “child1” from the root DNS zone, and select “Delete”.
Now “Child1” has disappeared from the “sub-zones” of “contoso.com”, but “child1.contoso.com” is still present has an autonomous DNS zone.
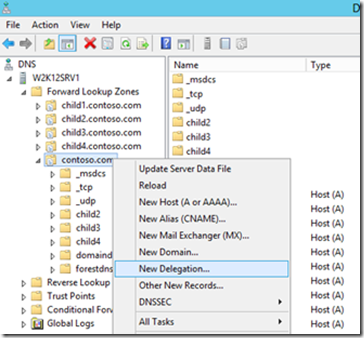
In order to be able to resolve “child1.contoso.com” on DNS servers that are hosting “contoso.com” but are not hosting “child1.contoso.com”, we need to create a delegation for “child1” from the “contoso.com” zone. Right click on the zone “contoso.com” and select “New delegation…”.
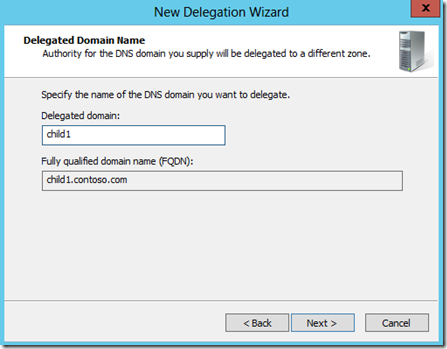
Click “next” and type the name of the child domain (example: child1) and click “Next”.
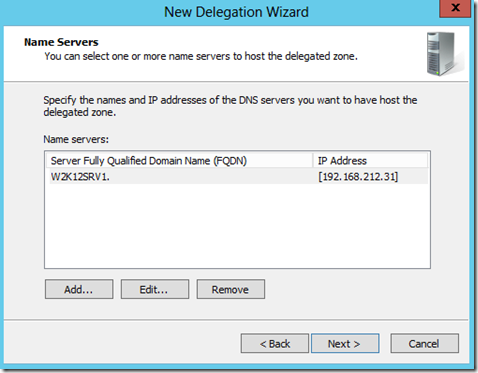
From this list, add all servers that are hosting the zone “child1.contoso.com” (that list could be a long list, depending on the size of your environment), then click “Next” and “Finish”.
Now, from the DNS server console, you should see “child1” as a delegation of “contoso.com”.
Repeat this operation for each child domains. At the end, your DNS should be like this:
Well done, the migration is finished! Now you can change the replication scope of child DNS zones if you wish. Check that NS records for all DNS zones are coherent. You can also consider re-enabling aging and scavenging for your new child zones if you wish.
12-6-13- Scripts have been uploaded to the technet repository.
https://gallery.technet.microsoft.com/scriptcenter/Copy-ACL-of-DNS-records-97837128
https://gallery.technet.microsoft.com/scriptcenter/Extract-a-specific-DNS-dc633d77
-Pierre Ricca
