Explaining the Hyper-V authorization model, part three
Hyper-V uses a role based authorisation model for access checks. This series of articles takes a look at the model; defines the available primitives; and walks through a couple of examples. (I actually wrote most of this series many months ago – only finally found the time to post it up!).
Quick links: Part1; Part 2; Part 3; Part 4
In part two, I started creating the scenario of separating the view two users have when opening Hyper-V Manager so that they only see their own VMs. To do that, I created two VM Scopes, one for each user, and moved the users’ VMs to the required VM scopes. I mentioned that some more steps were still required. This part of the series walks through those steps.
The first part of the additional steps I’ve pretty well covered to death in my remote management of Hyper-V series. As my two users, John and Joe are not local administrators; they need to be granted explicit access to WMI namespaces (and Distributed COM Users if managing remotely). By far the easiest way to achieve this is using HVRemote. (Note, I’m assuming you’re following best practice, and using remote management as the server is running Hyper-V Server, the standalone SKU, or a Server Core installation of Windows Server 2008/2008 R2.)
From an elevated command prompt when logged on as a local administrator, run
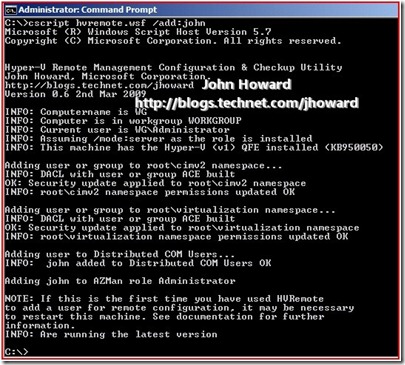
cscript hvremote.wsf /add:john
(Use /add:domain\account if the Hyper-V machine is domain joined)
If you look at the output carefully, note the line that says “Adding john to AZMan role Administrator” near the bottom. Apart from a typo I need to correct in a future version, what HVRemote has done is add john to the ‘Administrator’ role assignment in the default scope. This is simply a limitation in HVRemote. At the time of writing, HVRemote cannot cope with VM Scopes. (In fact it is hard coded to always update the role assignment called ‘Administrator’ in the default scope – on my big list and will be covered in the future).
If John and Joe are now administrators in the default scope, we’ve not performed any separation as administrators in the default scope can view all VMs. There are two ways to resolve this. Either we update policy using Authorisation Manager to undo the generalisation HVRemote has made here, or use a parameter available in HVRemote when adding the account.
Method 1 Use Authorisation Manager
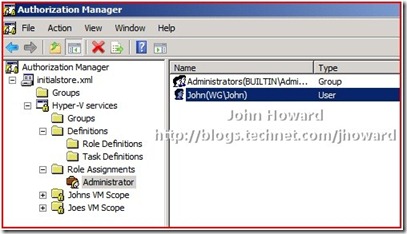
Select the Role Assignment ‘Administrator’ in the root scope to find the user which has been added.
Right click on the user and choose delete (or simply hit the delete key)
Method 2 Use a parameter to hvremote
*Caveat this may not work in future releases – it does as of version 0.7 though.
From an elevated command prompt when logged on as a local administrator, run
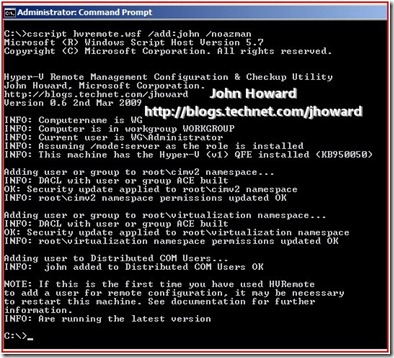
cscript hvremote.wsf /add:john /noazman
(Use /add:domain\account if the Hyper-V machine is domain joined)
If you compare this output to the previous hvremote output, notice there is no role assignment update in AZMan.
The last part to get our user separation in place require a little thought to get your head around, and a little knowledge of the Hyper-V design.
We have a service called VMMS (Virtual Machine Management Service). There are two operations in our authorisation model which are required to be able to perform operations on the VMMS. VMMS always performs its access checks for these operations in the default scope.
The operations are
- Read Service Configuration, and
- Reconfigure Service
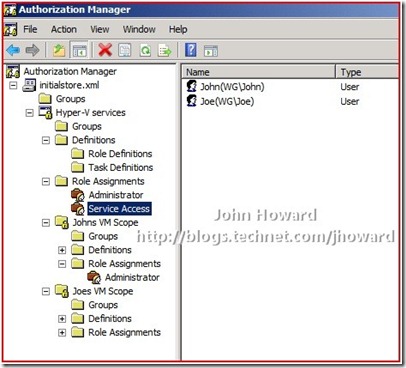
What this means is that the users I’m separating, John and Joe, must be authorized to these operations in the default scope. It is not sufficient to just have them an ‘administrator’ in the VM Scope. Based on our knowledge from the previous parts, this is easily achieved:
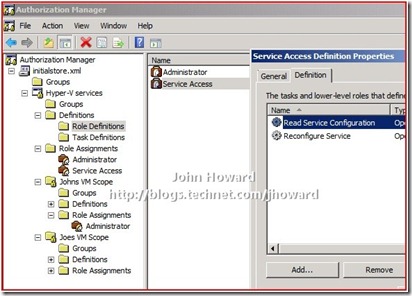
- Create a Role Definition ‘Service Access’ containing the two operations in the default scope
- Create a Role Assignment ‘Service Access’ linked to the ‘Service Access’ role definition in the default scope
- Add John and Joe to the role assignment ‘Service Access’ in the default scope
Authorisation manager should look like the following when done:
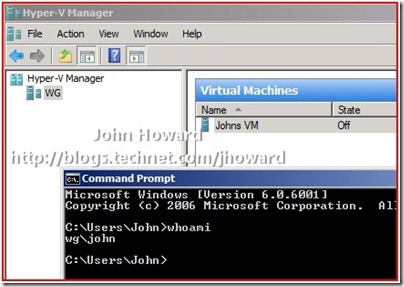
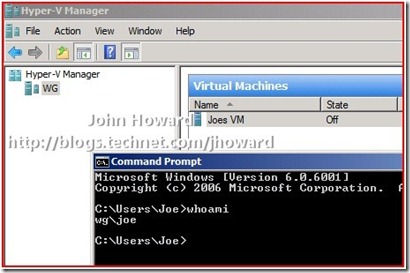
All that remains validate the configuration is to log on as those users and start Hyper-V Manager (or use Hyper-V Manager remotely in the case of a server core or Microsoft Hyper-V Server installation).
Here, I’m logged on as John
And here, I’m logged on as Joe
So that works as expected. With the information so far, I hope I’ve provided everything you need to enable you to build a model which makes sense for your own unique implementation. It’s a question of sitting down and working through how to map your organisational needs into authorisation model primitives. There is no single right answer which fits everyone, so building a mapping is not something I can help you with!
In the next part of this series, I’ll take a look at how you could debug issues with a custom authorisation model you develop.
Cheers,
John.
