Hyper-V: Why does Hyper-V Manager not always work over VPN connection? Access Denied or RPC server unavailable errors.
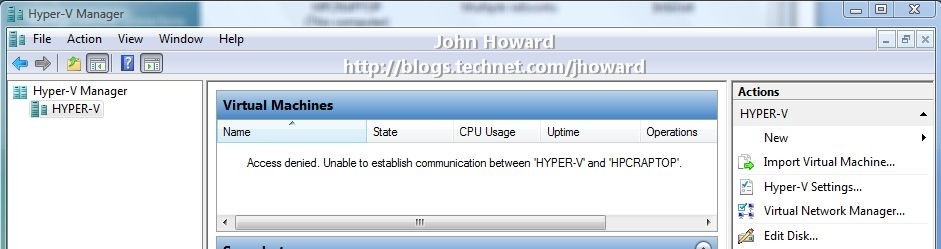
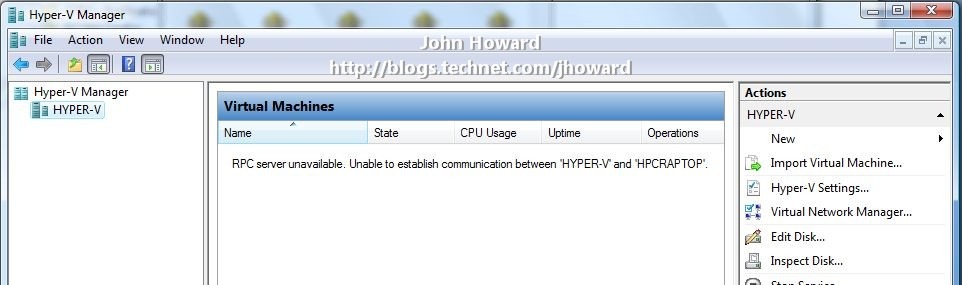
This post examines a problem several people have reported when running Hyper-V Remote Management tools over a VPN connection - specifically hitting an error “Access denied. Unable to establish communication between ‘SERVER’ and ‘CLIENT’”. In some variations, I’ve seen RPC errors such as “RPC server unavailable. Unable to establish communication between ‘SERVER’ and ‘CLIENT’.”
And an example of an RPC error case:
To be explicit up front, I am talking about this only occurring over a VPN/RAS connection – when connected using a wired or wireless connection without VPN, everything works normally. If things are not working on wired/wireless, follow my series of remote management posts to configure everything first.
Diagnosing the issue took a bit of sleuthing. So let’s dive in. A big clue is in the first message – it implies there is some form of communication between the Hyper-V enabled server and the Remote Management client. Indeed, that is correct – there is a DCOM callback. So let’s start by looking at the IP configuration on the laptop machine I’m using for this walkthrough after the VPN connection has been established.
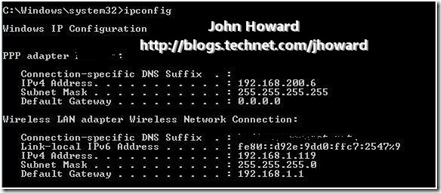
Note that the DHCP assigned address for the VPN connection is 192.168.200.6, and the DHCP assigned address for the Internet connection is 192.168.1.119.
Let’s run a network trace network trace on the Hyper-V enabled server to see what’s going on. I’m running the network trace while starting Hyper-V Manager on the laptop:
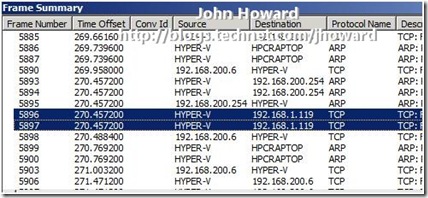
The two highlighted lines show that the Hyper-V enabled server is making an attempt to connect to my local wireless IP address on my broadband connection, 192.168.1.119, rather than the DHCP assigned IP address for my machine on the internal network, 192.168.200.6.
What’s also interesting in the trace are ARP packets from the Hyper-V enabled server at 192.168.200.218 to “HPCRAPTOP”:
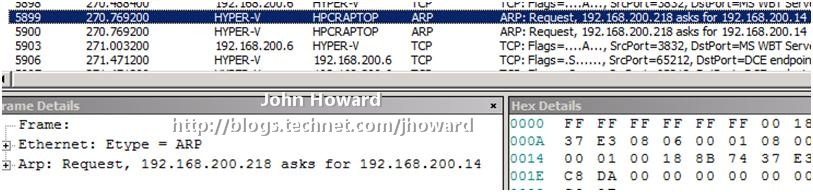
Notice that the server is asking where 192.168.200.14 is, and netmon is resolving 192.168.200.14 to the IP address of the laptop. So that indicates all is not well with DNS since we know above that the DHCP assigned address on the VPN connection is 192.168.200.6. Let’s do an nslookup to examine the DNS entry for the laptop.

Indeed, the laptop from a DNS perspective is incorrect and explains why netmon is resolving 192.168.200.14 to my laptop. (Although I didn’t mention it, I happen to know that this DNS entry, 192.168.200.14, was the IP address assigned to the laptop when it was last connected directly to the internal network.)
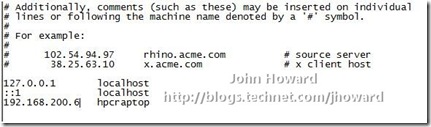
So as an experiment and first workaround, let’s edit \windows\system32\drivers\etc on the Hyper-V enabled server to add an entry for my laptop as 192.168.200.6, the current IPv4 address for VPN and see what happens.
Yes, that works. But it’s hardly what I could describe as a desirable or every-day-workable solution. If you’re walking through with me, remember to remove that entry hosts to see if there are any other workarounds.
Well there is one interesting workaround which I mentioned in my remote management configuration series. However, I absolutely do NOT recommend this one unless you really need to as you are lowering the security of your machine. Changing this setting is NOT necessary for remote management in a domain environment, but it is in a workgroup environment (my home environment I’m using for this is domain based). Here are the settings to change in dcomcnfg on the management client:

Why this works is related to WMI/DCOM fallback, but I’m far from claiming to be an expert here and will walk swiftly away from any further explanation. However, I re-iterate, I absolutely do not recommend you change this setting unless you need to.
So let’s step back a bit now and try and understand a bit more about the DNS issue. The obvious thing to think may be to run “ipconfig /registerdns” from an elevated command prompt on the remote management machine to correct the DNS registration. Let’s see what happens, while at the same time running a network trace on the ISA server with a filter for just the DNS protocol.
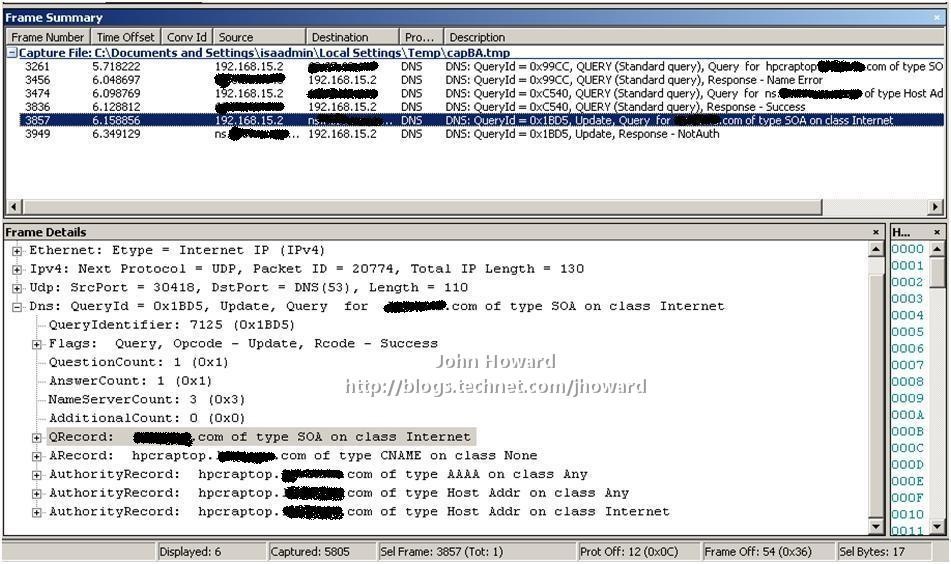
If you’re ahead of the game, you may notice this is a very interesting capture! Maybe not if you’re aware of my home setup, so let me explain why. 192.168.15.2 is the external internet address of my ISA server (in turn connected to a VOIP router). The destination being resolved to a host with name starting ‘ns’ is my ISP’s DNS server. Looking at the frame details, you can see the packet is a DNS update request for the laptop. Unsurprisingly, if you look at the response from the ISP in packet 3949, the response is “NotAuth”. Afterall, they’re not authoritative for DNS of my domain. I am!
This routing to the external network through ISA is normal expected behaviour. So I’m still yet to find a good solution. But all is not lost (of course). Let’s take a different tactic and look a little closer at the Vista SP1 inbox VPN client configuration (as in one which hasn’t been created by what-ever the equivalent of CMAK, or Connection Manager Administration Kit, for Vista – and no, I’ve no idea what the replacement technology is. But it does remind me to do some research for another day....).
I’m assuming you’re already familiar with configuring a PPTP or L2TP VPN connection in Vista – that’s a little outside of the scope of this post. But here’s the IPv4/Properties/Advanced/DNS dialog tab of the VPN connection I’ve created to connect back to my home network. Look at the bottom three items relating to DNS registration:
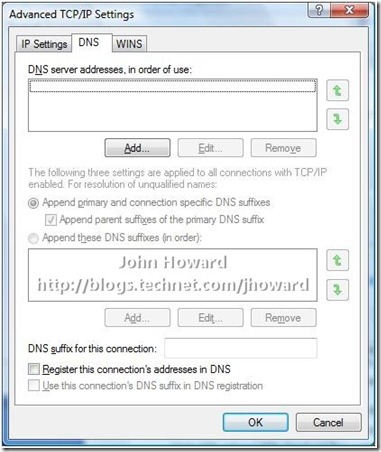
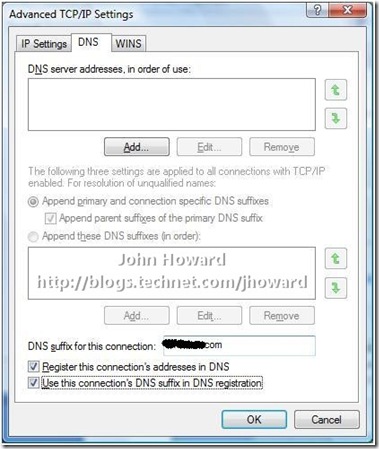
Hmmmm. These look extremely promising . Logically, it sounds like I want all three: I want to specify a DNS suffix for this connection which is that of my internal domain; Yes, I want to register the connection’s address in DNS; and I’d like to use the DNS suffix in the DNS registration. So I changed it to look like this:
After saving the changes, let’s run that DNS-filtered network trace on the ISA server again while re-establishing the VPN connection:
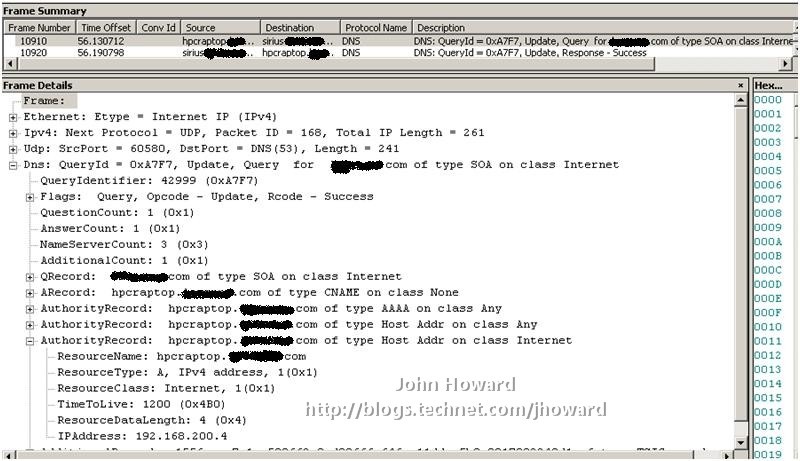
Looks good as a DNS update was sent to the internal DNS servers, not to the external ISP. It shows the update for the IPv4 address of the remote management client as 192.168.200.4 with a success response in the following packet. And ipconfig on the client?
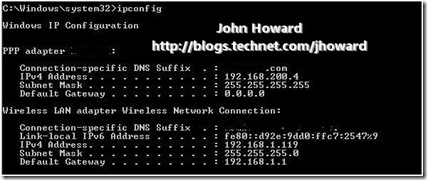
This confirms the trace above – the remote management client has IP address 192.168.200.4. What about an nslookup of the laptop?

Excellent. Everything is looking rosey – the DHCP assigned IP address of the laptop acquired from the VPN connection is in DNS on the internal servers. Therefore, the Hyper-V enabled server should be able to locate the laptop when making it’s DCOM callback, so let’s fire up Hyper-V manager and see what happens:

Voila! Hope you found that useful.
Cheers,
John.