Your first DevTest Labs artifact – PowerShell scripts
In my last post, I talked about how to create a custom Azure DevTest Labs artifact JSON file, but I also said you’ll probably need some kind of script to go along with it. In this post, I’ll show you some tricks and tips I’ve discovered (and been shown) to help make creating your own, custom artifacts a breeze. If you missed my last post, you might want to go catch up. If you have no idea what I’m talking about here, you might want to go back to the very beginning.
To quickly recap, the JSON file is necessary for a multitude of reasons including it’s how DevTest Labs knows anything about your artifact, but also because it’s what triggers the script to be run and provides any necessary pipeline inputs needed to make your script “go” if you need to prompt for information.
Let’s get started. I’m going to use a super basic PowerShell command example because the point of this post is not to each you PowerShell, but to show you how to quickly, and easily, create a PowerShell script-based artifact. In fact, here’s the PowerShell command we’re going to run:
start-sleep
That’s right. We’re just going to pause the action. Bear with me, we’ll do some other cool things too.
So, that’s it. Create a PowerShell script file named sleep.ps1, tell the corresponding JSON file’s runCommand section to run the sleep.ps1 script with no parameters, upload and sync your artifact folder from your GitHub repo to DevTest Labs, and you’re done. Seriously, that’s it. Unless it isn’t.
Bonus tip: if you do all that and your custom artifact never shows up in DevTest Labs, it’s most likely your JSON file’s fault and not your shiny new script’s. Go check your syntax and try sync’ing again.
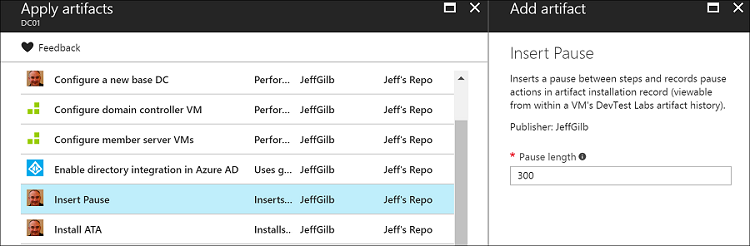
Assuming your custom artifact has safely arrived in DevTest Labs, it’s time to go apply it to a running VM and see what happens:
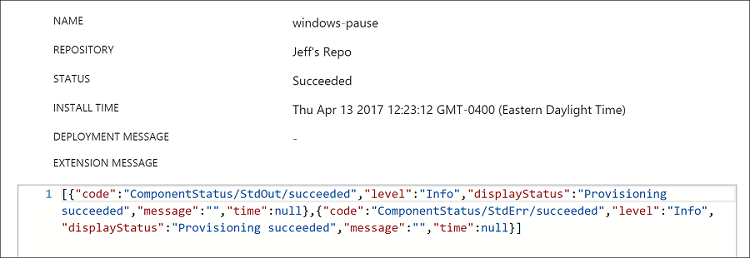
Hopefully everything runs smoothly and the artifact returns success:
Now, sadly, anyone who knows me knows that I’m no PowerShell guru, but I do know enough to be dangerous to my VMs. What this means is that sometimes I learn by simply pushing buttons to see what happens…and then generally spend a lot of time perusing log files and deciphering error messages. Unfortunately, if you don’t build in some error checking in your scripts, you’ll never have anything to troubleshoot. In the end, you also usually spend more time trying to figure out what went wrong than it takes to fix the issue. This can be frustrating when you’ve told a computer to do something ill-advised and it dutifully complies. Case in point, the artifact history below shows that it ran successfully by dutifully running the script, but there’s something amiss (the big red arrow is a hint):
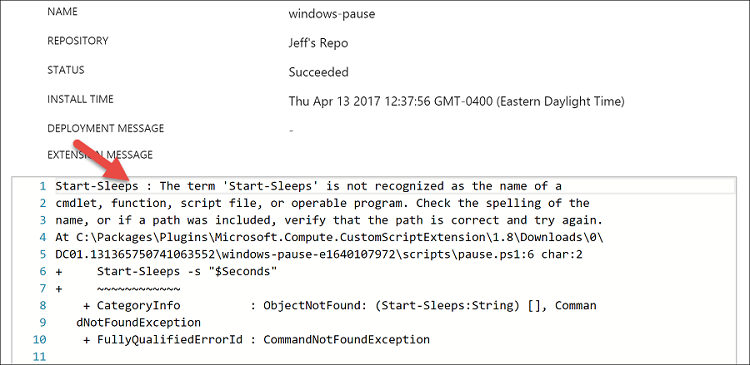
Oops. Typo. It’s supposed to be start-sleep, not start-sleeps. The artifact ran the script successfully so its status shows succeeded, but that doesn’t help us much because it successfully executed a flawed script. Maybe we should do something to stop that from happening and point out our scripting deficiencies more clearly at the same time.
Like I said, I’m no PowerShell guru so adding error logging to scripts is not something I do every day. Luckily, it’s easy to figure out how to do: just go look at some of the artifacts already existing in the Azure DevTest Labs artifact repos and see what they did. You’ll probably notice that a lot of those artifacts contain pretty much the same kind of error catching wrapper for script commands. This is something I didn’t notice at first, but a very kind, very exasperated Azure DevTest Labs developer, who was probably tired of responding to my troubleshooting questions, pointed it out to me. So, I’ll now I'll pay it forward and show you the easy way to add error logging to your script.
Unless you’re a PowerShell guru who’d rather code error catching yourself, I’d suggest starting off by copying the code below as the first step in writing a PowerShell script that wants to grow up to be part of an Azure DevTest Labs artifact:
Note: When you tell a VM to pause (sleep), it’s helpful to tell it how long you’d like that pause to be. So, I’ve added a prompted parameter value in my JSON file to ask the user how long they’d like to pause the computer in seconds ($Seconds). When you have prompted values like that, you need to let the script know the value is coming and I do that in a top section (param) that you’ll see in the example. If you don’t have prompted values, then you don’t need that param section, just delete it.
 param(
     [Parameter(Mandatory = $true,valueFromPipeline=$true)]
            [String] $Seconds
)
###################################################################################################
# PowerShell configurations
# NOTE: Because the $ErrorActionPreference is "Stop", this script will stop on first failure.
#      This is necessary to ensure we capture errors inside the try-catch-finally block.
$ErrorActionPreference = "Stop"

# Ensure we set the working directory to that of the script.
pushd $PSScriptRoot
###################################################################################################
# Functions used in this script.
function Handle-LastError
{
   [CmdletBinding()]
   param(
   )

   $message = $error[0].Exception.Message
   if ($message)
   {
       Write-Host -Object "ERROR: $message" -ForegroundColor Red
   }

   # IMPORTANT NOTE: Throwing a terminating error (using $ErrorActionPreference = "Stop") still
   # returns exit code zero from the PowerShell script when using -File. The workaround is to
   # NOT use -File when calling this script and leverage the try-catch-finally block and return
   # a non-zero exit code from the catch block.

   exit -1
}
###################################################################################################
# Handle all errors in this script.
trap
{
   # NOTE: This trap will handle all errors. There should be no need to use a catch below in this
   #       script, unless you want to ignore a specific error.
   Handle-LastError
}
###################################################################################################
# Main execution block.

try
{
     Start-Sleep -s "$Seconds"
}
finally
{
   popd
}
I am not going to go through each section of this example or discuss try/catch/finally blocks here because it’s all fairly self-explanatory. However, one thing you might want to look into is the $ErrorActionPreference value. When an error is encountered, and that value is set to stop, the script…stops—even if it normally would have continued if you ran it manually. If you set that preference to something like continue instead of stop, you’ll get a different experience. I do that sometimes when I have a nagging error that isn’t very impactful to my script execution and I don’t have the time or inclination to fix it properly (plus, I get lazy sometimes). Moving on.
You’ll spend most of your time with this code in the try block. All the action goes down between those {} ’s in the try block (unless you’ve broken something). In this super simple example, the start-sleep PowerShell command is being told to run and execute for $Seconds long. So, if someone entered 5 for the $Seconds value when prompted by the artifact JSON file (DevTest Labs artifact UI), it would pause the VM for five seconds when executed. Easy enough, right?
Now, with error catching, let’s see what happens when the artifact is applied to a VM:
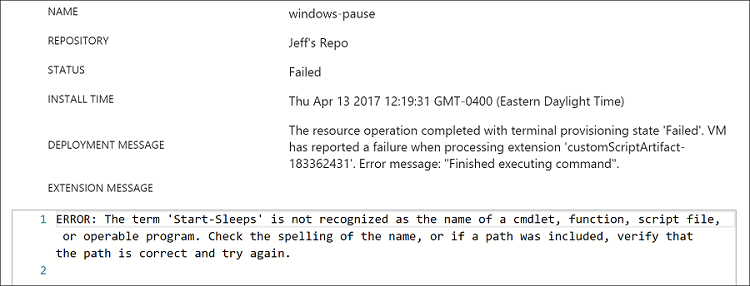
That’s better, sort of. The artifact now knows it has failed (because the script’s -1 returned error code tells it so) and we can also clearly see the syntax error that made things go wonky.
It’s nice to know when and why things go wrong, but wouldn’t it still be nice to know when things go right too? Sometimes just having a record of what an artifact does (some can get complicated) is pretty handy. Maybe it’s just because I’m an old SMS/SCCM guy, but isn’t everything better with a bunch of logging? I think so. So, after many minutes spent pondering the mysteries of PowerShell scripting and trying to come up with an overly-complicated logging option…I finally decided to just use write-host. See, the cool thing about running artifacts is that the logging basically just shows you what you’d see if you ran the script interactively. So, write-host does the job with no muss and no fuss. That’s me. Master of the simple.
What might be interesting about watching a VM pause itself in this example you might ask. A harder question to answer than you might think since I’ve picked such a simple PowerShell command, but I finally decided that I’d have the artifact record the start and stop times for when it was paused. Again, super simple example, but hopefully you get the idea behind finagling some custom logging out of your artifact. My try block now looks like this:
 try
{
     $currentTime = Get-Date
     Write-Host "Started pause at $currentTime."
     Start-Sleep -s "$Seconds"
     $currentTime = Get-Date
     Write-Host "Pause completed at $currentTime."
}
And the resulting artifact history, after I fixed the typo and added the write-host lines, looks like this:
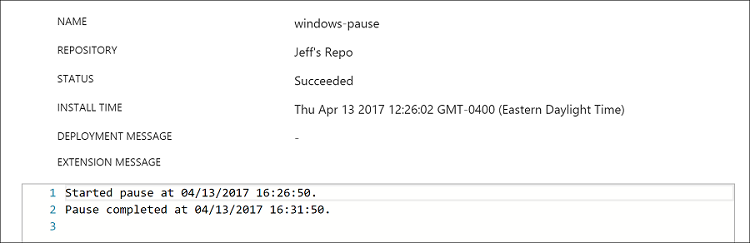
Whether you noticed this or not, if you’re new to PowerShell you now have a few interesting tidbits of know-how that can be applied with or without Azure DevTest Labs artifacts running your script for you. You can prompt for pipeline input, you can catch errors, and you can write out some basic logging information. Not a bad day’s work, but making DevTest Labs do all the work, including running the script, is much more satisfying. Go see for yourself.
You’ve seen my blog; want to follow me on Twitter too? @JeffGilb.