ISA 2006 & TMG 2010 – CA interna: creare subject alternative names in un certificato
Capita spesso di utilizzare gli “alternative names” (SANs), in particolar modo se stiamo configurando dei servizi come Outlook Anywhere, OWA e Active Sync per Exchange e li vogliamo pubblicare attraverso TMG/ISA. Sotto queste circostanze ciò di cui abbiamo bisogno è un web server certificate con SANs.
E’ un qualcosa che possiamo eseguire direttamente attraverso la Microsoft Internal CA. Tuttavia ci sono alcuni passaggi da effettuare prima di ottenere un nuovo certificato che utilizza SANs.
Sostanzialmente abbiamo due modi diversi per generare un web certificate con SANs, esclusa la power shell console di Exchange che qui non prenderemo in considerazione e sono :
- attraverso il certsrv website e IIS7/IIS6 (non raccomandato per motivi di sicurezza)
- direttamente attraverso mmc --> certificates console
Vedremo solo come creare un certificato con SANs da mmc, essendo il primo modo non raccomandato da Microsoft per motivi di sicurezza.
Dal technet sappiamo che:
Security best practices for allowing SANs in certificates
The following are security best practices for allowing SANs in certificates:
- In general, the use of user-defined SANs can increase the risk of impersonation attacks because it allows a user to specify arbitrary names in a certificate request. Because user input can be abused by persons with malicious intent, precautions should be taken to mitigate the risks associated with the use of user-defined SANs and protect the integrity of your public key infrastructure (PKI).
- Certificate requests that contain SANs should be held in a pending state until they can be reviewed by a certificate manager. For information about configuring certificate templates to require certificate manager approval.
- Implement administrative procedures for reviewing pending certificate requests and verifying the requester is authorized to use the requested subject names.
- Implement separation of duties and role-based administration to ensure that individuals who can request certificates with SANs cannot also issue them.
- Restrict usage of SANs to only those individuals that require it, such as administrators who install Web server certificates. For information about configuring certificate template security.
- Do not enable EDITF_ATTRIBUTESUBJECTALTNAME2 on an enterprise CA. If this is enabled, user-defined SANs are allowed in every certificate request and certificates are issued without certificate manager approval.
- Whenever possible, specify a SAN by using certificate extensions instead of request attributes to avoid enabling EDITF_ATTRIBUTESUBJECTALTNAME2.
- If you must enable EDITF_ATTRIBUTESUBJECTALTNAME2, consider adding to your PKI a standalone CA that issues only certificates with SANs.
- If you must use SAN attributes because your server that requires a certificate with a SAN is running Windows Server 2003, consider completing certificate enrollment procedures on a computer that is running Windows Server 2008 R2, Windows Server 2008, Windows 7, or Windows Vista.
http://technet.microsoft.com/it-it/library/ff625722(WS.10).aspx
Tuttavia prima di procedere con la creazione del certificato da mmc console abbiamo bisogno di duplicare il template “web server” e renderlo visibile sotto mmc -> certificate.
Per eseguire questo passaggio dovremo aprire la certificate authority e sotto “certificate templates” fare click sul tasto destro del mouse e scegliere “manage”. Apriremo la certification template console dove dovremo duplicare il template “web server” e dare il permesso per essere visibile sotto mmc certificate console, selezionando “enroll” sotto la security tab per “authenticated users”.
Attenzione: il template version deve essere V2 e non V3 (2003 e non 2008) se vogliamo utilizzare certsrv web site e un nuovo template duplicato. Questo è tuttavia vero solo sotto certsrv web site.
La limitazione non è vera se utilizziamo la seconda opzione.
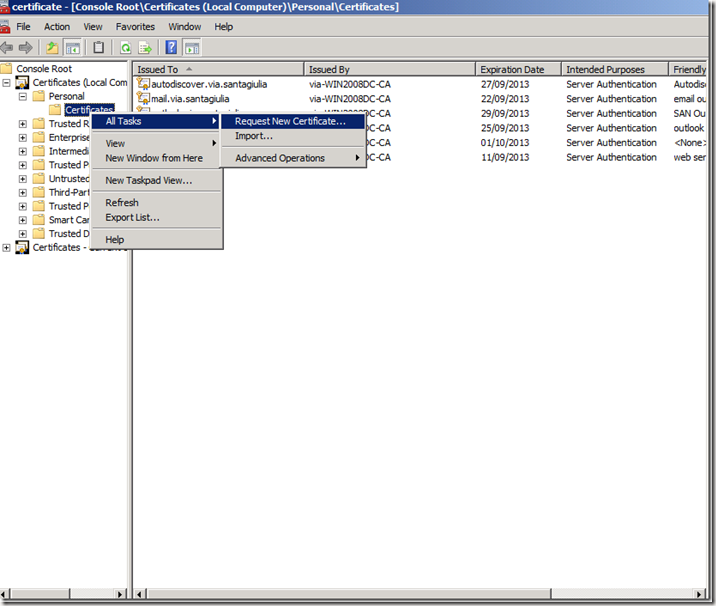
Una volta che abbiamo aperto e abbiamo espanso local computer –> personal, dovremo cliccare sul tasto destro del mouse e scegliere “all task” e “request new certificate”.
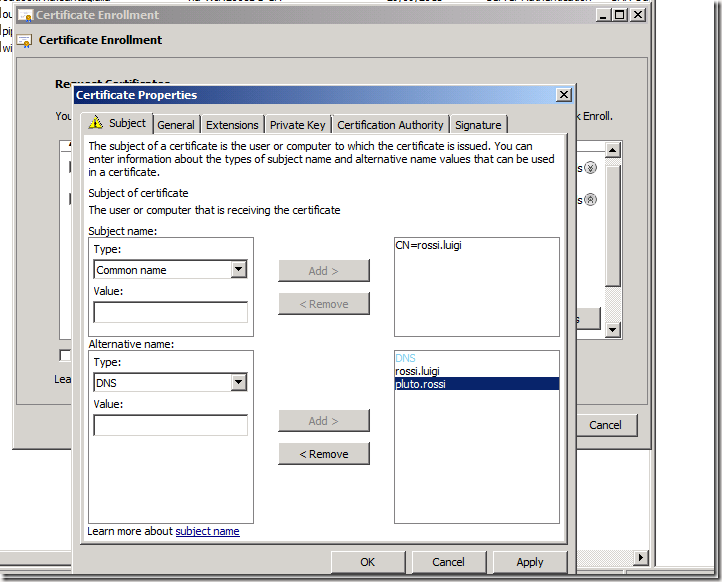
Poi dopo aver digitato per due volte “next” e scelto il template model “web server” che abbiamo precedentemente duplicato, come possiamo vedere qui, dobbiamo selezionarlo e sotto details premere il tasto “properties”.
In questo passaggio sotto il subject tab otteniamo i due campi che stavamo cercando:
- -Subject name -> type-> CN
- Alternative name -> type-> DNS
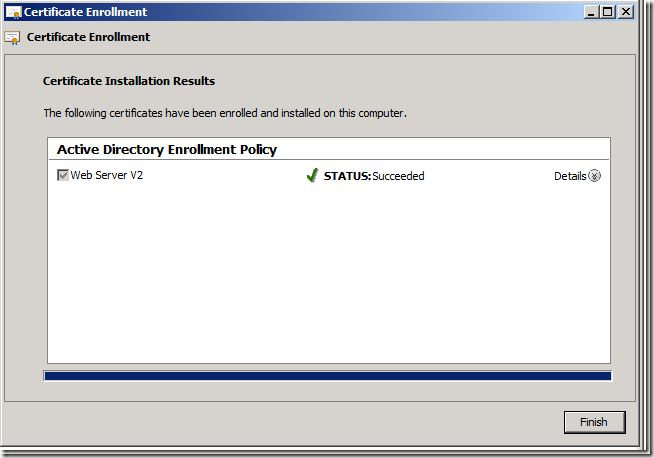
Premendo infine “ok” ed “enroll”, se tutto va a buon fine dovremmo ottenere:
A questo punto il certificato è stato correttamente creato e installato sotto la certificate store.
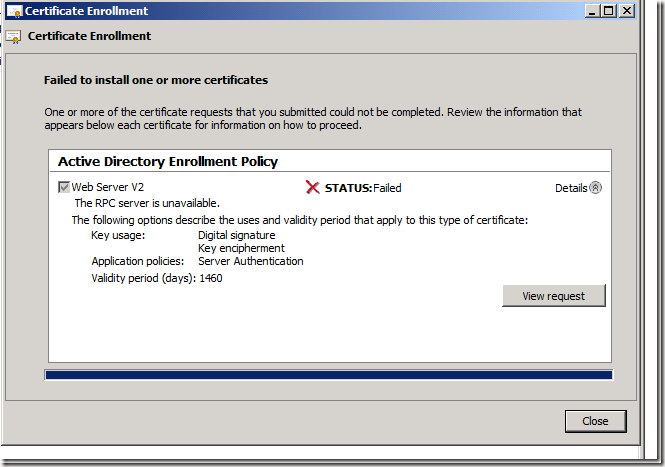
Tuttavia da TMG/ISA c’è qualcosa da fare prima di registrare il certificate. Infatti by design TMG/ISA blocca DCOM, ottenendo qualcosa di simile:
Questo è confermato dal seguente risultato ottenuto attraverso il comando certutil:
- certutil -ping -config "WIN2008DC.domain.it\domain-WIN2008DC-CA"
- Connecting to WIN2008DC.domain.it\domain-WIN2008DC-CA ...
Server could not be reached: The RPC server is unavailable. 0x800706ba (WIN32: 1722)
Sotto TMG/ISA abbiamo bisogno di disabilitare: “edit system policies” -> “authentication services” -> “enforce strict RPC compliance” e applicare.
Questo perchè TMG/ISA by design blocca DCOM (Si ottiene questo errore perchè DCOM è richiesto per acquisire un certificato. Con la configurazione di default, il traffico DCOM è bloccato).
In ogni caso, nel momento in cui stiamo provando a generare un nuovo SAN certificate, da qualunque macchina lo si stia facendo, possiamo sempre eseguire il seguente test per verificare la CA availability:
- C:\Windows\system32>certutil -ping -config "FQDN\CA_Name"
E se tutto è giusto dovremmo ottenere:
- C:\Windows\system32>certutil -ping -config "WIN2008DC.domain.it\domain-WIN2008DC-CA"
- Connecting to WIN2008DC.domain.it\domain-WIN2008DC-CA ...
- Server "domain-WIN2008DC-CA" ICertRequest2 interface is alive
- CertUtil: -ping command completed successfully.
Abbiamo così creato con successo, fatto un troubleshooting e importato il nostro nuovo SAN certificate in due maniere differenti.


