Using Windows Server Update Service for the TMG Update Center
Introduction
With the recent release of TMG and its dependency on Microsoft Updates for Network Inspection System (NIS) and Enhanced Malware Protection (EMP) updates, this seems like a good time to help you create a policy that will ensure TMG successfully obtains updates through your Windows Server Update Services (WSUS) deployment. This TMGBlog posting discussed the fine details of NIS configuration. When using WSUS to obtain NIS and EMP updates, there are a few things you need to understand about this process:
1. Depending on how you install WSUS, the installer may configure the WSUS web site to listen for client connections on port 8530. This means that a WSUS client will use HTTP to port 8530 when checking for and downloading updates from your WSUS server.
2. There is no WSUS protocol definition in TMG. This means that TMG may be unable to connect to your WSUS server using this port.
Basically, you have two options to resolve this state; either create a WSUS traffic policy or change the default WinHTTP proxy settings.
Note: there is no benefit in performing both tasks. If you change the WinHTTP proxy configuration, the custom traffic policy will not be used.
1. The WinHTTP proxy settings option requires that you define the proxy configuration for WinHTTP clients that allow WinHTTP to self-determine the proxy. WinHTTP is a somewhat less capable in its proxy support than Internet Explorer; specifically, it cannot be told to use a specific proxy script. By default, WinHTTP uses proxy auto-detection via the WinHTTP Web Proxy Auto-Discovery Service or a static proxy server with specific bypass list entries. The advantage to this option is that need not create a custom traffic policy. The disadvantages to this is that it can adversely affect other WinHTTP consumers and will not be exported with TMG policies should you need to rebuild the server.
2. Create a custom WSUS traffic policy. This requires that you define a custom protocol for WSUS and that you use that custom protocol in an access rule. The advantage to using this method is that you need not change the WinHTTP proxy settings, which can affect more than just Windows Update mechanisms. For instance, certificate revocation requests via HTTP also use WinHTTP. The primary disadvantage to using a custom policy is that this method does not take advantage of the Web proxy or associated filters (NIS, EMP, URL Filtering).
Update Center Configuration
In order for TMG to receive NIS or EMP updates from your WSUS server, you have to choose a configuration that supports this process. Thus, the first order of business is to make sure TMG is configured properly. If you ran the Getting Started Wizard, the following steps may simply verify the proper settings.
1. In the TMG management console left pane, select Update Center
2. In the TMG management console right pane
a. Select the Tasks tab
b. Click Configure Settings
3. In the Update Center Properties page
a. select the Microsoft Update tab
b. ensure “Use the Microsoft Updates service…” is selected as shown below
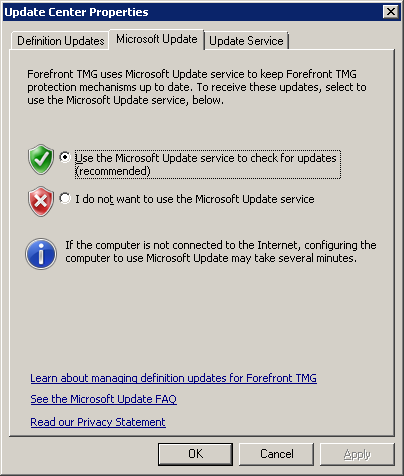
Figure 1 Microsoft Update tab
c. select the Update Service tab
d. select “Use the computer default service only…” as shown below
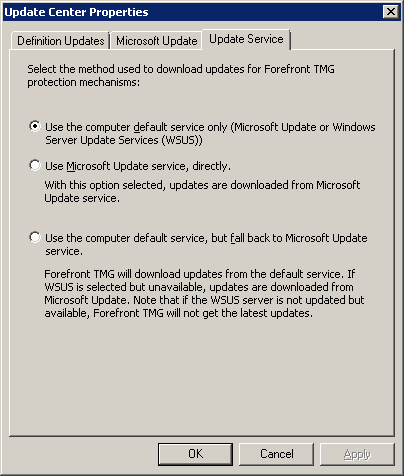
Figure 2 Update Service tab
Notes:
1. Selecting “Use Microsoft Updates service, directly” will cause TMG to ignore the computer configuration that directs it to use WSUS for NIUS and SMP updates.
2. Selecting this option ensures that TMG checks for and obtains NIS and EMP updates from your WSUS service only. If you want TMG to fall back to Microsoft Updates in the event your WSUS service is unavailable, you should select “Use the computer service, but fall back to Microsoft Updates.”
e. Click OK to close the Update Center Properties page.
4. When prompted in the TMG management console center pane, click Apply to save the changes
5. In the Configuration Change Description page
a. enter any comments that you like
b. click Apply again
6. In the Saving Configuration Changes page, click OK
Define the WinHTTP Proxy Configuration
One of the things that can affect your TMG ability to reach Microsoft Updates or your WSUS server is the WinHTTP proxy configuration. In most cases, you don’t need to make any changes, but in some deployments, you may have to configure the proxy configuration used by WinHTTP. If you configured NIS and EMP to download directly from Microsoft Updates and this has been failing, you need to configure the WinHTTP proxy settings. The good news is that this process is much cleaner and simpler in Windows 2008 than it was for Windows 2003.
Start an elevated command window
1. Click Start, then select All Programs, then Accessories
2. Right-click Command Prompt and select Run as administrator
Examine the WinHTTP Proxy settings
1. In the elevated command window, enter the following command and hit <Enter>
netsh winhttp sho proxy
The default settings are shown below
C:\>netsh winhttp sho proxy
Current WinHTTP proxy settings:
Direct access (no proxy server).
2. To change the WinHTTP proxy settings and include the internal domain (contoso.com, in this example) as part of the bypass list, enter the following command and hit <Enter>
netsh winhttp set proxy localhost:8080 “<local>;*.contoso.com"
The results of this command should appear as:
C:\>netsh winhttp set proxy localhost:8080 "<local>;*.contoso.com"
Current WinHTTP proxy settings:
Proxy Server(s) : localhost:8080
Bypass List : <local>;*.contoso.com
Note: the bypass list must be entered as a semi-colon-delimited list, surrounded by double quotes.
Verify the TMG Local Host proxy settings
1. In the TMG management console left pane, select Networking
2. In the TMG management console center pane,
a. Select the Networks tab
b. double-click the Local Host network
3. in the Local Host Properties page
a. select the Web Proxy tab
b. verify that the settings appear as shown below
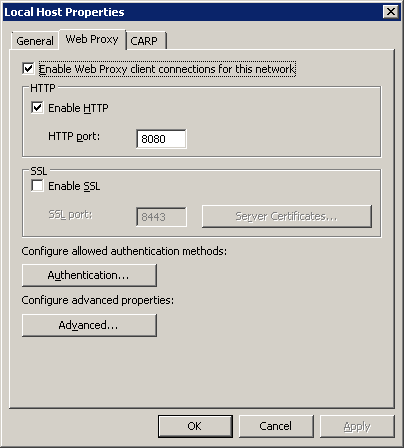
Figure 3 Local Host proxy settings
If the settings differ from those shown, change them to match the figure and save the changes.
Create a WSUS Traffic Policy
Luckily, creating a rule that allows this communication is simple. You do it by performing the following steps.
Create the access rule.
1. In the TMG management console left pane:
a. right-click Firewall Policy
b. select New, then Access Rule
2. in the Welcome to the New Access Rule Wizard page,
a. enter WSUS from TMG
b. click Next
3. in the Rule Action page
a. select Allow
b. click Next
4. in the Protocols page, click Add
5. in the Add Protocols page, click New, then Protocol
6. in the Welcome to the New Protocol Definition Wizard, enter WSUS Client and click Next
7. in the Primary Connections Information page, click New
8. in the New/Edit Protocol Connection page:
a. select TCP in the Protocol type: drop-down
b. select Outbound in the Direction: drop-down
c. enter 8530 in the Port Range From: and To: boxes
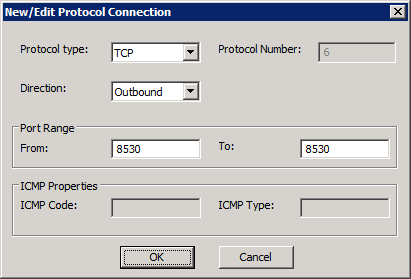
Figure 4 Custom protocol details
d. click OK to close the New/Edit Protocol Connection page
9. in the Primary Connections Information page, verify that the summary agrees with the data in 8.a through 8.c and click Next
10. in the Secondary Connections Information page, leave the defaults and click Next
11. in the Completing the New Protocol Definition Wizard page, verify that the summary agrees with the figure below and click Finish
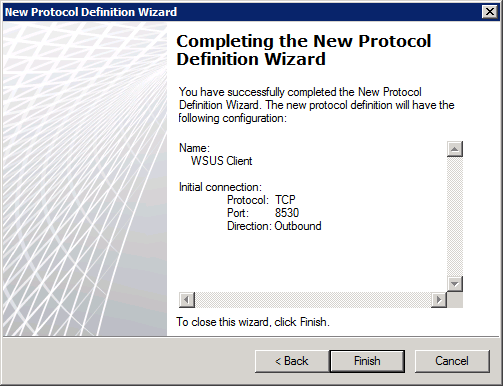
Figure 5 Protocol summary
12. in the Add Protocols page
a. expand User-Defined
b. select WSUS Client
c. click OK, then Close
13. in the Protocols page, click Next
14. In the Access Rule Sources page, click Add
15. In the Add Network Entities page
a. Expand Networks
b. Select Local Host
c. click Add, then Close
16. In the Access Rule Sources page, click Next
17. In the Access Rule Destinations page, click Add
18. In the Add Network Entities page, Click New, then Computer
19. In the New Computer Rule Element page
a. Enter WSUS Server in the Name field
b. In the Computer IP address: field, enter the IP address of your WSUS server
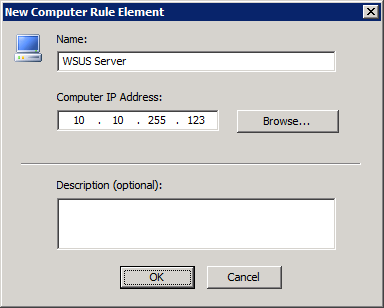
Figure 6 WSUS server IP address
c. click OK
20. In the Add Network Entities page
a. expand Computers
b. select WSUS Server
c. click Add, then Close
21. In the Access Rule Destinations page, click Next
22. In the User Sets page, click Next
23. In the Completing the New Access Rule Wizard page, click Finish
24. When prompted in the center pane, click Apply to save the changes
25. In the Configuration Change Description page
a. enter any comments that you like
b. click Apply again
26. In the Saving Configuration Changes page, click OK
Your new policy rule will appear as shown below:
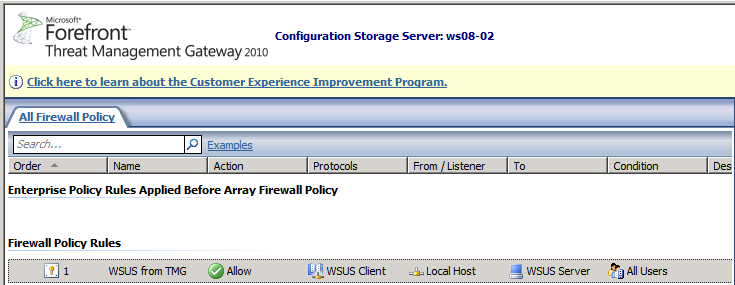
Figure 7 Custom WSUS policy
Testing the New Configuration
After you set your chosen configuration, you should verify that it works as expected. The best way to do this is to use the TMG Update Center, since this is the process you’re trying to support. To do this:
1. In the TMG management console left pane, select Update Center
2. In the right pane
a. select the Tasks tab
b. click Install New Definitions.
The display will change to indicate that TMG is checking for updates as shown below:
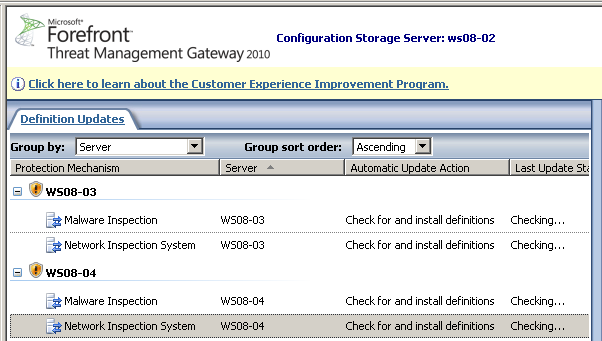
Figure 8 Checking for updates
When the updates are successfully validated and installed, the display will change as shown below:
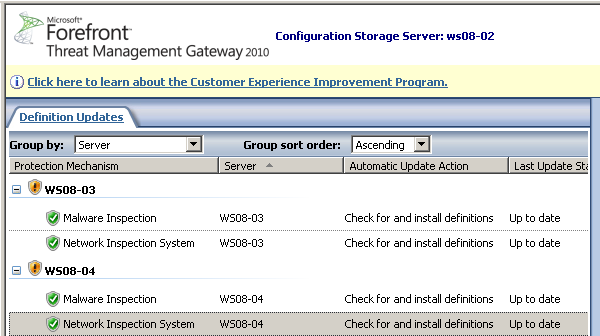
Figure 9 Signatures up-to-date
All Done
The steps in this article provide two supportable methods for ensuring that your TMG Update Center is able to quickly and reliably detect, acquire and install updates for NIS and EMP. Proper configuration and monitoring of this mechanism is critical to ensuring that you have the latest TMG traffic protection updates in place.
Author
Jim Harrison, Program Manager, Forefront Edge CS
Tech Reviewers
Bala Natarajan, Senior Support Engineer, FF Edge Beta