Walk-through for RSA SecurID Delegation for ISA Server 2006
Walk-through for RSA SecurID Delegation for ISA Server 2006
Note: Many of the steps outlining the configuration of the RSA Authentication Agent software are not directly supported by Microsoft. They should be used as a guideline to help familiarize and guide you in this configuration. For additional assistance in directly configuring the RSA Authentication Agent Software, please review your RSA SecurID documentation.
Prerequisites:
· You have configured RSA SecurID Authentication on your ISA 2006 Web Listener; you are successfully publishing a Web resource using SecurID Authentication and you would now like to configure SecurID Delegation in your Publishing rule.
For additional information on how to configure RSA SecurID Authentication for ISA 2006, please see the following blogs:
· You have installed the RSA Authentication Agent for Web for IIS on the Published Web resource and the Published Web resource has been successfully configured as an Agent Host on the RSA Authentication Manager Server. For more information, please reference your RSA documentation.
RSA Authentication Agent for Web for IIS Configuration
· Domain secret and SecurID cookie
Important Note: To allow a SecurID cookie to be generated by ISA Server, and then trusted by the RSA Authentication Web Agent, the same domain secret must be shared on the ISA Server computer and the Web Agent. When exporting the domain secret on the Web Agent computer, verify that the Domain name text box in the Manage Domain Configuration dialog is cleared. If a domain name is entered in the text box, a failure will occur when importing the domain secret to the ISA Server computer.
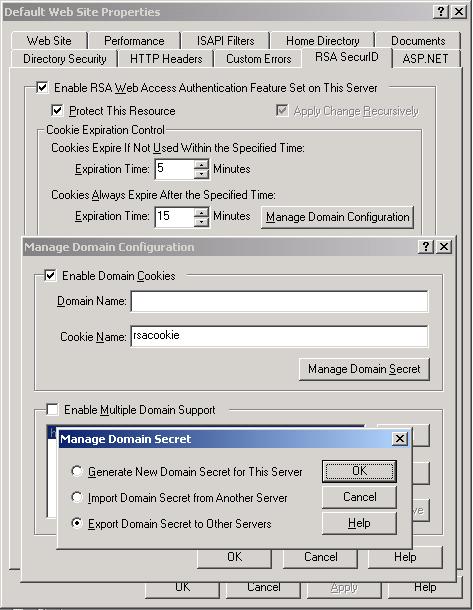
1. In IIS, open the properties of the published web site and select the ‘RSA SecurID’ tab.
2. Click the ‘Manage Domain Configuration’ button. Select the ‘Enable Domain Cookies’ checkbox.
3. Clear the ‘Domain Name’ field. In the ‘Cookie Name’ field, enter a name for the SecurID cookie that will be generated by ISA server and trusted by the RSA Web Agent (i.e. rsacookie).
4. Click the ‘Manage Domain Secret’ button. Select the ‘Export Domain Secret to Other Servers’ radio button and click ‘OK’.
5. Save the Domain Secret file with the default filename of ‘domain.sdi’. You can save this file anywhere you’d like.
·
ISA 2006 Cookie Compatibility
To enable versions greater than 5.0 of RSA Authentication Agent for Web for Internet Information Services to work with Internet Security and Acceleration Server (ISA) 2006, you must perform the following procedure:
1. On the published web server, log on as Administrator.
2. Click Start > Run and in the Run dialog box, enter regedit.
3. In the Registry Editor, click HKEY_LOCAL_MACHINE\SOFTWARE\SDTI\RSAWebAgent.
4. In the right pane of the Registry Editor window, right-click, and then click New > DWORD Value.
5. For the new value name, enter Agent50CompatibleCookies.
6. Right-click Agent50CompatibleCookies and select Modify.
7. In the Edit DWORD Value dialog box, in the Value data field, enter 1.
8. On the published web server, open the IIS Manager and in the left pane double-click Web Sites, then right-click Default Web Sites.
9. In the Default Web Site Properties dialog box, click the RSA SecurID tab, and select Ignore Browser IP Address for Cookie Validation.
ISA 2006 Configuration
· Domain secret and SecurID cookie
1.
1. Copy the Domain Secret file (i.e. domain.sdi) you previously created from the published web server to the ISA server. You can save this file anywhere you like.
2. Open the Properties sheet of the Web Listener and select the ‘Authentication’ tab.
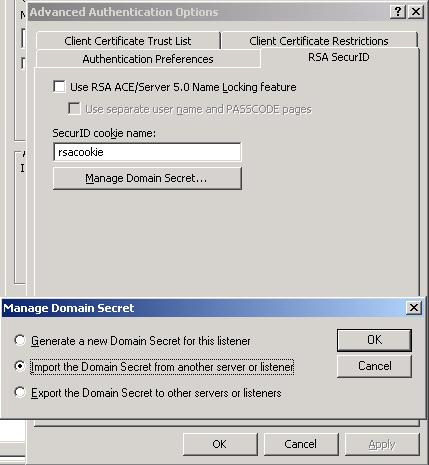
3. Click the ‘Advanced’ button and select the ‘RSA SecurID’ tab.
4. In the ‘SecurID cookie name’ field, type the name of the cookie you specified above in the ‘Manage Domain Configuration’ dialog of the RSA Authentication Agent for Web for IIS (i.e. rsacookie).
5. Click the ‘Manage Domain Secret’ button.
6. Select the ‘Import the Domain Secret from another server or listener’ radio button and click ‘OK’.
7. Select the Domain Secret file you copied to the ISA server (i.e. domain.sdi).
8. Click ‘OK’ on all dialog boxes and Apply the settings in the ISA MMC.
· Ignore browser’s IP address for cookie validation
1.
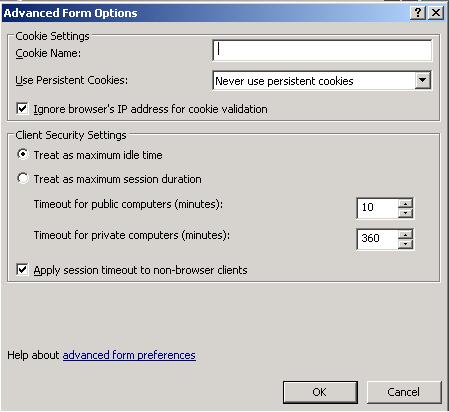
1. Open the Properties sheet of the Web Listener and select the ‘Forms’ tab and click the ‘Advanced’ button.
2. Check the ‘Ignore browser’s IP address for cookie validation’ checkbox. NOTE: you can leave the ‘Cookie Name’ field blank.
3. Click ‘OK’ on all dialog boxes and Apply the settings in the ISA MMC.
· Set Delegation method
1.
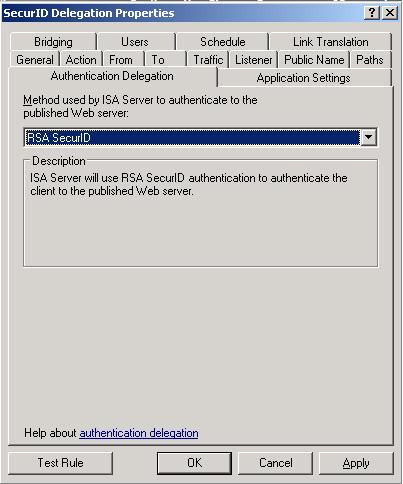
1. Open the Properties sheet of the Publishing rule and select the ‘Authentication Delegation’ tab.
2. In the drop-down list, select ‘RSA SecurID’
3. Click ‘OK’ and Apply the settings in the ISA MMC.
Richard Barker
Senior Support Engineer