Configuration Manager 2012: Task Sequence Export and Import
Export and Import – Version 2!
As we looking at Configuration Manager 2012 Release Candidate 2, I would like to go over a new feature that was introduced. Starting with ConfigMgr 2012 RC2, we have updated the import and export experiences around task sequences. If you are familiar with ConfigMgr 2007, you already know we have a way to import and export a task sequence which preserves the steps implemented for an operating system deployment. What was lacking from the existing import and export was to go beyond the metadata of the task sequence and preserve the administrator intent. Starting in ConfigMgr 2012 RC2, the existing import and export functionality has been replaced with an updated version that allows for not only the export of the task sequence, but an export and import of the related objects for the task sequence. If you used the Application import and export features in ConfigMgr 2012, it is a very similar experience.
So let’s go over some of the details….
From you Configuration Manager 2012 console, create a new operating system deployment task sequence. As part of your task sequence add a lot of different actions to see the relationship mappings in action. Make sure you add an Operating System Image, a Boot Image, a Client Agent package, a Driver Package and add some applications that have some dependencies.
Export:
Now select the task sequence and let’s walk you through the new export:
Select a task sequence or even multiple ones if you need to move several from one hierarchy to another. If you select more than one task sequence they are all stored in one export file.
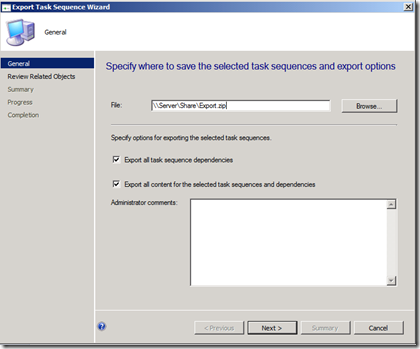
Enter a location and name for the export. If you browse, we will append a .zip to the end of the file. If you type in a location, make sure the file ends in .zip.
On the initial screen you have a few options:
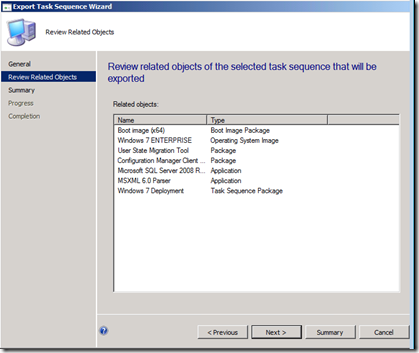
- Export the task sequence with dependencies. This will scan for all the related objects. This will include the dependencies for applications.
- If you uncheck this checkbox, it will just take the task sequence without any dependencies. Similar to ConfigMgr 2007, but in a new format.
- Export all content for selected task sequence and dependencies. This option will copy the content from the package source to the export location. On import it will use the import path as the new package source location.
- If you do not select this option, the location of the original package source will be retained at import.
The final output of the wizard will be a .zip file if there is no content or a .zip file and a folder named {export}_files (where {export} is the name of the .zip file) that contains the content required for the export. If you include content in your export, make sure you copy the .zip file and the {export}_files folder or your import will fail.
NOTE: If you want to use a different directory structure than the output of the export wizard. Export the task sequence without content. After import use the SDK to update the path to a new file server.
Import:
Now that you have exported your task sequence let’s walk through some of the features around import. When we import objects we retain some metadata about the original location that the export came from. This is a combination of package ID and site GUID for all objects except applications. For applications we have a proper GUID, so we retain the GUID so we know the application is unique. This is to help out with conflict resolution when objects are shared across multiple exports.
So let’s walk through the import:
- On the first page, you browse to or type in the path to the zip file you previously exported.
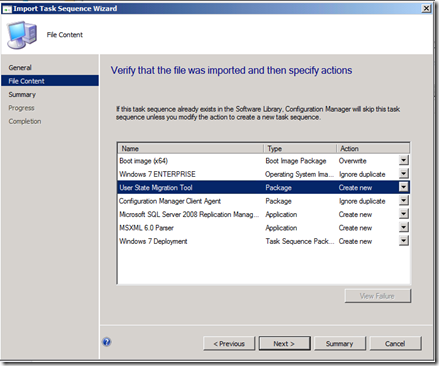
- The second page is the File Content page. It shows all the objects that will be imported. This is where we can see if items have been previously imported. On this page you will see a few actions. Select the action required for your import.
- If the object has never been imported, there is an action to Create New.
- If the object has been previously imported, we have two options:
- 1. Ignore Duplicate (default). This means it will not import the object, but it will link the already existing object to the task sequence.
- 2. Overwrite. This will overwrite the existing object with the one being imported. (For applications there is an add revision to update the existing application or create new to create new application instead of the adding a revision to the previously imported one).
- You will now see a progress screen as we import the objects. Depending on the size of the import, this may take some time.
Upon completion, you will need to update any passwords as those are not carried forward to ensure security. Once you do that, you now have a functional task sequence that is ready to deploy!
Some additional notes:
- When export and importing a boot image, both the export and import site need to have the same version of WinPE. If you update a site to WinPE 3.1, a export/import will fail with WinPE 3.0.
- An application may not be detected as a duplicate even though it was previously imported. If the application was previously imported at Site 1 and the imported again at Site 2, it will be considered a new application. This is consistent with the Application Import wizard in the console. It is a best practice to import all objects at the CAS.
- Passwords stored in the task sequence are not exported. When you edit the task sequence the password field will have a masked value. The value was not part of the export and is null. Ensure you update passwords for Domain Join, map network drive and Run command line actions.
- References for disabled steps will not be exported. When a step is disabled the reference is not considered valid. As part of the export we will export all the data for the step, but not the reference package. An example is you have a Run Command Line action that references PKG00001, a "Scripts” package. When an export is performed, we will record all the information about the command line, timeout, etc but will not export the reference of PKG00001.
- When importing a task sequence that has a reference to an Application; The application was imported and then an edit was made, the revision history on the application is incremented. If you reimport that application, it will detect a difference in the application and allow you to ignore it (link to the one you edited) or add a revision. If you add a revision it will change the metadata of the application to the metadata in the export file. If you accidently revise an app, you can go to revision history of the application and restore the revision. This is consistent with the Application Import wizard in the console.
- On export of a task sequence if you reference the built-in task sequence package for the “Setup Windows and ConfigMgr” step, the package will not be exported. This is to ensure you are using the correct client version for the import hierarchy. If you created your own client agent package, the reference will be exported as it is seen as unique. On import of a task sequence, the package reference for the “Setup Windows and ConfigMgr” action will update the reference to the built-in ConfigMgr client agent package. Since over time there could be a difference in the client agent, this ensures you are deploying the correct agent version for your hierarchy. Best practice, use the built-in package.

Note, we also added export and import functionality to the packages node. It follows a similar work flow.
John Vintzel
Microsoft Corporation| Sr. Program Manager | System Center Configuration Manager | twitter: jvintzel
http://blogs.technet.com/b/inside_osd
The blog is own by some members of the System Center Configuration Manager product team. These postings are provided "AS IS" with no warranties, and confer no rights.
Download System Center Release Candidate here .


