How to deploy Windows 10 Device Guard for mobile information workers
Scenario
In your company your employees are using domain joined Windows 10 laptops. On these laptops they will run standard Windows Applications, Windows Store applications and an unsigned line of business application (7-zip). All of your users are local administrator on their laptops and as an administrator you want to protect your employees from installing and running malicious or unknown software with new Windows 10 technology with the highest possible security but they should be able to install any application from the Windows Store.
Technical information
Device Guard
Device Guard is a combination of enterprise-related hardware and software security features that, when configured together, will lock a device down so that it can only run trusted applications that you define in your code integrity policies. If the app isn’t trusted it can’t run, period. With hardware that meets basic requirements, it also means that even if an attacker manages to get control of the Windows kernel, he or she will be much less likely to be able to run malicious executable code. With appropriate hardware, Device Guard can use the new virtualization-based security in Windows 10 to isolate the Code Integrity service from the Microsoft Windows kernel itself. In this case, the Code Integrity service runs alongside the kernel in a Windows hypervisor-protected container.
With thousands of new malicious files created every day, using traditional methods like antivirus solutions—signature-based detection to fight against malware—provides an inadequate defense against new attacks. Device Guard on Windows 10 changes from a mode where apps are trusted unless blocked by an antivirus or other security solution, to a mode where the operating system trusts only apps authorized by your enterprise. You designate these trusted apps by creating code integrity policies.
Like the operating system, code integrity contains two primary components: kernel mode code integrity (KMCI) and user mode code integrity (UMCI). KMCI has been available in previous versions of the Windows operating system, and protects the kernel mode from running unsigned drivers. In Windows 10, UMCI is also available, to help protect against viruses and malware. vice Guard Configurations consists of Code integrity Policy and Catalog files.
Code Integrity Policy
Code integrity policies maintain the standards by which a computer running Windows 10 determines whether an application is trustworthy and can be run. When you generate a code integrity policy, you are generating a binary-encoded XML document that includes configuration settings for both the User and Kernel-modes of Windows 10 Enterprise, along with restrictions on Windows 10 script hosts.
Typically, code integrity policies are configured to use the application's signing certificate as part or all of what identifies the application as trusted. This means that applications must either use embedded signing—where the signature is part of the binary—or catalog signing, where you generate a “catalog file” from the applications, sign it, and through the signed catalog file, configure the code integrity policy to recognize the applications as signed.
Catalog files
Catalog files (which you can create in Windows 10 with a tool called Package Inspector) contain information about all deployed and executed binary files associated with your trusted but unsigned applications. When you create catalog files, you can also include signed applications for which you do not want to trust the signer but rather the specific application. After creating a catalog, you must sign the catalog file itself by using enterprise public key infrastructure (PKI), or a purchased code signing certificate. Then you can distribute the catalog, so that your trusted applications can be handled by code integrity policies in the same way as any other signed application.
Catalog files are simply Secure Hash Algorithm 2 (SHA2) hash lists of discovered binaries. These binaries’ hash values are updated each time an application is updated, which requires the catalog file to be updated also.
Catalog files can be very useful for unsigned LOB applications that cannot easily be given an embedded signature. However, catalogs need to be updated each time an application is updated. In contrast, with embedded signing, your code integrity policies typically do not have to be updated when an application is updated. For this reason, if code-signing is or can be included in your in-house application development process, it can simplify the management of your code integrity policies
After you have created and signed your catalog files, you can configure your code integrity policies to trust the signer or signing certificate of those files.
Requirements for this scenario
- At least one reference machine with 64 Bit CPU with CPU Virtualization extensions
- Intel VT-x or
- AMD-V
- UEFI Firmware with Secure Boot
- Qualified Windows Operating System ( Windows 10 Enterprise or Education)
- Code Signing Certificate for:
- Signing Catalog files
- Signing Code Integrity Policy
The following information are the configuration steps to configure this scenario in your environment.
Configuration Steps
Action 1: Configure Virtualization Based Security with Group Policy
- From either a domain controller or a client computer that has Remote Server Administration Tools (RSAT) installed, open the Group Policy Management Console (GPMC) by running GPMC.MSC or by searching for Group Policy Management.
- Browse to the Device Guard OU (manually created OU)
- Create or Modify an Exisiting Group Policy Object
- Navigate to Policies\Administrative Templates\System\Device Guard
- Open 'Turn on Virtualization Based Security' and use this configuration:

For more information about the specific settings, please see the Help information in the GPO settings.
Action 2: Create Code Signing Template in your Windows Server 2012 R2 PKI environment
As you deploy code integrity policies (part of Device Guard), you might need to sign catalog files or code integrity policies internally. To do this, you will either need a publicly issued code signing certificate or an internal CA.
In this document we assume that you want to use your own internal CA and you should complete these steps to create a code signing certificate.
- Open the Certification Authority Microsoft Management Console (MMC) snap-in, and then select your issuing CA.

- When connected, right-click Certificate Templates, and then click Manage to open the Certification Templates Console.Figure 1. Manage the certificate templates
- In the navigation pane, right-click the Code Signing certificate, and then click Duplicate Template.
- On the Compatibility tab, clear the Show resulting changes check box. Select Windows Server 2012 from the Certification Authority list, and then select Windows 8 / Windows Server 2012 from the Certificate recipient list.
- On the General tab, specify the Template display name and Template name. This example uses the name DG Catalog Signing Certificate.
- On the Request Handling tab, select the Allow private key to be exported check box.
- On the Extensions tab, select the Basic Constraints check box, and then click Edit.

- In the Edit Basic Constraints Extension dialog box, select Enable this extension, as shown in Figure 2.Figure 2. Select constraints on the new template
- If a certificate manager is required to approve any issued certificates, on the Issuance Requirements tab, select CA certificate manager approval.
- On the Subject Name tab, select Supply in the request.
- On the Security tab, verify that whatever account will be used to request the certificate has the right to enroll the certificate.
- Click OK to create the template, and then close the Certificate Template Console.
When this certificate template has been created, you must publish it to the CA published template store. To do so, complete the following steps:

- In the Certification Authority MMC snap-in, right-click Certification Templates, point to New, and then click Certificate Template to Issue, as shown in Figure 3.Figure 3. Select the new certificate template to issueA list of available templates to issue appears, including the template you just created.
- Select the DG Catalog signing certificate, and then click OK.
Now that the template is available to be issued, you must request a code signing certificate from the computer running Windows 10 on which you will do all the actions for the Code Integrity Policy and the Catalog files.
To begin, open the MMC, and then complete the following steps:
- In MMC, from the File menu, click Add/Remove Snap-in. Double-click Certificates, and then select My user account.
- In the Certificates snap-in, right-click the Personal store folder, point to All Tasks, and then click Request New Certificate.
- Click Next twice to get to the certificate selection list.

- In the Request Certificate list, select your newly created code signing certificate, and then select the blue text that requests additional information, as shown in Figure 4.Figure 4. Get more information for your code signing certificate
- In the Certificate Properties dialog box, for Type, select Common name. For Value, select ContosoDGSigningCert, and then click Add. When added, click OK.
- Enroll and finish.
This certificate must be installed in the user’s personal store on the computer that will be signing the catalog files and code integrity policies. If the signing is going to be taking place on the computer on which you just requested the certificate, exporting the certificate to a .pfx file will not be required because it already exists in your personal store.
Optional:
If you are signing on another computer from which you have requested the certificates, you will need to export the .pfx certificate with the necessary keys and properties.
To do so, complete the following steps:
- Right-click the certificate, point to All Tasks, and then click Export.
- Click Next, and then select Yes, export the private key.
- Choose the default settings, and then select Export all extended properties.
- Set a password, select an export path, and then select DGCatSigningCert.pfx as the file name
When the certificate has been exported, import it into the personal store for the user who will be signing the catalog files or code integrity policies on the specific computer that will be signing them.
Action 3: Create Code Integrity Policy from a reference machine
The creating of a Code Integrity Policy from a reference machine is reasonably simple. This part describes how you can use a reference machine and capture all of the publishers of the installed applications. Please be aware that your reference machine must be clean of any malware or viruses as the scan will review all of the installed software and the found publishers will be validated as trustworthy. If you want to trust additional publisher, please install the software before scanning the system.
- Open Powershell with Admin privileges
- Initialize the Powershell variables that you will use. The following example commands use InitialScan.xml and DeviceGuardPolicy.bin for the names of the files that will be created on your desktop:
$CIPolicyPath=$env:userprofile+"\Desktop\"
$InitialCIPolicy=$CIPolicyPath+"InitialScan.xml"
$CIPolicyBin=$CIPolicyPath+"DeviceGuardPolicy.bin
- Use New-CIPolicy to create a new code integrity policy by scanning the system for installed applications:
New-CIPolicy -Level PcaCertificate -FilePath $InitialCIPolicy –UserPEs 3> CIPolicyLog.txt
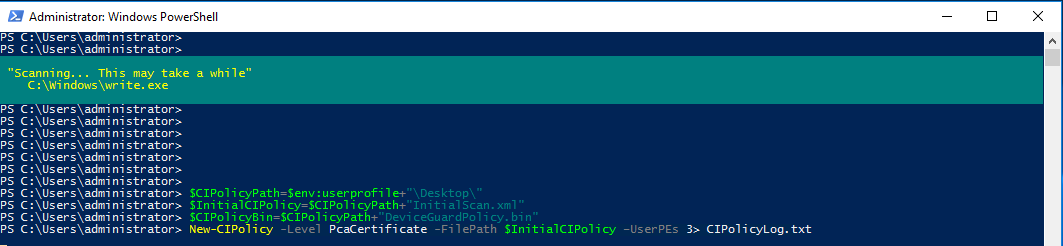
Note: This cmd-let will scan all the files on the system for a code signing certificate and will trust all the publishers found. Depending on your system performance this can take up to two hours.
- Use ConvertFrom-CIPolicy to convert the code integrity policy to a binary format:
ConvertFrom-CIPolicy $InitialCIPolicy $CIPolicyBin

This DeviceGuardPolicy file can be used to run the Code Integrity Policy in Audit mode. It is a general recommendation to run every Code Integrity Policy in Audit mode before being enforced. It is also recommend to to keep the original .xml file for the Code Integrity Policy so you can quickly modify the policy.
Action 4: Test and Audit a code integrity policy with a local Policy.
In this example you will run the Code Integrity Policy in Audit mode on the reference machine. If you want to run the Code Integrity Policy on a different machine copy the binary Code Integrity Policy to that machine and perform the local Policy actions on that machine.
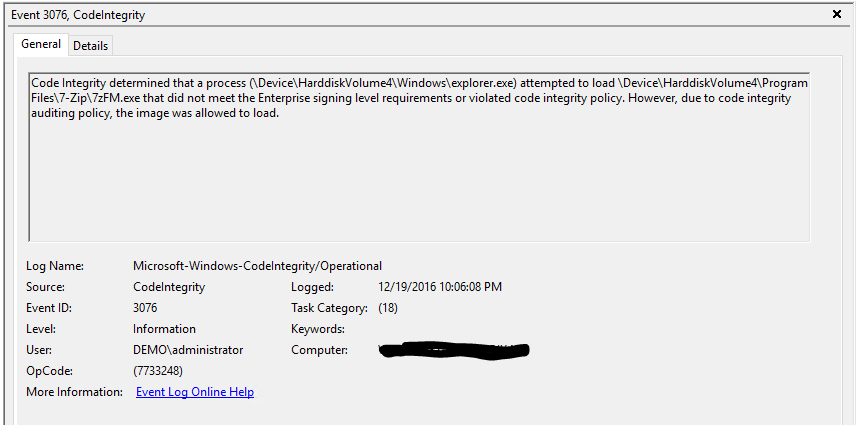
When code integrity policies are run in audit mode, it allows administrators to discover any applications that were missed during an initial policy scan and to identify any new applications that have been installed and run since the original policy was created. While a code integrity policy is running in audit mode, any binary that runs and would have been denied had the policy been enforced is logged in the Applications and Services Logs\Microsoft\Windows\CodeIntegrity\Operational event log.
Open Powershell with Admin privileges
Initialize the Powershell variables that you will use. The following example commands use InitialScan.xml and DeviceGuardPolicy.bin for the names of the files that will be created on your desktop:
$CIPolicyPath=$env:userprofile+"\Desktop\"
$InitialCIPolicy=$CIPolicyPath+"InitialScan.xml"
$CIPolicyBin=$CIPolicyPath+"DeviceGuardPolicy.bin
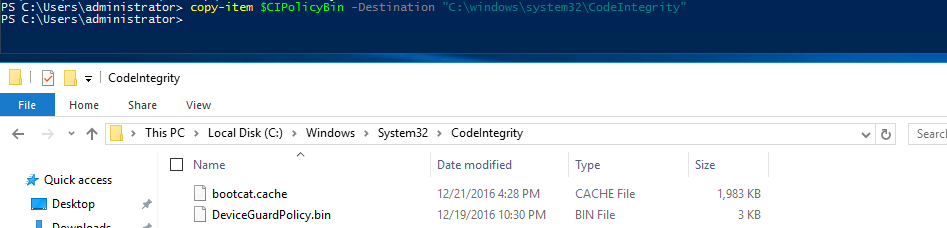
Copy the newly created binary Code Integrity Policy to the C:\Windows\System32\Code Signing folder with the following Powershell command:
copy-item $CIPolicyBin -Destination "C:\windows\system32\CodeIntegrity"
- Open the Local Group Policy Editor by running GPEdit.msc from the Powershell window
- Navigate to Computer Configuration\Administrative Templates\System\Device Guard, and then select Deploy Code Integrity Policy. Enable this setting by using the appropriate file path, C:\Windows\System32\CodeIntegrity\DeviceGuardPolicy.bin
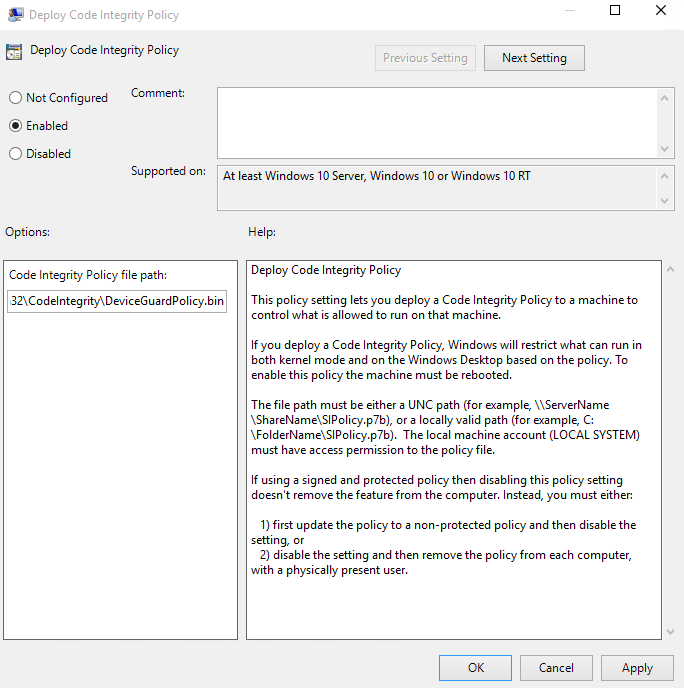
- Restart the system for the Code Integrity Policy to take effect.
- Use the system normally and monitor the code integrity events in the event log. While in audit mode, any exception to the deployed code integrity policy will be logged in the Applications and Services Logs\Microsoft\Windows\CodeIntegrity\Operational event log, as shown below.
Action 5: Add your unsigned Line of Business Application with Catalog files.
Catalog files can be important in your deployment of code integrity polices if you have unsigned line-of-business (LOB) applications (7-Zip) for which the process of signing is difficult. To prepare to create code integrity policies that allow these trusted applications but block unsigned code (most malware is unsigned), you create a catalog file that contains information about the trusted applications. After you sign and distribute the catalog, your trusted applications can be handled by code integrity policies in the same way as any other signed application. With this foundation, you can more easily block all unsigned applications, allowing only signed applications to run.
- Be sure that a code integrity policy is currently deployed in audit mode on the computer on which you will run Package Inspector.
- Start powershell in admin mode
- Start Package Inspector, and then start scanning a local drive, for example, drive C:
PackageInspector.exe Start C:
- Copy the installation media to the local drive (typically drive C). In this example download 7-zip from www.7-zip.org.
By copying the installation media to the local drive, you ensure that Package Inspector detects and catalogs the actual installer. If you skip this step, the future code integrity policy may trust the application to run but not to be installed.
- Install the application (7-zip) . Install it to the same drive that the application installer is located on (the drive you are scanning). Also, while Package Inspector is running, do not run any installations or updates that you don't want to capture in the catalog
Important Every binary that is run while Package Inspector is running will be captured in the catalog. Ensure that only trusted applications are run during this time.
- Start the application (7-zip file manager).
- Close the application
- When you have confirmed that the previous steps are complete, use the following commands in an admin Powershell to generate the catalog and definition files on your computer's desktop.
$ExamplePath=$env:userprofile+"\Desktop"
$CatFileName=$ExamplePath+"\LOBApp-Contoso.cat"
$CatDefName=$ExamplePath+"\LOBApp.cdf"
PackageInspector.exe Stop C: -Name $CatFileName -cdfpath $CatDefName
When finished, the files will be saved to your desktop. You can double-click the *.cat file to see its contents, and you can view the *.cdf file with a text editor.
To trust this catalog file within a code integrity policy, the catalog must first be signed. Then, the signing certificate can be added to the code integrity policy, and the catalog file can be distributed to the individual client computers. This will be done in the next actions.
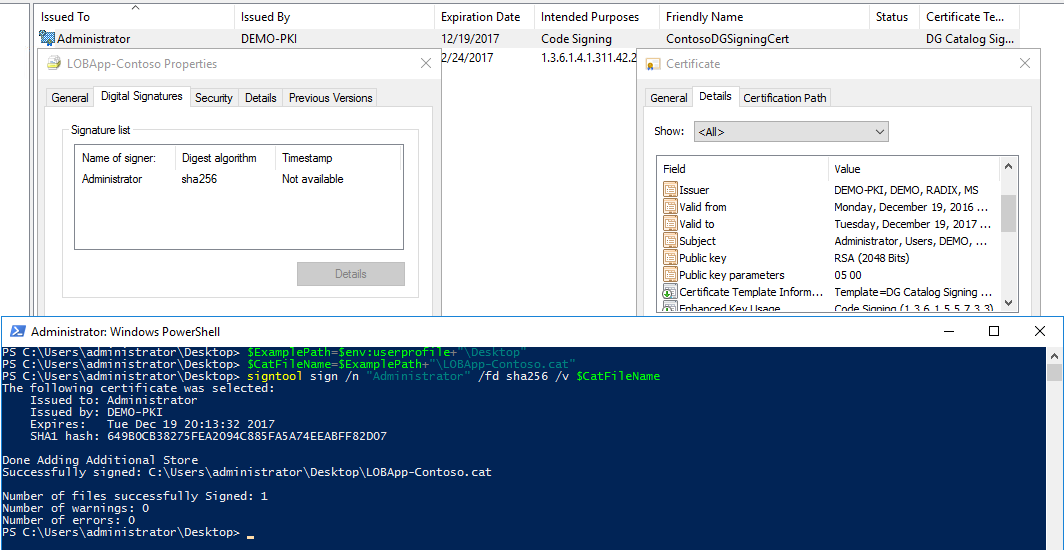
Action 6: Catalog Signing with the Signtool.exe
In this action, you will sign your custom catalog file for your Line of Business application (7-Zip).
Requirements:
- SignTool.exe, found in the Windows software development kit (SDK—Windows 7 or later)
- The catalog file that you generated in the Create catalog files section, or another catalog file that you have created.
- The code signing certificate created in action 2
- Copy the signtool from the Windows ADK to the desktop of the reference machine
- On the reference machine open an admin Powershell
- Initialize the Powershell variables that will be used
$ExamplePath=$env:userprofile+"\Desktop"
$CatFileName=$ExamplePath+"\LOBApp-Contoso.cat"
- Sign the catalog file with the signtool:
<path to signtool.exe> sign /n "ContosoDGSigningCert" /fd sha256 /v $CatFileName
Action 6: Add the catalog signing certificate and enforce Configuration of the Code Integrity Policy
After the catalog file is signed, add the signing certificate to a code integrity policy, as described in the following steps.
- Export the code signing certificate from the certificate store with the following command
- On the reference computer open mmc.exe with administrative privileges
- Click on File -> Add/Remove Snap-in
- Click on Certificates and Click on Add
- Select My User Account and click Finish
- Click on OK.
- Open Personal – Certificates and select the Code Signing certificate
- Right-Click on the certificate and select All Tasks – Export
- Click Next
- Select No, do not export the private key and click Next
- Select Base-64 encoded X.509 and click Next
- Save the file to your desktop
- Open an administrator Powershell
- Initialize the Powershell Variables
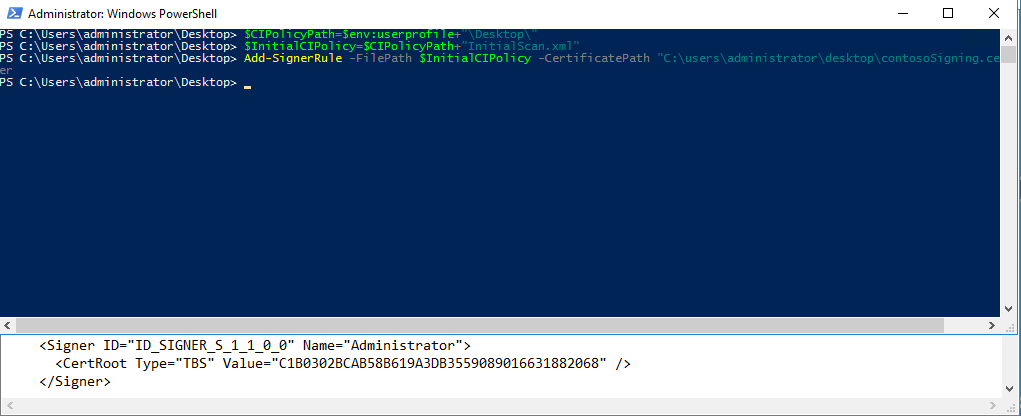
$CIPolicyPath=$env:userprofile+"\Desktop\"
$InitialCIPolicy=$CIPolicyPath+"InitialScan.xml"
$EnforcedCIPolicy=$CIPolicyPath+"EnforcedPolicy.xml"
$CIPolicyBin=$CIPolicyPath+"EnforcedDeviceGuardPolicy.bin"
- Use Add-SignerRule to add the signing certificate to the code integrity policy, filling in the correct path and filenames for and :
Add-SignerRule -FilePath $InitialCIPolicy -CertificatePath <certpath> -Kernel -User – Update
In the following picture you will see the commands run and the Code Integrity Policy output in the background:
- Ensure that rule options 9 (“Advanced Boot Options Menu”) and 10 (“Boot Audit on Failure”) are set the way that you intend for this policy. We strongly recommend that you enable these rule options before you run any enforced policy for the first time. Enabling these options provides administrators with a pre-boot command prompt, and allows Windows to start even if the code integrity policy blocks a kernel-mode driver from running. When ready for enterprise deployment, you can remove these options
Set-RuleOption -FilePath $InitialCIPolicy -Option 9
Set-RuleOption -FilePath $InitialCIPolicy -Option 10
- Copy the initial file to maintain an original copy:
Copy $InitialCIPolicy $EnforcedCIPolicy
- Use Set-RuleOption to delete the audit mode rule option:
Set-RuleOption -FilePath $EnforcedCIPolicy -Option 3 -Delete
Note To enforce a code integrity policy, you delete option 3, the Audit Mode Enabled option. There is no “enforced” option that can be placed in a code integrity policy.
- Use Set-RuleOption to remove the unsigned policy rule option:
Set-RuleOption -FilePath $EnforcedCIPolicy -Option 6 -Delete
- Use ConvertFrom-CIPolicy to convert the new code integrity policy to binary format:
ConvertFrom-CIPolicy $EnforcedCIPolicy $CIPolicyBin
Action 7: Deploy the Catalog file via the Device Guard GPO
To simplify the management of catalog files, you can use Group Policy preferences to deploy catalog files to the appropriate computers in your organization.
- Copy the created and signed Catalog file to a network share that is accessible for every computer account to which the GPO will be deployed.
- From either a domain controller or a client computer that has Remote Server Administration Tools (RSAT) installed, open the Group Policy Management Console (GPMC) by running GPMC.MSC or by searching for Group Policy Management.
- Browse to the Device Guard OU and edit the GPO which you have created or edited in action 1.
- Within the selected GPO, navigate to Computer Configuration\Preferences\Windows Settings\Files. Right-click Files, point to New, and then click File.
- To keep versions consistent, in the New File Properties dialog box (Figure 4), select Replace from the Action list so that the newest version is always used.
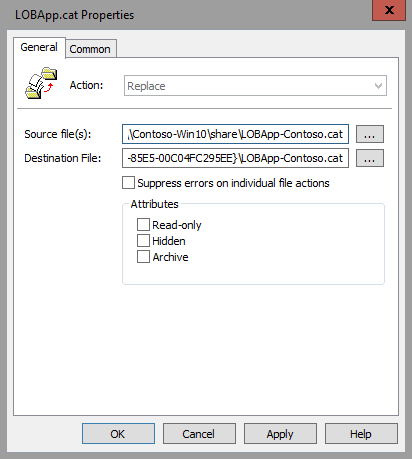
- In the Source file(s) box, type the name of your accessible share, with the catalog file name included (for example, \\Contoso-Win10\share\LOBApp-Contoso.cat).
- In the Destination File box, type a path and file name, for example:
C:\Windows\System32\catroot\{F750E6C3-38EE-11D1-85E5-00C04FC295EE}\LOBApp-Contoso.cat
For the catalog file name, use the name of the catalog you are deploying.
- On the Common tab of the New File Properties dialog box, select the Remove this item when it is no longer applied option. Doing this ensures that the catalog file is removed from every system, in case you ever need to stop trusting this application.
- Click OK to complete file creation.
- Close the Group Policy Management Editor, and then update the policy on the test computer running Windows 10, by running GPUpdate.exe. When the policy has been updated, verify that the catalog file exists in C:\Windows\System32\catroot\{F750E6C3-38EE-11D1-85E5-00C04FC295EE} on the computer running Windows 10.
Action 8: Sign and Deploy Code Integrity Policy
Signed code integrity policies give organizations the highest level of malware protection available in Windows 10. In addition to their enforced policy rules, signed policies cannot be modified or deleted by a user or administrator on the computer. These policies are designed to prevent administrative tampering and kernel mode exploit access
To sign a code integrity policy with SignTool.exe, you need the following components:
SignTool.exe, found in the Windows SDK (Windows 7 or later)
The binary format of the code integrity policy that you generated
The code signing certificate created in action 2
- Open admin Powershell
- Initialize Powershell variables
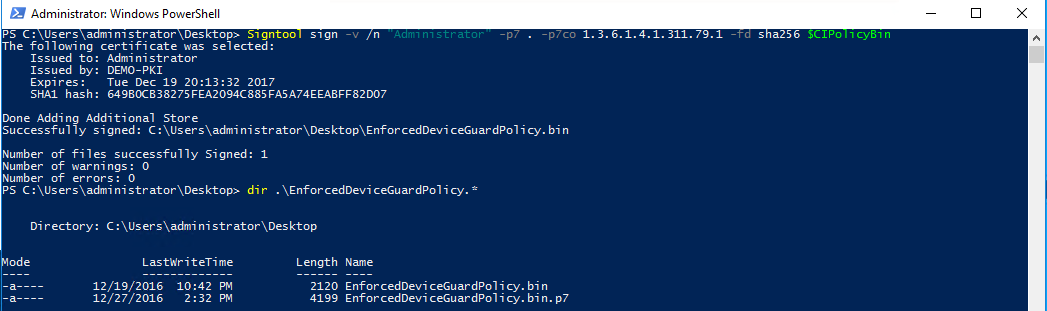
$CIPolicyPath=$env:userprofile+"\Desktop\"
$CIPolicyBin=$CIPolicyPath+"EnforcedDeviceGuardPolicy.bin"
- Navigate to your desktop as the working directory with Powershell
cd $env:USERPROFILE\Desktop
- Sign the code integrity policy by using SignTool.exe
Signtool sign -v /n "Administrator" -p7 . -p7co 1.3.6.1.4.1.311.79.1 -fd sha256 $CIPolicyBin
Note: “Administrator” is a substring of the Subject Name of the code Signing certificate
- Copy the signed file ‘EnforcedDeviceGuardPolicy.bin.p7’ to the same share as defined in Action 7
- From either a domain controller or a client computer that has Remote Server Administration Tools (RSAT) installed, open the Group Policy Management Console (GPMC) by running GPMC.MSC or by searching for Group Policy Management.
- Browse to the Device Guard OU (manually created OU)
- Modify an Exisiting Group Policy Object
- Navigate to Policies\Administrative Templates\System\Device Guard
- Open the Deploy Code Integrity Policy
- Select Enabled and fill in the path.
\\<server>\<share>\EnforcedDeviceGuardPolicy.bin.p7
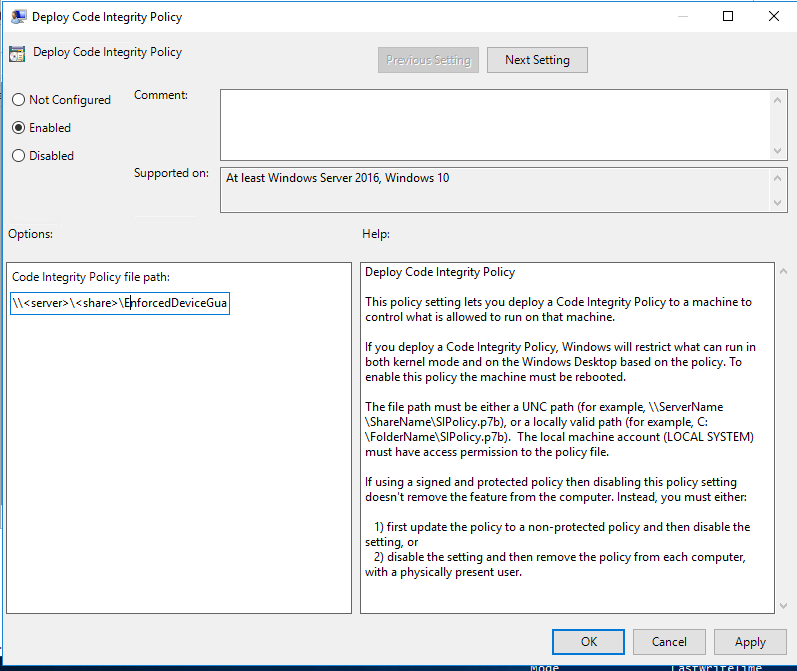
- Restart the Windows 10 computer to which this policy is deployed. Restarting the computer will update the code integrity policy and will put it into enforced mode.