Using Exchange Management Shell to manage your Exchange Online and Exchange On Premises Environment
Yesterday I have had the pleasure of doing a TechNet LiveMeeting here @Microsoft Belgium, entitled “Using the Power of PowerShell to manage your Exchange Online and Exchange On Premises Environment”. The session was not a level 400 deep dive in PowerShell, but its aim was to give some tips on how one can use PowerShell to manage an Exchange Online tenant in Office365.
Tip 1. Set-ExecutionPolicy Unrestricted and -AllowRedirection
Connecting to Exchange Online is easy, and boils down to launching Windows PowerShell, creating a new persistent connection to the remote Exchange Client Access Server, and importing it, like can be seen in the picture below:

Two remarks here:
1. Before you are able to run the cmdlet Import-PSSession, you need to make sure you are allowed to run scripts... When you run Import-PSSession and you get the following error message:
Import-Module : There were errors in loading the format data file:
Microsoft.PowerShell, , C:\Users\Seppe\AppData\Local\Temp\tmp_0740bdd5-5276-437
7-a890-50bb10d3d32b_cuwqdhef.gqv\tmp_0740bdd5-5276-4377-a890-50bb10d3d32b_cuwqd
hef.gqv.format.ps1xml : File skipped because of the following validation except
ion: File C:\Users\Seppe\AppData\Local\Temp\tmp_0740bdd5-5276-4377-a890-50bb10d
3d32b_cuwqdhef.gqv\tmp_0740bdd5-5276-4377-a890-50bb10d3d32b_cuwqdhef.gqv.format
.ps1xml cannot be loaded because the execution of scripts is disabled on this s
ystem. Please see "get-help about_signing" for more details..
At line:3 char:30
+ Import-Module <<<< -Name $name -Alias * -Function * -Prefix
$prefix -DisableNameChecking:$disableNameChecking -PassThru -ArgumentList @($se
ssion)
+ CategoryInfo : InvalidOperation: (:) [Import-Module], RuntimeEx
ception
+ FullyQualifiedErrorId : FormatXmlUpateException,Microsoft.PowerShell.Com
mands.ImportModuleCommand
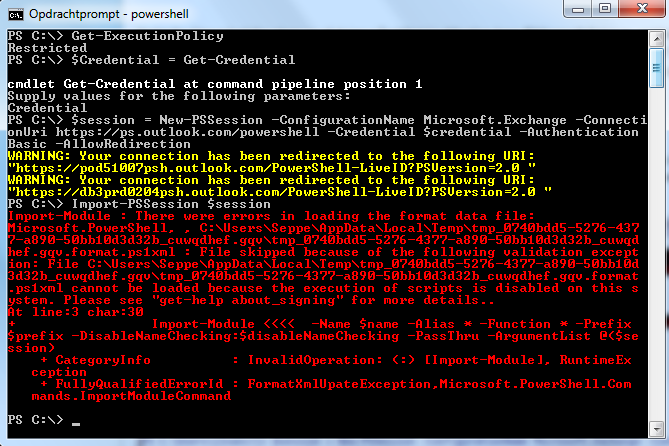
To enable the execution of scripts you can run the cmdlet Set-ExecutionPolicy Unrestricted. This can be enforced btw by using Group Policies, you can download the ADM Group Policy Template for PowerShell here. For more information on Set-ExecutionPolicy, check this link here.
2. Do not forget the parameter AllowRedirection, which will enable redirection to the appropriate Exchange server using different URI.
Tip 2. Connecting to Exchange Online and Exchange On Premises at the same time, use –Prefix
When you launch the Exchange Management Shell, you are using Remote PowerShell to connect to a Client Access Server in your Exchange On Premises environment, as you can see by running Get-PSSession after launching Exchange Management Shell

If you would then create a new persistent connection to Exchange Online using the directions mentioned above, you would get the following warning when importing the PowerShell Session:
“WARNING: Proxy creation has been skipped for the following command: …., because it would shadow an existing local command. Use the AllowClobber parameter if you want to shadow existing local commands.”


If you would use the parameter AllowClobber, you would indeed shadow the existing commands, meaning, you would hide or replace the original commands: eg. running Get-Mailbox would retrieve the Exchange Online mailboxes, but you wouldn’t be able to retrieve the ones in your Exchange On Premises organization anymore in this EMS Session!
Solution: Use the Prefix parameter, which will add the given prefix to the nouns in the names of the imported commands.
Running the following Import-PSSession $Session –Prefix o365 will import all the commands, but will prefix all the nouns with o365, running Get-DistributionGroup will return a list of all Distribution Groups in my On Premises Exchange Organization, where-as running Get-o365DistributionGroup will return a list of Distribution Groups in my Exchange Online environment:

Tip 3. Remove-PSSession
Looking at the definition of Remove-PSSession on TechNet
The Remove-PSSession cmdlet closes Windows PowerShell sessions (PSSessions) in the current session. It stops any commands that are running in the PSSessions, ends the PSSession, and releases the resources that the PSSession was using. If the PSSession is connected to a remote computer, Remove-PSSession also closes the connection between the local and remote computers.
Why would you do this for your Exchange Online? Because if you do not close the Windows PowerShell window without disconnecting from the server-side session, your connection will remain open for 15 minutes. And you have a limit of three connections to the server-side session at one time per account.
Tip 4. Use Profiles
If you want to know more about Windows PowerShell Profiles, please head over here @MSDN, where you can dive into the wonders of profiles. The reason it might be useful to use profiles here is that you don’t need to type everything every single time you want to connect to your Exchange Online environment. By entering the New-PSSession and Import-PSSession lines in any of the 4 profiles, you can create functions that you can call upon when you want to connect to your Office365 Exchange Online tenant by simply entering Connect-ExchangeOnline.
In the TechNet LiveMeeting I created my Windows PowerShell Profile, the process on how to create this is clearly described here, and here’s what it looks like after creating it:

By using the so-called Windows PowerShell user profile, this will only work for the currently logged on user, and only for the Microsoft.PowerShell shell, if I launch ISE for example, you won’t have the functions Connect-ExchangeOnline and Disconnect-ExchangeOnline:

Question: is it possible to schedule a PowerShell script against Exchange Online?
Answer: Sure
In the below example I will schedule a task to when run will create a excel file with an overview of the mailbox sizes, the tricky part is the passing of your credentials. I have chosen to first create a passwordfile, which will contain the password of the user that will be used to connect in the script to the Exchange Online tenant:
Read-Host -AsSecureString | ConvertFrom-SecureString | Out-File C:\users\ilvancri\MyPassword.txt
Then I have created a script called “Mailboxsizes.ps1”, that will connect to Office365, create the csv file, and remove the PSSession in the end:
$password = type C:\users\ilvancri\MyPassword.txt | ConvertTo-SecureString
$userid = "ilse@microsoftbelux.onmicrosoft.com"
$cred = New-Object System.Management.Automation.PSCredential $userid,$password
$global:session365 = New-PSSession -configurationname Microsoft.Exchange -connectionuri https://ps.outlook.com/powershell/ -credential $cred -authentication Basic -AllowRedirection
Import-PSSession $global:session365
Get-Mailbox | Get-MailboxStatistics | Select Displayname,TotalItemSize, ItemCount | Export-csv .\mailboxsizes.csv
Get-PSSession | Remove-PSSession
Now it’s time to create a batch file that when run, will launch and execute the script:
C:\Windows\System32\WindowsPowerShell\v1.0\powershell.exe -command ". 'C:\users\ilvancri\mailboxsize.ps1'
And now you can schedule to run the BAT file when needed.
Ilse