Migration from SQL Server to Azure SQL Database Managed Instance
Today we'll review how you can migrate databases, running on SQL Server, to a new Azure SQL Database Managed Instance.
Azure SQL Database Managed Instance (aka "SQL MI") is a new deployment model of Azure SQL Database, providing near 100% compatibility with SQL Server database engine with benefits of PaaS. So if you think about migrating your SQL Server databases to the public cloud - you definitely should consider SQL MI as the first option. Especially if you still use SQL Server 2008, which will reach end of support in less than a year.
SQL MI is a special version of SQL Server, deployed on Azure infrastructure and managed by Microsoft. But since SQL Server instance is dedicated for your needs and not shared with any other customers, the list of differences between SQL MI and regular SQL Server that you use is way shorter comparing to other Database-as-a-Service offerings, available on the market today.
Today you'll see how you can migrate your workload from existing SQL Server to SQL MI with minimal changes on the workload level.
Preparation
Migration of SQL Server databases to Azure SQL Database Managed Instance consists of the following steps:
- Perform an assessment using Data Migration Assistant (DMA). DMA is a light-weight tool that you can run inside your environment to analyze if your current SQL Server databases are compatible with SQL MI.
- Decide how your app will connect to SQL MI after the migration. Keeping front end much closer to back end as possible is a best practice, so if you migrate the database from on-prem SQL Server to SQL MI, consider also migrating front end server to Azure VM or Azure App Service. For example, you can migrate front end server and on-prem SQL Server to Azure together using Azure Migrate or another lift&shift tool, and then migrate databases from SQL Server inside Azure VM to SQL MI.
- Create new SQL MI through Azure Portal. Deployment of the first SQL MI instance takes up to 6 hours, so consider doing this first. Don’t worry, deployments of additional instances take less than an hour.
- Create new Azure Database Migration (DMS) instance. DMS is a free service that supports migrations of different databases to Azure database offerings. It can migrate MySQL, PostgreSQL, MariaDB databases to Azure Database for MySQL/PostgreSQL/MariaDB, and it also supports SQL Server migrations, including SQL MI.
- Connect DMS to the source SQL Server and to target SQL MI.
- Perform the migration (online or offline).
- Change the connection string in the app to direct it to SQL MI host name.
Important aspects of SQL MI:
- SQL MI is based on SQL Server 2017 Enterprise Edition, which has backwards compatibility with SQL Server 2008 and newer. But what's very important - you need to know what is the latest supported compatibility level of the app that is using SQL Server - a number from 80 to 150. Each version of SQL Server introduces a new set of features and changes, and to ensure that app is using T-SQL queries with the right syntax and invoked stored procedures in the right way, there is a concept of compatibility levels. SQL Server 2000 has default compatibility level 80, and each next version of SQL Server has +10 compatibility by default (up to 150 for SQL Server 2019). For backwards compatibility each new SQL Server supports compatibility levels of older SQL Server versions. SQL Server 2017 supports compatibility levels from 100 (default for SQL Server 2008) to 140 (default for SQL Server 2017). So if you app requires compatibility level 100 (default for SQL Server 2008), and you use SQL Server 2014 - you can safely move to SQL MI. But if you use an app with compatibility level 80, running on SQL Server 2008 (which supported that compatibility level, which is default for SQL Server 2000), you won't be able to move it to SQL MI since it supports compatibility levels 100 and newer. You may face such situation if you have very old workloads, which were created a decade ago and hasn't been updated since then. You can an upgrade from compatibility level 90 to 100 though using in-place upgrade, but ensure to check the differences between compatibility level 90 and 100 to ensure that it won't break the app.
- SQL MI is a SQL Server database engine. While it includes SQL Server Agent, it doesn't include other components of SQL Server product like:
- SQL Server Reporting Services (SSRS) - there is no alternative to traditional SSRS paginated reports in Azure except running SQL Server inside a VM. But if you've already switched from paginated reports to PowerBI-format reports, it won’t be a problem for you to move those reports to PowerBI.
- SQL Server Analysis Services (SSAS) - Azure provides PaaS solution based on SSAS - Azure Analysis Services. You can use it as an alternative to existing SSAS. SSAS has its own compatibility levels, and Azure Analysis Services supports 1200 and newer (SQL Server 2016+)
- SQL Server Integration Services (SSIS) - if your app relies on SSIS, you can deploy it in Azure Data Factory.
- Check this article for connectivity options between your app and SQL MI. Important to remember:
- SQL MI requires a new subnet inside new or existing vNet that conforms to specific requirements. If you'll decide to create a new vNet during SQL MI deployment on Azure Portal, it will create a new vNet with 10.0.0.0/16 address space and 10.0.0.0/24 subnet. SQL MI default cluster IP is 10.0.0.254. If your existing SQL Server environments is in 192.168.x.x address space or any other outside 10.x.x.x range, then you can leave it as is. But you already use 10.x.x.x address space, you won't be able to tie existing network with SQL MI vNet due to conflicting address spaces. In this case you should consider creating a new vNet with all required rules applied using the following script.
- SQL MI can't be published to the Internet and it can't be accessed by IP directly. It has a private IP assigned (10.0.0.254 by default) inside Azure vNet and has a publicly resolvable host name in a form <mi-name>.<unique-id>.database.windows.net. But private IP doesn’t belong to SQL MI - it belongs to internal load balancer that directs traffic to the Managed Instance Gateway (GW). As multiple Managed Instances can run inside the same cluster on the same IP, GW uses Managed Instance host name ( <mi-name>.<unique-id>.database.windows.net) to redirect traffic to the correct SQL Engine service. Check here for more details. For you it means that app should connect to SQL MI using a specific host name. If you'll try to connect directly using private IP, GW won't accept the connection since it won't know to which instance do you want to connect.
- Comment above means that you will need to change the connection string on the app level and switch your app from existing SQL Server IP/FQDN to SQL MI hostname. Trick with modifying hosts file won't work, since you can't access SQL MI directly by IP. Adding an ability to connect to SQL MI through DNS CNAME (and leaving the connection string as-is) is in the roadmap for future SQL MI versions.
- SQL MI doesn't support connectivity through Named Pipes. So if you app connects to SQL Server using Named Pipes, you need to switch it to TCP/IP sockets.
- SQL MI currently supports only SQL Server logins. Azure AD logins will be added in next versions. Windows logins are not supported. So if your app connects to SQL Server using Windows Authentication, then you need to switch to SQL Authentication. Or you can wait for the release of Azure AD logins support in SQL MI and then convert existing Windows logins to Azure AD logins.
- I recommend to use SQL Server Management Studio (SSMS) 18 since I've faced some issues with SSMS 17.9 related to SQL MI management. E.g. SSMS 17.9 throwed an error when I tried to create a new DB through UI, most probably because SQL MI uses different syntax for CREATE DATABASE command. Running a command using a query went fine. That bug was fixed in SSMS 18.
Important aspects of DMS related to SQL MI migrations:
- Azure Database Migration Service has two pricing tiers - General Purpose and Business Critical. For General Purpose you can select the instance size - 1 vCore, 2 vCore or 4 vCore. Business Critical is available only in 4 vCore size. Larger instance means more computation power to perform data replication and transformation from source to the target. It allows to perform the migration quicker. Since DMS is free of charge until December 31st, 2018 anyway, I recommend to use Business Critical tier for DMS to reduce the downtime period.
- DMS can perform offline and online migrations to SQL MI. Online mode is available only for Business Critical tier DMS instances.
- In offline migration mode DMS performs full backup of the source database, copies the backup from local network share to Azure Storage blob and then restores it on SQL MI. You should stop all write transactions on the source database before initiating last full backup through DMS. So your database won't be available for writes for the time of making full backup, uploading it to Azure blob and then restoring on MI, which takes time depending on the database size - from minutes for small databases to hours for large ones. It also copies SQL Server logins with current passwords from source SQL Server to SQL MI. Offline migration mode should be used in all migration scenarios where putting the database to read-only mode is a possible option.
- In online migration mode you need to perform full backup and incremental transaction log backups, then DMS will take these files from local share, upload it to Azure Storage account, and then restore the database on SQL MI - starting from the last full backup, and then applying all incremental transaction log backups. So just before the migration you put the database to read-only mode and perform the last transaction log backup, and then DMS automatically uploads it and applies to the current database copy on SQL MI. As soon as it is done, you perform the failover in DMS and SQL MI database becomes available for read-write. Downtime time in this case is significantly shorter since you don't need to wait until the full backup is completed and uploaded to Azure blob - minutes even for large databases. But there are some disadvantages of DMS online migration mode for SQL Server:
- It can migrate up to 4 databases per activity, up to 2 activities per DMS instance. So you can perform up to 8 database migrations and cutovers at the same time.
- It requires to use Business Critical tier for DMS instance, which potentially means more migration costs after DMS promotion period.
- You need to migrate SQL Server logins manually
- It won't work for databases in Simple recovery model.
- Current experience for offline and online mode differs, but DMS team is working on building a unified UI.
- DMS requires to perform checksums for database backups. If you didn't enable that setting for existing backups - you will need to do backups again.
- SQL Server logins are migrated only in offline mode. Windows logins can't be migrated since SQL MI doesn't support them. An ability to convert Windows logins to Azure AD logins will be added in next versions of DMS.
- SQL Server Agent jobs are not migrated through DMS UI, but you can migrate them through PowerShell. Migration of jobs through DMS UI will be added in next versions.
- If migration takes too long or fails - try using a larger DMS instance (4 vCore) or switching to Business Critical tier.
OK, now let's start.
Source environment
Our source environment will be represented by a solution that you may already forgot about - Windows Azure Pack (WAP). While WAP migration to Azure doesn’t have practical sense, it shows the value of SQL MI in DMS. WAP relies on several interconnected databases, including management databases and databases belonging to different tenants. WAP supports SQL Server authentication and it doesn't require any other components of SQL Server beyond database engine. Perfect candidate to demonstrate how real-world workloads can be moved from on-prem SQL Server to SQL MI.
Source environment consist of two VMs:
- Front-end - all Windows Azure Pack components (tenant portal, admin portal, resource providers). Windows Server 2012. Private IP 10.0.1.4 + public IP for Internet access.
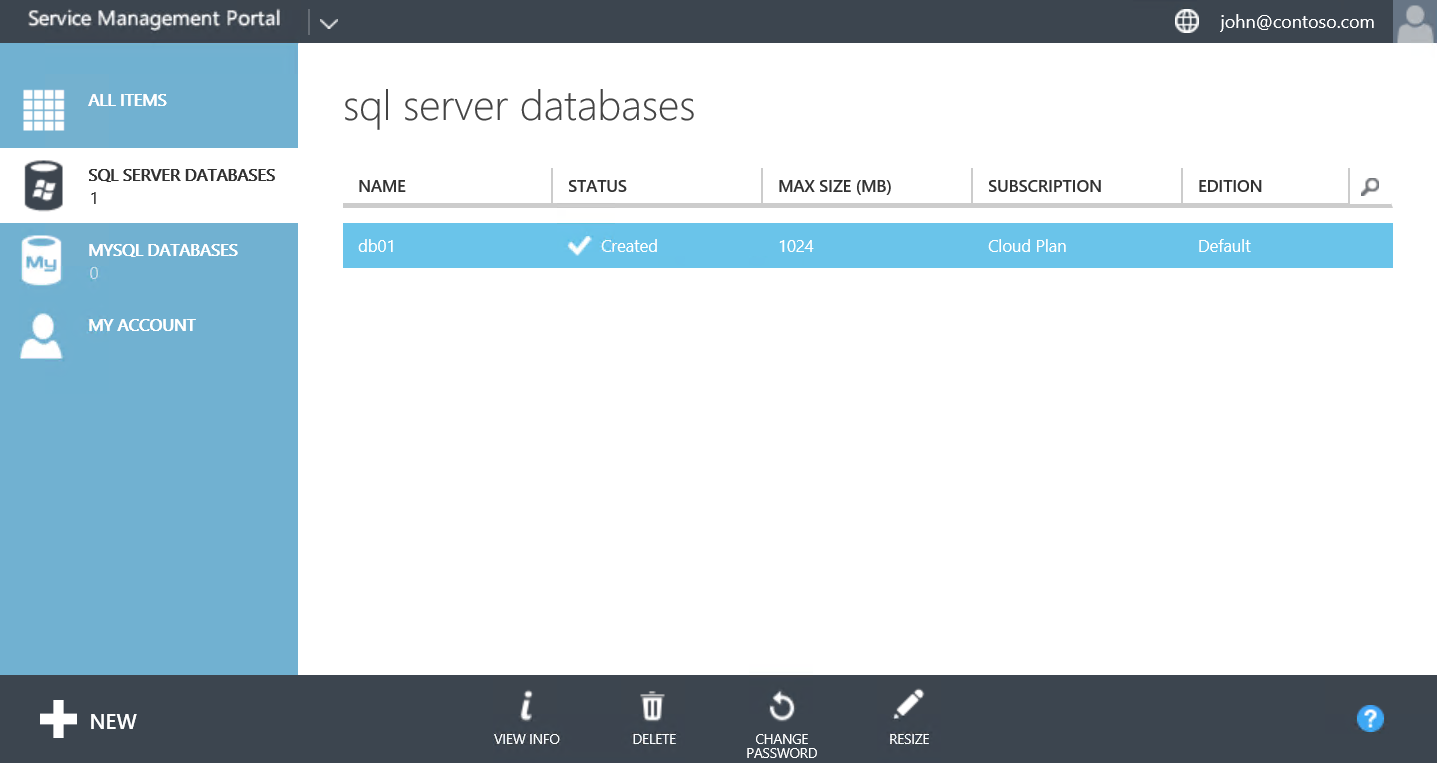
- Back-end - SQL Server 2012 on Windows Server 2012. Hosting 7 management databases of Windows Azure Pack and one tenant DB (db01). Private IP 10.0.1.5, no public IP.
VMs are connected with each other through vNet called SQLMigrationRG-vnet.

Our goal is to migrate all databases from Back-end VM to SQL MI, change Windows Azure Pack connection string on Front-end VM and decommission Back-end VM. The whole process is identical for Windows Server 2008 and SQL Server 2008, so you can use this guidance for end-of-support activities.

Step 1: Assessment using DMA
Download SQL Server Database Migration Assistant to check that your databases are compatible with SQL MI. Just run the software on any Windows machine that has network access to your SQL Server, or on SQL Server itself. The process is straightforward - choose Assessment, Source Server type - SQL Server, Target server type - Azure SQL Database Managed Instance. 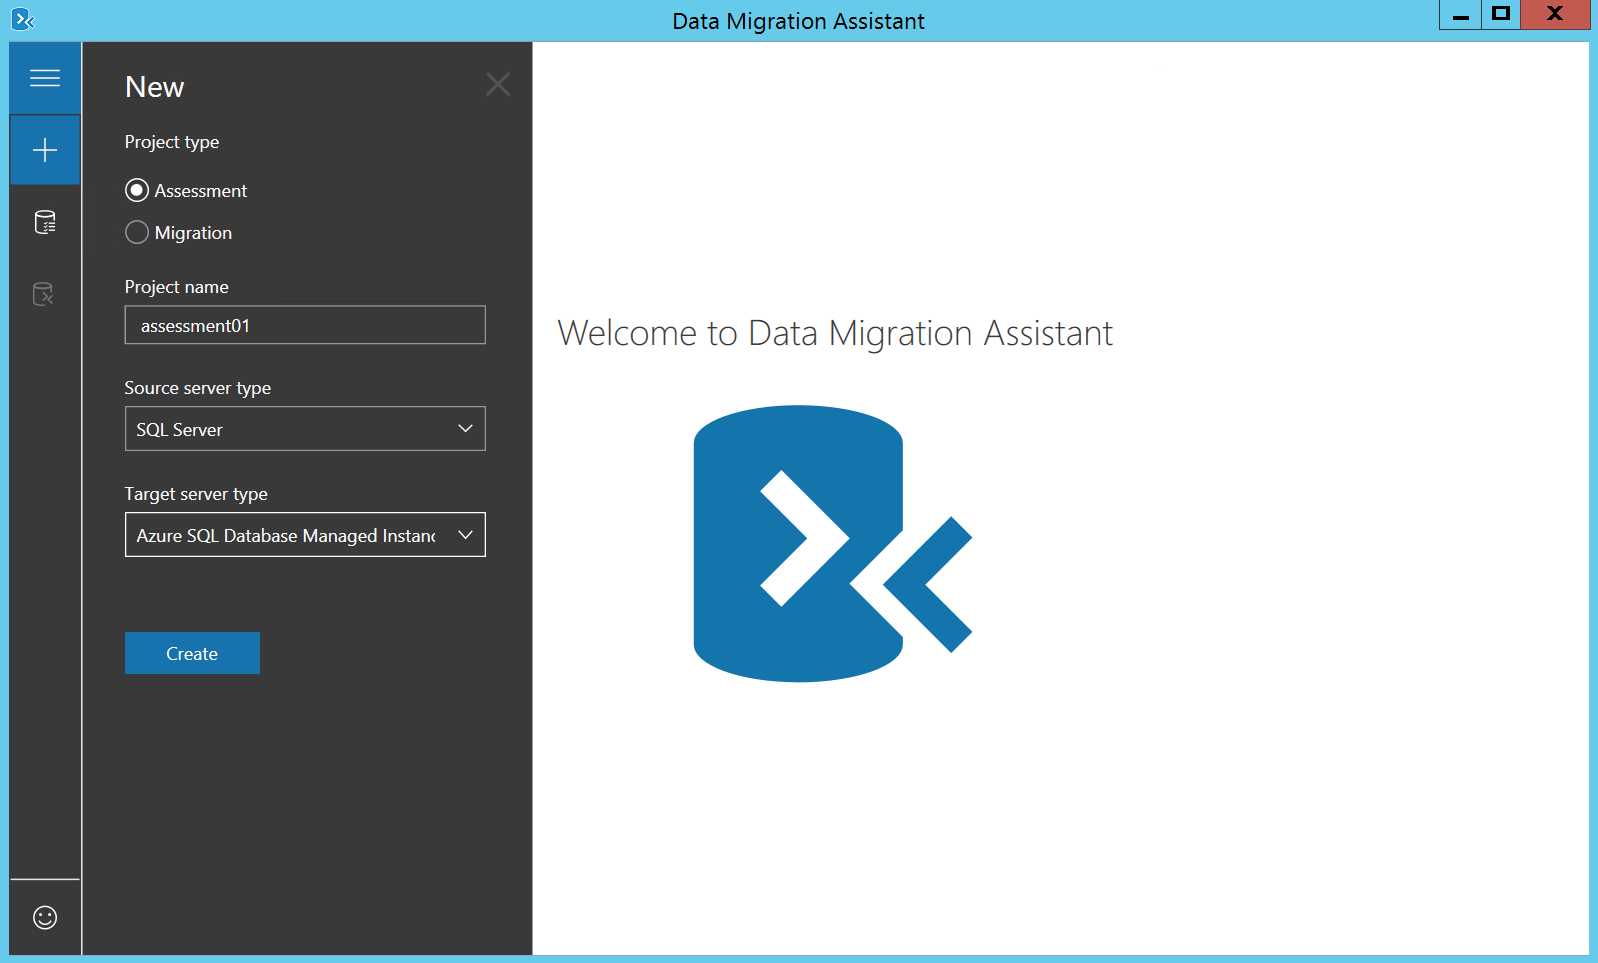
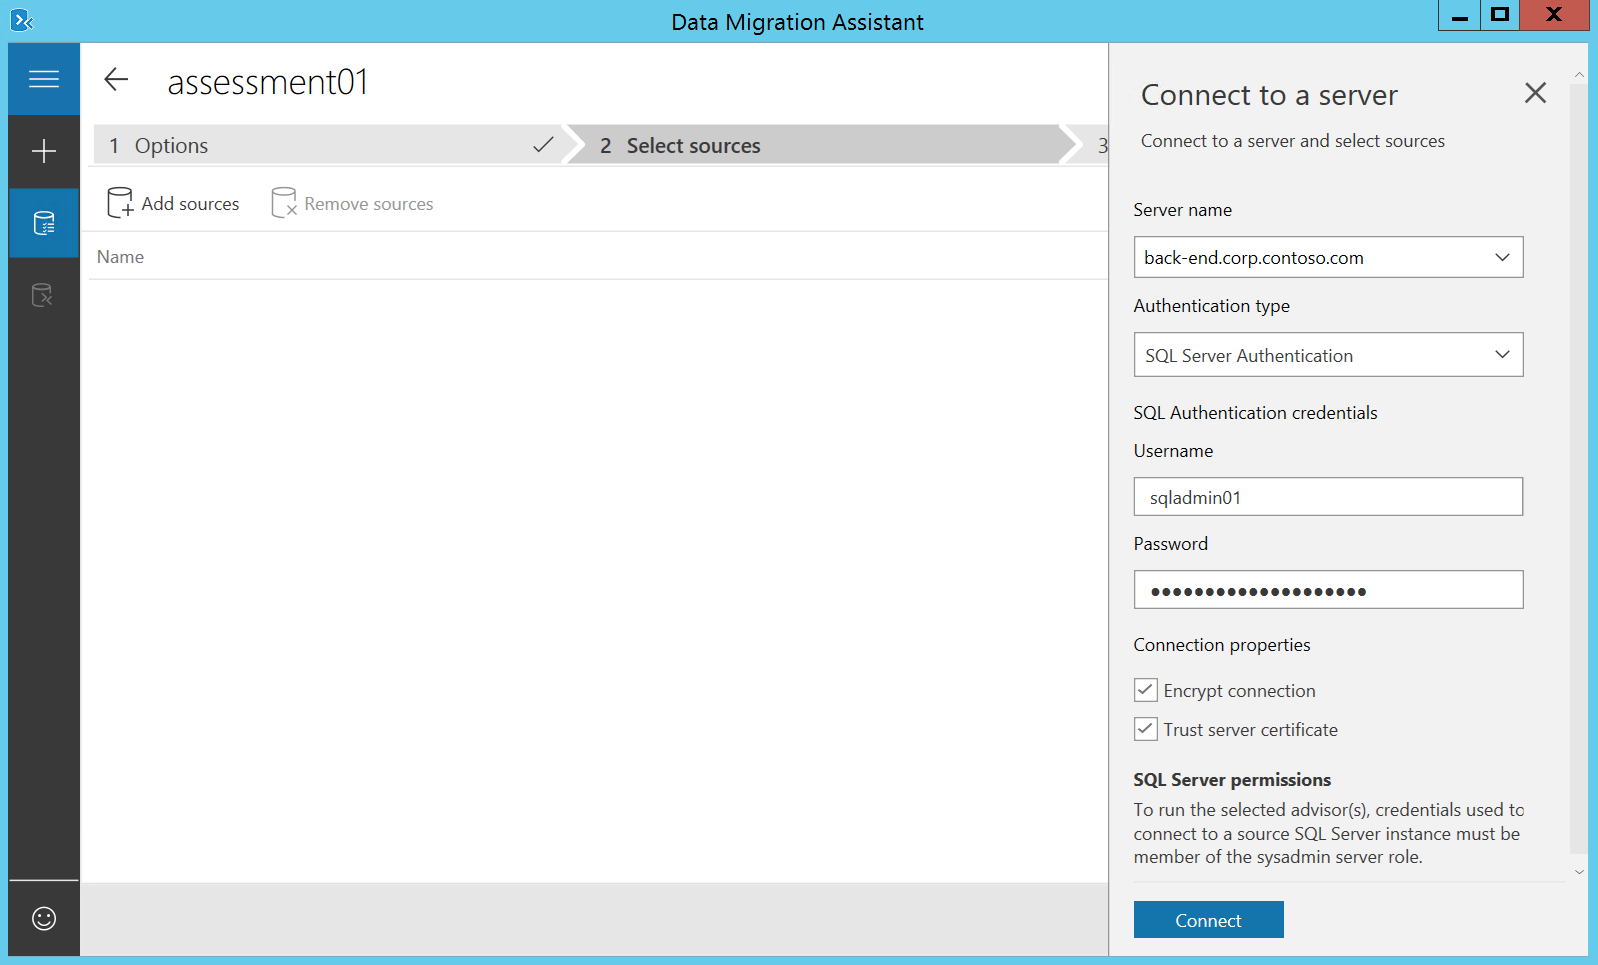
Then provide server IP/FQDN, specify credentials of a user with sysadmin role.
Select databases that you want to assess.
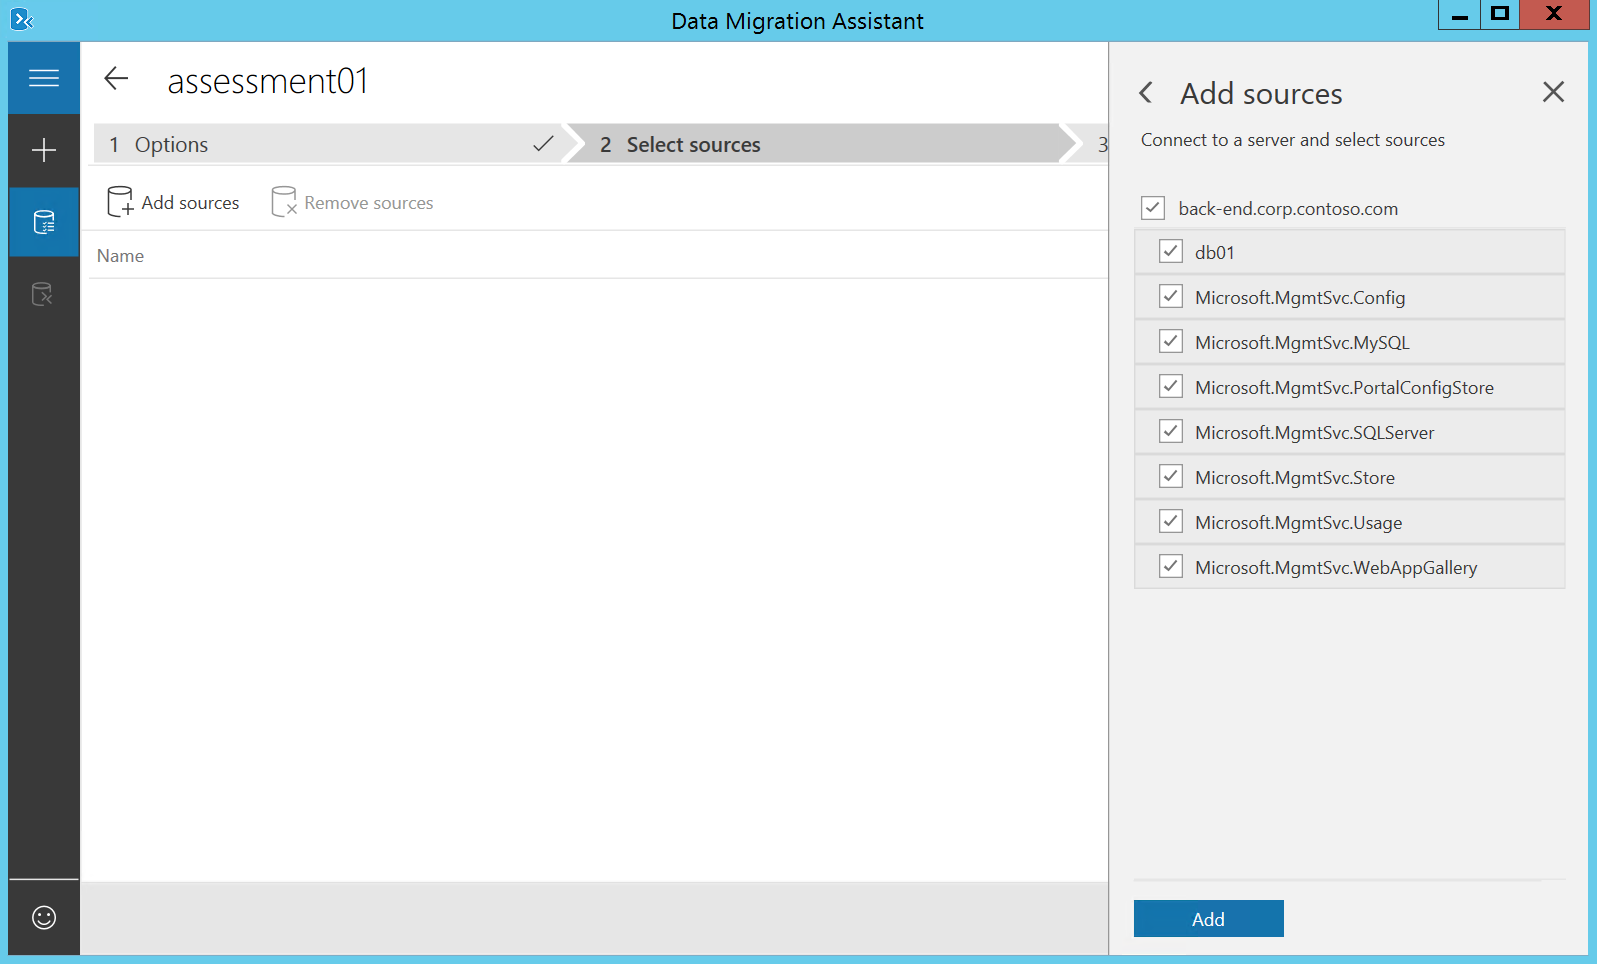
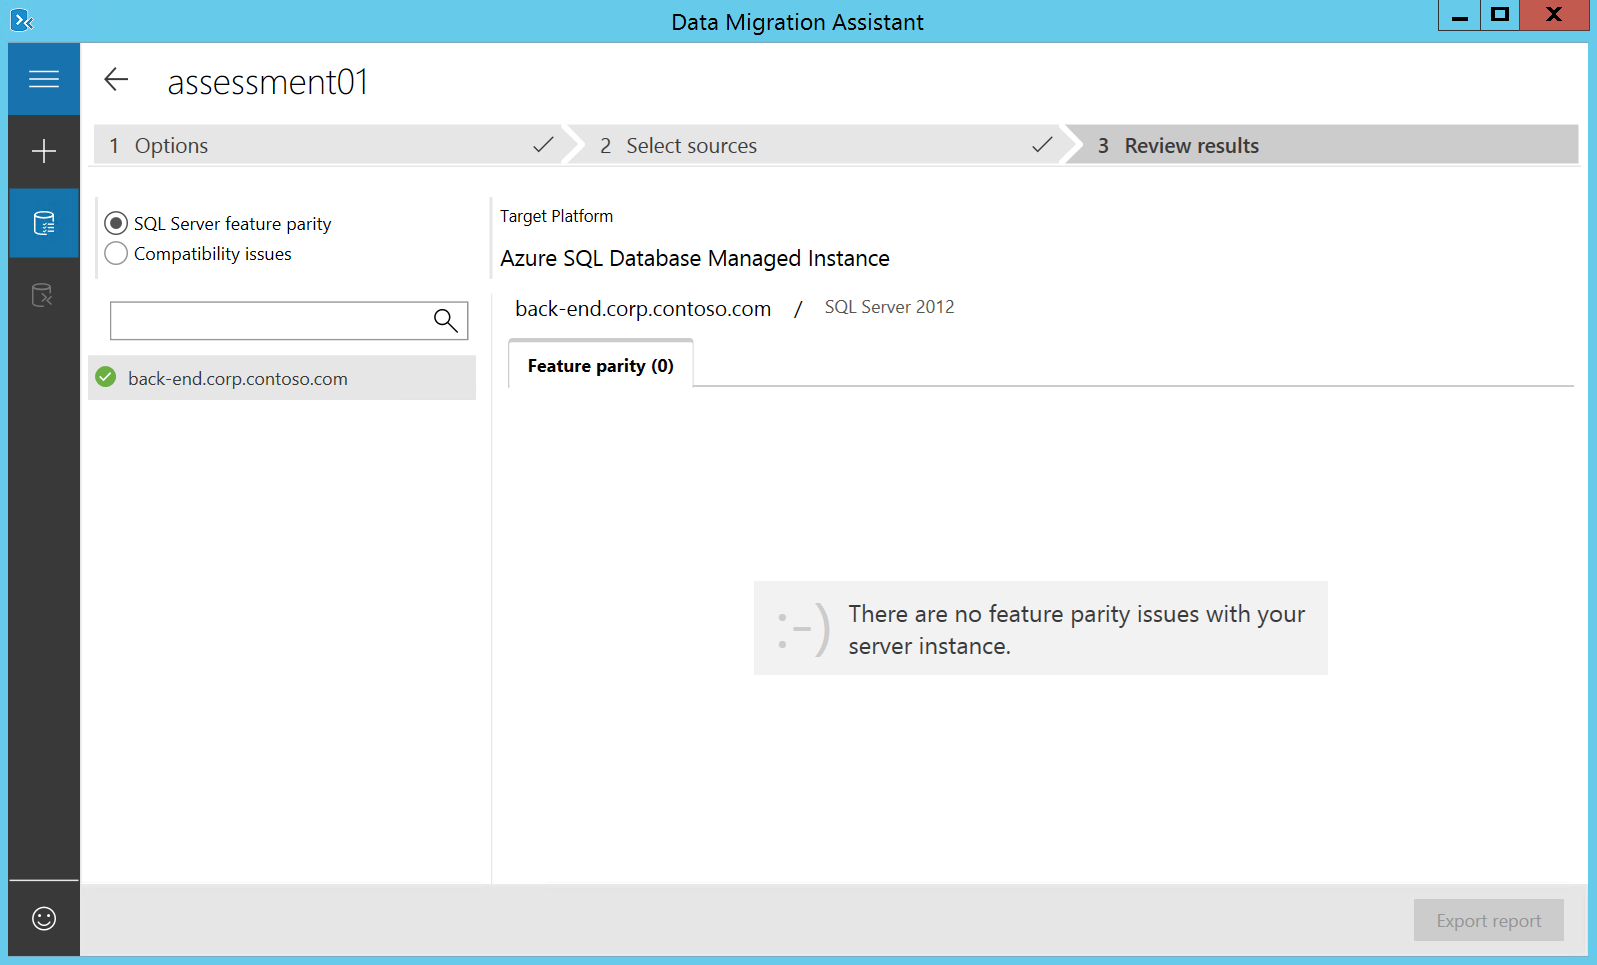
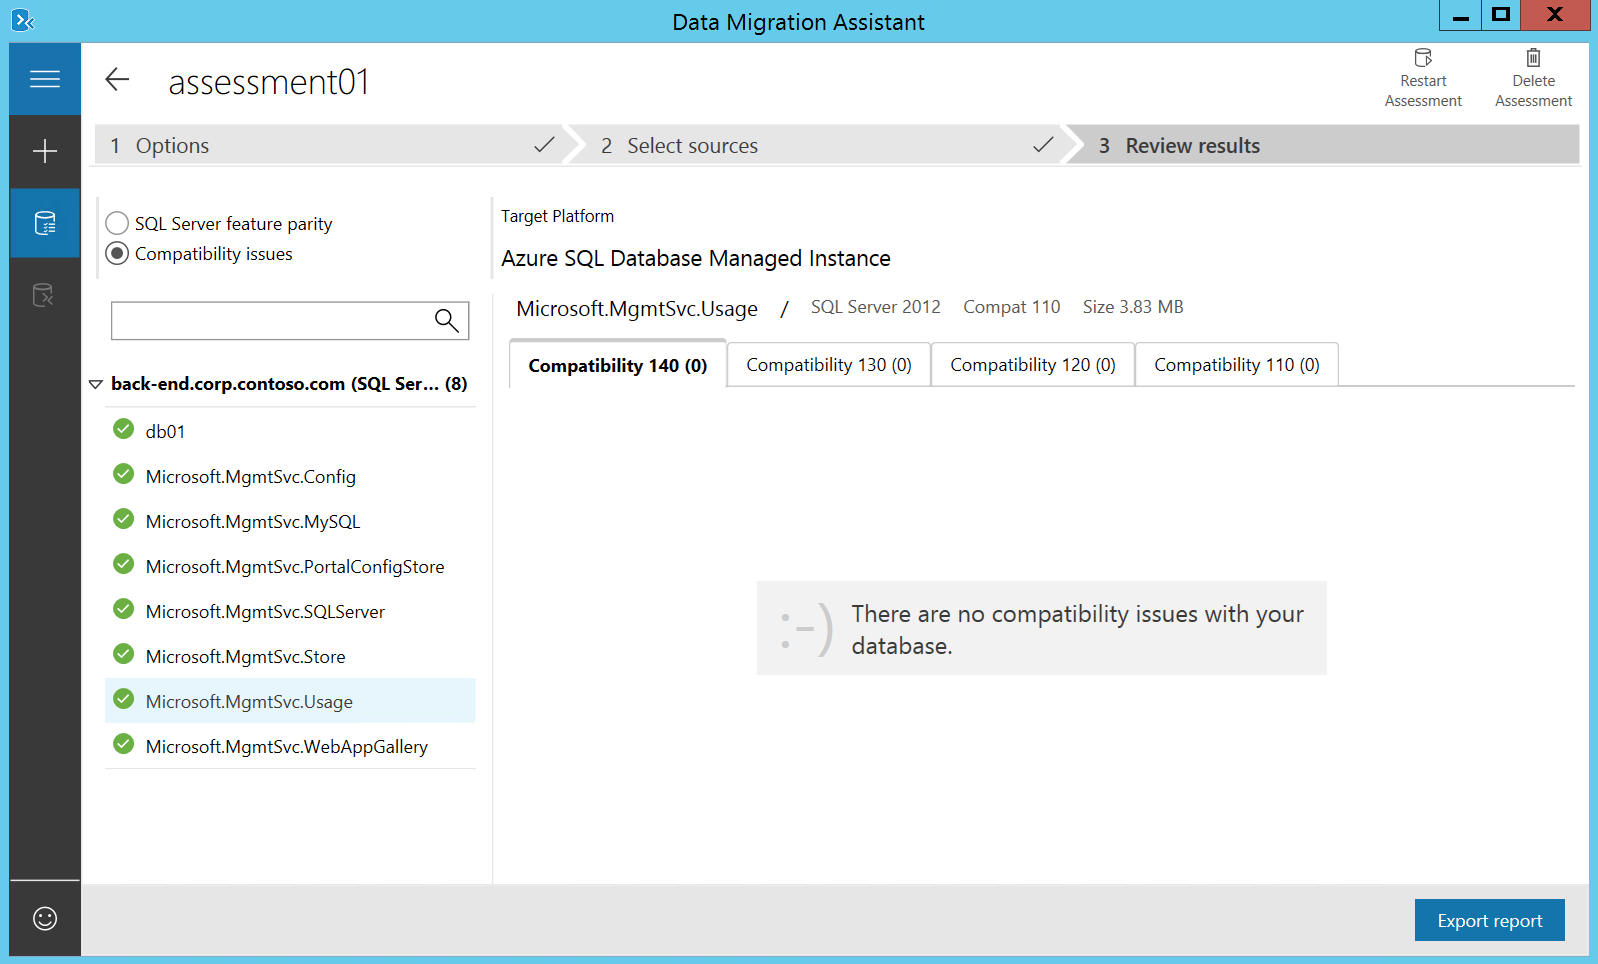
Wait for few minutes and check the results. Ensure that you don't have any blocking issues and read all warnings. In our case everything is OK.
Step 2: Create SQL MI Instance
Go to Azure Portal and click Create a resource -> Databases -> Azure SQL Database Managed Instance. 
Specify managed instance name, admin login credentials and select if you want wizard to create a new vNet for you of select a qualifying subnet (if you've created in manually before).
If you select Create new virtual network, then a new vNet with standard name and address space 10.0.0.0/16 will be created.
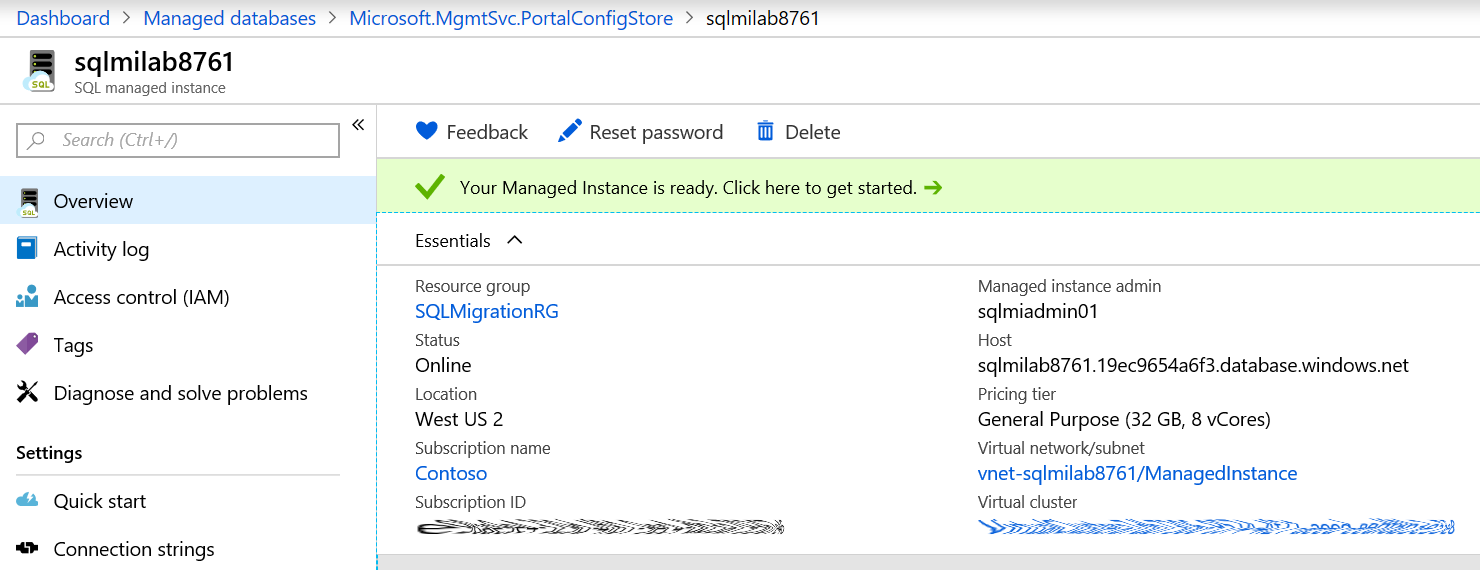
Wait for several hours until deployment is complete.
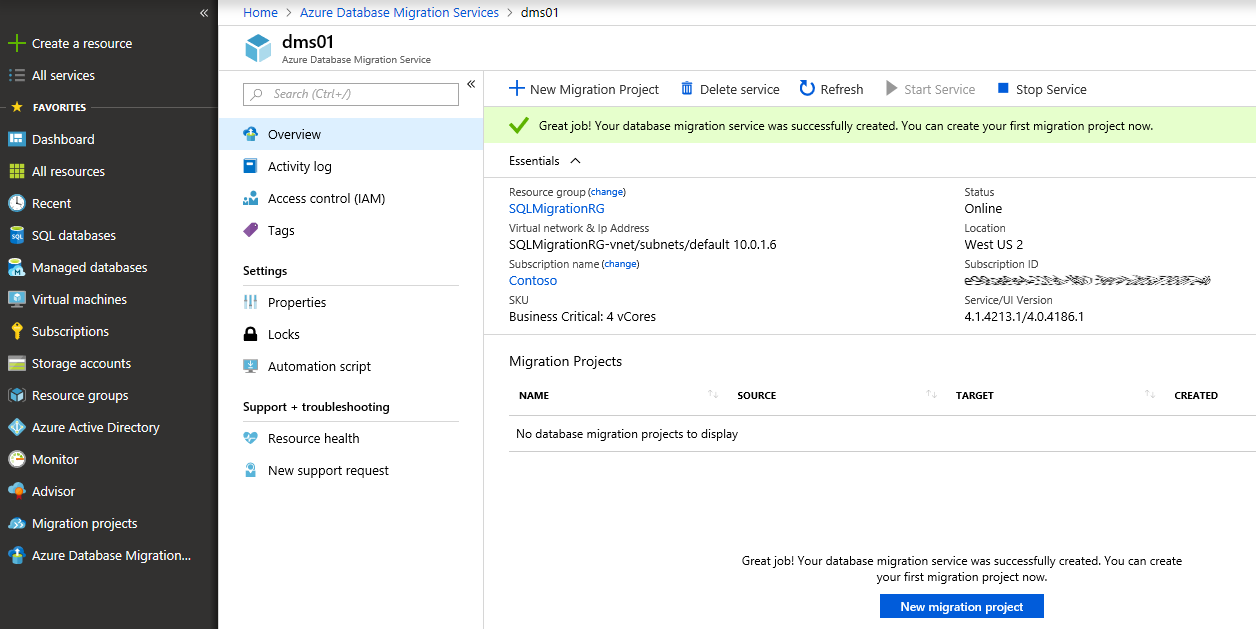
Step 3: Create DMS Instance
Go to Azure Portal and click Create a Resource, search for Database Migration Service and click Create.
Specify DMS instance name, select virtual network where your source SQL Server resides and select tier. I will use Business Critical tier since we plan to use online database migration mode.
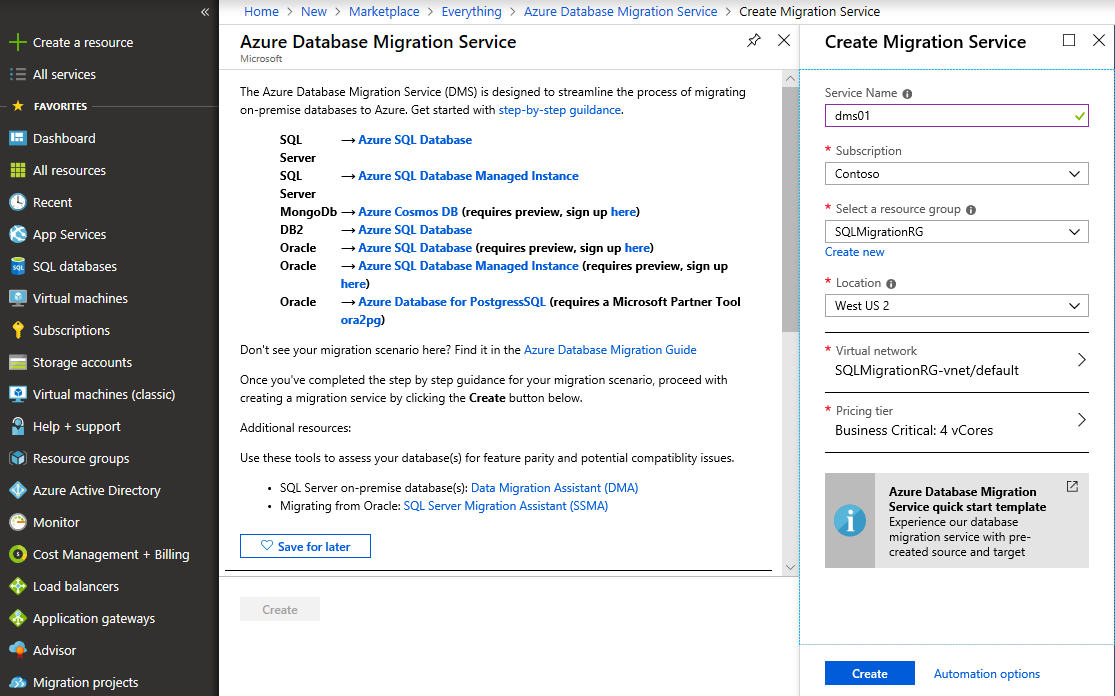
Wait for an hour until DMS instance is created.
Step 4: Connect source SQL Server, SQL MI and DMS
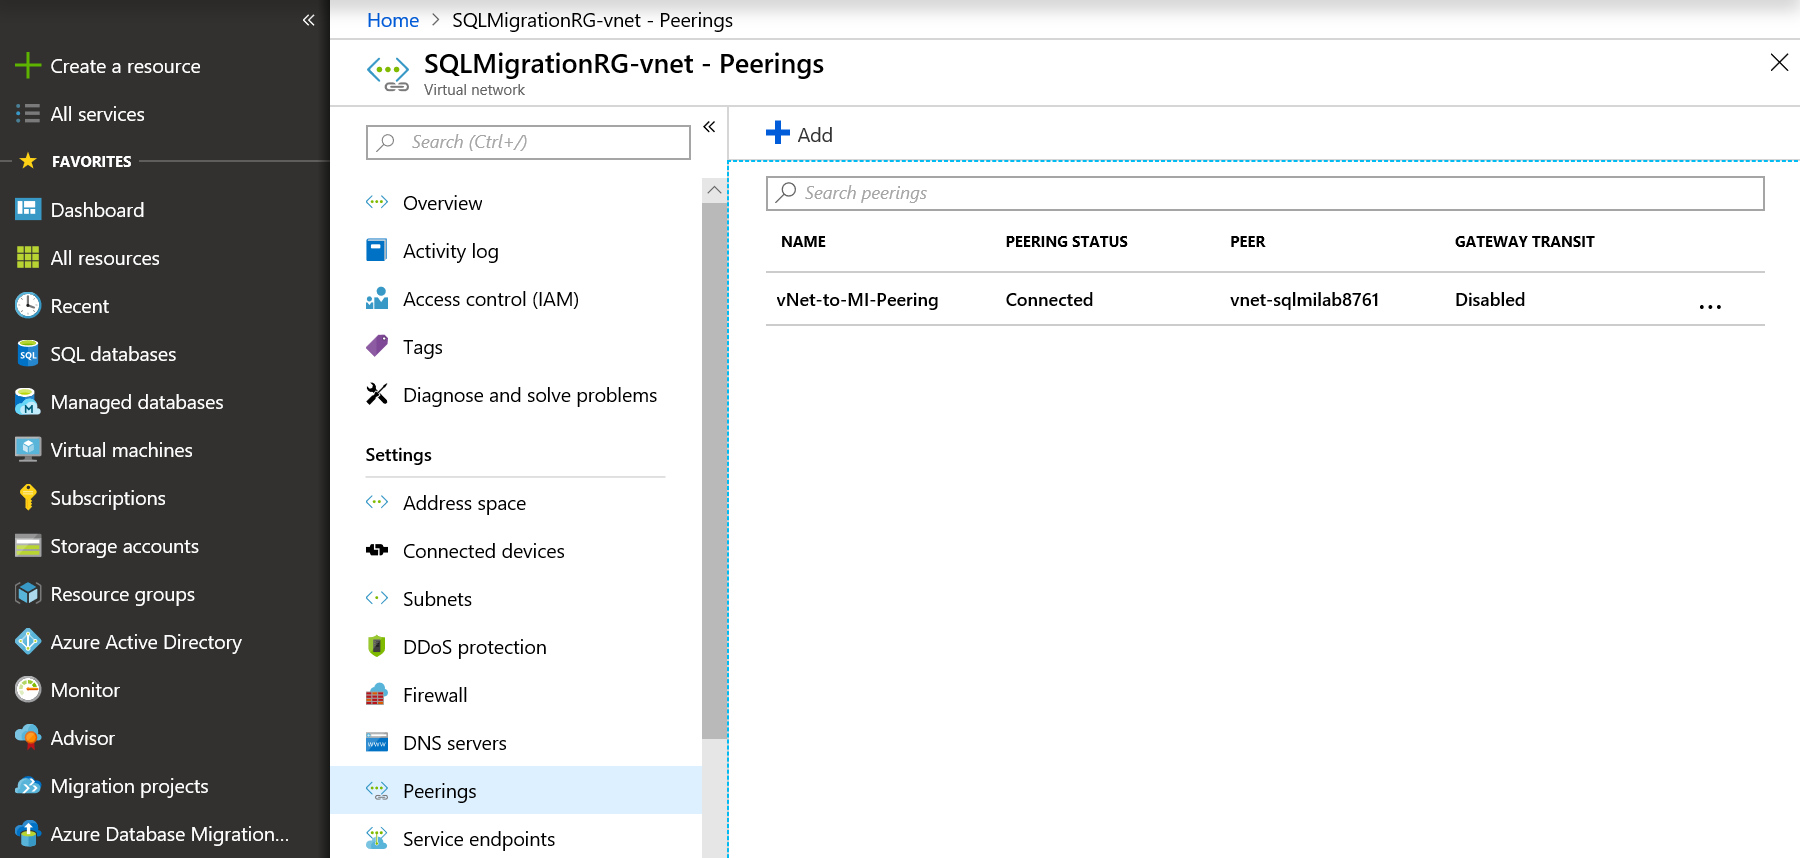
In order to use DMS for migration, it should be able to connect to source SQL Server and to destination SQL MI using the network. In our case we will use vNet peering since source and destination servers reside in two different vNets inside the same Azure region.
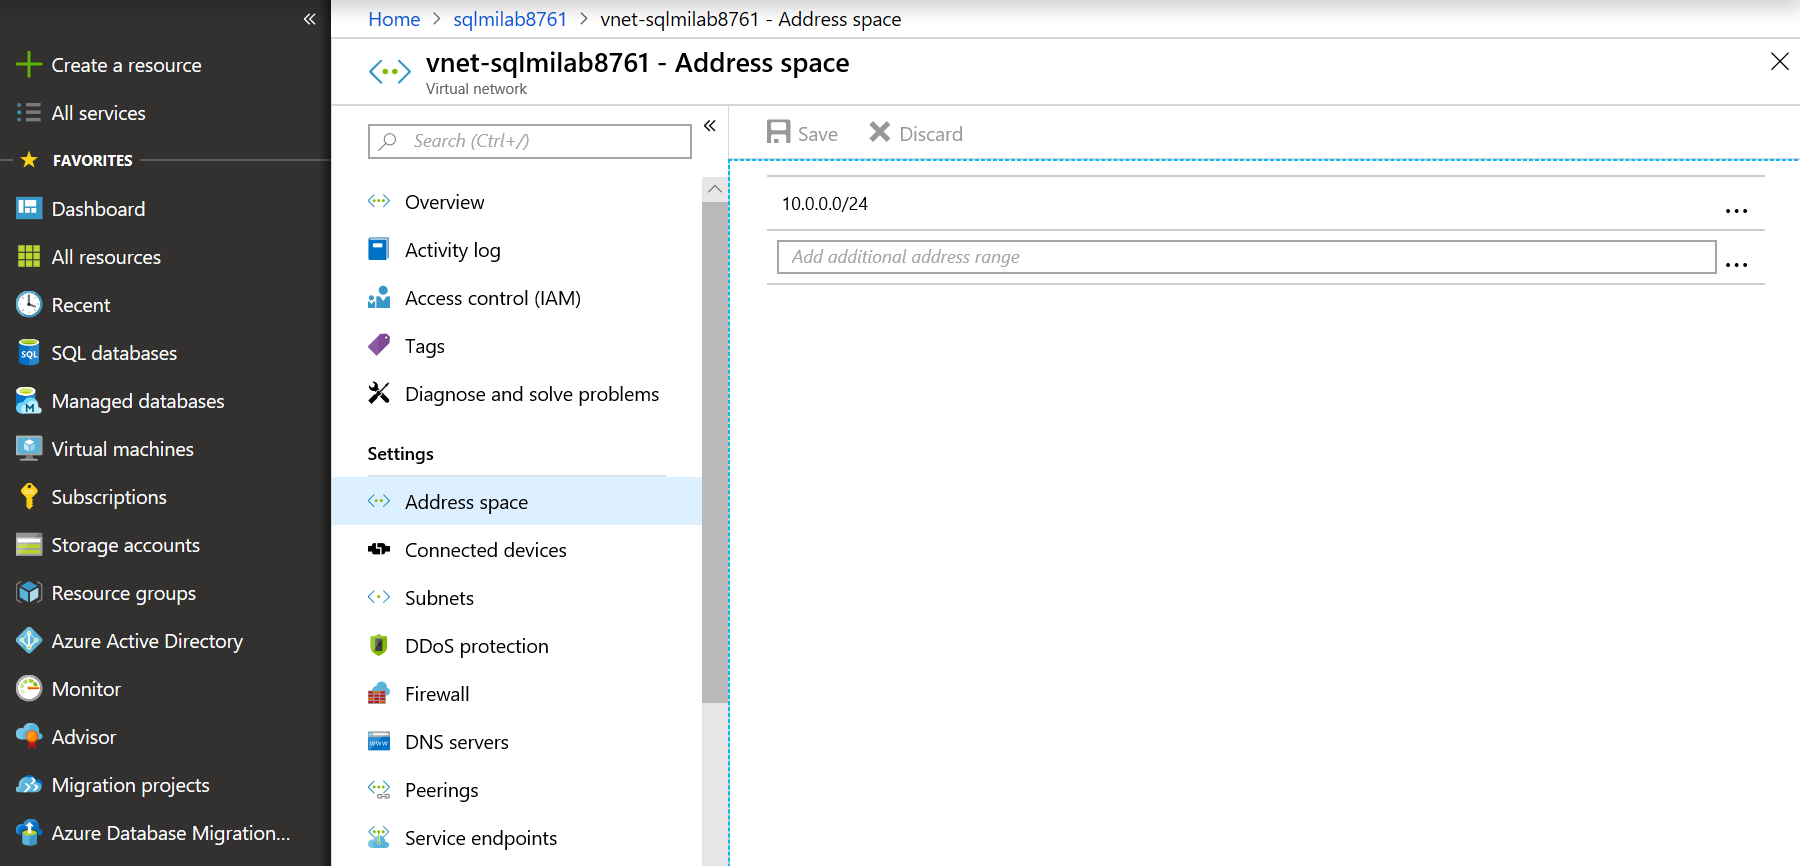
Since vNet where source SQL Server resides has address space 10.0.1.0/24, is conflict with SQL MI vNet with address space 10.0.0.0/16. To resolve that, we'll just reduce the address space in SQL MI vNet to 10.0.0.0/24. Now we have two vNets with two address spaces - 10.0.0.0/24 (SQL MI vNet) and 10.0.1.0/24 (vNet with source SQL Server VM).
Go to first vNet settings, select Peerings and create a peering request from SQL MI vNet to another vNet. Then do the same on another vNet side and create a peering request to SQL MI vNet.
After creating requests from both sides, peering should turn into Connected state.
Now we should be able to connect to SQL MI from any VM in the same vNet where source SQL Server resides using SQL Server Management Studio.
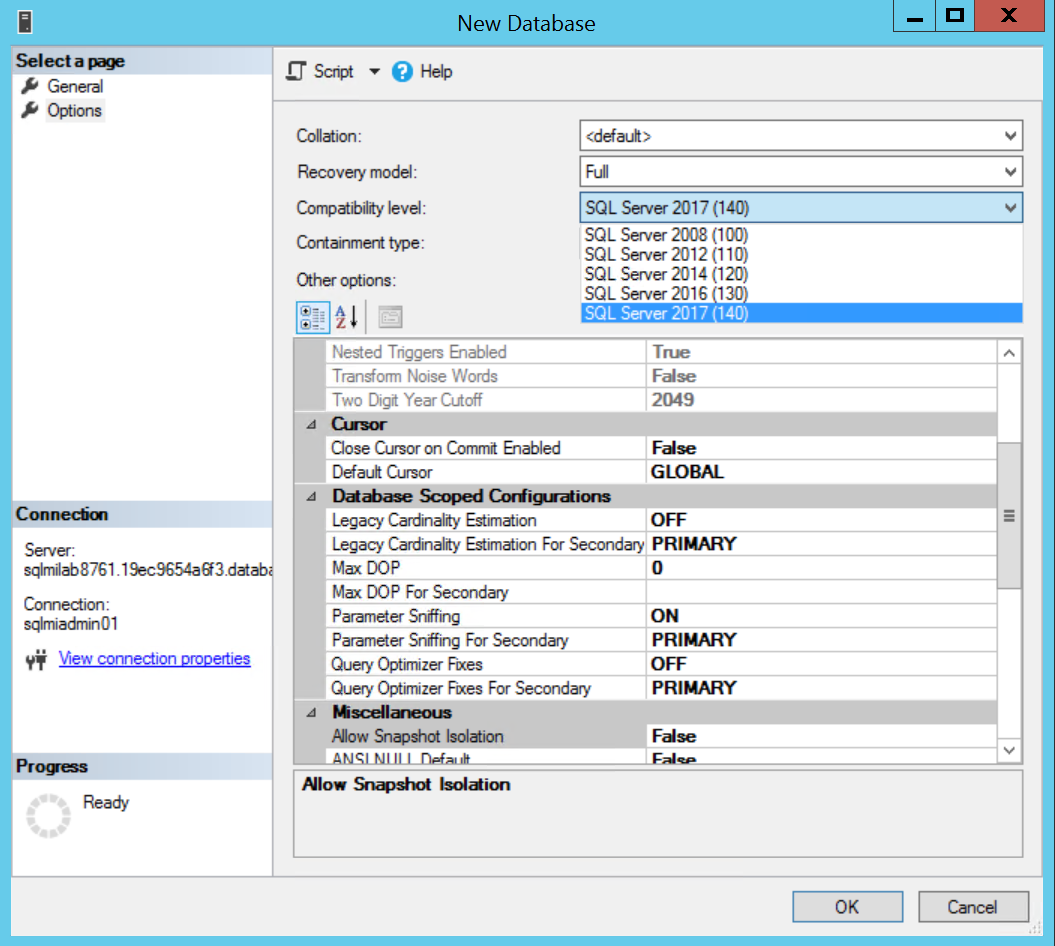
As you see, SQL MI supports databases with compatibility level starting from 100 (SQL Server 2008) up to 140 (SQL Server 2017).
Windows authentication is greyed out in New Login menu since SQL MI doesn't support Windows authentication logins.

Step 5: Configure DMS
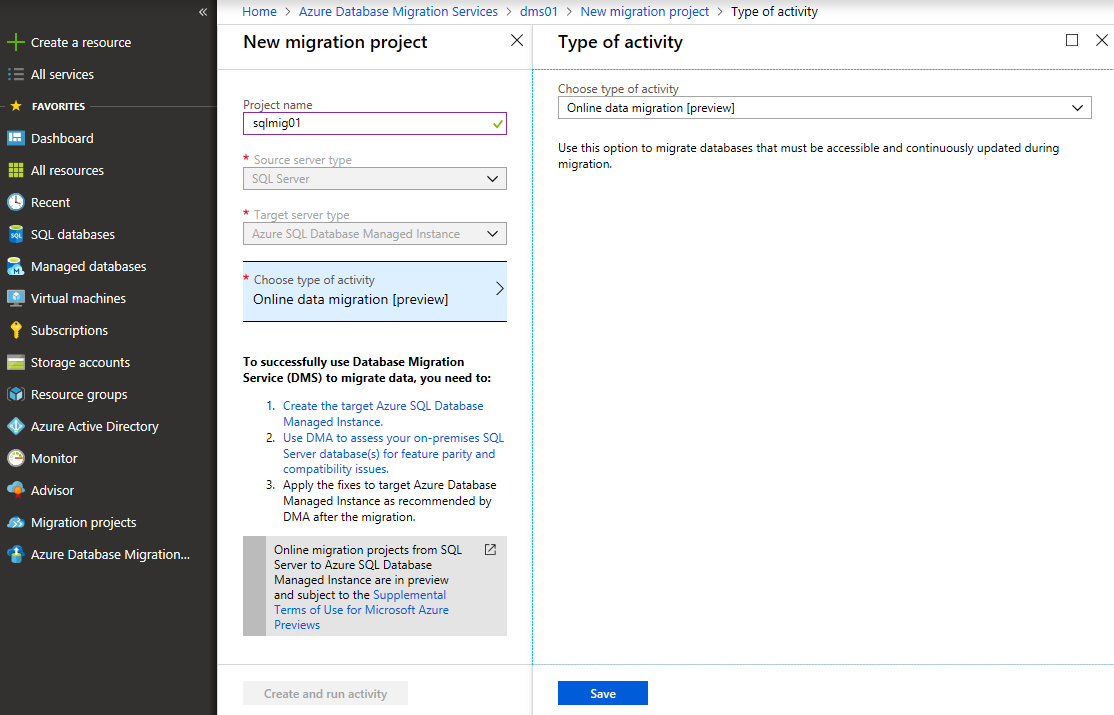
Go to Azure Portal, click All services and search for Azure Database Migration Service. Click New migration project. Give it a name and select Online data migration ( see the difference between online and offline mode in the beginning of this article).
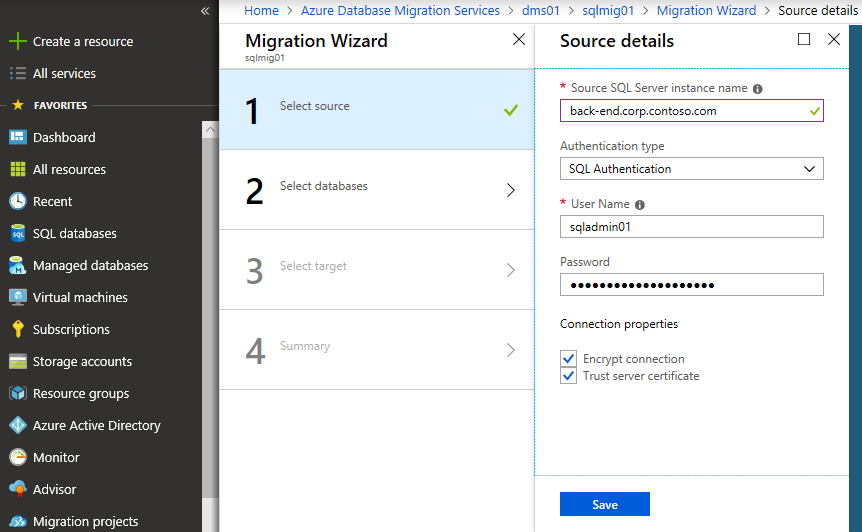
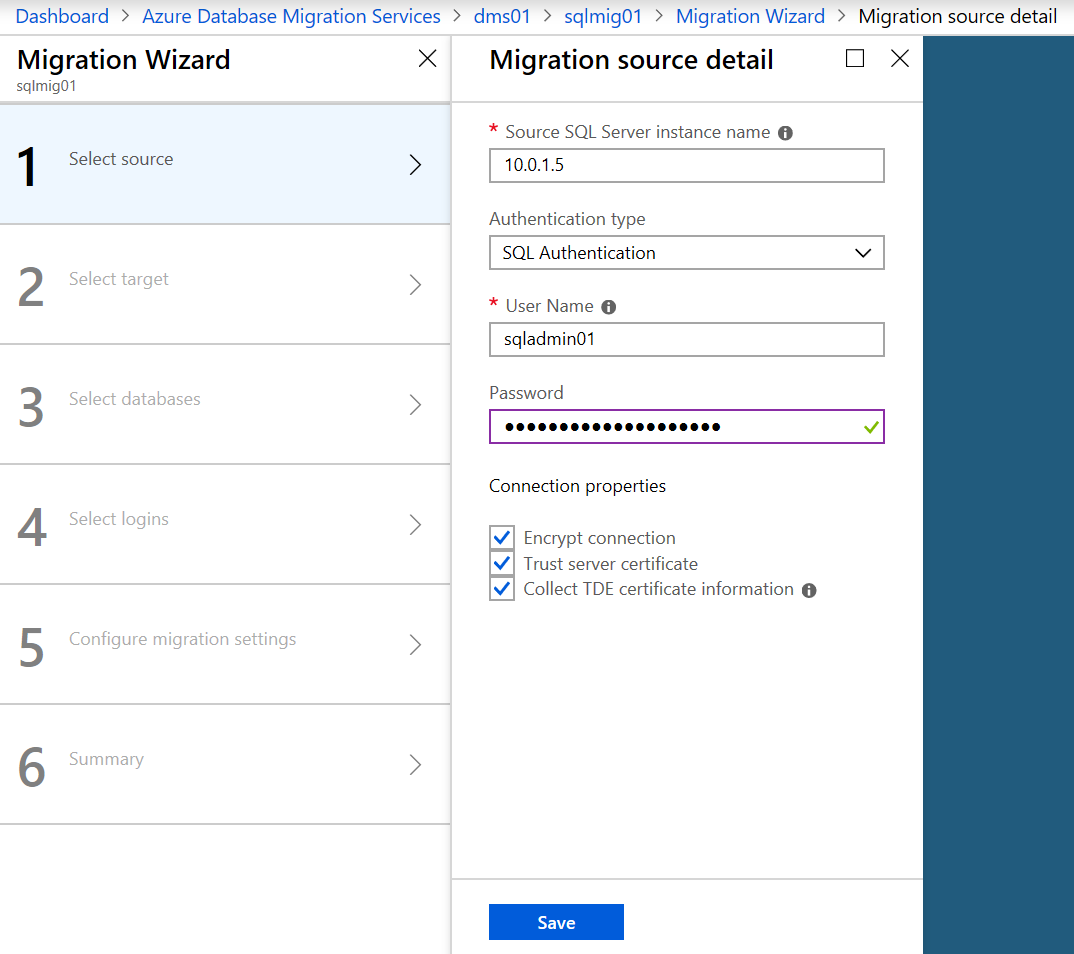
Specify FQDN or IP of the source SQL Server and sysadmin user credentials. Most probably you will need to select Trust server certificate, otherwise DMS connection attempt will fail.
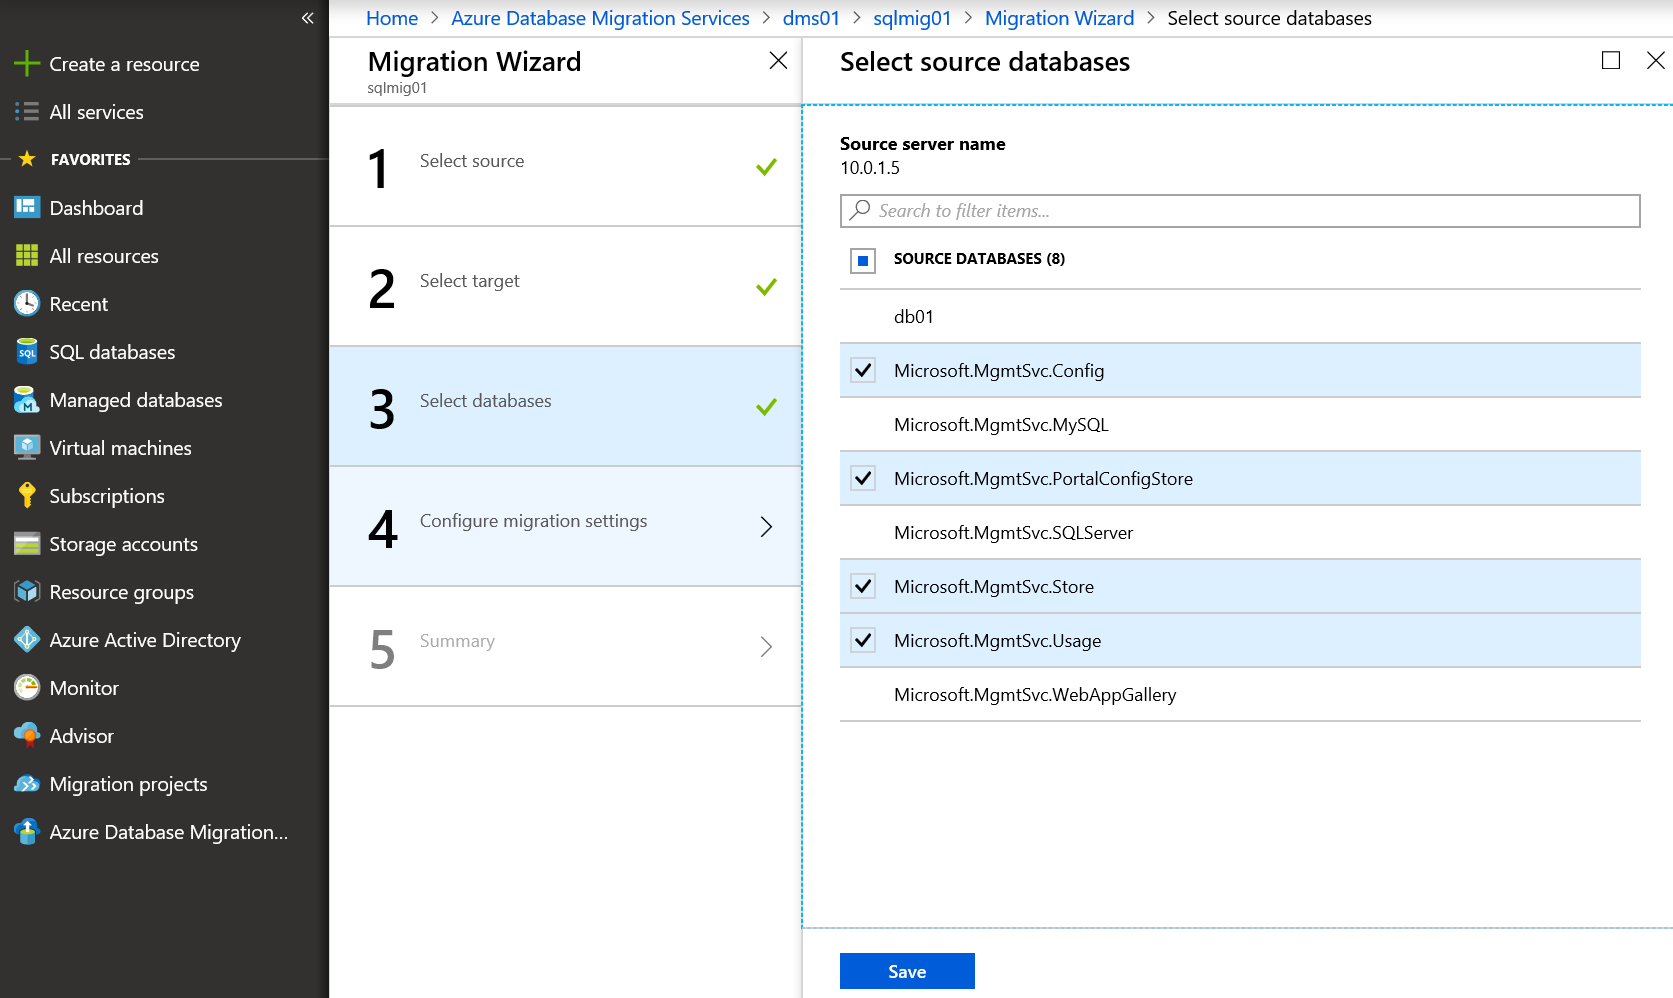
If connection is successful, on the next step you will see all databases running on that server. Select all DBs.

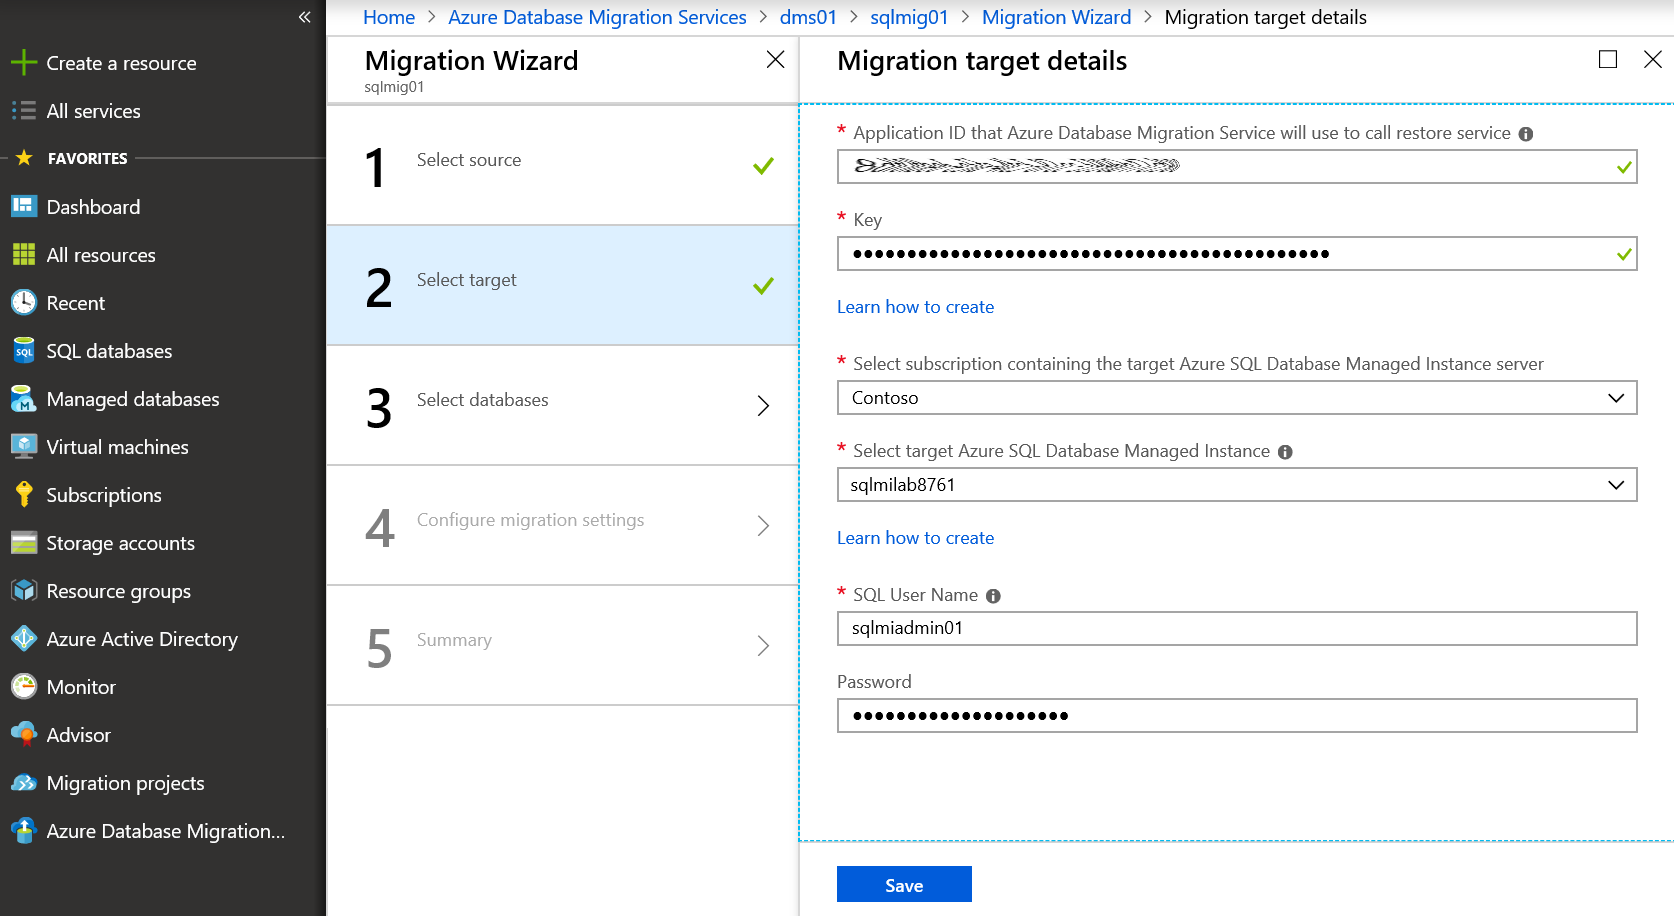
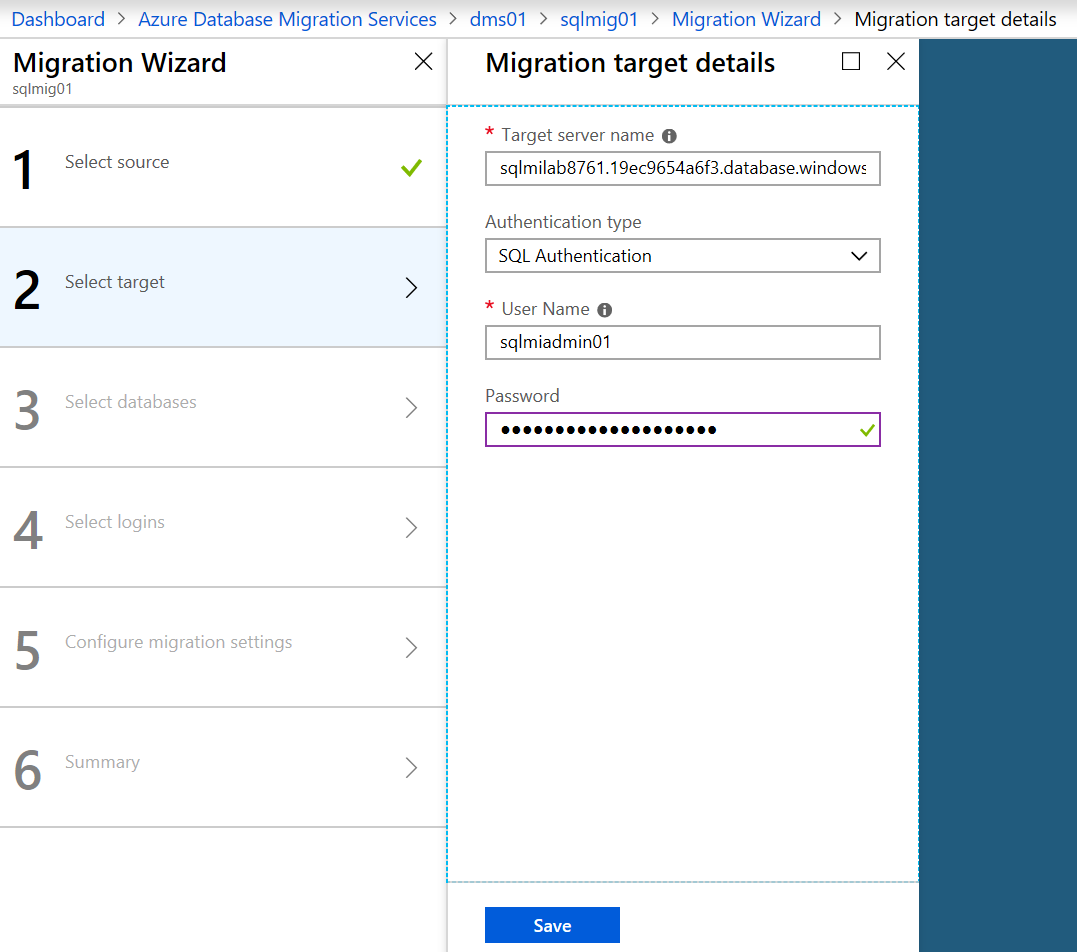
Specify FQDN of SQL MI and user credentials of SQL MI.
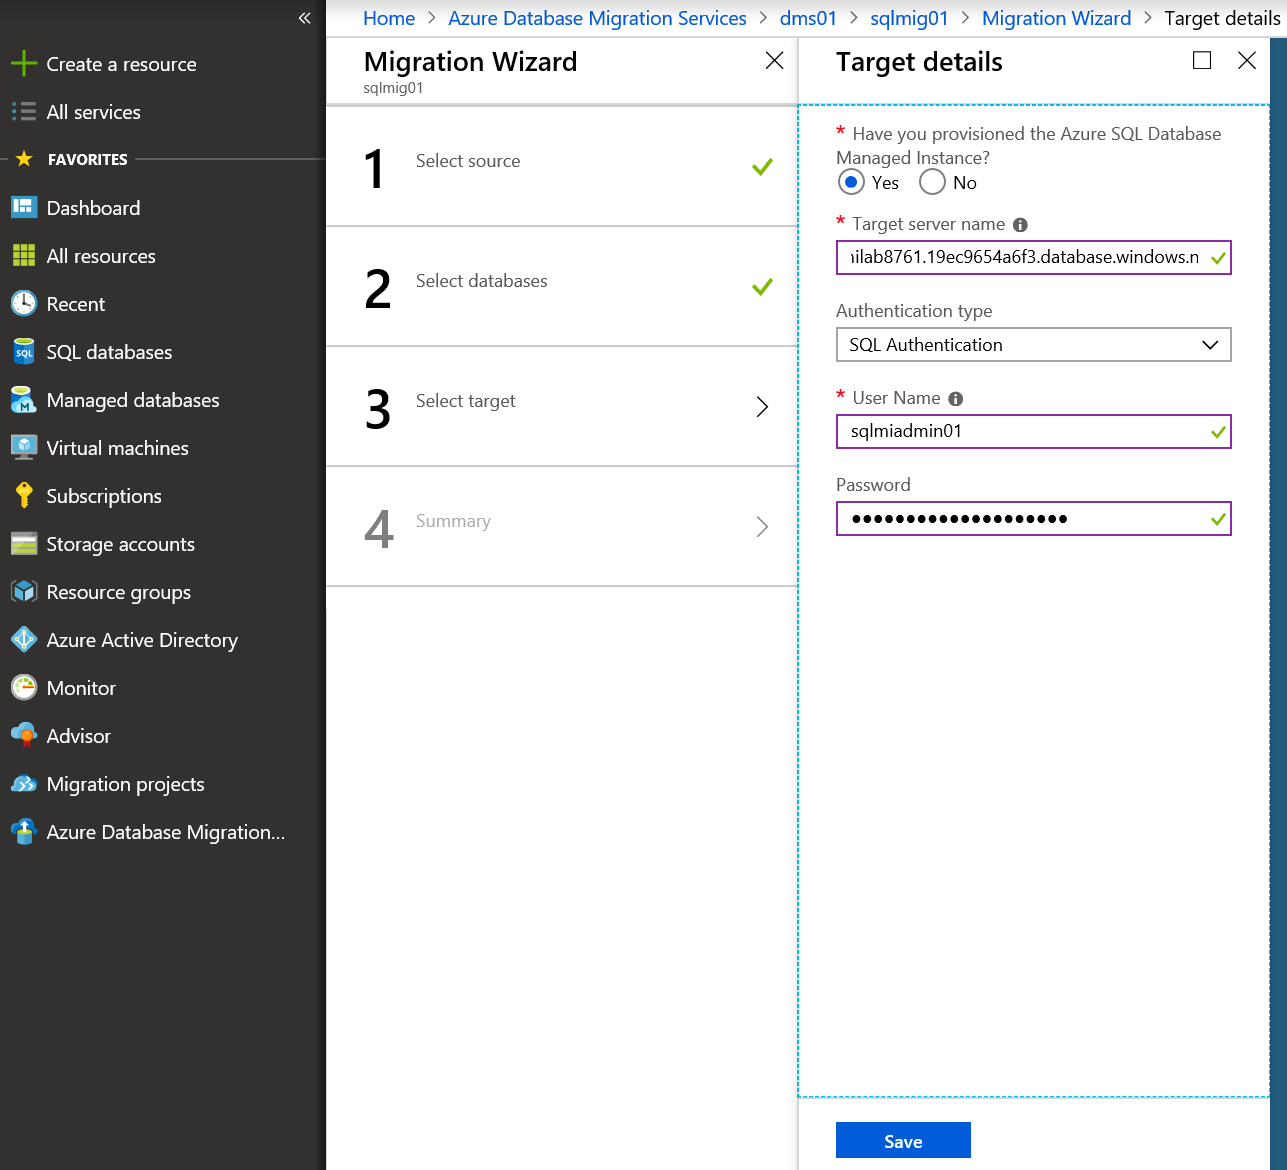
Click Save to save this migration project.
Step 6a: Migrate databases using online mode
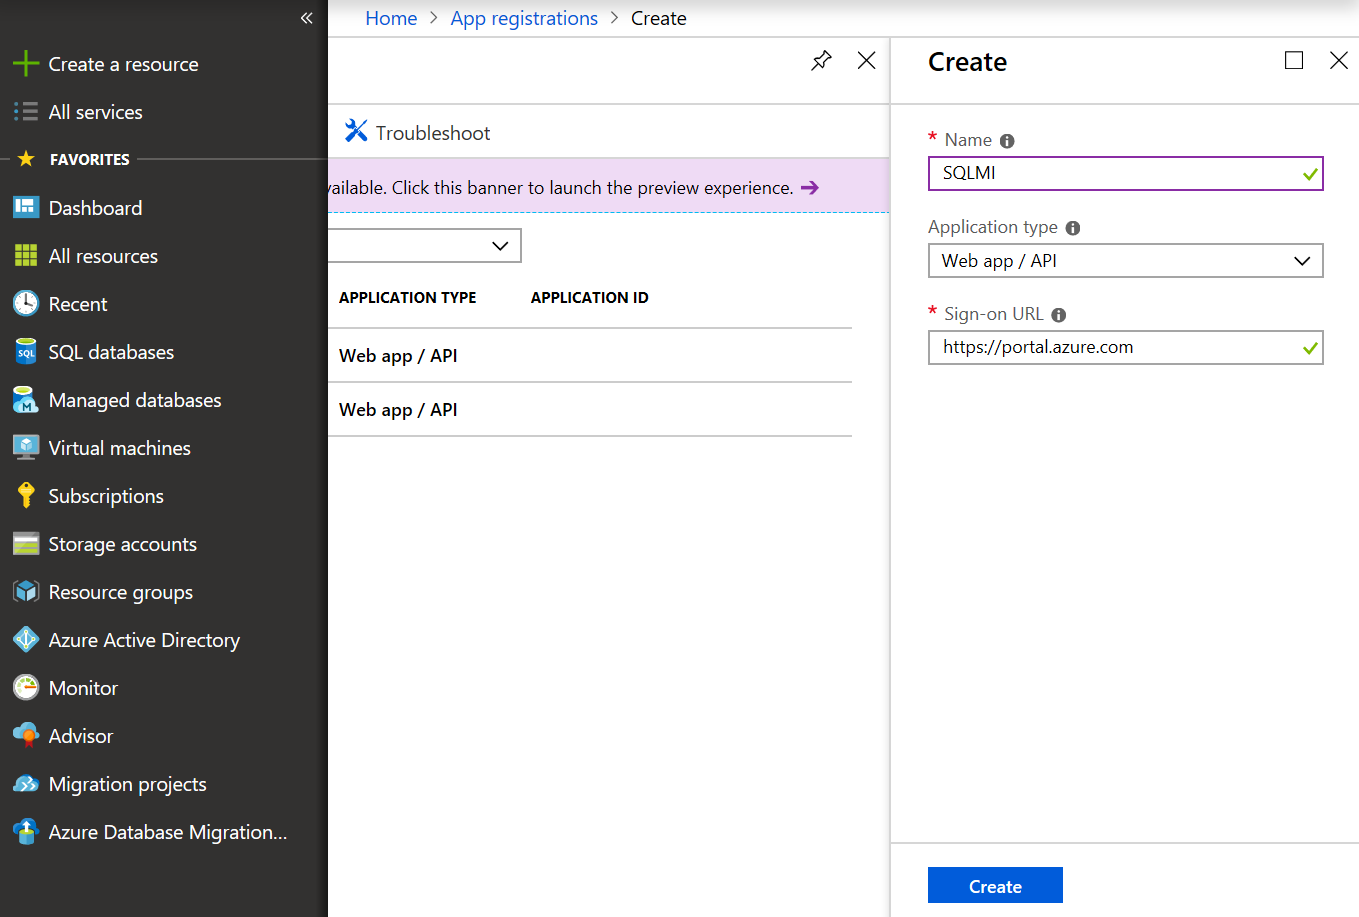
In order to use online mode of DMS, you need to create app registration in your Azure Active Directory. For that go to your Azure AD settings -> App Registrations -> Create. Specify any name and any resolvable sign-on URL (e.g. https://portal.azure.com).
Then go to Keys and create a new key. Key value will become visible when you click Save. Store that key and application ID, we'll need it later. 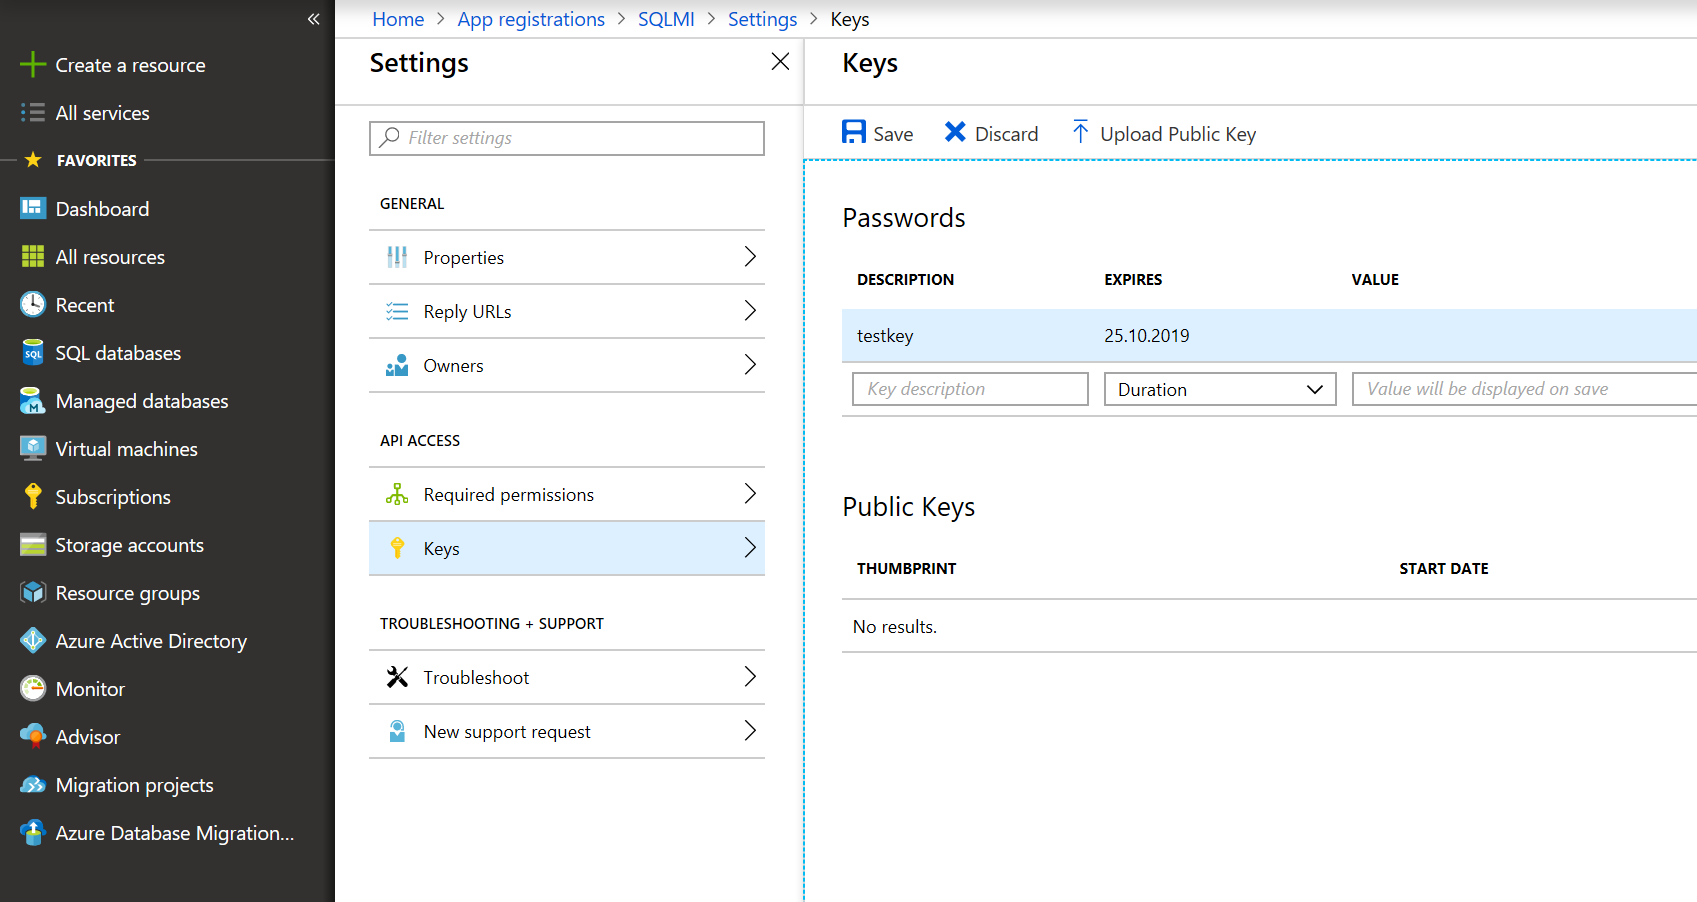
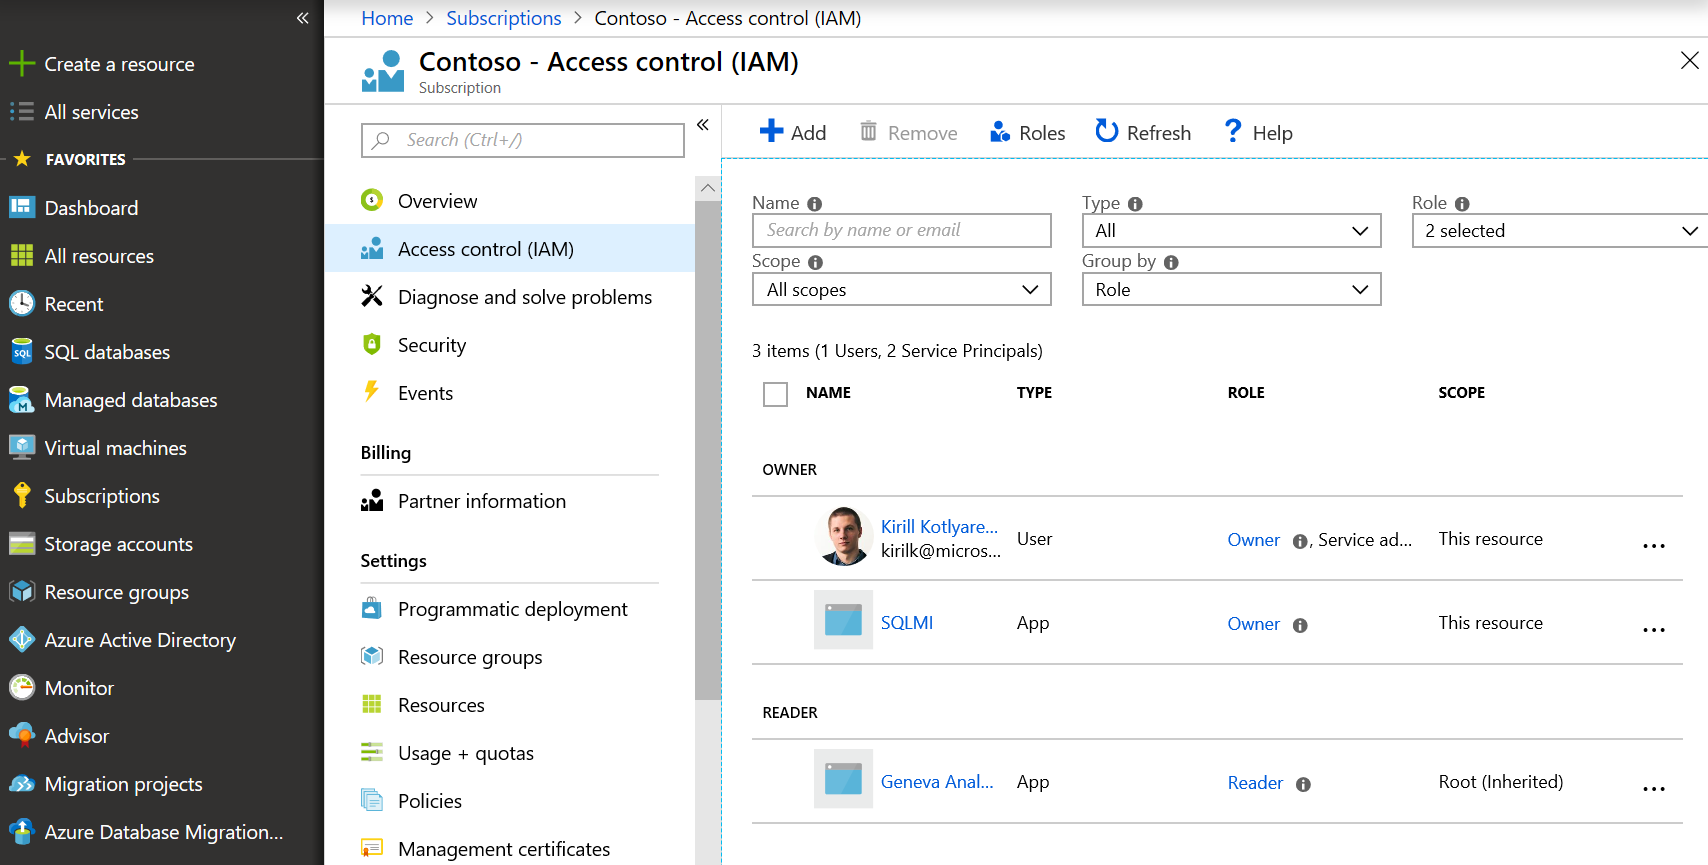
Then go to Azure subscription settings and assign Owner permissions to this app.
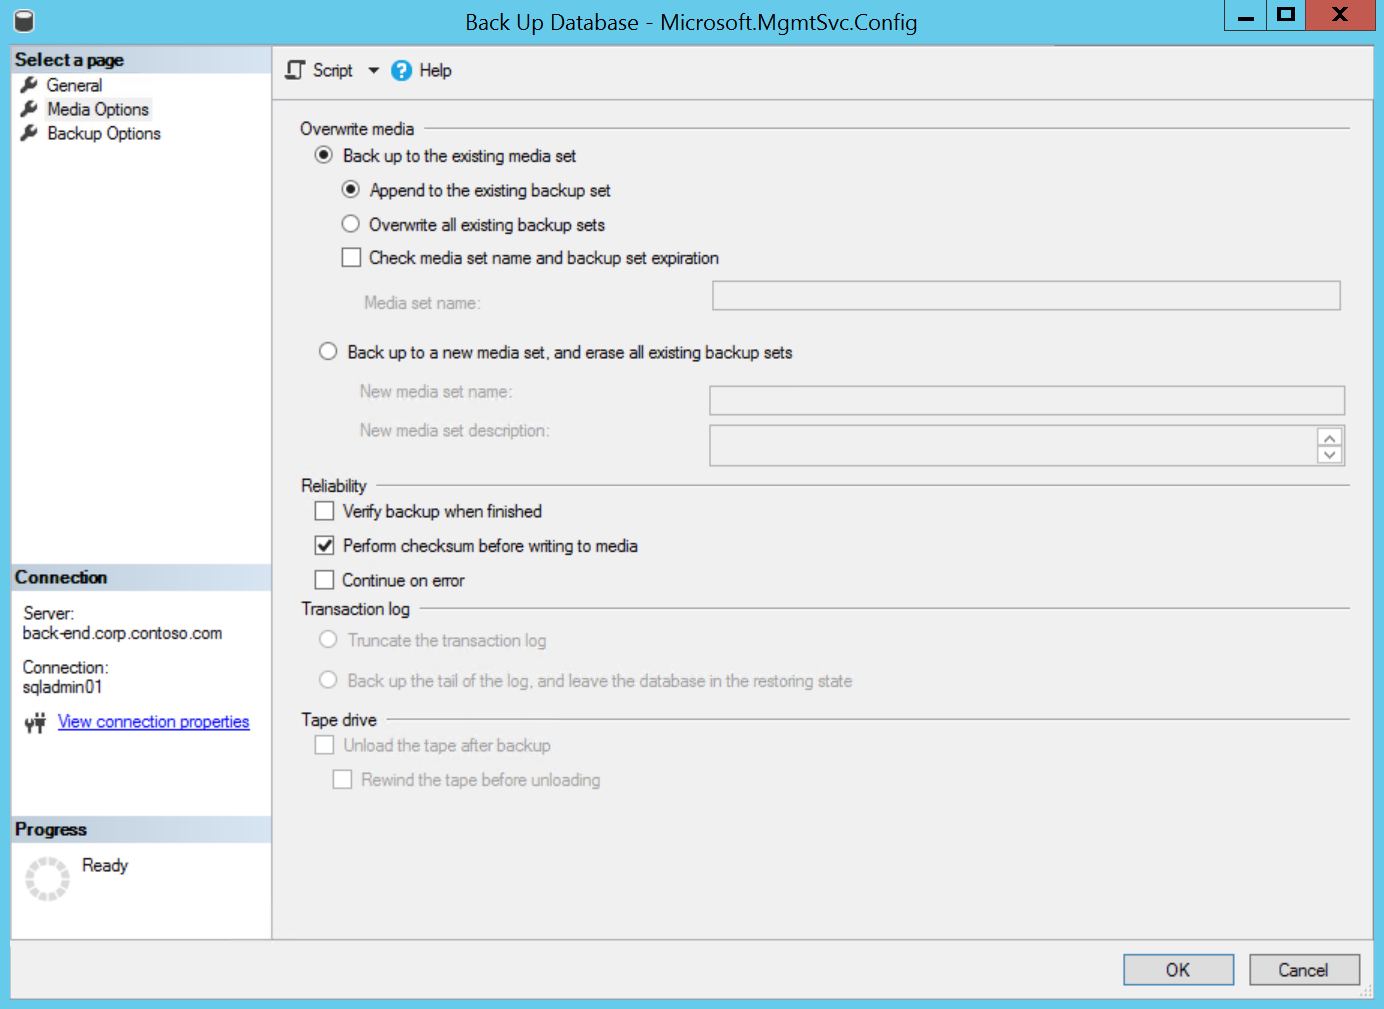
If you don't have backups for DBs that you want to migrate, do them know. Don’t forget to enable Perform checksum before writing to media - that's a requirement on DMS side for SQL Server backups. But I assume you already have full backups and transaction log backups for DBs that you plan to migrate.
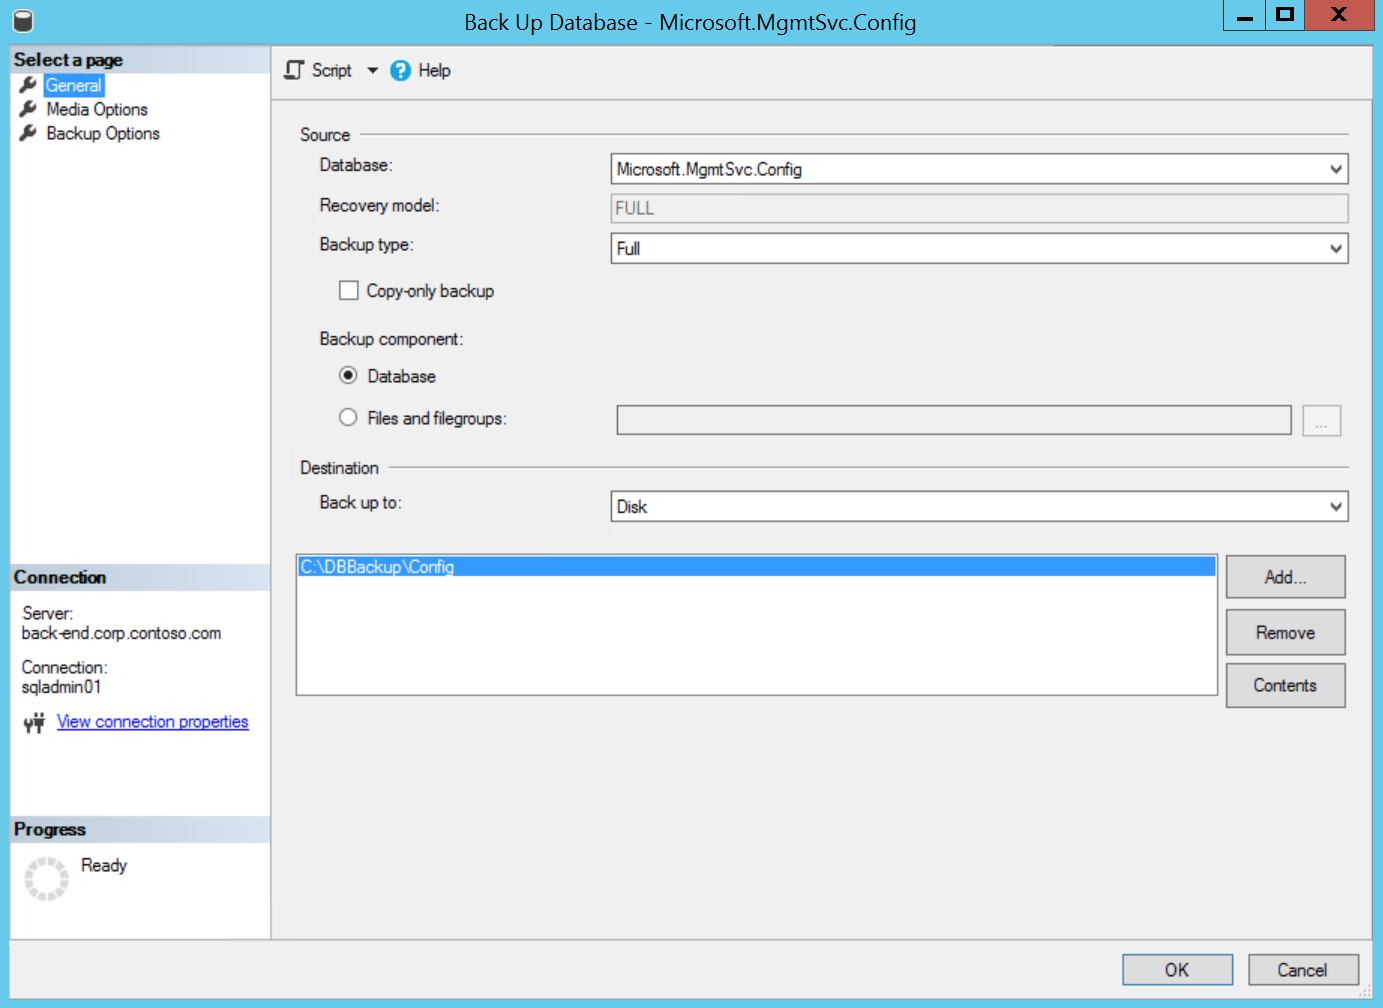
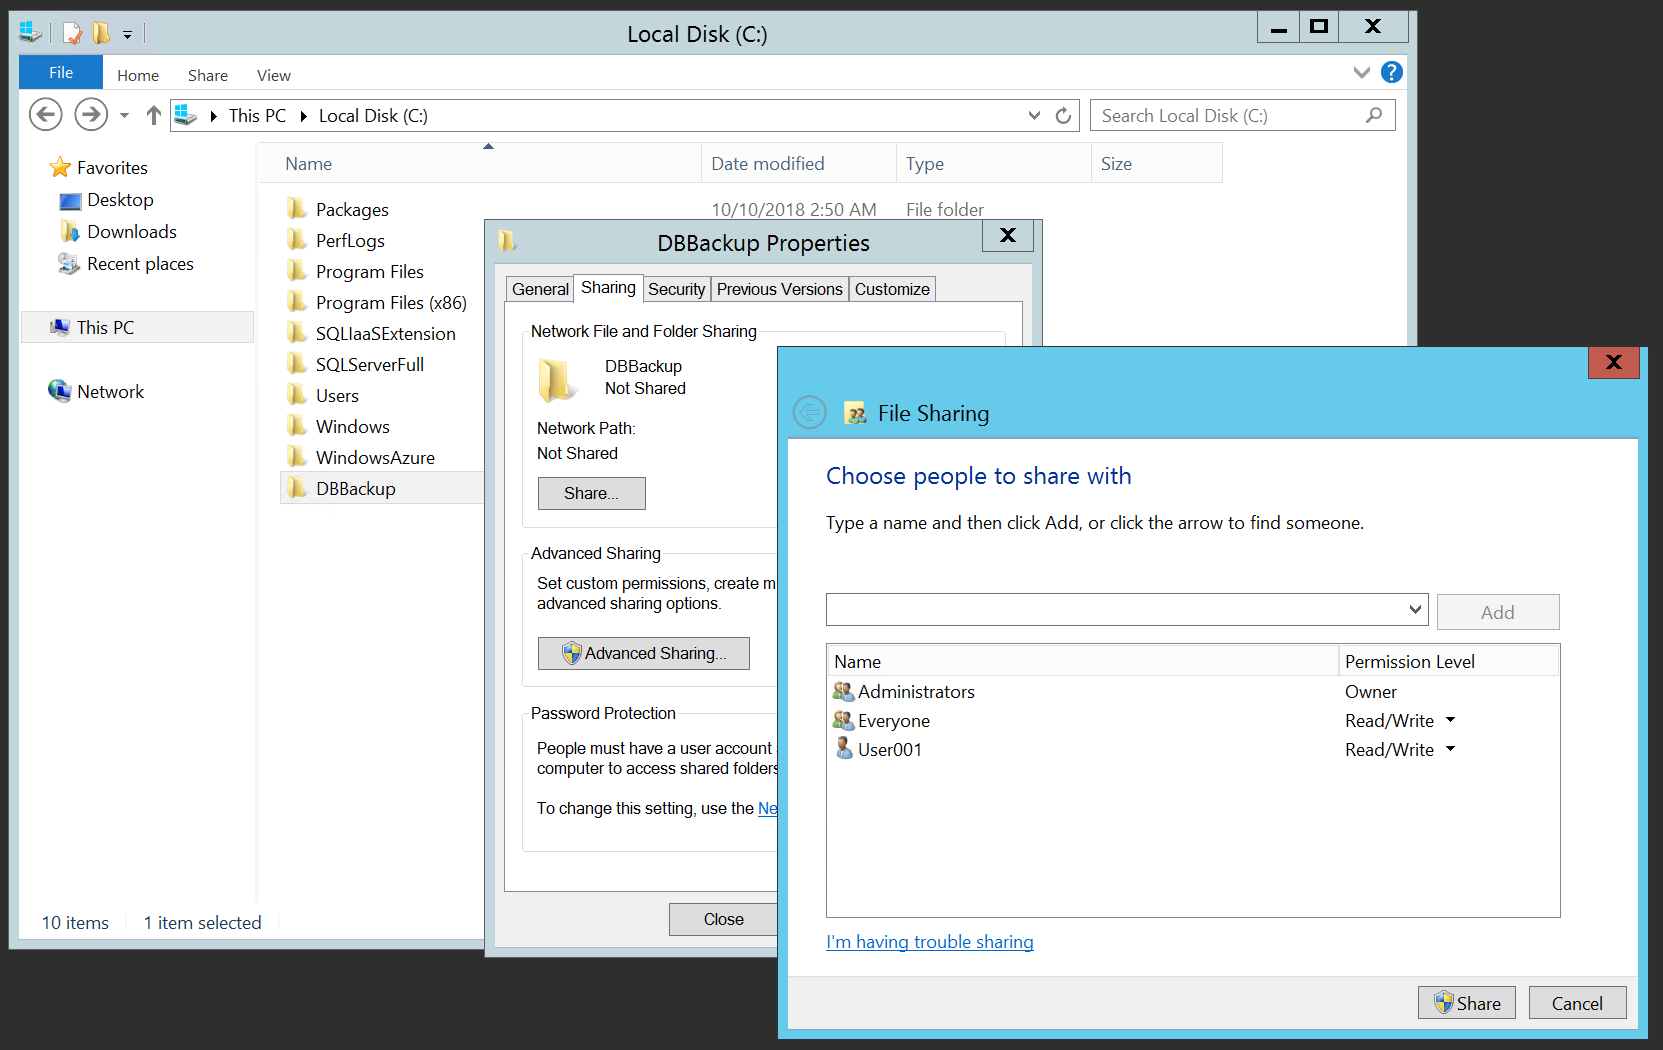
Share the folder where backups are stored. If should be accessible by SQL Server service user using UNC path. Or you share it with Everyone just to be sure.
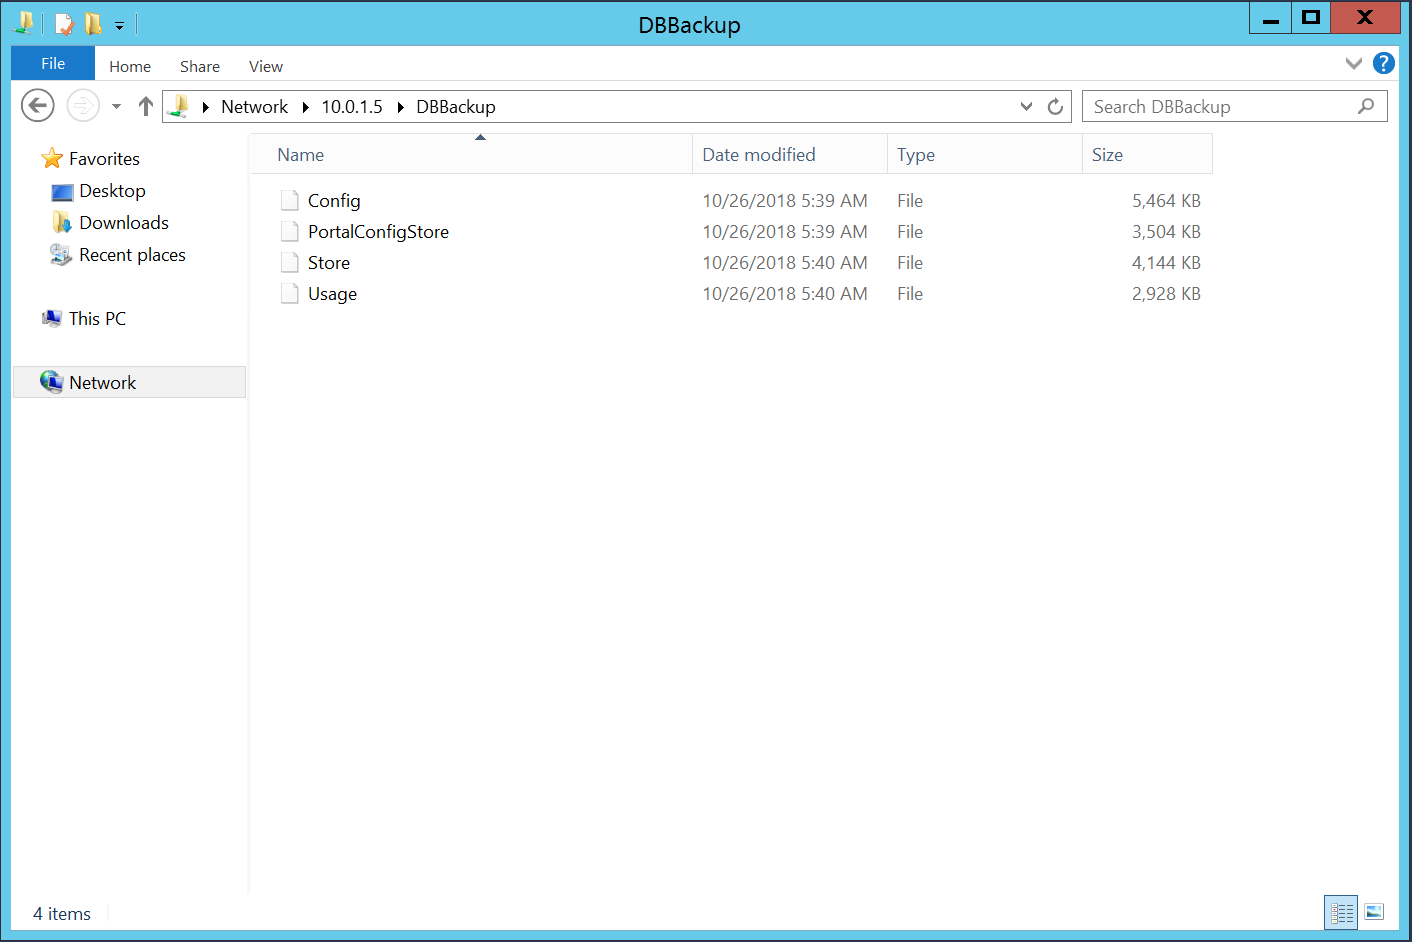
Now all backups are stored in the same folder and accessible by SQL Server service.
Return to DMS page and create New Activity -> Online data migration. 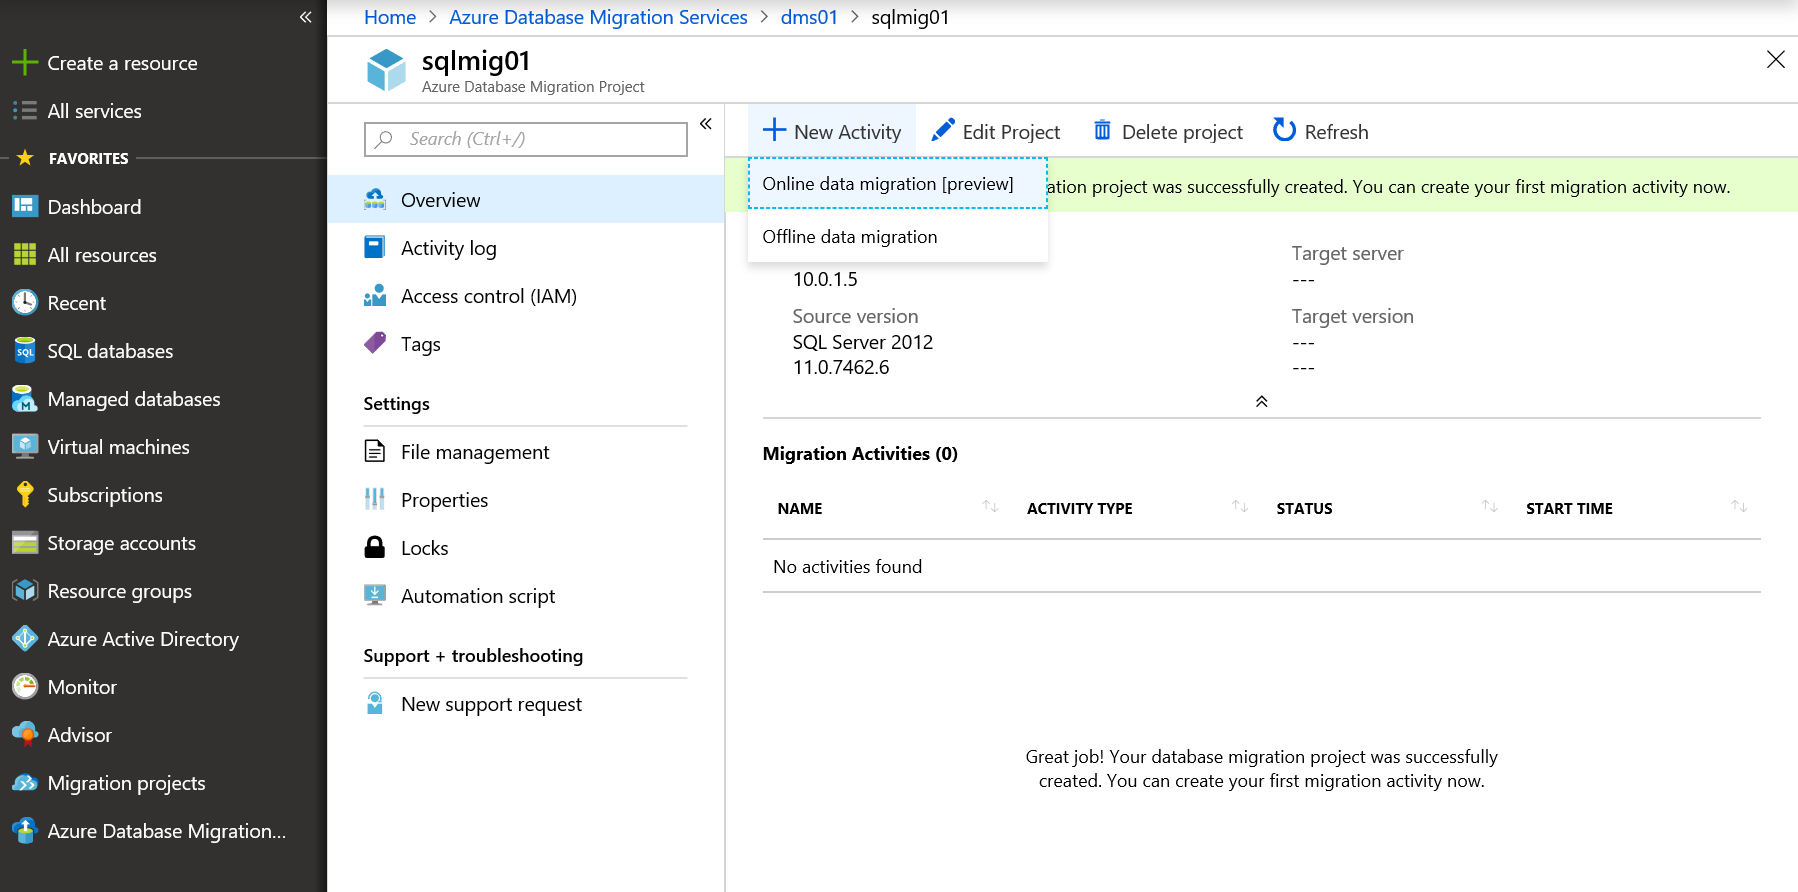
Select source SQL Server again, and on target page specify Application ID and Key that you've obtained a minute before.
Select up to 4 databases to migrate (current limit for a single activity for DMS in online mode).
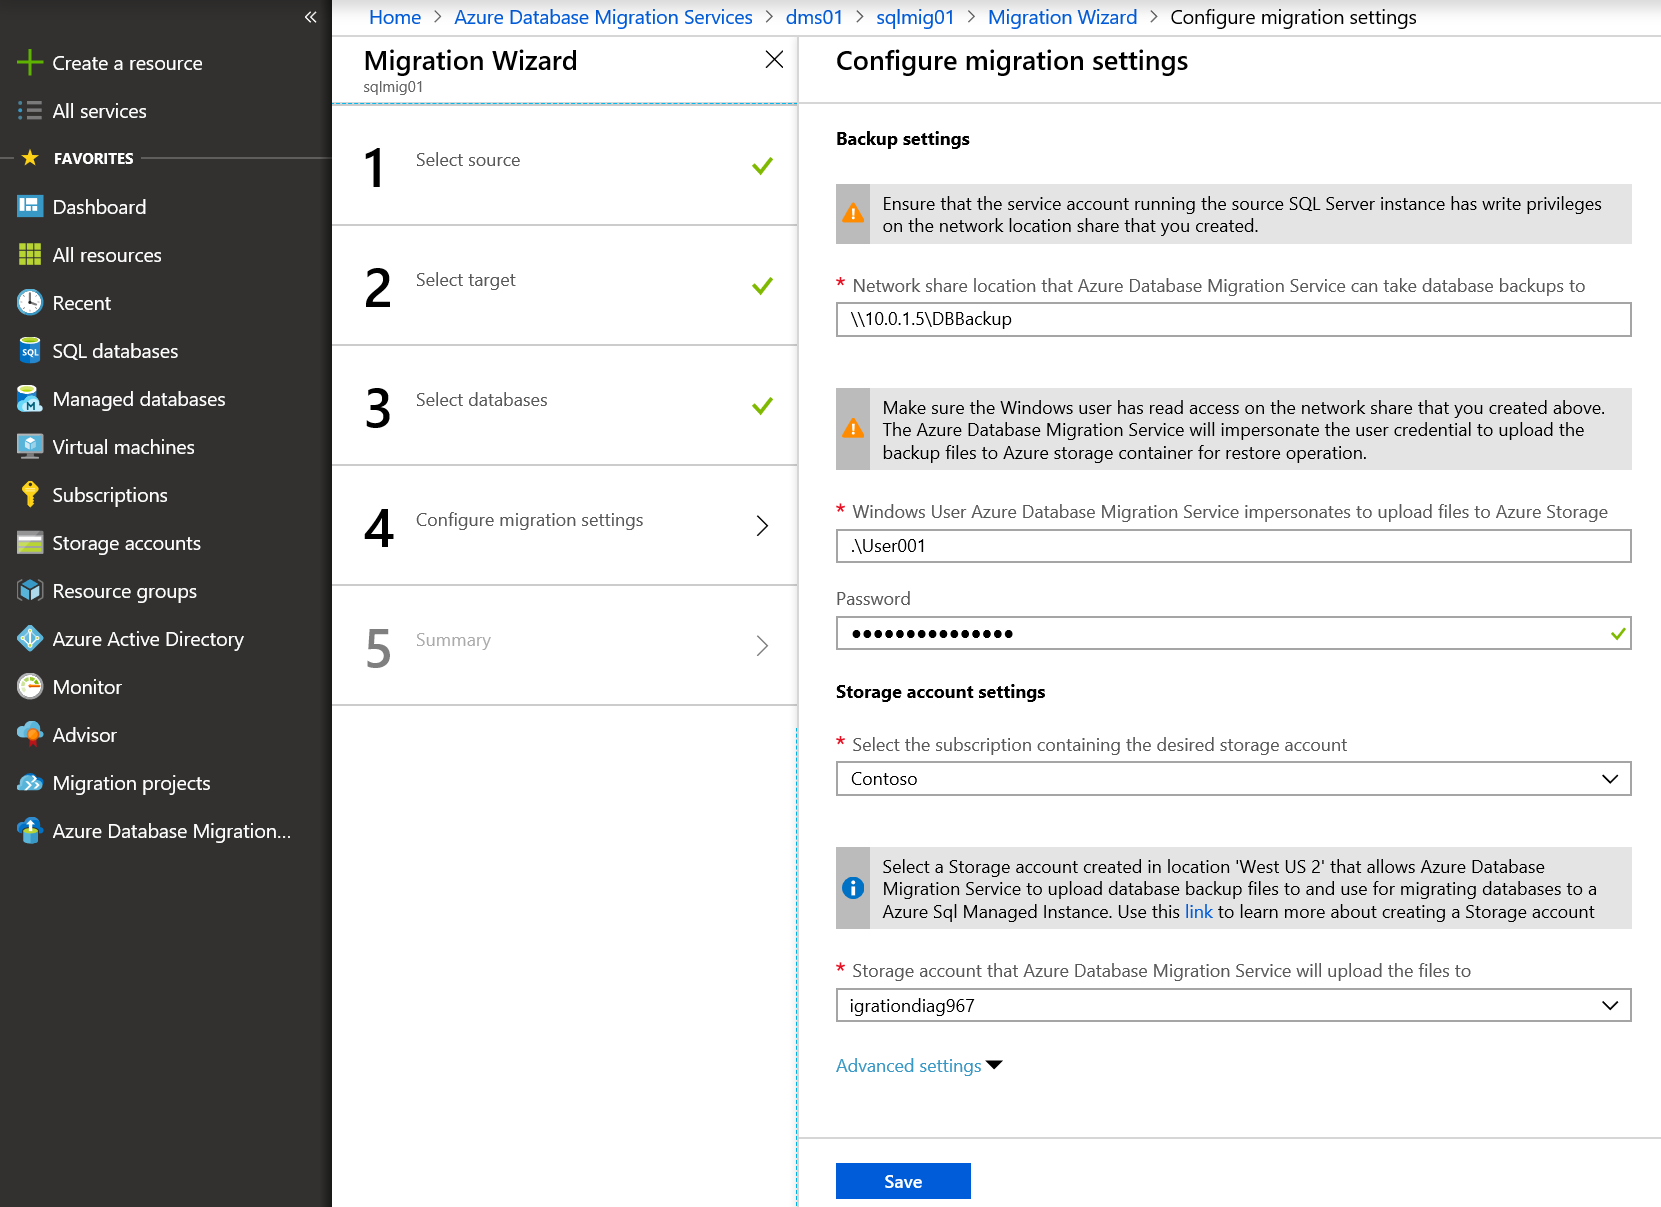
Specify path to file share where DB backups are stored. Source SQL Server should be able to access that share. Specify user credentials for uploading backups to Azure Storage account (I will use local admin credentials for source SQL Server VM) and select Azure Storage account where DB backups will be copied.
Wait for some time until all backups are uploaded to Azure Storage account and applied to database replica in SQL MI. As soon as it is done, select database and click Complete cutover.
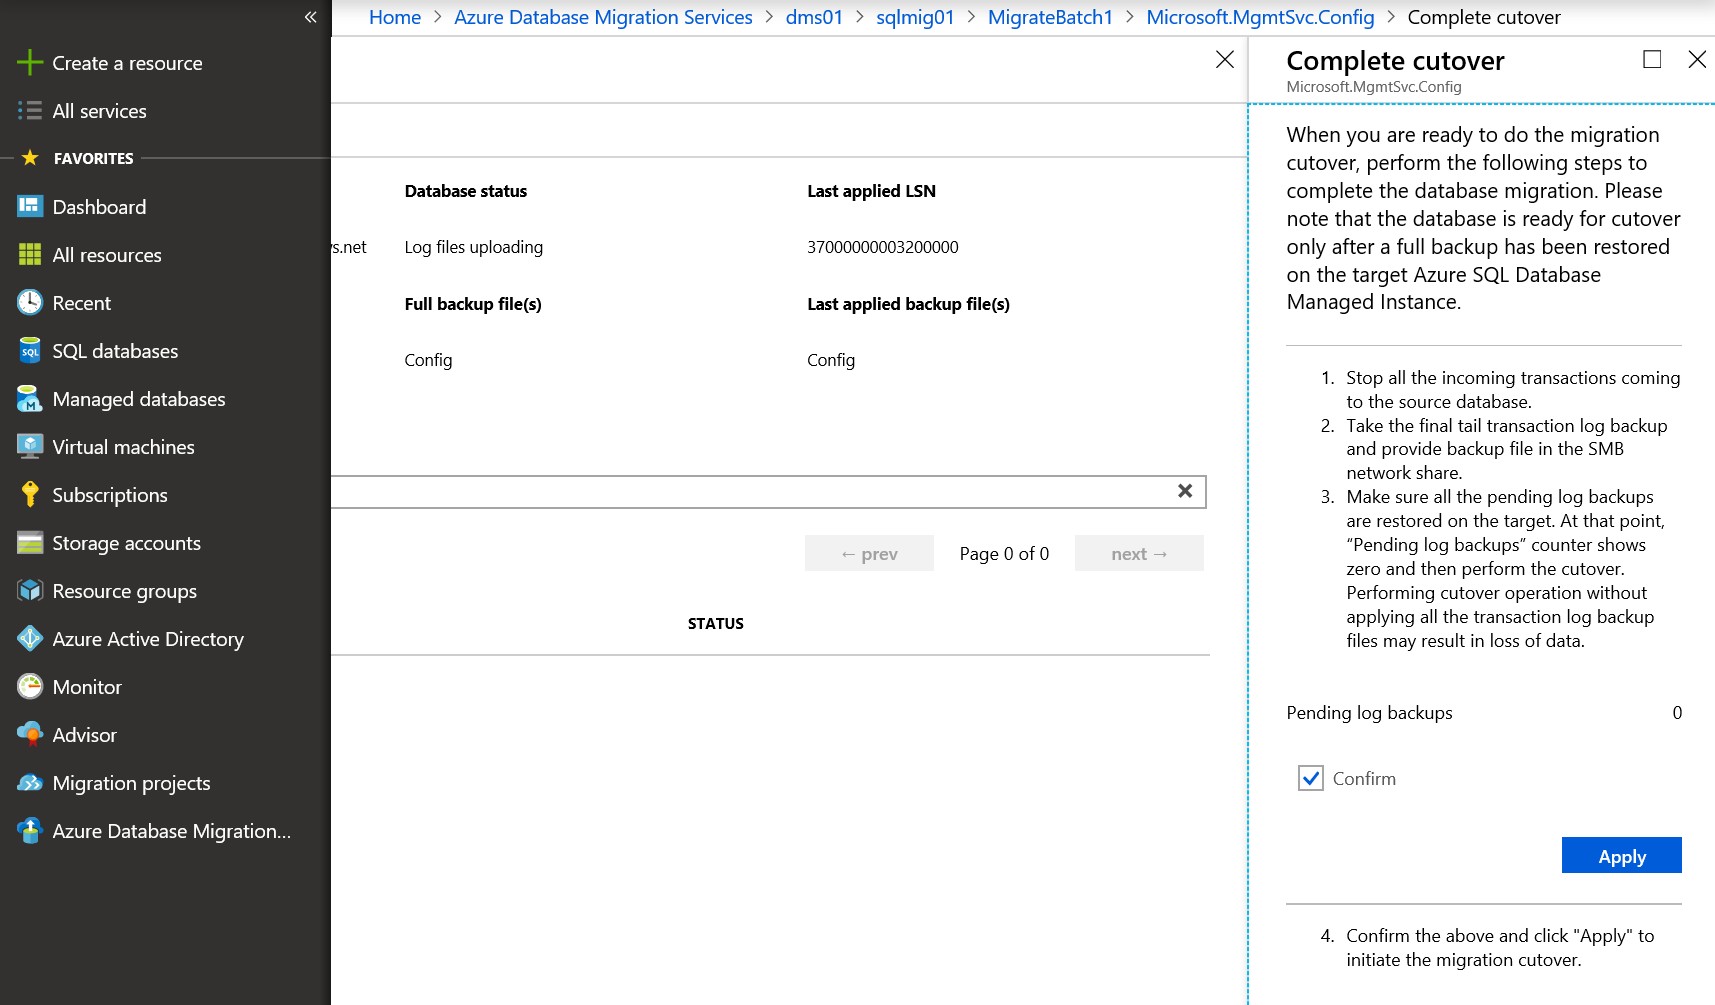
Then you should stop all incoming transactions to that DB, perform the final transaction log backup and wait until it is applied to replica. Pending log backups should become 0. 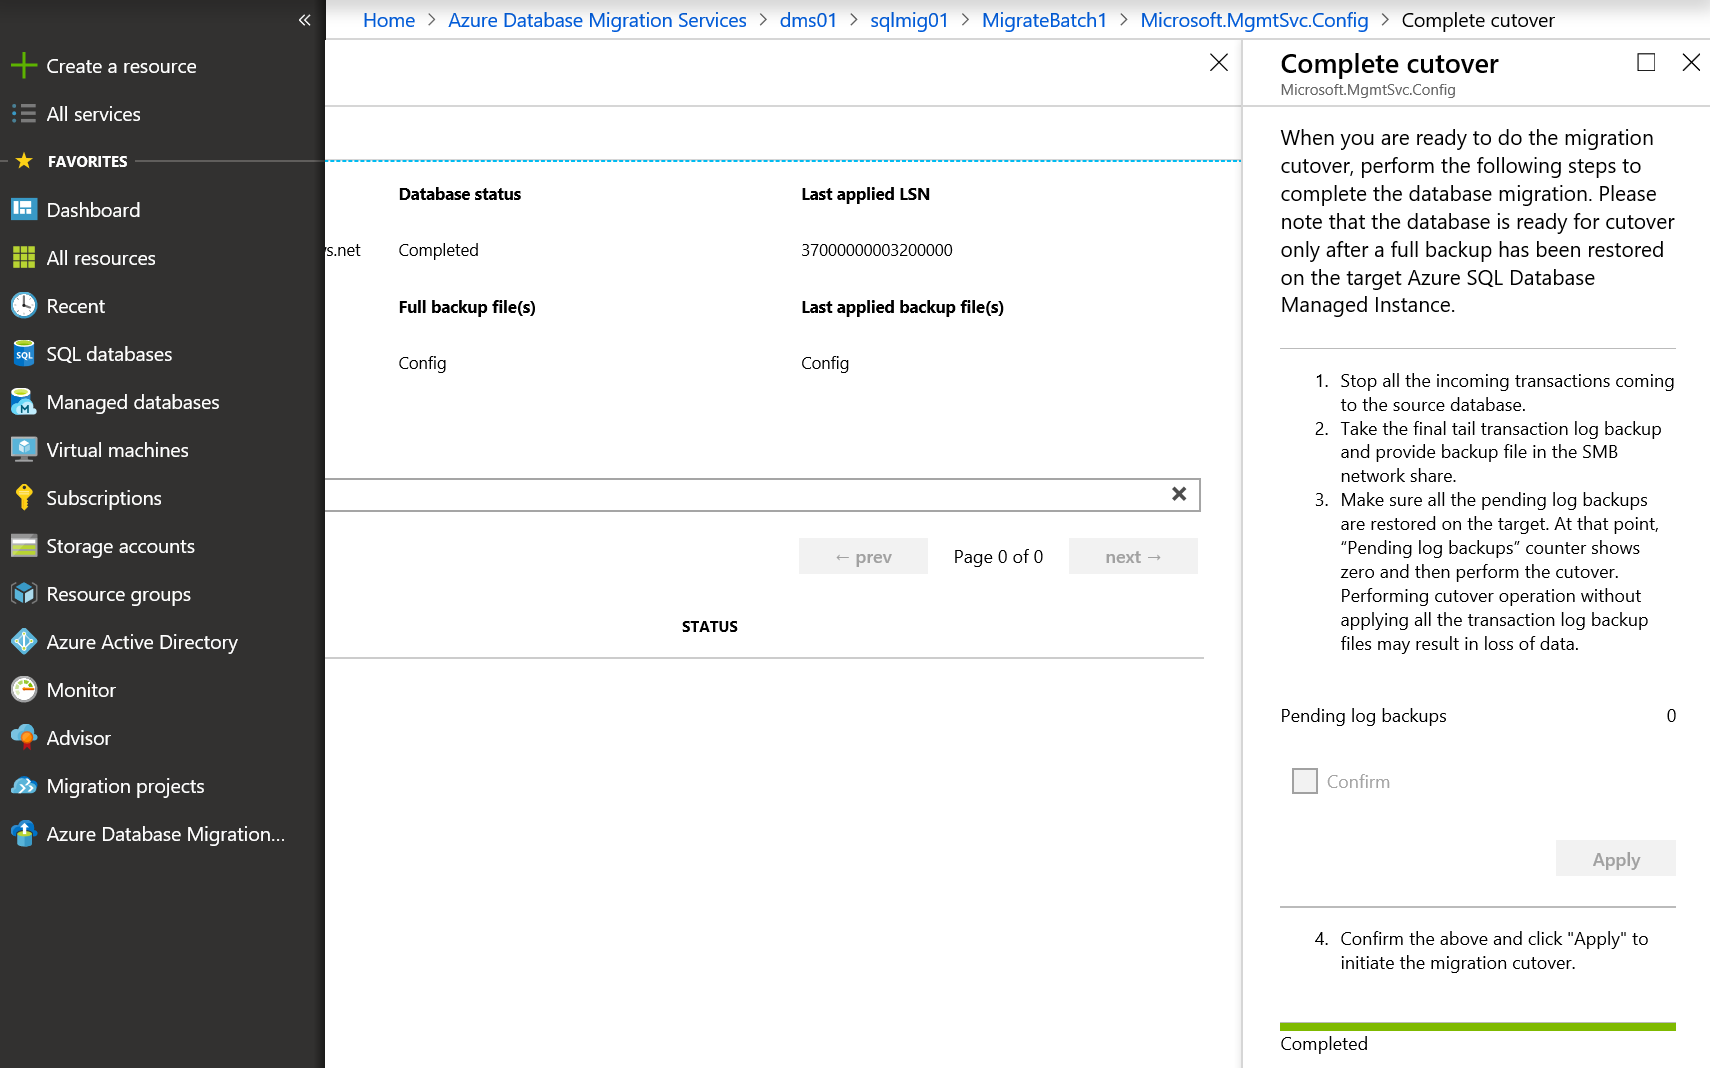
Click Confirm and Apply. After some time cutover status will be completed. Repeat the same process for remaining databases.

Step 6b: Migrate databases using offline mode
We'll migrate 4 remaining databases using DMS offline mode to show you how alternative process looks like.
UI for offline mode is slightly different then for online mode. You don't need to create app registration in Azure AD, but you need to download Azure Storage Explorer, login to Azure subscription, create new container in new or existing Azure Storage account and click Get Shared Access Signature. 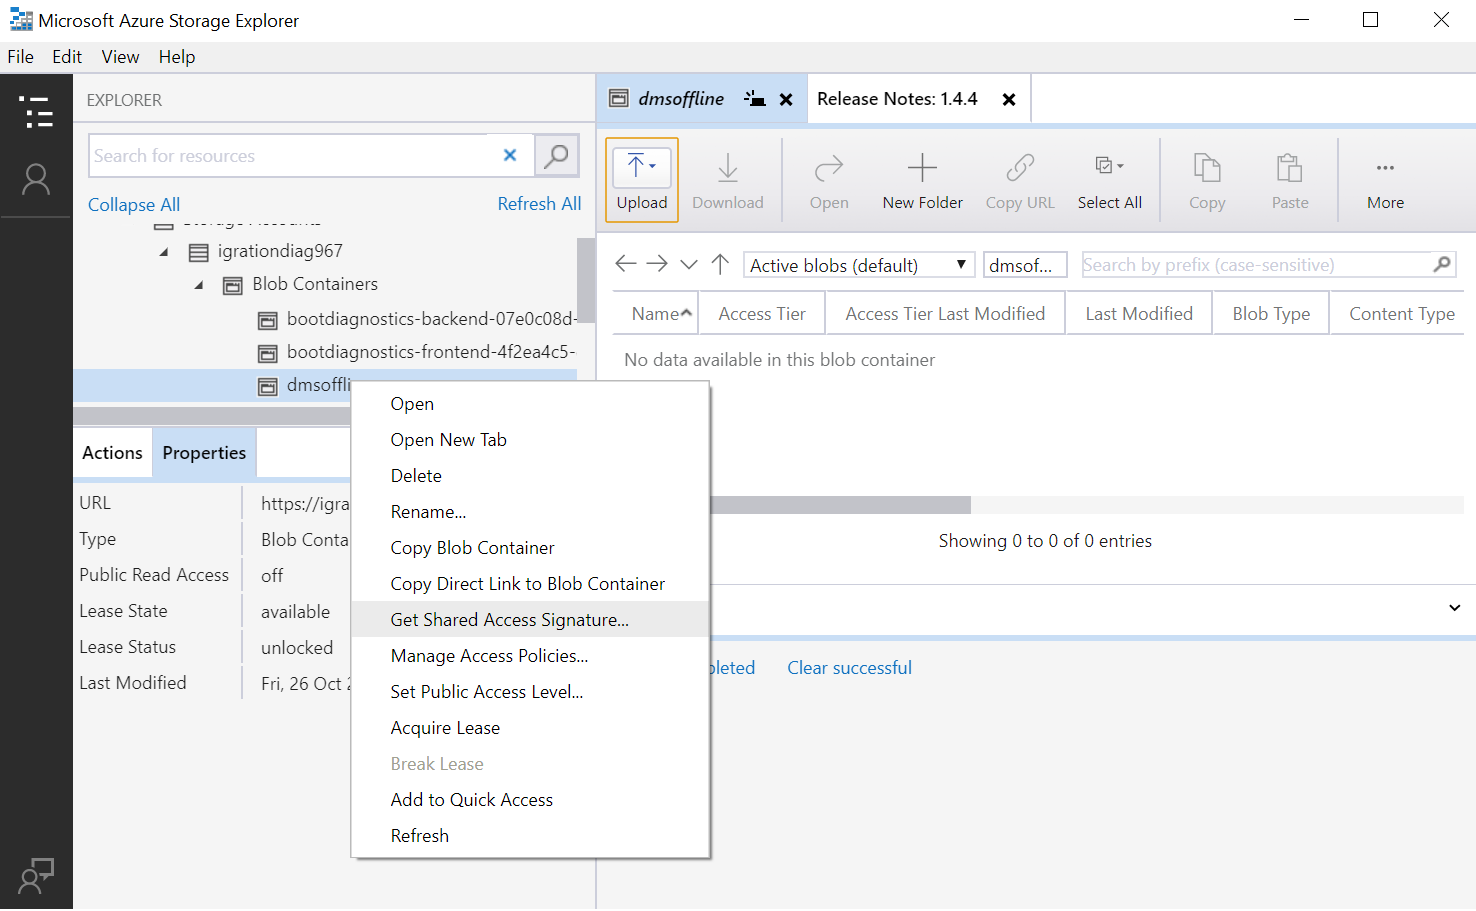
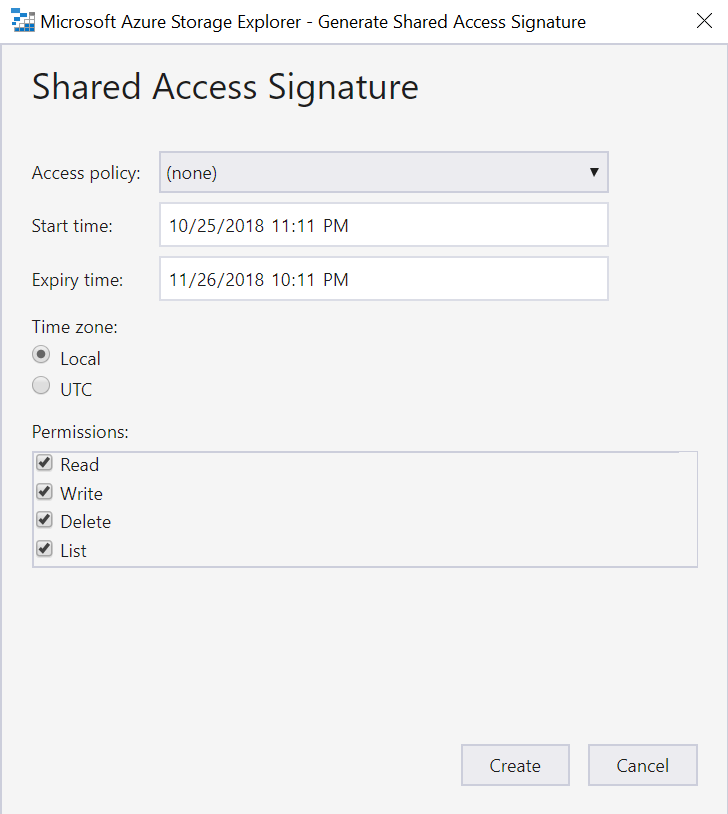
Select Read, Write, Delete and List permissions . Save SAS URI for the future use.
Return to Azure Portal, open DMS page and click New Activity -> Offline data migration. 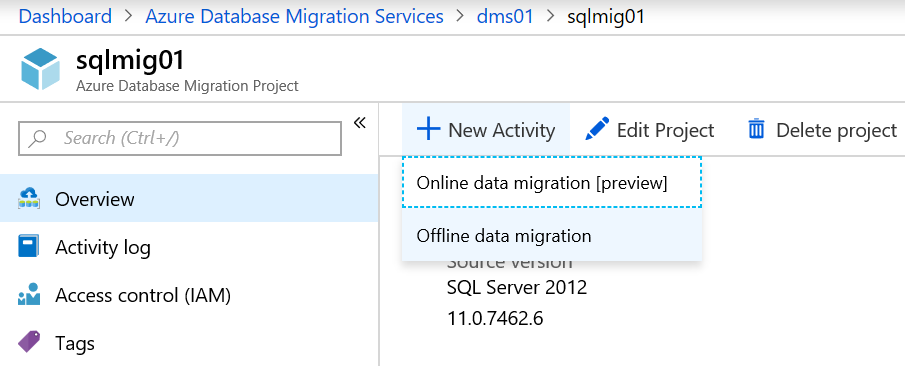
Select source SQL Server and target SQL MI in the same way as we showed it for online mode.
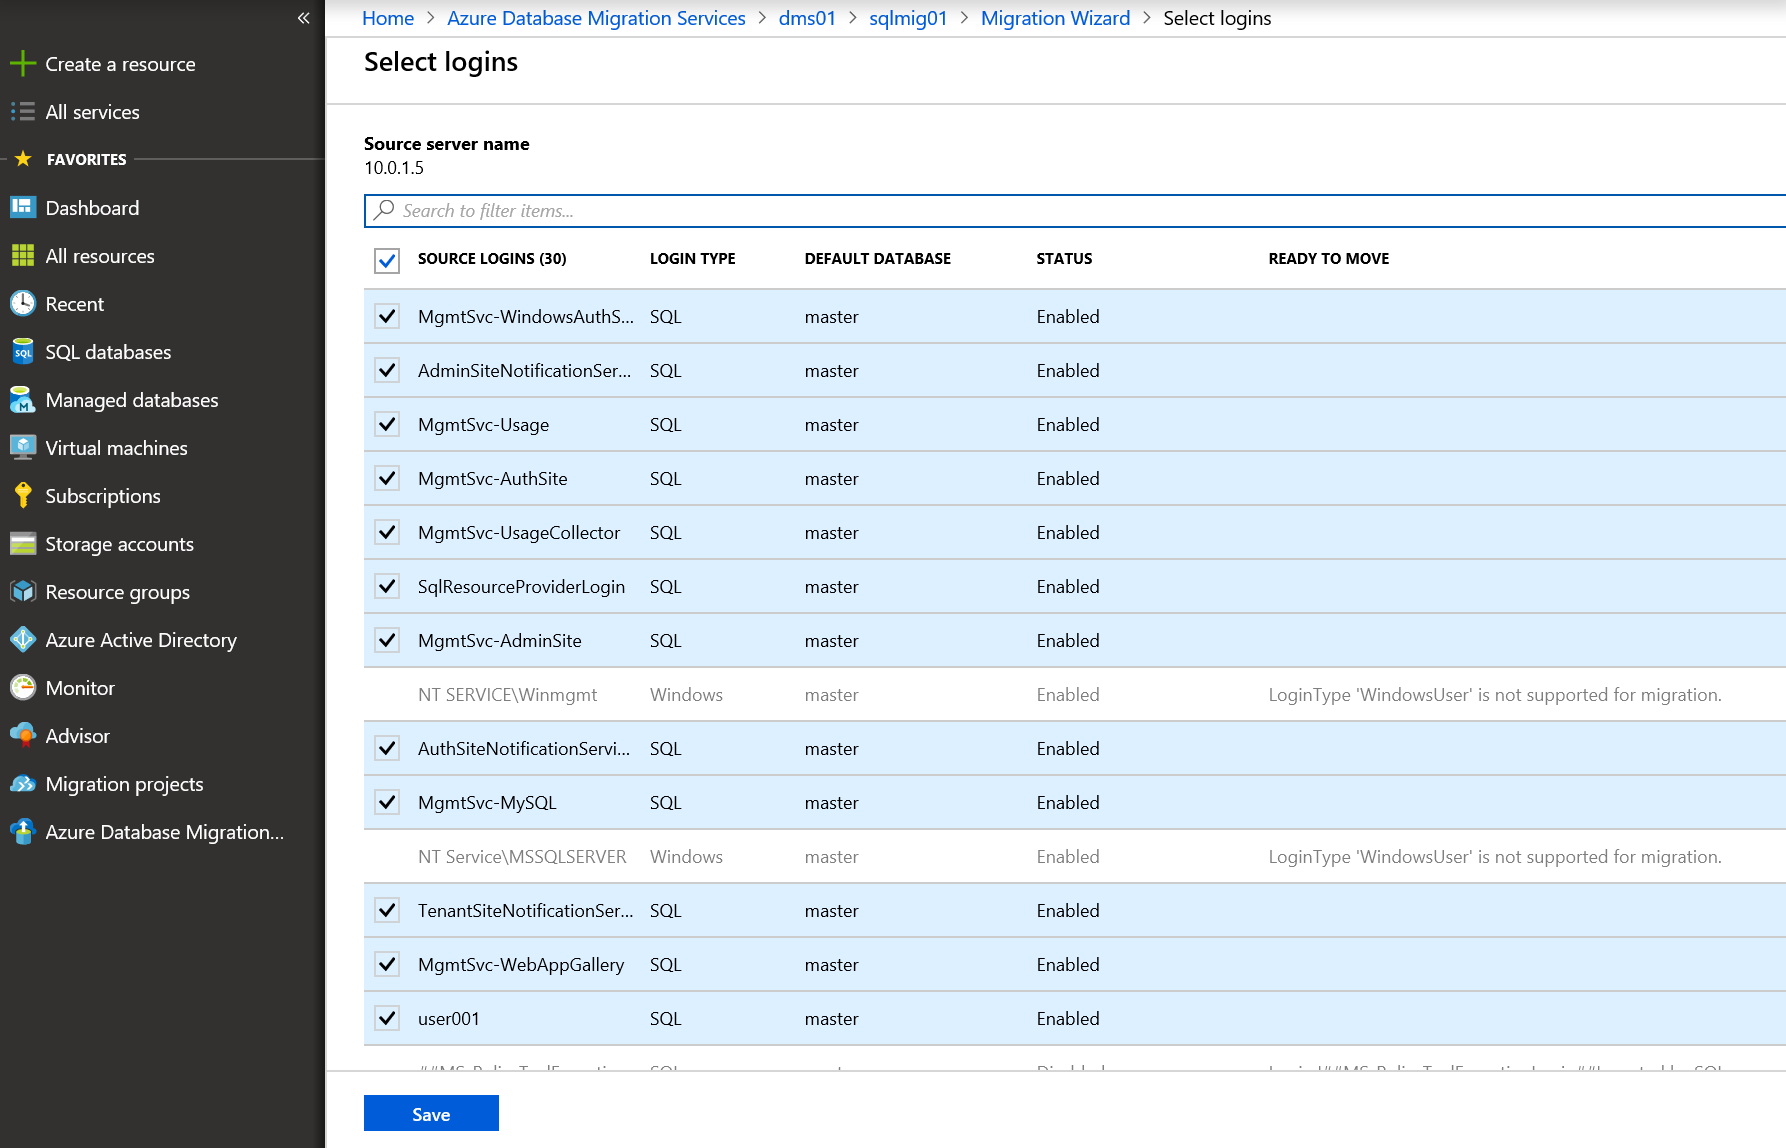
Select databases that you want to migrate. Then select logins that should be migrated to SQL MI (note: login migration is currently available only in offline mode). You can select only SQL Server logins since Windows authentication logins are not supported by SQL MI.
Select if you want DMS to perform full DB backups for you or reuse existing full backups. Specify network share where backups should be stored (or where they are stored already). Specify user credentials for uploading backups to Azure Storage account (I will use local admin credentials for source SQL Server VM) and provide SAS URI for storage container that you've obtained earlier.

On the last step select Validate my databases by running test queries after migration is complete.
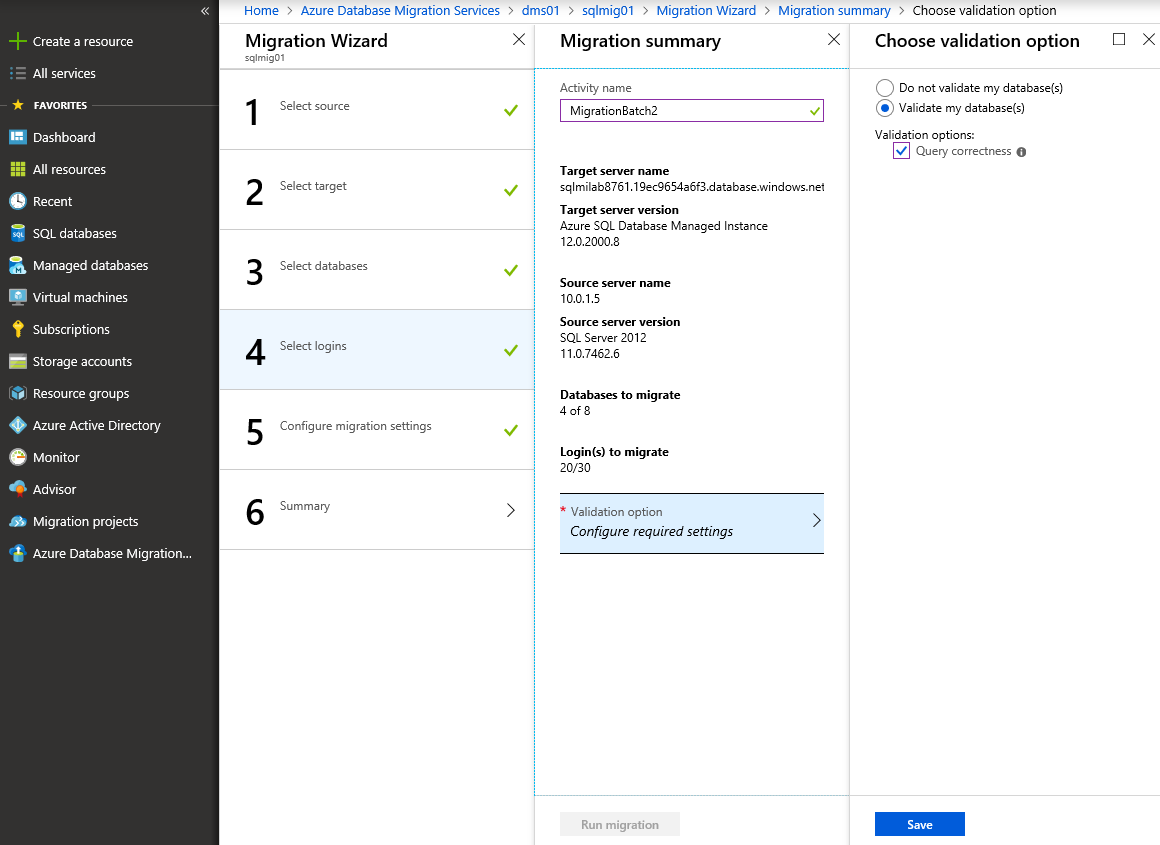
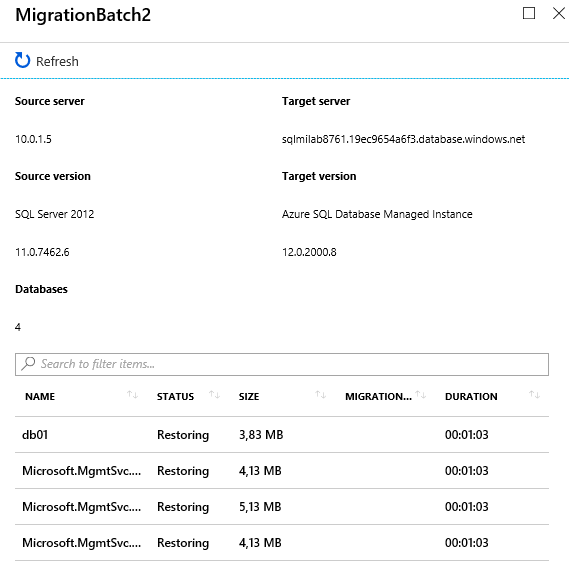
Track the progress of database and logins migration from source SQL Server to SQL MI. Required time depends on the total size of database backups. Status will change from Restoring to Completed. 

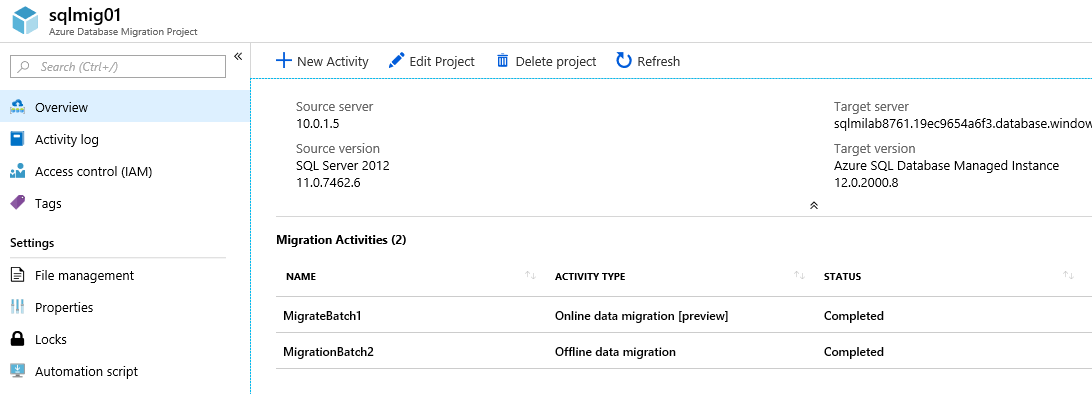
Now both migration activities should show status Completed since all 8 database in the scope are migrated to SQL MI. You can connect to SQL MI using SQL Server Management Studio and check that all databases and SQL Server logins are present and there are no errors.

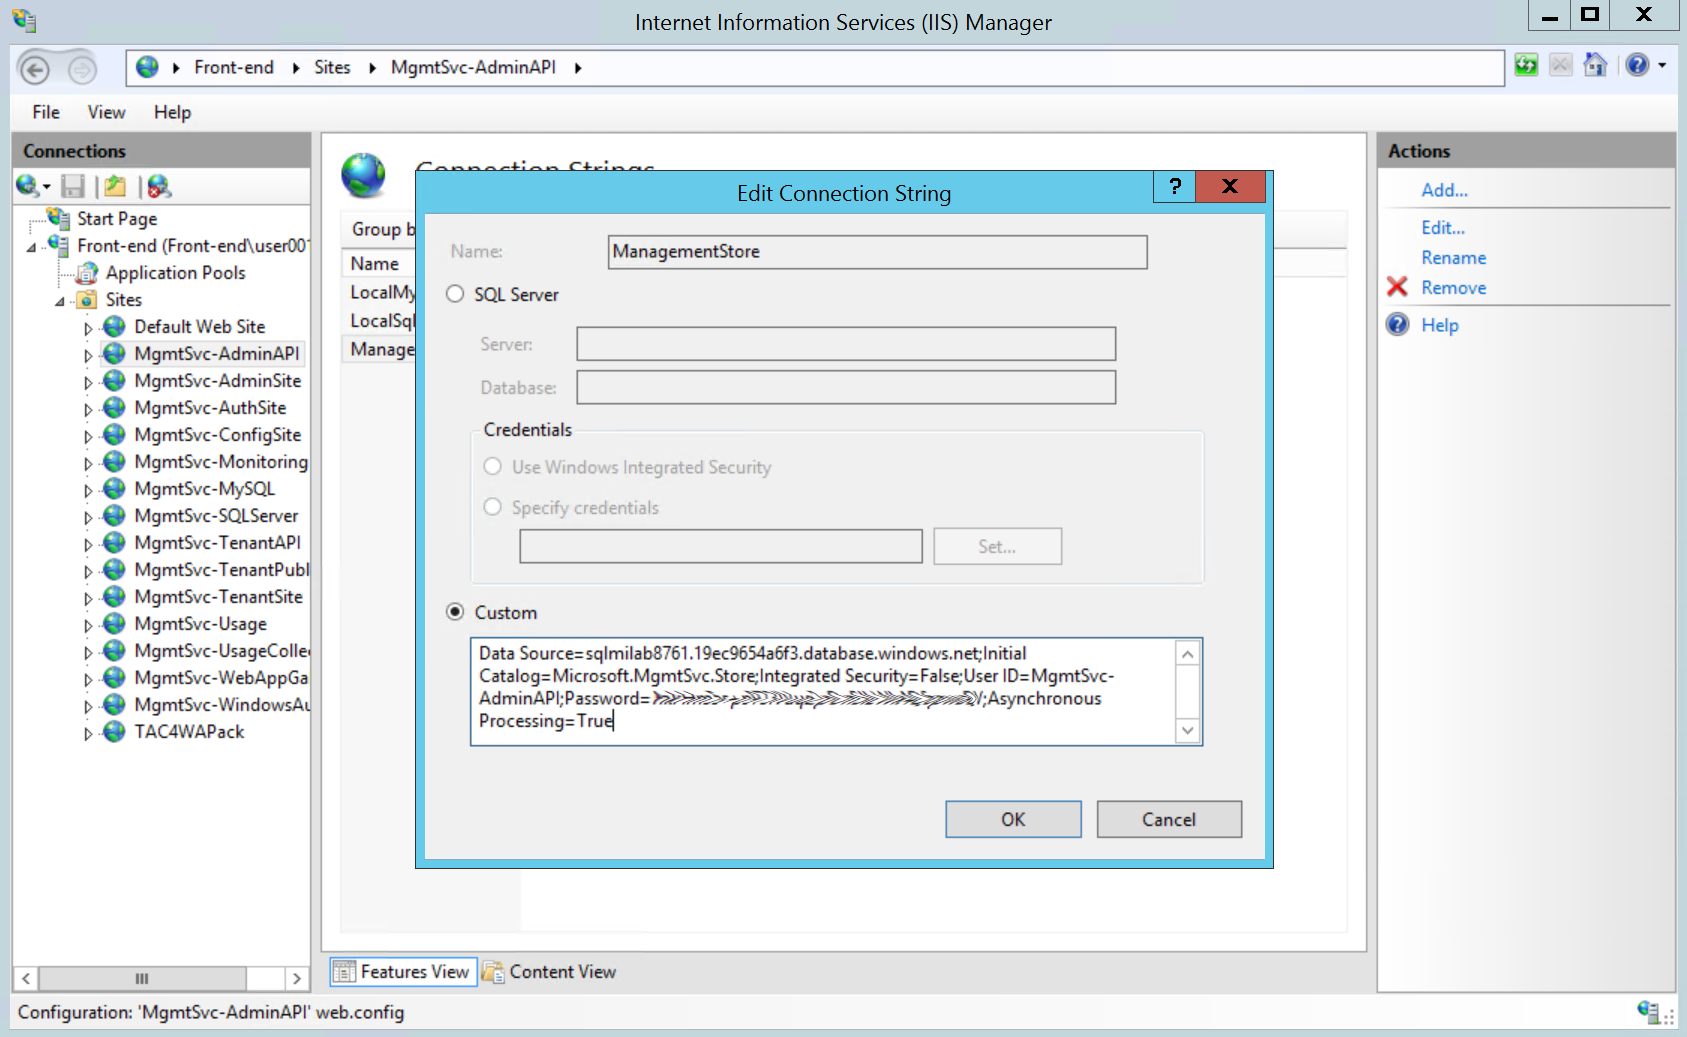
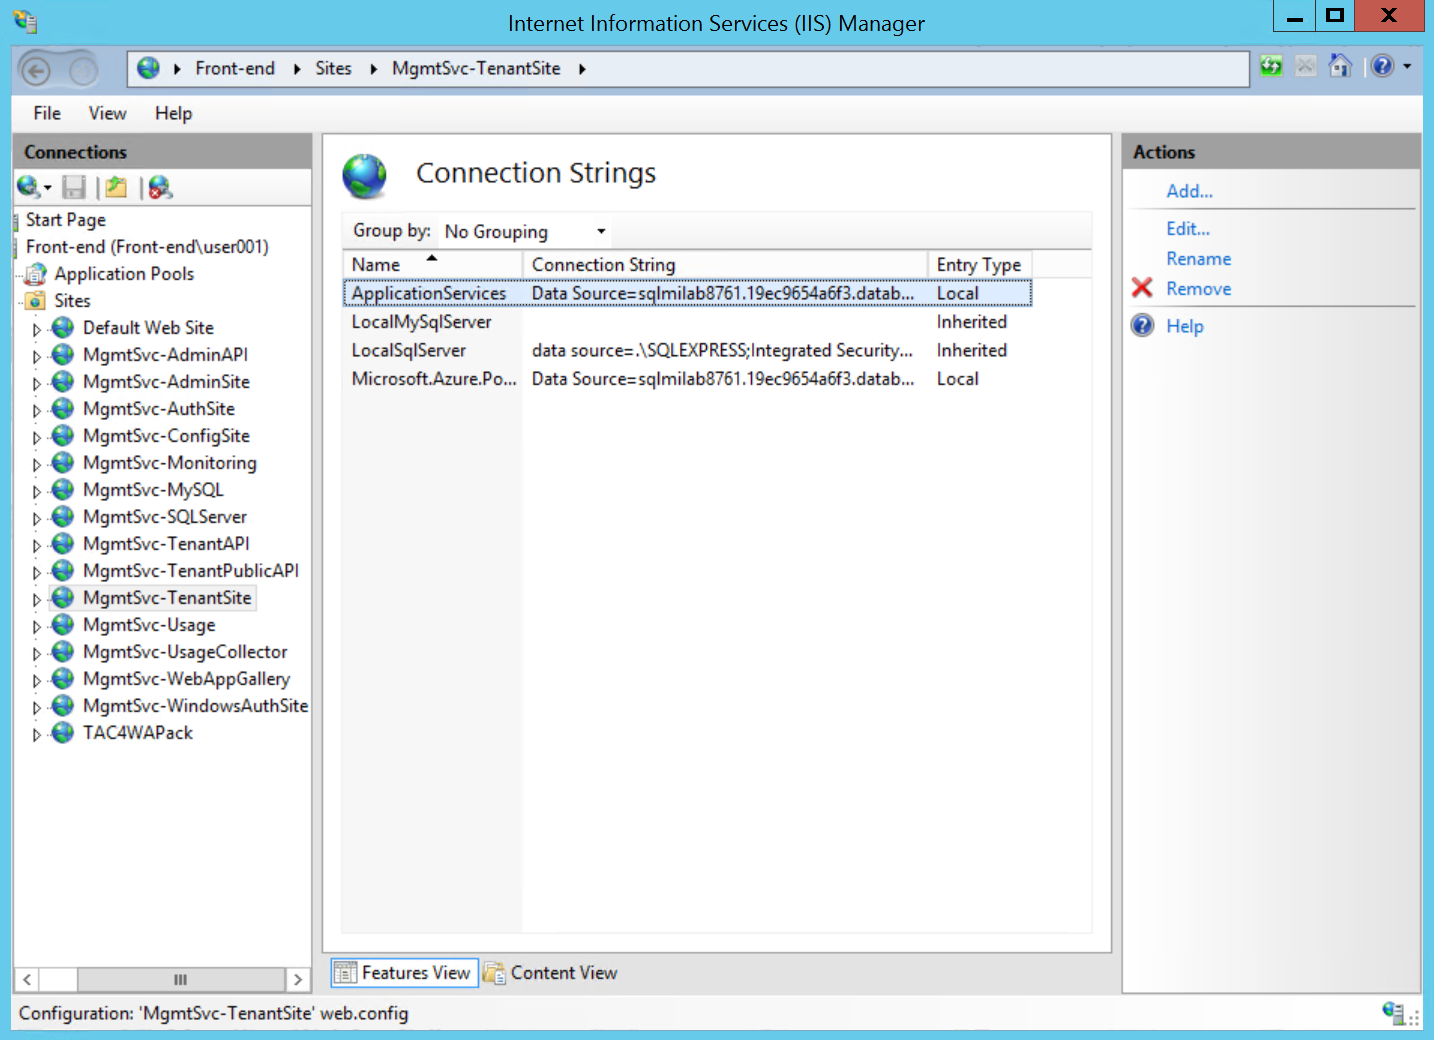
Step 7: Redirect the app to SQL MI
The final step is to change the connection string in the app to SQL MI hostname. You don't need to change any other settings in the connection string, including login and password of the user. You just need to replace old server FQDN or IP with SQL MI hostname, and then restart the app. In our case we need to update the connection string for all Windows Azure Pack website.

That's all. Our Windows Azure Pack test environment is now switched to 8 interconnected databases, running on SQL MI. And the only change that was required on the app level is just one small tweak in connection strings.
The described process may look complicated, but you will get used to it after the first migration. Benefits of SQL MI worth it - spend some time to migrate DBs once, and then never worry about installing OS patches, resizing VMs or updating to a newer version of the SQL Server.