Azure Stack TP2 Deployment
Azure Stack Technical Preview 2 was recently released and now available for download. In this article we'll talk about Azure Stack TP2 deployment in the lab environment.
BTW - my name is Attila Macskasy and this is my first post in this blog. I'm a Partner Technology Strategist in Microsoft and work in the same team with Kirill. I help service providers across several Central and Eastern European locations (CEE) to get the most value of Microsoft technologies. I consider myself deep-technical, majority of my knowledge is (still) on Oracle Databases (PL/SQL), VMware products, Open Source technologies and realtime (!) FibreChannel SAN Performance Management. I will do my best to bring some value to the community based on my learnings (especially feedback from our partners using Microsoft products). Probably running such „cooking show” will help me to access/help more people like before (compared to 1:1 workshops and 1:many events). I travel a lot and I will use blog format to share findings and help myself to follow up on promises. Thanks for reading my introduction and let's return back to Azure Stack :)
Find proper hardware
I've used the following hardware:
- 2 CPUs (X5660 from 2010/Q1), 6 core each (12 core in total, 24 with hyperthreading enabled)
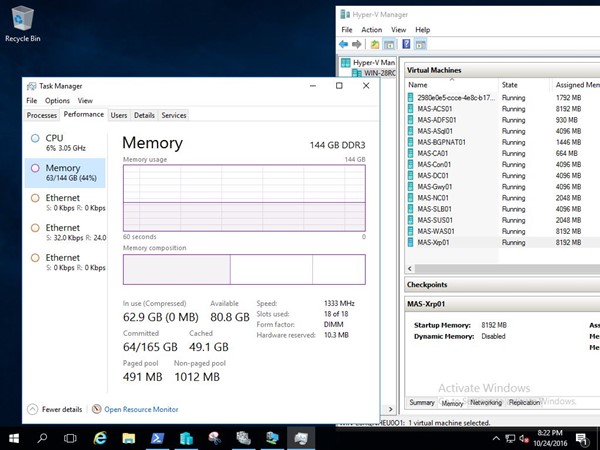
- 144 GB RAM (2*9*8GB DDR3) - maximum memory for my ~6 years old CPUs (G6 kind of server)
- 6 * 500GB HDD - I used 6 * 512GB SSDs for TP1, now I try the cheapest 7K SATA disks, let's see :-)
My lab works - good enough to learn the product and do small demos. Yes, with SSDs you can provision VMs way faster (image copy time). For better understating, after the fresh TP2 deployment, your Windows 2016 Hyper-V CPU(s) will host 13 VMs - average CPU load is closed to 5% (no tenant VMs yet).
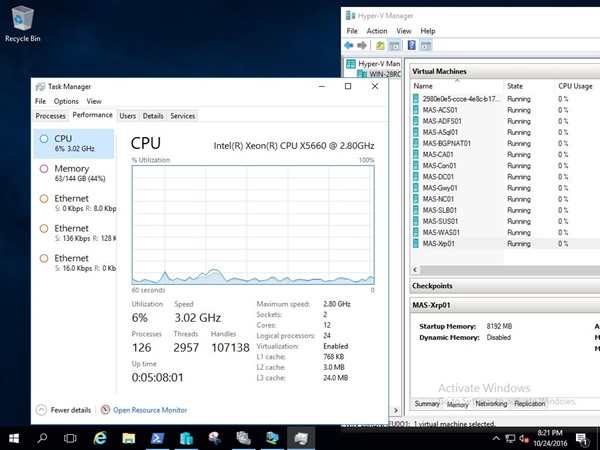
I deployed TP1 on 64GB host - worked. TP2 using ~60GB RAM from physical memory after deployment. This means, you rather use 96 or 128GB RAM to reserve some physical memory for upcoming tenant VMs. 64GB is not enough anymore, sorry - we have performance monitoring in place, lots of GUI improvements in TP2 vs. TP1.
Do not forget the learnings from TP1: connect only one network card to the public internet enabled gateway (this will be mapped to a Hyper-V switch called PubSwitch). Use local disks. Folks, non-shared/dedicated (boot) FC or iSCSI SAN is not a local disk - installation will fail, sorry. If you have local RAID controller (like my oldshool hardware, P410i), use RAID0 arrays for each individual disk to present it to operating system. In my case, I have 6 * 500GB RAID0, first LUN used to install temporary Windows 2016 to start Azure Stack deployment from VHDX, all other 5 disks are clean - ready for Storage Spaces Direct Pool. Modern RAID adapters has something called "raid pass through mode" to present disks as SATA/SAS/SSD to Windows (another way to go) - use this if you can. For more information review hardware requirements here.
Preparing the installation
Azure Stack Technical Preview 2 installation media is available to download since few days from here. File called MicrosoftAzureStackPOC20160913.1.zip download size is ~20GB. 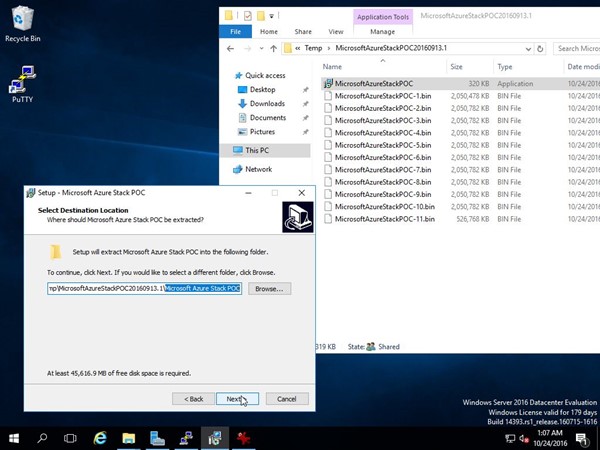
After uncompressing the zip file and running the installation wizard you will get CloudBuilder.vhdx image file (44.5 GB before and cca. 120GB after TP2 deployment). You will need to boot your physical server using this image.
Assuming, that you found the proper hardware for the POC and installed a temporary Windows 2016 server (I used recent MSDN image and datacenter serial here, but EVAL ISO is OK as well) you can use some additional scripts to add CloudBuilder.vhdx to the boot loader list of the phyisical server.
In order to prepare the boot loader, review steps here - if you short on time, I have the summary below for you
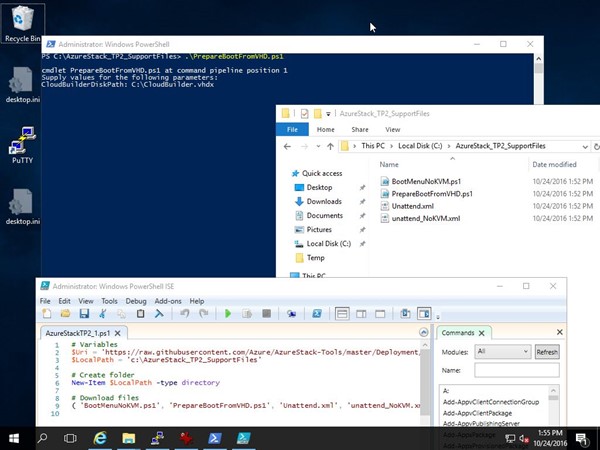
Save text below as whatevername.ps1 and run it.
This will download some files for you.
# Variables
$Uri = 'https://raw.githubusercontent.com/Azure/AzureStack-Tools/master/Deployment/'
$LocalPath = 'c:\AzureStack_TP2_SupportFiles'
# Create folder
New-Item $LocalPath -type directory
# Download files
( 'BootMenuNoKVM.ps1', 'PrepareBootFromVHD.ps1', 'Unattend.xml', 'unattend_NoKVM.xml') | foreach { Invoke-WebRequest ($uri + $_) -OutFile ($LocalPath + '\' + $_) }
I used only PrepareBootFromVHD.ps1, this way:
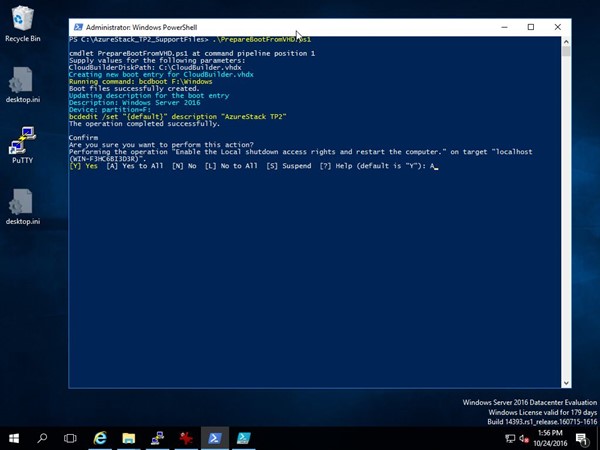
Just started without any parameters, asked for C:\CloudBuilder.vhdx location. As I remember, this rebooted the server for me, default was the Azure Stack TP2 boot option, and a new Windows 2016 started for me. Do not worry, you need to complete basic sysprep steps to be able to login.
Installing Azure Stack TP2
Before doing this you need to create an admin account in a new Azure Active Directory in a new Tenant. This is different from TP1 - TP2 requires you to create a Tenant account as well.
Fun starts here, especially if you are new to Microsoft Online services, such as Azure and Office 365.
I am a lucky owner of an MSDN subscription, that gives me access to Azure with some prepaid money every month. You can register to Azure EVAL - the only service needed for Azure Stack TP2 is Azure Active Directory - this is free. Keep in mind, we need to use old Azure Portal (looks like Windows Azure Pack) for Azure AD service management.
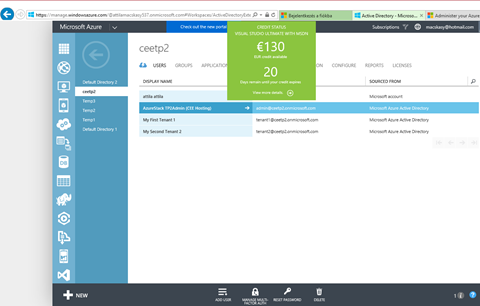
Start here: https://manage.windowsazure.com. Create a new Directory. Add a new user as admin, select role called "Global Admin".

Try to start the installation as mentioned in the documentation:
- In PowerShell, run this command: cd C:\CloudDeployment\Configuration
- Run the deploy command: .\InstallAzureStackPOC.ps1
- At the Enter the password prompt, enter a password, and then confirm it. This is the password to all the virtual machines. Be sure to record it.
- Enter the credentials for your Azure Active Directory account. This user must be the Global Admin in the directory tenant.
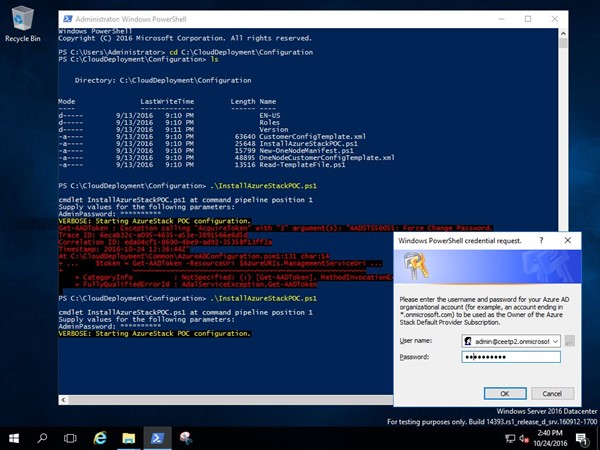
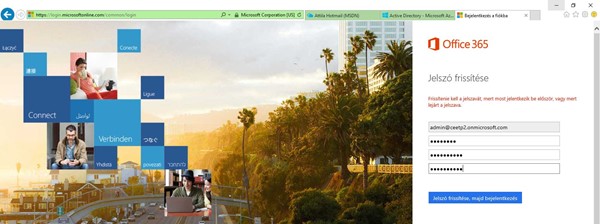
You will see an error message saying - Force change password. This is happening, because you forget to change password for the user recently created using Azure Portal. To change password, you need to use Office 365 portal to login and change password.
Office365 is portal is different from Old Azure Portal (https://manage.windowsazure.com). Try here: https://login.microsoftonline.com/
Login with username and password, this will push you to change password.
In my LAB, I use: admin@ceetp2.onmicrosoft.com
After changing password, restart the Azure Stack TP2 installer.
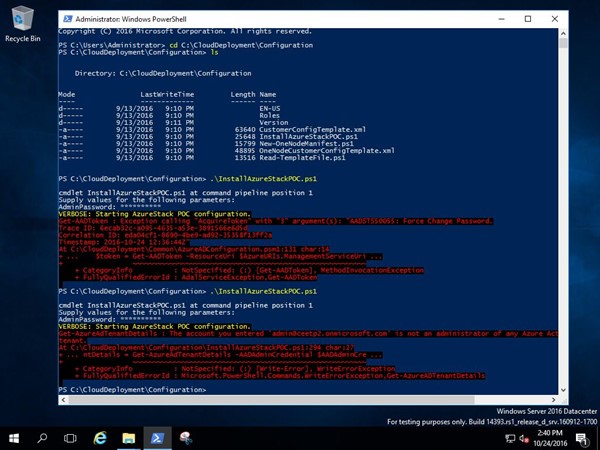
You will see the next error message saying: not and administrator of any Azure bla bla tenant
This is happening because we forget the read documentation here:
- Create an Azure AD account that is the directory administrator for at least one Azure Active Directory - DONE
- Create at least one account so that you can sign in to the Azure Stack POC as a tenant - MISSING (this step is new to TP2!)
What is tenant? Tenant is a user of the same directory. Cool, let's create it. There are 2 ways to do the same thing. But only the second way worked for me :P You can create user using Azure AD on Azure old Portal, using Add User button below - this is how I created First Tenant
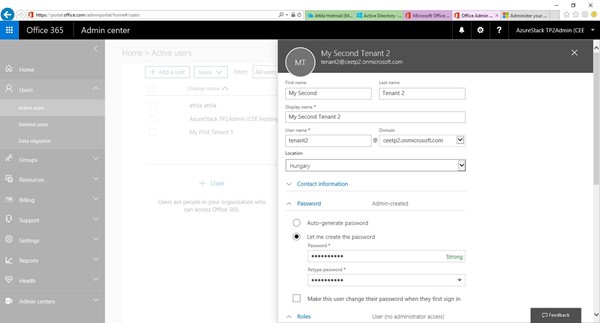
With Office 365 Admin Portal, you can do the same (after logging on as admin created before)
https://portal.office.com/adminportal/home#/users
This is how I created the Second Tenant.
In order to get rid of "not and administrator of any Azure bla bla tenant" error message, I had to use Office 365 Admin Center to create the "Tenant" = user in the same Azure AD.
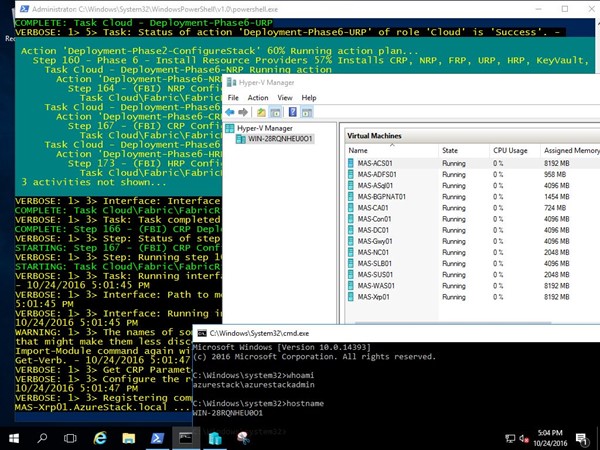
After this, deployment started- lots of things happening (sit back and relax)
- Installed roles and features on physical server
- Created cluster storage using storage spaces direct (pool, volume, etc.)
- Scale out File Server in place
- There is a Fabric Domain created
- VM created, joined to domain
- Services installed
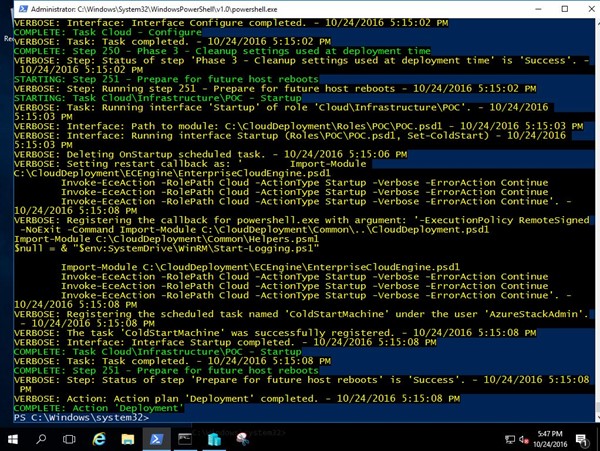
When the deployment succeeds, the PowerShell console displays: COMPLETE: Action 'Deployment'.
OK, Azure Stack TP2 is installed. In my next blog articles, I will discuss:
- First look on Azure Stack TP2 - what's new
- Customization tips - adding new templates and configuring them
- Additional resource providers to add (DBaaS with SQL 2016, Web Apps, etc.)
- Support for Hybrid offerings.
Take your time and review Azure Stack TP1 Review article - this will give you the big picture. And don't forget to subscribe to know more about Azure Stack and Hybrid Cloud :)