Keeping it Together: Documents in SharePoint
Between the research, edits, and approvals for all the projects on your desk, does it ever feel like you’re barely keeping it together? SharePoint has just the tool to help you keep it together—keep related documents together, that is.
Document sets in SharePoint make it easier to manage multiple documents that are part of a group. So when you’re creating lots of different documents for a team project, you can use a document set to conveniently manage all the documents and even send the set through the approval process. Document sets are easier to manage than folders, so you can organize and collaborate on all the documents related to one project without creating a new library or site.
To create a document set:
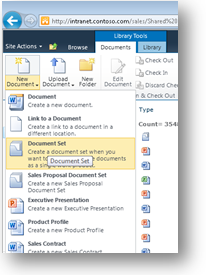
- In a SharePoint library, click the Library Tools Documents contextual tab.
- Click the New Document button arrow.
- Select Document Set (this feature must be enabled).
- Type a name for the document set.
- Type a description for the document set.
- Click OK.
Once you’ve created a document set, you can start adding your team’s documents.
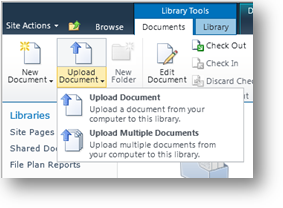
- With the document set open, click the Library Tools Documents contextual tab.
- Click the Upload Document button arrow.
- Choose Upload Document or Upload Multiple Documents to add an existing document or documents to the library.
- Click New Document and choose Document to create a new Word document that will be saved directly to the library.
With a document set for each project or each client , there’s no rummaging around for related documents—it’s all in one convenient, easily manageable spot.