
Cloud operating system deployment: WinPE in Azure
Jason Ryberg is a Consultant for Microsoft, where he writes PowerShell code and provides DevOps support. Have you ever wanted to boot to WinPE in Azure and select an Microsoft Deployment Toolkit (MDT) Task Sequence? As part of an informal cloud-readiness evaluation, I was asked to deploy a server image to Azure. The image that I was given would run the MDT Deployment Wizard to allow for the selection of deployment options. But, how could I choose deployment options if I could not reach the Azure virtual machine in the boot environment? Read on to find out how to interact with an Azure virtual machine in a preboot environment!
Introduction
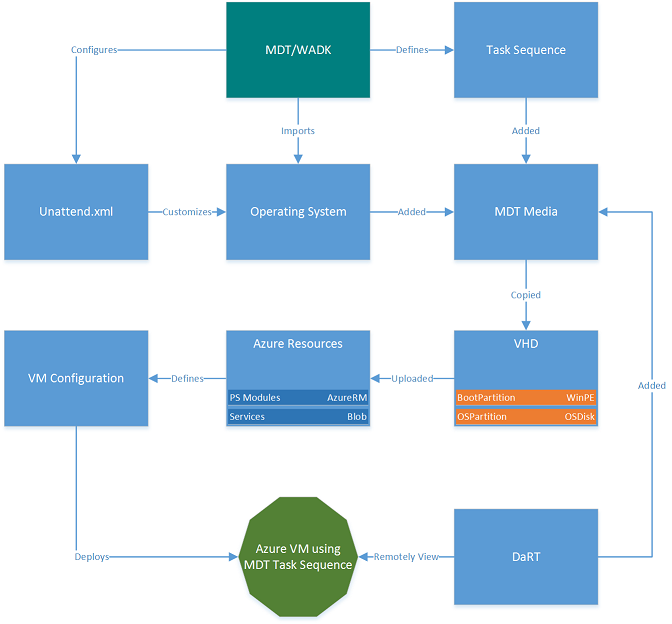
Plenty of moving pieces need to be precisely configured as part of the process. The following diagram describes the relationship of the components and visualizes the required configurations. Before you begin, ensure that you have met all the system requirements.
System requirements
- Install MDT and WADK as usual with default values.
- Ensure that you have proper operating system installation media. Use Volume Licensed images if possible. (This post covers deploying Windows Server 2012 R2.)
- Create an account for Azure Storage and add Blob storage
- Ensure that Hyper-V Services is installed on your workstation.
It’s used to create a custom VHD.
- Track down the install bits for the Diagnostics and Recovery Toolset (DaRT), which is part of the Microsoft Desktop Optimization Pack (MDOP) and requires a Visual Studio subscription or Software Assurance. Because the MDOP requires Software Assurance to use legally, I cannot provide a direct link. DaRT is used to interact with the WinPE console remotely to complete the Task Sequence Wizard in Azure.
Task sequence modifications
Through the process of elimination, I discovered that many of the default steps in a Server Deployment Task Sequence end up breaking a virtual machine deployment in Azure. The following steps can be removed or disabled to ensure proper deployment:
- “Preinstall – New Computer Only – Format and Partition Disk”
- “Preinstall – Inject Drivers”
- “Postinstall – Add Windows Recover (WinRE)”
Now there are steps to add to get DaRT integrated with your task sequence:
- In the Install – Install Operating System step, specify the partition to install the operating system.
- Change the Select the location where you want to apply this operating system dropdown to Specific disk and partition.
- Select 0 for Disk and 2 for Partition.
- Add the “Postinstall – Copy Scripts to OS Drive” to include a Diskpart script that’s used to remount the WinPE partition after reboot.
- Modify the “Postinstall – Copy Scripts to OS Drive” command-line textbox to the following text:
cmd /c mkdir %OSDisk%\Scripts && copy %SCRIPTROOT%\assignPEletter.txt %OSDisk%\Scripts\assignPEletter.txt - Copy the following text into a file named assignPEletter.txt: select volume 1 assign letter k exit
- Copy the assignPEletter.txt file to the Scripts directory of the Deployment Share.
- Modify the “Postinstall – Copy Scripts to OS Drive” command-line textbox to the following text:
- An additional step is required to ensure that the assignPEletter.txt file is run before the operating system is started.
- Click the OS Info tab in the Task Sequence dialog box, and then click the Edit Unattend.xml
- Expand the 7 oobeSystem item, the amd64_Microsoft-Windows-Shell-Setup_neutral item, and the FirstLogonCommands
- Right-click the FirstLogonCommands item, and then click New SynchronousCommand.
- Copy “cmd /c diskpart.exe /s %SystemDrive%\Scripts\assignPELetter.txt” to the Commandline Add an appropriate description, and change the Order to 2.
- Close the Unattend.xml file and confirm saving the file.
MDT Media
Before deployment, the Task Sequence requires a delivery method, which MDT refers to as Media. Many options are available to creating Task Sequence Media. However, this post will only touch on the pertinent steps. Create Media if you do not have one, open your Media’s properties, and ensure that SkipBDDWelcome=YES is listed in the Rules textbox and the Bootstrap.ini textbox. By skipping the welcome page, the deployment wizard and the DaRT utility launch automatically. To install DaRT in your media, first download and install DaRT, then copy the required files from the DaRT installation path to your MDT directory.
Copy-Item 'C:\Program Files\Microsoft DaRT\v10\Toolsx64.cab' 'C:\Program Files\Microsoft Deployment Toolkit\Templates\Distribution\Tools\x64'
After you copy the file, open your Media’s properties, click the Features tab, and check the box next to Microsoft Diagnostics and Recovery Toolkit (DaRT) at the bottom of the list. By including the DaRT feature in the WinPE environment, you now have a method to remotely interact with WinPE. Finally, copy the DartRemoteViewer.exe file to your workstation. The Dart Remote Viewer is the tool that we launch to interact with our Azure virtual machine. But, how exactly do you connect to the WinPE environment?
Reaching the connection data
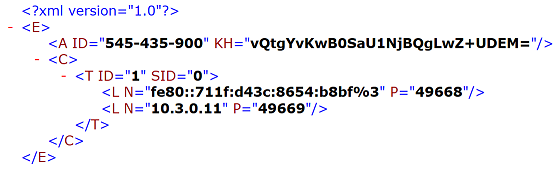
DaRT generates an XML configuration file – Inv32.xml – that contains the connection information, but the file is generated locally on the Azure virtual machine. Because you can’t reach the virtual machine in the preboot environment, the file will need to be copied to a readable location.
Figure 1 Example Inv32.xml file
To perform this task, I supplemented the check for DaRT bits in MDT’s LiteTouch.wsf script to mount Azure File storage as a local drive and copy the Inv32.xml file to that drive. Replace the If block starting on line 1576 in the LiteTouch.wsf file with the following If block.
If oFSO.FileExists(oEnv("SystemRoot") & "\System32\inv32.xml") then
oShell.Run "cmd.exe /C a. net use [drive letter] \\[storage account].file.core.windows.net\[file service] /u:[storage account] [storage account access key] && copy /Y x:\windows\system32\inv32.xml J:\inv32.xml"
ElseIf not oFSO.FileExists(oEnv("SystemRoot") & "\System32\inv32.xml") then
oLogging.CreateEntry "Unable to find the inv32.xml file, DaRT remote control is not running.", LogTypeInfo
Exit Sub
End if
When the virtual machine loads WinPE, the MDT deployment process will load the LiteTouch.wsf script, which then checks for the Inv32.xml file. If the script finds the file, it attempts to mount Azure File storage and copy the file to the locally mapped drive. (After the file is copied to Azure File storage, you can mount the same Azure File storage to your workstation and view the connection file. More on that later.)
Note: Currently this method requires that your workstation be connected to the same virtual network as the target virtual machine. This is due to the default DaRT configuration connecting to the virtual machine’s private IP. Efforts to connect the DaRT service to the public IP are in progress.
VHD customization
Next, we create the custom virtual hard disk (VHD) to contain our MDT Media content. Before beginning, please ensure that your image meets all the Azure prerequisites. Then, create the VHD container with two partitions – one for WinPE and one for the operating system bits. The VHD is, of course, created by using PowerShell.
- Create a VHD with two partitions – one for WinPE and one for the operating system. Note that the VHD is a fixed size, because Azure does not support dynamic VHDs.
Import-Module Hyper-V
$LocalVhdPath = “C:\VHDs\winpeAzure.vhd”
$VhdSize = 21GB
$WinPePartitionSize = 7GB
$FsLabel = "WinPE"
$OsDiskLabel = "OSDisk"
New-VHD -Path $LocalVhdPath -SizeBytes $VhdSize -Fixed
Mount-DiskImage -ImagePath $LocalVhdPath
$mountedDisk = Get-DiskImage -ImagePath $LocalVhdPath
Initialize-Disk -Number $mountedDisk.Number -PartitionStyle MBR
New-Partition -DiskNumber $mountedDisk.Number -Size $WinPePartitionSize -AssignDriveLetter -IsActive | Format-Volume -FileSystem NTFS -NewFileSystemLabel $FsLabel -confirm:$false
New-Partition -DiskNumber $mountedDisk.Number -UseMaximumSize | Format-Volume -FileSystem NTFS -NewFileSystemLabel $OsDiskLabel -confirm:$false
- Update the Media, and copy the Media folder contents to the WinPE partition of the VHD that you just created.
$MdtDrive = "DS001"
$DeploymentShare = "C:\DeploymentShare"
$MediaName = "Media001"
Add-PSSnapin -Name Microsoft.BDD.PSSnapIn
#Check for MDT Drive and mount if not
if (!(Test-Path "$($MdtDrive):"))
{
New-PSDrive -Name $MdtDrive -PSProvider MDTProvider -Root $DeploymentShare
}
$mdtMediaPath = "$($MdtDrive):\Media\$MediaName"
Update-MDTMedia -Path $mdtMediaPath
Mount-DiskImage $LocalVhdPath -ErrorAction Ignore
$mountedDisk = Get-DiskImage -ImagePath $LocalVhdPath
$winPePartition = Get-Volume -FileSystemLabel $FsLabel
$driveLetter = $winPePartition.DriveLetter
$tsMediaContentPath = "C:\Media\Content"
Write-Output "Copying updated content to VHD"
Copy-Item $tsMediaContentPath\* "$($driveLetter):\" -Recurse -Force
Dismount-DiskImage $LocalVhdPath
- Copy the VHD to your Azure subscription.
$SubscriptionId = "[SUBSCRIPTION_GUID]"
$StorageAccountName = "[STORAGE ACCOUNT NAME]"
$VhdPath = "vhds/winpe-final.vhd"
$login = Login-AzureRmAccount -SubscriptionId $SubscriptionId
$storageAccount = Get-AzureRmStorageAccount | Where-Object StorageAccountName -EQ $StorageAccountName
$resourceGroupName = $storageAccount.ResourceGroupName
Add-AzureRmVhd -Destination "$($storageAccount.PrimaryEndpoints.Blob.ToString())$VhdPath" -LocalFilePath $LocalVhdPath -ResourceGroupName $resourceGroupName -OverWrite
- And finally, create an Azure Virtual Machine by using the VHD as a source image. The entire script resource that provides this functionality is listed in the Resources section. Following are the pertinent parts of the script.
$TargetDiskParent = "VHDs/"
$virtual machineName = "IMGWinPETest"
$virtual machine = New-AzureRmVIRTUAL MACHINEConfig -VIRTUAL MACHINEName $virtual machineName -VIRTUAL MACHINESize "Standard_D1"
$sourceImageUri = "$($storageAccount.PrimaryEndpoints.Blob.ToString())$VhdPath"
$osDiskUri = "$($storageAccount.PrimaryEndpoints.Blob.ToString())$TargetDiskParent$virtual machineName-OsDisk.vhd"
$virtual machine = Set-AzureRmVIRTUAL MACHINEOSDisk -VIRTUAL MACHINE $virtual machine -Name "$virtual machineName-OSDisk" -VhdUri $osDiskUri -CreateOption FromImage -SourceImageUri $sourceImageUri -Windows
WinPE interaction in Azure using DaRT
After running your virtual machine configuration script, the virtual machine provisioning process in Azure will start. To view the deployment, sign in to the Azure portal and find your new virtual machine. You can still view the virtual machine’s console by selecting the virtual machine, opening the Support & Troubleshooting section of the VIRTUAL MACHINE properties blade, and clicking Boot Diagnostics. A new blade will open with a screencap of the VIRTUAL MACHINE console.
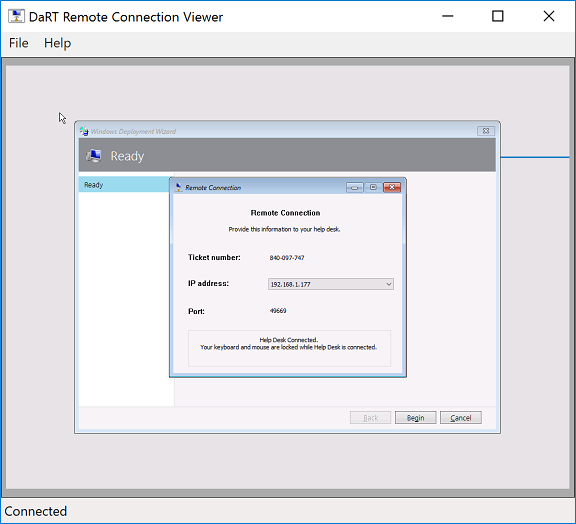
However, to interact with the console, connect to an endpoint that is on the same virtual network as the Target virtual machine. Launch the Dart Remote Viewer utility from your workstation, and copy the connection info from the Inv32.xml file on Azure File storage to the connection dialog box.
Figure 2 DaRT Remote Connection Viewer

After you click Connect, you should be looking at your WinPE environment in Azure, and you can interact with it, even completing the MDT Deployment Wizard.
Figure 3 DaRT console interaction with WinPE in Azure
Next steps
To improve this process, the first step would be to configure DaRT to attach to the public IP interface. This process removes the requirement that DaRT connections must come from the same virtual network. Additionally, this process can become even more automated by reading the XML file and prompting technicians for connection when a new connection file becomes available. Further, monitoring tools could be integrated to polish the connection process.
Resources
The two scripting resources referenced in this post are located at the Script Center:
Configure WinPE VHD for Azure VIRTUAL MACHINE Pre-boot Interaction
Deploy AzureRM VIRTUAL MACHINE with Accessible Pre-boot Environment
I invite you to follow me on Twitter and Facebook. If you have any questions, send email to me at scripter@microsoft.com, or post your questions on the Official Scripting Guys Forum. Also check out my Microsoft Operations Management Suite Blog.
 Light
Light Dark
Dark
0 comments