
Debugging PowerShell script in Visual Studio Code – Part 1
Summary: Here’s a look at the many features of the PowerShell debugger for Visual Studio Code.
In previous blog posts, we covered how to get started with PowerShell development in Visual Studio Code and the editing features of Visual Studio Code and the PowerShell extension. If you don’t already have Visual Studio Code configured with the PowerShell extension, read those blog posts to get caught up.
In the first of this two-part series, we will cover the many features of the PowerShell debugger for Visual Studio Code. These features are provided by the PowerShell extension, or, more accurately, by the PowerShell Editor Services module which comes with the PowerShell extension.
PowerShell Editor Services runs in a separate process and supplies both language and debugging services to Visual Studio Code via a JSON remote procedure call (RPC) protocol that’s defined by Visual Studio Code. One advantage of this approach is that a crash of the PowerShell Editor Services process doesn’t cause Visual Studio Code to crash. And, with the latest version of the PowerShell extension, you can simply restart the current PowerShell session without restarting Visual Studio Code to get going again.
First look at the PowerShell Debugger in Visual Studio Code
Press Ctrl+Shift+P (Cmd+Shift+P on Mac) to open the PowerShell extension’s Examples folder, type PowerShell open examples, and then press Enter. After the Examples folder has loaded, open the DebugTest.ps1 file, and set a breakpoint on the line that has the Start-Sleep command. To set the breakpoint, either click in the left editor margin or press F9 to toggle the breakpoint on and off for the current line.
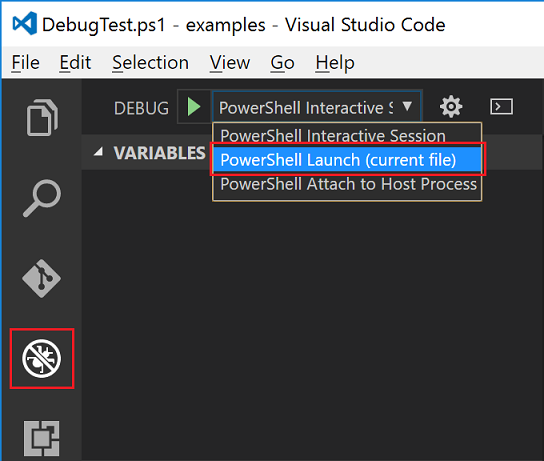
To open the Debug view, in the View Bar select Debug from the View menu or press Ctrl + Shift + D. In the Launch Configuration dropdown (shown in the following screenshot), select the PowerShell Launch (current file) configuration. Like the PowerShell integrated scripting environment (ISE), this configuration will execute the file that’s in the active editor window under the debugger when debugging is started.
Let’s start a debug session. First, make sure the DebugTest.ps1 file’s editor window is still the active window, and then press F5 or click the green Start Debugging button to the left of the Launch Configuration dropdown (shown in the previous screenshot).
After the debugger starts, you will see the Debug actions pane (shown in the following screenshot), and the debugger should pause at the breakpoint that you set.

The Debug actions pane provides buttons for:
- Continue / Pause – F5
- Step Over – F10
- Step Into – F11
- Step Out – Shift + F11
- Restart – Ctrl + Shift + F5
- Stop – Shift + F5
Now, let’s look at the Debug view features that are available during a debug session.

The VARIABLES section of the Debug view allows easy inspection of variable values. The Auto group weeds out the PowerShell automatic variables and leaves just the variables you’ve defined and are likely interested in seeing. However, if the variable you are looking for isn’t listed in Auto, you can look for it in the Local, Script, or Global groups.
The WATCH section allows you to specify a variable or expression whose value should always be displayed.
The CALL STACK section displays the call stack, and you can also select a different frame in the call stack to examine calling functions, scripts, and the variables that are defined in those scopes.
The BREAKPOINTS section provides a central UI to manage, that is, create, disable, enable, and delete breakpoints that you may have defined over many different script files.
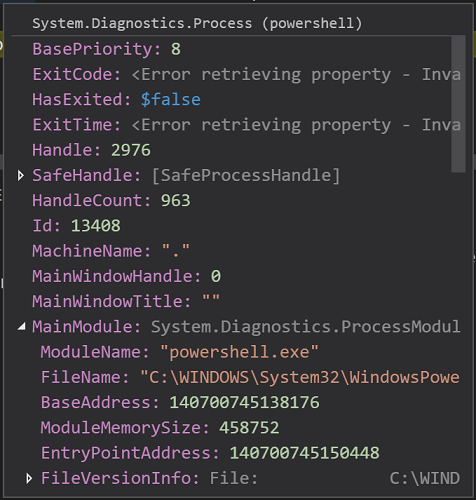
You can also see from the previous screenshot that you get hover tips when you hold the cursor over a variable. Hover tips can show simple values, like numbers and strings, or complex objects as shown in the following screenshot:
VARIABLES section
The VARIABLES section allows you to inspect variable values, including complex variables such as those shown in the following screenshot:
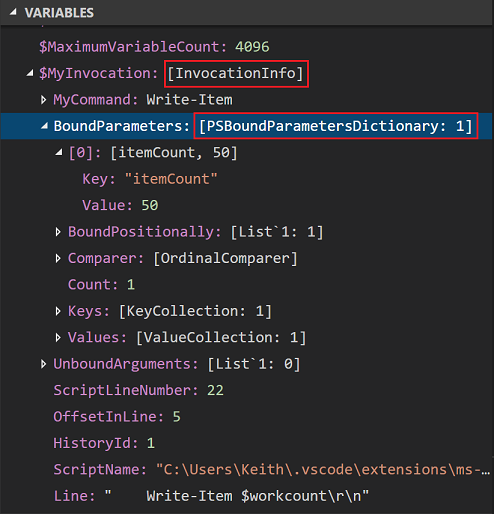
For primitive variable types, the value is displayed directly, typically as numbers, strings, and Booleans. For non-primitive variables, the type information is displayed. If the type is a collection or an array, the number of elements is displayed as well.
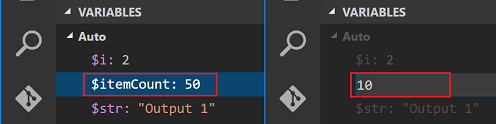
You can do more than just inspect variable values. To change those values, double-click the value that you want to change, enter a new value, and click outside the edit box to complete the operation.
You can enter arbitrary expressions when setting a variable’s value, for example, $itemCount+10 or $null or $true. Just remember, the expression has to be valid PowerShell syntax.
Watch section
The WATCH section allows you to add a watch for any variable or expression. Simply click the + button (highlighted in the following screenshot), and type the variable name or a PowerShell expression:
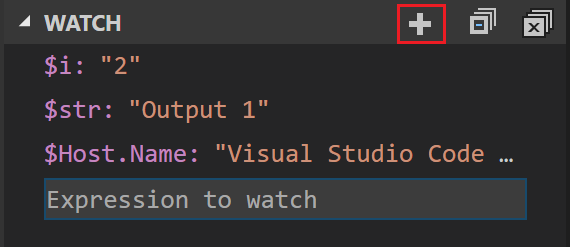
This values will always be evaluated, if possible. Keep in mind that the variables entered as a watch may not be available in all scopes.
BREAKPOINTS
Besides setting line breakpoints, the PowerShell debugger allows you to set function breakpoints, conditional breakpoints, and tracepoints.
Function breakpoints
Function breakpoints are effectively the same as a command breakpoint that you can set by using Set-PSBreakpoint with the -Command parameter. You can set a function breakpoint to break into the debugger not only on a particular function invocation but also on an alias, a built-in command, or application invocation.
To set a function breakpoint, hover over the BREAKPOINTS section title bar, click the + button, type Write-Output, and then press Enter as shown in the following screenshot.
Remove the line breakpoint that we set earlier on the line that executes the Start-Sleep command.
Press F5 to start debugging the DebugTest.ps1 script, and you will see the debugger stop everywhere Write-Output is called. You can tell when the debugger is stopped on a function breakpoint by looking at the CALL STACK section of the Debug view. It will indicate that it is paused on a function breakpoint. The Debug Console will also indicate that a breakpoint has paused the debugger as shown in the following screenshot. If the Debug Console is not visible, select Debug Console from the View menu, or press Ctrl + Shift + Y.

Stop debugging (press Shift + F5), and remove the function breakpoint by right-clicking it in the BREAKPONTS section, and selecting Remove breakpoint.
Conditional breakpoints
A conditional breakpoint is a line breakpoint that breaks into the debugger only when the line is executed and a user-supplied expression evaluates to $true. Conditional breakpoints are handy in scenarios where a line is executed many times, but you’re interested in breaking into the debugger only when a certain “condition” is true.
Let’s set a conditional breakpoint on the $i = $i + 1 line in DebugTest.ps1. Right-click the line, and select Add Conditional Breakpoint…. Enter the expression, $i % 10 -eq 0, as shown in the following screenshot, and then press Enter. As in the case with setting the value of a variable in the VARIABLES section, you have to use PowerShell syntax in the condition expression.

After you set the breakpoint, you will see that conditional breakpoints are displayed with an “=” sign in the glyph:
![]()
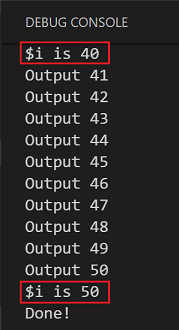
When this expression evaluates to $true, the debugger will pause execution. Now press F5 to start debugging. You will notice the debugger stops when $i is 10, 20, 30, 40 and 50. Stop debugging (Shift + F5).
Tracepoints
Tracepoints allow you to emit information to the Debug Console (or change state in your script) without ever pausing the debugger. These are effectively the same as using Set-PSBreakpoint -Action {scriptblock} where the scriptblock tests for a certain condition, and if met, executes some script and then uses Continue to resume execution.
Let’s convert our previous conditional breakpoint to a tracepoint. Right-click the conditional breakpoint in the left editor margin, select Edit Breakpoint…, and modify the condition to:

Press F5 to start debugging. You will notice that the script runs to completion without ever breaking into the debugger. In the Debug Console (Ctrl + Shift + Y), you will see the following output from this tracepoint:
Hit count for breakpoints
Line breakpoints support not only condition expressions but hit counts as well. When you specify a hit count, the PowerShell debugger notes the number of times that the breakpoint has been encountered and only breaks into the debugger after the specified hit count has been reached.
Let’s set a line breakpoint with a hit count. First, remove all previous breakpoints in DebugTest.ps1 by using the Remove All Breakpoints button as highlighted in the following screenshot:

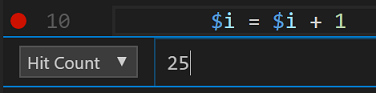
Now set a line breakpoint (F9) on the line: $i = $i + 1. Right-click the Red breakpoint glyph, and select Edit Breakpoint…. Then, click the dropdown, and select Hit Count:

This UI allows you to set both Expression and Hit Count to have a conditional breakpoint that obeys the specified hit count. Let’s set the hit count to 25. Press Enter to complete setting the hit count.
Press F5 to start debugging, and you will see the debugger stop when $i is 25. After you press F5 again to continue execution, the breakpoint is not hit again.
In this blog post, we looked at the debugging features of Visual Studio Code and the PowerShell extension. All debugging examples in this post used a project that had the debugger “preconfigured”. In Part 2 of this series, we will look at how to configure the debugger to launch and debug your scripts.
I think you’ll find the PowerShell debugging experience in Visual Studio Code to be quite productive. Of course, if you do find a bug, please be sure to submit an issue at https://github.com/PowerShell/vscode-powershell/issues so that we can continue to improve the debug experience for everyone.
Keith Hill Software Engineer PowerShell MVP
 Light
Light Dark
Dark
6 comments
Excellent post! I’m new to this and I learned a lot from it.
Hi, Nice article thanks!.
One question, is there the way to debug just selected fragment of script without executing the rest i.e. select code and press F8?
Kind regards
Karol
If you’re looking for part two, https://devblogs.microsoft.com/scripting/debugging-powershell-script-in-visual-studio-code-part-2/.
Link is now dead, John:
This site can’t be reachedit%27s%20here’s server IP address could not be found.
Search Google for its here
ERR_NAME_NOT_RESOLVED
@James link is all fixed 🙂
This is cool, but I prefer Write-Debug and Write-Verbose to find out the problem.
Usually it takes less than 5 minutes to find a bug, I think I need some practice with debugging described here.
thank you for sharing.