
Part 3 – Use Azure Automation DSC to Configure Linux and execute PowerShell scripts
Summary: Learn how to configure and use PowerShell, Bash, and DSC with Linux.
Hi, my name is Stefan Roth (Blog: http://stefanroth.net / Twitter: @stefanroth_net), and I am a Cloud and Datacenter MVP. In my last post of this three-part series, I would like to show you how we are able to hook up the previously installed Linux system to Azure Automation desired state configuration (DSC), deploy a DSC configuration, and apply it to our Linux system. What we are actually going to do is create a cronjob on Linux via Azure Automation DSC. This cronjob will run a PowerShell script on Linux every five minutes to send the current connected users to Azure Log Analytics HTTP Data Collector API.
The first step is to hook up our system to Azure Automation DSC. Simply run the following script on the Linux system.
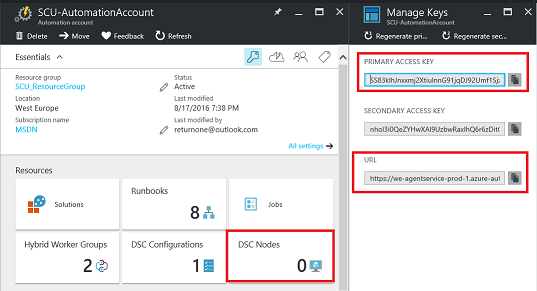
/opt/microsoft/dsc/Scripts/Register.py <PRIMARY ACCESS KEY> <URL>
This script will configure the local machine’s Local Configuration Manager (LCM) and also register on Azure Automation DSC. You find the primary access key and the URL in the Azure portal.
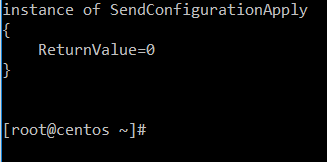
After you ran the script on the Linux system, you should get an output like in this screenshot.
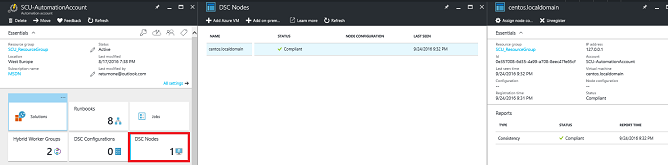
Of course, you will see your registered server in the Azure portal as well.
The first step has been done. The next step will supply the actual DSC configuration script, which we will run from Azure Automation DSC. Before we actually can do that, we need to upload the nx DSC module, which contains the script resource.
First, download the module to your Windows computer, for example, C:\Temp. Use the Save-Module cmdlet to download and save the module locally. Next, just ZIP the nx module folder to a file nx.zip.

Azure Automation needs the module in the ZIP format to successfully install the module. Then, upload the ZIP file to Azure Automation. This screenshot provides the steps.

After few minutes the module will appear as a listed module.

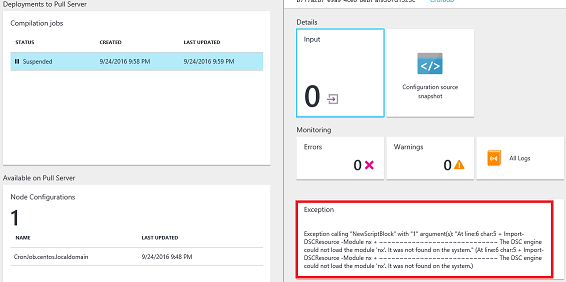
If you don’t upload this module and you try to compile a DSC configuration, the compilation will fail and shoot an exception.
At this moment, we are ready to upload the actual DSC configuration file, which will create the cronjob. A cronjob is similar to a scheduled job in Windows. This specific cronjob will run every five minutes and run a script, /tmp/Send-Login.ps1, which we will create in an upcoming step. The TestScript part checks if the cronjob has been created. If not, it will execute the SetScript section which will add the cronjob. What’s interesting here is that we are actually using the PowerShell binary to execute a native PowerShell script on Linux.
DSC_CronJob.ps1
# DSC configuration CronJob
configuration CronJob
{
# Import the DSC module nx
Import-DSCResource -Module nx
# Node name or IP
node centos.localdomain
{
# Use the nxScript resource to create a cronjob.
nxScript CronJob{
GetScript = @"
#!/bin/bash
crontab -l | grep -q "powershell -c /tmp/Send-Login.ps1" && echo 'Job exists' || echo 'Job does not exist'
"@
SetScript = @"
#!/bin/bash
(crontab -l | grep -v -F "powershell -c /tmp/Send-Login.ps1" ; echo "*/5 * * * * powershell -c /tmp/Send-Login.ps1" ) | crontab
"@
TestScript = @'
#!/bin/bash
crontab -l | grep -q "powershell -c /tmp/Send-Login.ps1" && exit 0 || exit 1
'@
}
}
}
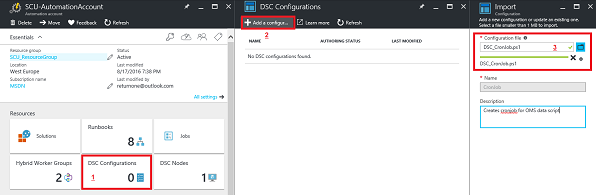
Within the Azure portal, go to DSC Configuration > Add a configuration, provide the configuration file, and then click OK.
Remember, we just provided the PowerShell script code. Next, we need to create the MOF file from this code. To generate the MOF file, simply select the DSC configuration, and select Compile.

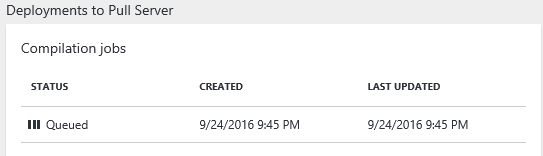
The compilation job starts and deploys the file to the DSC pull server. It takes a couple of minutes for the job to finish.
After completion, go to DSC Nodes, select your node, and then click Assign node configuration. This step assigns the DSC configuration to the Linux machine.

Make sure you will see the proper Node configuration and the status.

After your next configuration update cycle, the DSC configuration will be applied to your Linux system.

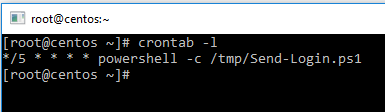
If you want to check whether the DSC configuration has been applied, sign in to your Linux server as root, and type crontab -l, which will display the configured cronjob.
The last step is to create the Send-Login.ps1 PowerShell script in the /tmp directory. I use vi editor to create the file and copy the code. These are the steps to create the PowerShell script:
- vi /tmp/Send-Login.ps1 (launches an empty file called Send-Login.ps1)
- Type i (for inserting text)
- Paste the Send-Login.ps1 script below
- Type Esc-Key (changing vi editor mode)
- Type :
- Type wq! (write and quite)
If you are connected via Windows Bash to your Linux system (which I recommend), it will look similar to this screenshot.
As a next step, make the script executable.
chmod +x /tmp/Send-Login.ps1

The Send-Login.ps1 script is based on a script from Log Analytics HTTP Data Collector API documentation . I actually added just an additional function Get-UserData.
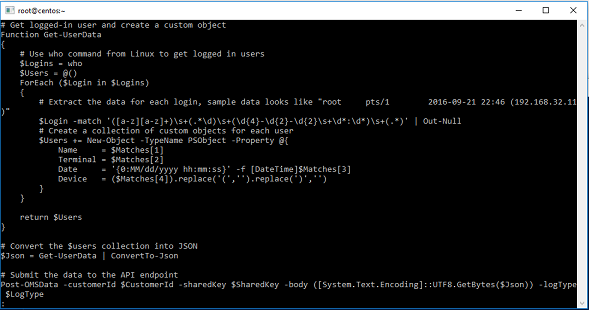
The Get-UserData function returns the current logged in user from Linux by using the who command (it is a Linux command, not a PowerShell command!). Here is a sample output of the who command.
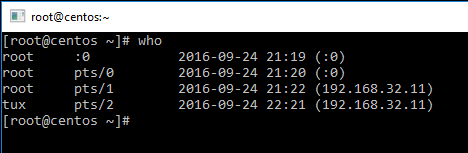
The output of the who command is assigned to $Logins variable. Next, for each logged in user the user name, terminal (pseudo terminal or pts) where the user is signed in, the sign-in date/time, and from which device the user is logged in is extracted. For each login, a PowerShell custom object is created. The last line of code converts the login object array to plain JSON output.
# Get logged-in user and create a custom object
Function Get-UserData
{
# Use who command from Linux to get logged in users
$Logins = who
$Users = @()
ForEach ($Login in $Logins)
{
# Extract the data for each login, sample data looks like "root     pts/1        2016-09-21 22:46 (192.168.32.11)"
$Login -match '([a-z][a-z]+)\s+(.*\d)\s+(\d{4}-\d{2}-\d{2}\s+\d*:\d*)\s+(.*)' | Out-Null
# Create a collection of custom objects for each user
$Users += New-Object -TypeName PSObject -Property @{
Name     = $Matches[1]
Terminal = $Matches[2]
Date     = '{0:MM/dd/yyyy hh:mm:ss}' -f [DateTime]$Matches[3]
Device   = ($Matches[4]).replace('(','').replace(')','')
}
}
return $Users
}
# Convert the $users collection into JSON
$Json = Get-UserData | ConvertTo-Json
If the script is executed it will send the user JSON data (user login data) to Log Analytics HTTP Data Collector API.
#####################################################################################
Send-Login.ps1
# Replace with your Workspace ID
$CustomerId = [YOUR WORKSPACE ID]
# Replace with your Primary Key
$SharedKey = [YOUR PRIMARY KEY FROM YOUR OMS WORKSPACE]
# Specify the name of the record type that you'll be creating
$LogType = 'LinuxLogin'
# Specify a time in the format YYYY-MM-DDThh:mm:ssZ to specify a created time for the records
$TimeStampField = ''
# Create the function to create the authorization signature
Function Build-Signature ($CustomerId, $SharedKey, $Date, $ContentLength, $Method, $ContentType, $Resource)
{
$xHeaders = "x-ms-date:" + $Date
$StringToHash = $Method + "`n" + $ContentLength + "`n" + $ContentType + "`n" + $xHeaders + "`n" + $Resource
$BytesToHash = [Text.Encoding]::UTF8.GetBytes($StringToHash)
$KeyBytes = [Convert]::FromBase64String($SharedKey)
$Sha256 = New-Object System.Security.Cryptography.HMACSHA256
$Sha256.Key = $KeyBytes
$CalculatedHash = $Sha256.ComputeHash($BytesToHash)
$EncodedHash = [Convert]::ToBase64String($CalculatedHash)
$Authorization = 'SharedKey {0}:{1}' -f $CustomerId,$EncodedHash
return $Authorization
}
# Create the function to create and post the request
Function Post-OMSData($CustomerId, $SharedKey, $Body, $LogType)
{
$Method = "POST"
$ContentType = "application/json"
$Resource = "/api/logs"
$Rfc1123date = [DateTime]::UtcNow.ToString("r")
$ContentLength = $Body.Length
$Signature = Build-Signature `
-customerId $CustomerId `
-sharedKey $SharedKey `
-date $Rfc1123date `
-contentLength $ContentLength `
-fileName $FileName `
-method $Method `
-contentType $ContentType `
-resource $Resource
$uri = "https://" + $CustomerId + ".ods.opinsights.azure.com" + $Resource + "?api-version=2016-04-01"
$Headers = @{
"Authorization" = $Signature;
"Log-Type" = $LogType;
"x-ms-date" = $Rfc1123date;
"time-generated-field" = $TimeStampField;
}
$Response = Invoke-WebRequest -Uri $uri -Method $Method -ContentType $ContentType -Headers
$Headers -Body $Body -UseBasicParsing
return $Response.StatusCode
}
# Get logged-in user and create a custom object
Function Get-UserData
{
# Use who command from Linux to get logged in users
$Logins = who
$Users = @()
ForEach ($Login in $Logins)
{
# Extract the data for each login, sample data looks like "root     pts/1        2016-09-21 22:46 (192.168.32.11)"
$Login -match '([a-z][a-z]+)\s+(.*\d)\s+(\d{4}-\d{2}-\d{2}\s+\d*:\d*)\s+(.*)' | Out-Null
# Create a collection of custom objects for each user
$Users += New-Object -TypeName PSObject -Property @{
Name     = $Matches[1]
Terminal = $Matches[2]
Date     = '{0:MM/dd/yyyy hh:mm:ss}' -f [DateTime]$Matches[3]
Device   = ($Matches[4]).replace('(','').replace(')','')
}
}
return $Users
}
# Convert the $users collection into JSON
$Json = Get-UserData | ConvertTo-Json
# Submit the data to the API endpoint
Post-OMSData -customerId $CustomerId -sharedKey $SharedKey -body ([System.Text.Encoding]::UTF8.GetBytes($Json)) -logType $LogType
#####################################################################################
Finally, we have everything set up and just need to wait for the scheduled job to run. If everything works correctly, you should see the results in the LinuxLogin_CL custom log or whatever name you have configured in the script ($LogType).
When the script fires, it takes about 2-3 minutes for the data to appear in OMS Log Search. In this case, we run a search query * Type=LinuxLogin_CL, and see the results immediately.
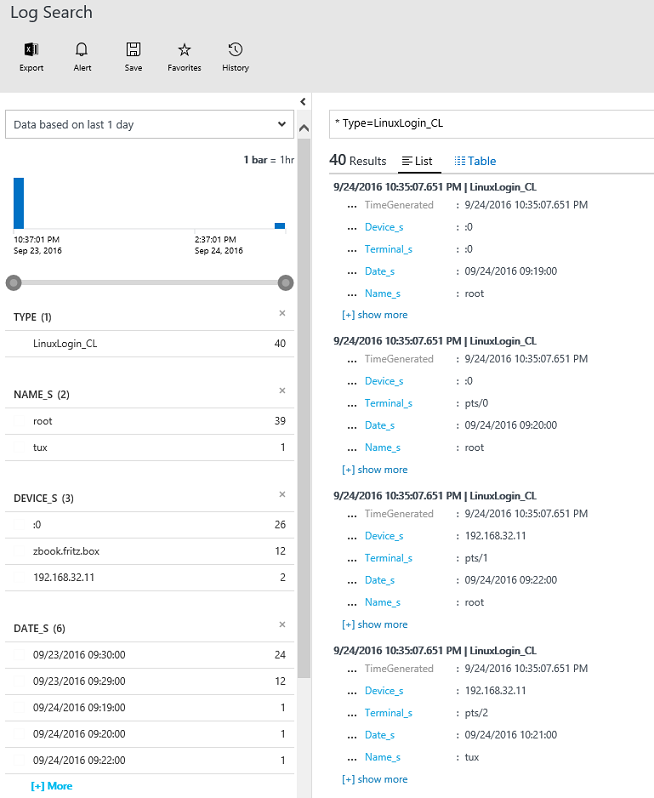
Of course, now you could start to play with this data and run some queries on it. For example, here we are able to see when a new user (hacker) connected, from which system, and at which time.

Another advanced way to display the data would be to use OMS View Designer to build some nice dashboards.
Summary: In this post, we connected the Linux server to Azure Automation DSC. Then, we assigned a DSC configuration, which will run some Bash commands to create a cronjob on Linux. This cronjob executes a PowerShell script on Linux (yes, native PowerShell code!) to send the current connected users to OMS via Azure Log Analytics HTTP Data Collector API.
I am fascinated how I am able to use Linux native command and use it together with PowerShell and vice versa. When you run a command on Linux, the output is just a string. With PowerShell on board, you can convert the output from Bash commands to objects – PowerShell objects. Working with objects unleashes all the power there is in PowerShell and more.
This example is not meant for a production-ready scenario. Instead, it gives you an idea which direction Microsoft is taking. It gives you an idea how we are able to mix Microsoft and Linux/Open Source technologies to take the best from both worlds to achieve our goal in less time and have some real fun.
Thank you, Stefan.
I invite you to follow me on Twitter and Facebook. If you have any questions, send email to me at scripter@microsoft.com, or post your questions on the Official Scripting Guys Forum. Also, check out my Microsoft Operations Management Suite Blog. Until next time, peace.
Ed Wilson Microsoft Scripting Guy
 Light
Light Dark
Dark
0 comments