
Part 2 – Install .NET Core and PowerShell on Linux Using DSC
Summary: Learn how to configure and use PowerShell, Bash, and desired state configuration (DSC) with Linux.
Today, Cloud and Data Center MVP Stefan Roth returns for Part 2 of his three-part series about how to configure and use PowerShell, Bash, and desired state configuration (DSC) with Linux. Take it away Stefan …
My previous post installed the foundation for this second part. It installed the OMI CIM server and DSC on Linux. In this part, the goal is to run a DSC configuration on Linux to download and install .NET core libraries and Windows PowerShell for Linux.
There is a multi-step process to get this done.
- Open firewall TCP port 5986 on the Linux machine
- Connect via CIM session to the OMI CIM server
- Install nx DSC module locally on your Windows 10 system
- Create MOF file locally on your Windows 10 system
- Copy and execute the DSC configuration (MOF file) on Linux
Sounds cool? Yeah it is!
Just to recap, my Ubuntu Bash is running on my client computer and a Linux server CentOS 7 x64. I think to test and develop a DSC configuration, which we want to run from Azure Automation, the best way is to write the configuration file locally and connect to the OMI CIM server via WinRM. By default, the OMI CIM server is listening on port 5986 for incoming traffic.
You can figure this out by looking at the omiserver.conf file in the /etc/opt/omi/conf/ directory.
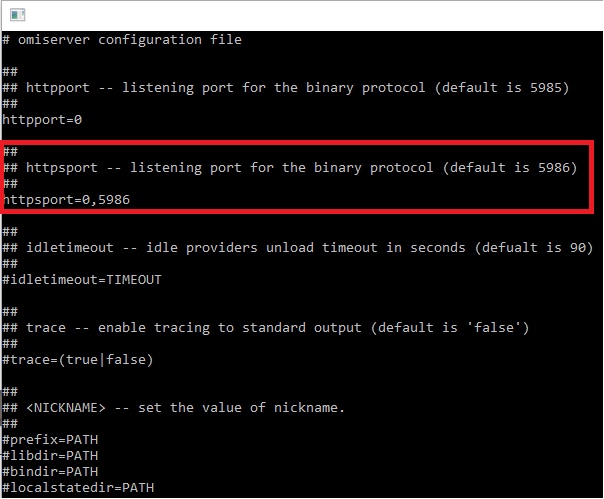
Because my CentOS 7 server has a firewall running, you need to open the firewall TCP port 5986.
To open TCP port 5986 (inbound), use the following commands:
firewall-cmd --zone=public --add-port=5986/tcp --permanent
firewall-cmd –reload
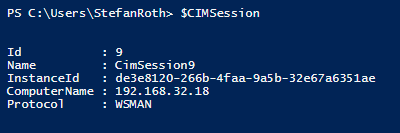
The next step is to use PowerShell on my Windows 10 system to connect to the OMI CIM server. For this, I use the New-CIMSession cmdlet. Because we do not use a valid certificate for https to successfully connect, we need to skip certificate authority (CA), certificate common name (CN) and revocation status check. So, the command looks like this.
Connect via CIM session to OMI CIM server:
$Credentials = Get-Credential -UserName:'root' -Message 'Enter Root Credentials'
$CIMOptions = New-CimSessionOption -SkipCACheck -SkipCNCheck -UseSsl -SkipRevocationCheck
$CIMSession = New-CimSession -Credential $Credentials -ComputerName '192.168.32.18' -Port 5986 -Authentication Basic -SessionOption $CIMOptions
If you look at the $CIMSession object, you will see the connection.
The next step is to install the nx DSC module on your Windows 10 system. You need this module so you can develop and compile the managed object format (MOF) file locally on Windows 10. The nx DSC module has several included resources. You need nxArchive, nxScript, and nxPackage.
The following list of resources and links to topics describe the resources in detail.
- nxArchive Resource–Provides a mechanism to unpack archive (.tar, .zip) files at a specific path.
- nxEnvironment Resource–Manages environment variables on target nodes.
- nxFile Resource–Manages Linux files and directories.
- nxFileLine Resource–Manages individual lines in a Linux file.
- nxGroup Resource–Manages local Linux groups.
- nxPackage Resource–Manages packages on Linux nodes.
- nxScript Resource–Runs scripts on target nodes.
- nxService Resource–Manages Linux services (daemons).
- nxSshAuthorizedKeys Resource–Manages public secure shell (SSH) keys for a Linux user.
- nxUser Resource–Manages local Linux users.
To install the nx DSC module on Windows 10, just run one command, Install-Module. When you get prompted several times, just confirm and agree.
To install the DSC module (nx), use the following command:
Install-Module -Name nx
After you install. the DSC module, we are ready to put some meat on the bone. I have created a DSC script that will install .NET Core and PowerShell on Linux.
The first section of the DSC script defines the download paths for .NET Core and PowerShell.
# Set the configuration data
$ConfigData = @{
AllNodes = @(
@{
NodeName = "192.168.32.18"
DownloadPath = "/root/Downloads/"
NetCoreSource = “https://download.microsoft.com/download/1/5/2/1523EBE1-3764-4328-8961-D1BD8ECA9295/dotnet-dev-centos-x64.1.0.0-preview2-003121.tar.gz”
NetVersion = "dotnet-dev-centos-x64.1.0.0-preview2-003121.tar.gz"
PowerShellSource = "https://github.com/PowerShell/PowerShell/releases/download/v6.0.0-alpha.8/powershell-6.0.0_alpha.8-1.x86_64-centos.7-x64.rpm"
PowerShellVersion = "powershell-6.0.0_alpha.8-1.x86_64-centos.7-x64.rpm"
}
)
}
The DSC configuration part uses several DSC resources from the nx module. There is a two-step process in place. First, you download prerequisites and source for .NET Core and installed it. If this step is successful, you download PowerShell for Linux and run the installation. If everything succeeds, you just type powershell, and the prompt from PowerShell on Linux will appear.
The DSC script has comments, so there is probably not much more to say.
# DSC configuration
configuration DotNetPowerShell
{
# Import the DSC module nx
Import-DSCResource -Module nx
node 192.168.32.18
{
# Use yum to install pre-requisites for .NET Core
nxPackage PreNetCore
{
Name = "libunwind libicu"
Ensure = "Present"
PackageManager = "Yum"
}
# Download the .NET Core source from Microsoft
nxFile DownloadNetCore
{
Ensure = "Present"
SourcePath = $Node.NetCoreSource
DestinationPath = $Node.DownloadPath + $Node.NetVersion
Type = "File"
DependsOn = "[nxPackage]PreNetCore"
}
# Extract the .NET Core tarball
nxArchive ExtractNetCore
{
SourcePath = $Node.DownloadPath + $Node.NetVersion
DestinationPath = “/opt/dotnet”
Force = $false
DependsOn = "[nxFile]DownloadNetCore"
}
# .NET Core needs to have a symbolic link set, therefore we use the script resource
nxScript Symlink{
GetScript = @"
#!/bin/bash
ll /usr/local/bin/dotnet
"@
SetScript = @"
#!/bin/bash
ln -s /opt/dotnet/dotnet /usr/local/bin
"@
TestScript = @'
#!/bin/bash
if [ -L /usr/local/bin/dotnet ]
then
exit 0
else
exit 1
fi
'@
DependsOn = "[nxArchive]ExtractNetCore"
}
# Download the PowerShell for Linux source
nxFile DownloadPowerShell
{
Ensure = "Present"
SourcePath = $Node.PowerShellSource
DestinationPath = $Node.DownloadPath + $Node.PowerShellVersion
Type = "File"
}
# Install the PowerShell for Linux package
nxPackage PowerShell
{
Name = $Node.PowerShellVersion
FilePath = $Node.DownloadPath +  $Node.PowerShellVersion
Ensure = "Present"
PackageManager = "Yum"
DependsOn = "[nxFile]DownloadPowerShell"
}
}
}
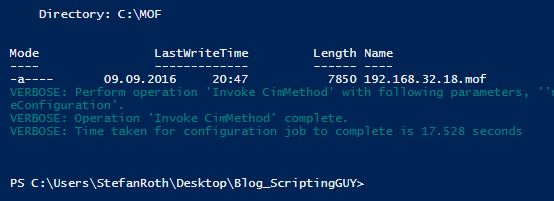
The next step is to create the MOF file on your local Windows system and save it to a directory (C:\MOF).
DotNetPowerShell -ConfigurationData $ConfigData -OutputPath "C:\MOF\"
Finally, we can connect and run the MOF file against the Linux server by using the CIM session and the following command.
Start-DscConfiguration -CimSession $CIMSession -Wait -Verbose -Path "C:\MOF\"
You should get an output like in this screenshot.
If you run simply the powershell command (yes, lowercase) in your Bash, PowerShell will start on Linux.
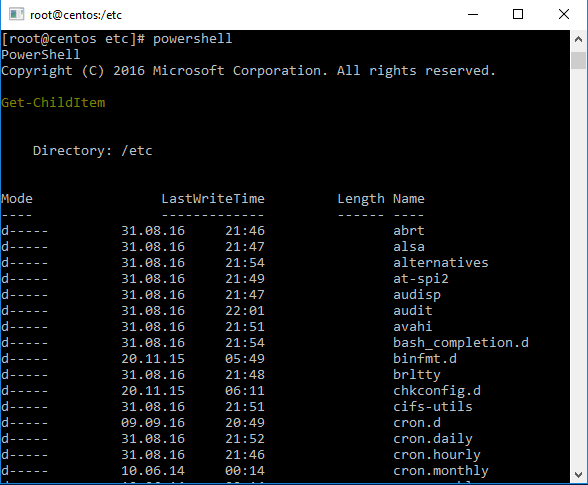
Summary: Imagine what this post achieves. First, you connected via WSMan protocol (PowerShell remoting) to the OMI CIM server that’s running on Linux. Then, you used DSC on Linux to install .NET Core and PowerShell (!) on Linux. Finally, you just ran Get-ChildItem on Linux to get the directories and files the same way they’re available on Windows. Isn’t this just awesome!?
In my next post, you will have some fun with Azure Automation DSC and the OMS injection API. Stay tuned!
Thank you Stefan.
I invite you to follow me on Twitter and Facebook. If you have any questions, send email to me at scripter@microsoft.com, or post your questions on the Official Scripting Guys Forum. Also, check out my Microsoft Operations Management Suite Blog. Until then, peace.
Ed Wilson Microsoft Scripting Guy
 Light
Light Dark
Dark
0 comments