
Part 1 – Install Bash on Windows 10, OMI CIM Server, and DSC for Linux
Summary: Learn about the Windows Subsystem for Linux that runs on top of Windows 10.
Today we have a guest article written by Stefan Roth. Take it away Stefan …
Hi, my name is Stefan Roth, and I am a Cloud and Datacenter MVP. In a couple of posts, I would like to show you how cool it is that Microsoft is touching the Linux world. Myself, I am a 100% Microsoft fan, but, as you can read all over the Internet…Microsoft loves Linux. This is not just a one-night stand. Microsoft is really serious about Linux support in all cloud scenarios (private, public, and hybrid). Therefore, we start with something really cool.
I will start a three-part series that touches a few parts of the Linux direction that Microsoft is taking. My first post gives you an overview of Bash on Windows 10 by using Secure Shell (SSH). We’ll run a script that installs the prerequisites and sets up a desired state configuration (DSC) environment. The second post will show you how to install .NET Core and PowerShell on Linux by using DSC. The last part will use Azure Automation DSC and the Operations Management Suite injection API for some fun.
The anniversary update
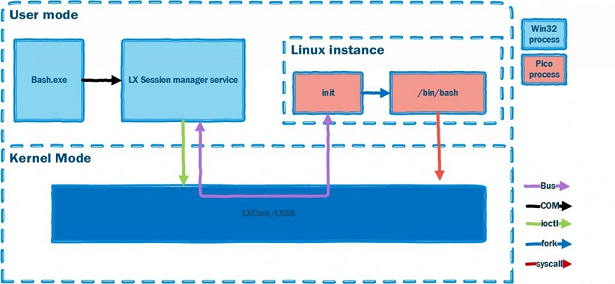
Microsoft released the Windows 10 Anniversary Update on August 2nd. One awesome new feature is the Windows Subsystem for Linux (WSL) that runs on top of Windows 10. What does that mean? This subsystem allows you to run native Linux binaries on Windows. If you remember back to Windows NT, there was already a POSIX subsystem available for Unix-based applications. Because the Windows NT kernel was designed to run such subsystems, Microsoft could use this architecture and build a subsystem for Linux. Exactly how this works is explained in the Windows Subsystem for Linux Overview blog post.
Why should we care at all? Good question. I think there is a short-term goal and a long-term goal. If you watched Technical Fellow Jeffrey Snover announcing PowerShell on Linux and Open Sourced , Jeffrey mentioned a vision to manage any system from any operating system by using Windows PowerShell. One short-term goal is for developers to have a Linux environment available on Windows as also a “native” way to use SSH to connect and manage native Linux systems, which has been requested for years. Scott Hanselmann has released a nice video on his blog, which shows what you can do with Bash and explains some more details.
Install Bash on Windows
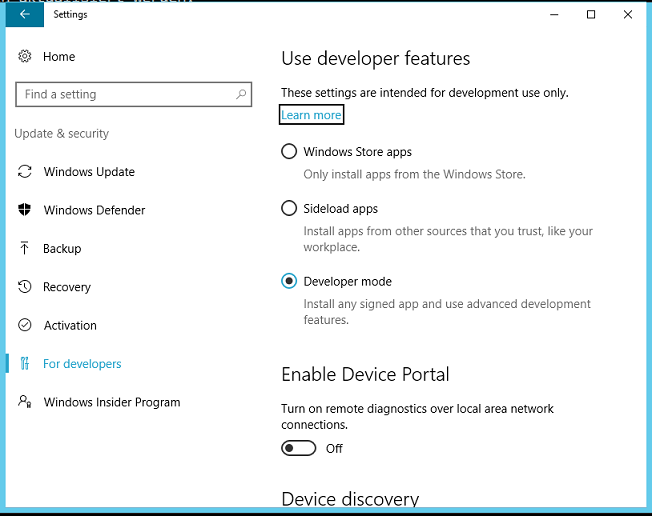
First, let’s install Bash on Windows 10. Make sure that you have the latest Windows 10 Anniversary 64-bit edition and that you have Developer Mode enabled. Open the Settings app and go to Update & security > For developers. Select Developer mode to enable Developer Mode.
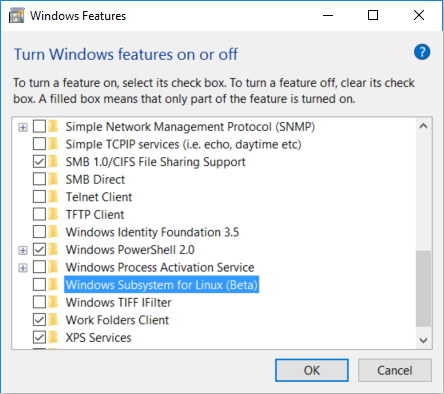
Next, use Turn Windows features on or off to turn on Windows Subsystem for Linux (Beta), reboot, and everything is done.
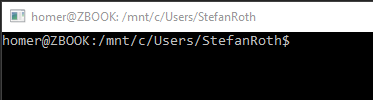
Type Bash in the Run Window, and follow the instructions to complete the setup. Now you are a proud owner of an Ubuntu Bash on Windows 10 that’s waiting for input.
I have a CentOS 7 x64 Linux system called centos installed on my local Hyper-V server. Now let’s connect from your Windows 10 Bash to the CentOS server system by using SSH.
Type within Bash:
ssh [IP OF YOUR SERVER] -l root
Enter your password when prompted.
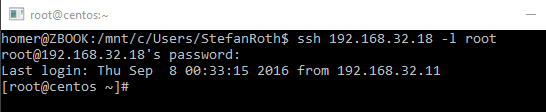
Note: If you receive a response like this, just confirm by typing yes.
The authenticity of host ‘192.168.32.18 (192.168.32.18)’ can’t be established. ECDSA key fingerprint is 26:b6:fb:b1:de:76:b0:2e:47:68:0b:94:32:00:c9:08. Are you sure you want to continue connecting (yes/no)?
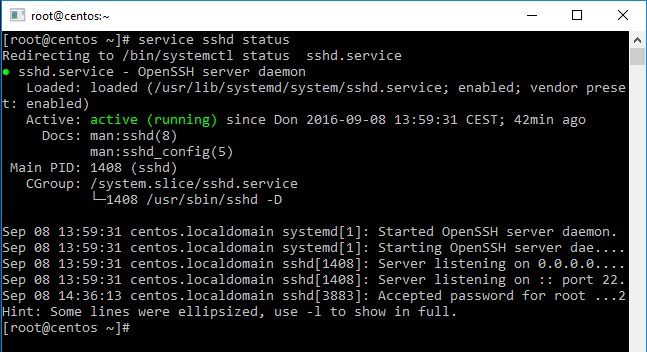
Now you are authenticated as root (root = administrator permission) to the remote system via SSH. If you get an error, check on your Linux server locally to determine if the sshd (SSH daemon) is running by typing:
service sshd status
You should get an output as shown in the following screenshot.
Install the prerequisites
Next, we are going to run a little shell script to download all prerequisites and source for the OMI CIM server and the DSC packages. After successful download, we’ll install the rpm packages (Package Manager for Red Hat).
First, to create the script file, go to /root/Downloads:
- Type
vi install.shto launch an empty file called install.sh. - Type
ito insert text. - Paste the script that follows these steps.
- Type Esc key to change vi editor mode.
- Type
:. - Type
wq!to write and quit.
It should look like this…
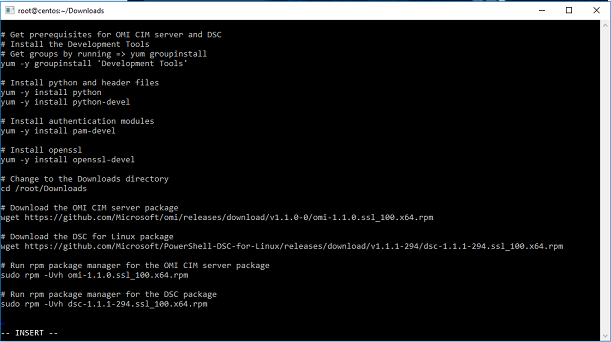
Shell script:
#####################################################################################
#! /bin/sh
# Get prerequisites for OMI CIM server and DSC
# Install the Development Tools
# Get groups by running => yum groupinstall
yum -y groupinstall 'Development Tools'
# Install python and header files
yum -y install python
yum -y install python-devel
# Install authentication modules
yum -y install pam-devel
# Install openssl
yum -y install openssl-devel
# Change to the Downloads directory
cd /root/Downloads
# Download the OMI CIM server package
wget https://github.com/Microsoft/omi/releases/download/v1.1.0-0/omi-1.1.0.ssl_100.x64.rpm
# Download the DSC for Linux package
wget https://github.com/Microsoft/PowerShell-DSC-for-Linux/releases/download/v1.1.1-294/dsc-1.1.1-294.ssl_100.x64.rpm
# Run rpm package manager for the OMI CIM server package
sudo rpm -Uvh omi-1.1.0.ssl_100.x64.rpm
# Run rpm package manager for the DSC package
sudo rpm -Uvh dsc-1.1.1-294.ssl_100.x64.rpm
###############################################################################
Next, to set the permission to the script as executable, type:
chmod +x install.sh
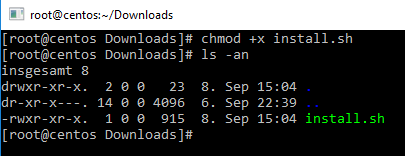
Finally, execute the script. The install process will kick off, and you will see the installation.

Note: If you get an error like “…Another app is currently holding the yum lock”, the yum installer is running in the background. To temporarily prevent the database lock, use the following command to stop the daemon.
Stop yum installer
service packagekit stop
Run the script again ./install.sh. If everything worked, you should have a prompt again and run the next command to see the status of the OMI CIM server.
OMI CIM server status
service omid status
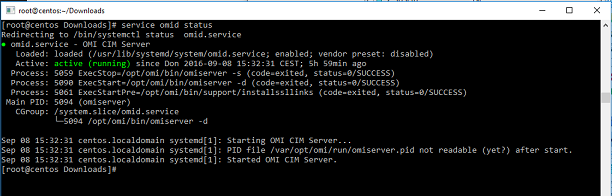
At this point, OMI CIM server and DSC Linux components are installed – up and running.
Testing it
If you want to explore your installation, there are few commands which might help you to troubleshoot OMI CIM server and DSC.
OMI Server
Show OMI server version:
/opt/omi/bin/omiserver -v
Show OMI server help:
/opt/omi/bin/omiserver -h
Shows the OMI server configuration file
vi /etc/opt/omi/conf/omiserver.conf
Shows the OMI server log file
vi /var/opt/omi/log/omiserver.log
DSC
Get DSC configuration
/opt/microsoft/dsc/Scripts/GetDscConfiguration.py
Get LCM configuration
/opt/microsoft/dsc/Scripts/GetDscLocalConfigurationManager.py
Install a DSC custom module
/opt/microsoft/dsc/Scripts/InstallModule.py /tmp/cnx_Resource.zip
Remove a DSC custom module
/opt/microsoft/dsc/Scripts/RemoveModule.py cnx_Resource
Applies a configuration MOF file to the computer
/opt/microsoft/dsc/Scripts/StartDscLocalConfigurationManager.py –configurationmof /tmp/localhost.mof
Applies a Meta Configuration MOF file to the compute
/opt/microsoft/dsc/Scripts/SetDscLocalConfigurationManager.py –configurationmof /tmp/localhost.meta.mof
Shows the DSC log file
vi /var/opt/omi/log/dsc.log
Summary
First, we installed the Windows Subsystem for Linux and used Bash to make a connection to a Linux server by using SSH. From this shell, we ran an installation script to install OMI CIM Server and DSC for Linux.
You might have noticed that we never had to leave the Bash window. We could manage the Linux server from Windows 10 without logging in to the Linux server console. One small but important goodie I like is that we are also able to copy from Windows and paste to the Bash window as we did tocreate the shell script file.
Thank you, Stefan.
I invite you to follow me on Twitter and Facebook. If you have any questions, send email to me at scripter@microsoft.com, or post your questions on the Official Scripting Guys Forum. Also check out my Microsoft Operations Management Suite Blog. Until then, peace.
Ed Wilson, Microsoft Scripting Guy
 Light
Light Dark
Dark
0 comments