
Use PowerShell to integrate with the Lync 2013 SDK for Skype for Business – Part 1
Summary: Get started with the Lync 2013 SDK by using PowerShell to manage Skype for Business 2016 client.
 How do I integrate Windows PowerShell with the Lync SDK to manage Skype For Business client?
 MVP Chendrayan Venkatesan is back again to show us how to get started with the Lync 2013 SDK and do some really cool stuff with PowerShell and Skype for Business!
Take it away, Chen!
The Skype for Business 2016 client helps you stay connected with known people by using instant messaging, audio, video call, email, persistent chat rooms, online meetings, and presentations. By using Skype for Business, you can send IM or call a known person, which saves time at work. Some organizations might have built customized Skype for Business client applications or integrated Skype for Business with custom applications for their business needs.
This blog post shares insights about how to extend PowerShell with the Lync SDK to explore Skype for Business 2016 client. Why should you use the Lync SDK for the Skype for Business client? Because there is no Skype for Business application API released for Windows. However, the Lync 2013 SDK (client) is fully supported for Lync 2013, Skype for Business, and Skype for Business online.
All the previous articles are focused for software developers, but what can system administrators can do with the Lync 2013 SDK to work with Skype for Business client? Well, the answer is: A lot more by using PowerShell.
Note: Install Lync 2013 SDK only if required. Its available in the Microsoft Download Center.
The system requirements to install the Lync SDK are a real challenge. Yes, the Lync 2013 SDK will look for Lync 2013 client and Visual Studio 2010 components, which you don’t want to install. To bypass it, we came up with a small tweak which follows.
- Download the LyncSDK.exe.
- Extract the file using 7Zip.
- Now, you see the Lync SDK folder, which has a security catalog file and two Windows installer files. Choose the appropriate version, 64- or 32-bit.
- Install the MSI package, and confirm the installation in Control Panel.
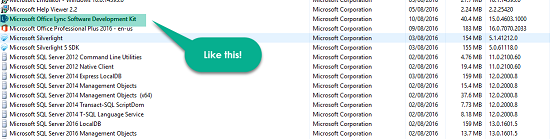
The 32-bit Lync SDK will be located at C:\Program Files (x86)\Microsoft Office 2013\LyncSDK and contains folders for Assemblies, Redist , samples, LyncClientSDK help, and redist help file.
Now you’re partially set to start exploring Skype for Business 2016 client features by using PowerShell and the Lync SDK assembly (Microsoft.Lync.Model.dll) from the Desktop folder.
To begin, you need to load the assembly in PowerShell by executing one of the following snippets and ensure that you’re signed in to Skype for Business. Here is the Lync client class documentation for reference.
Import-Module "C:\Program Files (x86)\Microsoft Office 2013\LyncSDK\Assemblies\Desktop\Microsoft.Lync.Model.dll"
$Client = [Microsoft.Lync.Model.LyncClient]::GetClient()
$Client
— or —
$assembly = "C:\Program Files (x86)\Microsoft Office 2013\LyncSDK\Assemblies\Desktop\Microsoft.Lync.Model.dll"
Import-Module $assembly
$Client
Here’s the output. The uri property is removed to avoid exposing our domain information.

How does this work? Microsoft.Lync.Model.LyncClient implements the client class, which is the main entry point for the API, and provides access to conversations and contacts by using the conversationmanger and contactmanager classes respectively. GetClient() and GetAutomation() are the static methods of the Lync client class. To get the static methods, use the following code:
[Microsoft.Lync.Model.LyncClient] | GM -Static
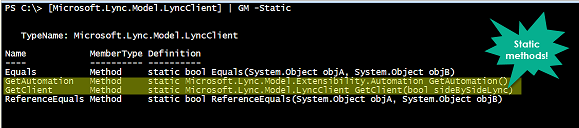
Let’s park the GetAutomation method for future blog posts and focus on the GetClient static method. After the successful execution of the following snippet, the $Client variable holds the Lync client object, which is all we need for our demo.
$Client = [Microsoft.Lync.Model.LyncClient]::GetClient()
Now, let us see the available properties, events, and methods of the Lync client class by using PowerShell.
$Client = [Microsoft.Lync.Model.LyncClient]::GetClient()
$Client | GM -MemberType Properties | Select Name , MemberType

$Client = [Microsoft.Lync.Model.LyncClient]::GetClient()
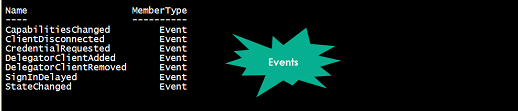
$Client | GM -MemberType Event | Select Name , MemberType
$Client = [Microsoft.Lync.Model.LyncClient]::GetClient()
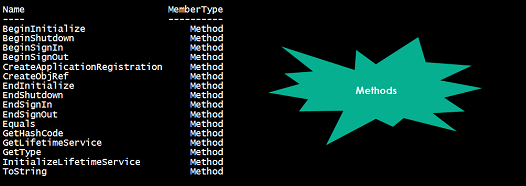
$Client | GM -MemberType Method | Select Name , MemberType
Note: PowerShell Scripting Lync 2010 Using Lync Mode API examples are worth reading if you’re interested in using Lync 2010 client at your work place.
Let’s see an example script that allows users to sign in to Skype for Business with a fancy personal note and custom presence while signing in to let users choose the status like Free, Away, Busy etc. Download the full script from the TechNet Script Gallery and save it. In our case, we saved the script at C:\Scripts\Publish-xSKBClient by using the dot sourcing operator call in the script as you see in the following screenshot. If you are already signed in to the Skype for Business, client the script will publish the presence and update the personal note.
![]()
That’s it! We’re good to test the Publish-xSKBClient.
#region Busy
Publish-xSKBClient -Uri "someone@domain.com" -SignInAs Busy -PersonalNote "We Love PowerShell!"
#endregion
#region Away
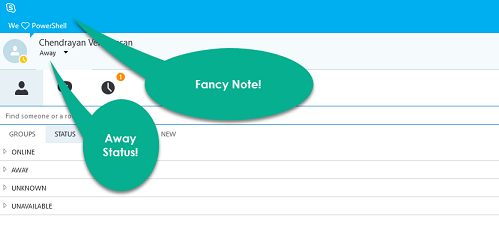
Publish-xSKBClient -Uri "someone@domain.com" -SignInAs Away -PersonalNote "We Love PowerShell!"
#endregion
#region DoNotDisturb
Publish-xSKBClient -Uri "someone@domain.com" -SignInAs DoNotDisturb -PersonalNote "We Love PowerShell!"
#endregion
#region Login with Fancy Note
Publish-xSKBClient -Uri "someone@domain.com" -SignInAs Away -PersonalNote ([string]::Concat("We " , (0x2764).ToChar($_) , " Love PowerShell"))
#endregion
Next blog post is to explain in-depth about Lync client class properties, events, methods with real world examples using PowerShell.
That is all there is to working with the Lync 2013 SDK and PowerShell for today. I can’t wait to see the next post !
I invite you to follow the Scripting Guys on Twitter and Facebook. If you have any questions, send email to them at scripter@microsoft.com, or post your questions on the Official Scripting Guys Forum. See you tomorrow.
Until then always remember that with Great PowerShell comes Great Responsibility.
Sean Kearney Honorary Scripting Guy
Cloud and Datacenter Management MVP
 Light
Light Dark
Dark
0 comments