
Passing through devices to Hyper-V VMs by using discrete device assignment
Summary: Learn how to attach a device from your Hyper-V host to your VM by using a new feature of Windows Server 2016.
Today we have a guest blogger, Rudolf Vesely, who has blogged here on previous occasions. Here is a link to his previous posts if you would like to read them.
Here is what Rudolf says about himself.
I am an Azure Solutions Architect at Rackspace in London. I believe that public cloud is the future for most organizations and this is why I specialize in public clouds (Amazon Web Services and Azure) and hybrid cloud strategy. My unique role at Rackspace is to guide our customers in their cloud strategy and ensure that their strategy is aligned with their business.
I started my career as a developer and have continued programming and scripting as a hobby. This is the reason why I am a big proponent of DevOps. I believe PowerShell is a fantastic tool that facilitates the process of joining the Dev and Ops worlds.
Contact information:
- Twitter: @rudolfvesely
- Blog: Technology Stronghold
Introduction
Many new features in Windows Server 2016 (in any Technical Preview) will draw your attention, and it’s very easy to miss some of them. This is true especially when people don’t speak or blog about them too much like they do for Windows PowerShell 5.0, Storage Spaces Direct, or Storage Replica, as examples.
One feature that drew my attention is a new feature in Hyper-V called discrete device assignment. It can be very simply described as a device pass-through feature, the likes of which has existed on other hypervisors for many years.
Microsoft started with device pass-through on Hyper-V with disk pass-through (attaching a physical disk without using VHD / VHDX), but true pass-through came with single root I/O virtualization (SR-IOV) on Windows Server 2012. I recommend that you read John Howard’s excellent blog post series that describes SR-IOV and hardware and system requirements.
On Windows Server 2016, we finally get the ability to directly work with devices on the host and attach them to a child partition (guest VM) without being limited to only networking and storage. This feature was probably built for passing-through graphics processing units (GPUs) in Azure for N-series VMs (GPU-enabled VMs), but we can use it for anything else. Please keep in mind that this is at your own risk. Microsoft will not support your setups, and you may also have very hard security issues. Any device pass-through on any hypervisor opens the possibility to take down the host (for example, by triggering an error on the PCI Express bus) or worse, taking control of your host.
The last thing you need to consider is whether you have hardware to test on it. You need a modern client computer or server that has Intel Virtualization Technology for Directed I/O (VT-d) or AMD Virtualization (AMD-V). I use an industrial mini PC, which will be my new router and wireless access point (all virtualized), but you should be fine with a modern laptop. So, if you’re still reading, activate Intel VT-d in firmware of your testing computer, install the latest Technical Preview of Windows Server 2016, and start with PnpDevice.
PnpDevice module
On Windows Server 2016, thanks to the PnpDevice module, we finally have the possibility to work with hardware without directly touching Windows Management Instrumentation (WMI). The PnpDevice module will be very important for Nano Server and non-GUI servers, so I recommend that you try it.
Get-Command -Module PnpDevice
CommandType Name Version Source
----------- ---- ------- ------
Function    Disable-PnpDevice     1.0.0.0 PnpDevice
Function    Enable-PnpDevice      1.0.0.0 PnpDevice
Function    Get-PnpDevice         1.0.0.0 PnpDevice
Function    Get-PnpDeviceProperty 1.0.0.0 PnpDevice
Let’s take a look what is attached to your system by using:
Get-PnpDevice –PresentOnly | Sort-Object –Property Class
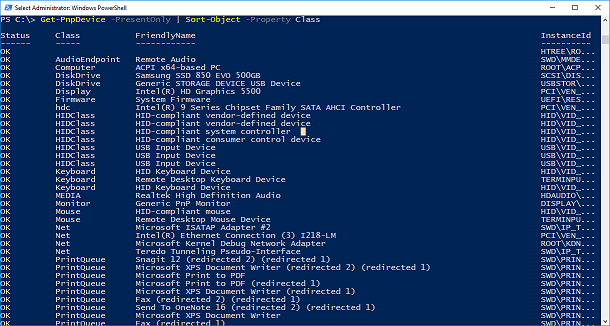
A lot of devices were returned. Now it’s a good idea to choose what should be passed. I do not have multiple GPUs to pass it, but my goal is to virtualize my router and access point, and I have two wireless adapters in mini PCI-e slots. I found that the easiest way to find them is by using vendor ID:
(Get-PnpDevice -PresentOnly).Where{ $_.InstanceId -like '*VEN_168C*' } # 168C == Qualcomm Atheros

If you installed drivers on your host for devices that you want to pass through (I did not), you can filter according to Class Net like this (example from my Surface Book):

I will assume that you have installed the VM and chosen a device to attach to it. I installed Windows 10 version 1511 because this is the easiest method to test that dual dynamic acceleration (DDA) works. Later I will try replacing Windows with virtualized pfSense (FreeBSD appliance) and DD-WRT (Linux appliance). Especially in FreeBSD, I might have problems with drivers, and I am sure that I will have no issues with drivers in Windows 10.
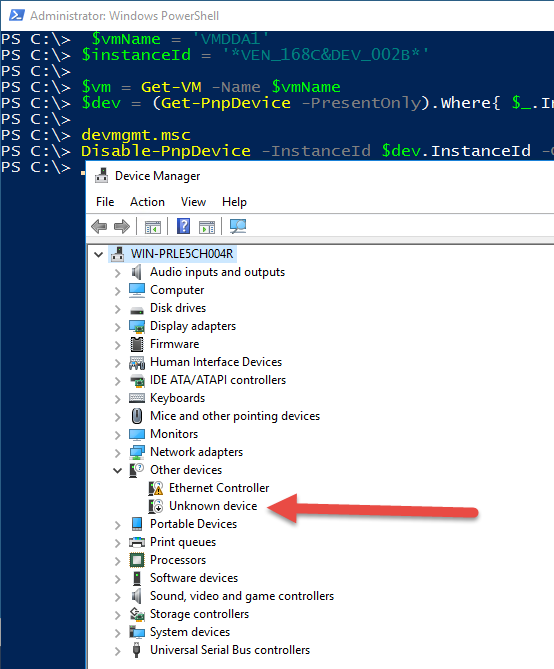
Let’s get VM object and device object of my Wi-Fi adapter:
$vmName = 'VMDDA1'
$instanceId = '*VEN_168C&DEV_002B*'
$vm = Get-VM -Name $vmName
$dev = (Get-PnpDevice -PresentOnly).Where{ $_.InstanceId -like $instanceId }
Our first action should be to disable the device. You can check Device Manager by typing devmgmt.msc in the PowerShell console to see that the correct device was disabled.
# Make sure that your console or integrated scripting environment (ISE) runs in elevated mode
Disable-PnpDevice -InstanceId $dev.InstanceId -Confirm:$false
Mount
Now we need to dismount the device from the host by using the Dismount-VmHostAssignableDevice cmdlet. To specify a location of the device, we need to get a specific property that is not presented in the device object by using Get-PnpDeviceProperty.
locationPath = (Get-PnpDeviceProperty -KeyName DEVPKEY_Device_LocationPaths -InstanceId $dev.InstanceId).Data[0]
Dismount-VmHostAssignableDevice -LocationPath $locationPath -Force –Verbose
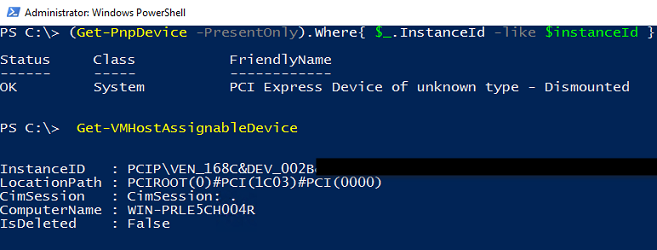
Now if you refresh the device object, you can see that something changed: Device is described as “Dismounted”:
(Get-PnpDevice -PresentOnly).Where{ $_.InstanceId -like $instanceId }
You can check available assignable devices by using Get-VMHostAssignableDevice:
The last step is to attach an assignable device to the VM by using Add-VMAssignableDevice like this:
Add-VMAssignableDevice -VM $vm -LocationPath $locationPath –Verbose
You may get error like this one:
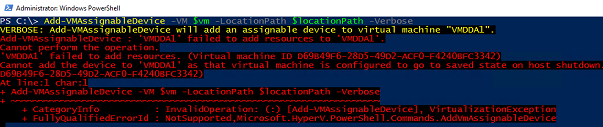
This is because you haven’t modified the VM configuration after you created it. There are two main requirements for passing through. The first is that the VM has to have Automatic Stop Action set to Turn off the virtual machine. This will probably be the only VM on your host that has this configuration because we usually want Shut down or Save. The second requirement is memory configuration. Dynamic memory is allowed, but minimum and startup memory have to be equal. Let’s fix it, and finally attach our device.
Set-VM -VM $vm -DynamicMemory -MemoryMinimumBytes 1024MB -MemoryMaximumBytes 4096MB -MemoryStartupBytes 1024MB -AutomaticStopAction TurnOff
Add-VMAssignableDevice -VM $vm -LocationPath $locationPath –Verbose

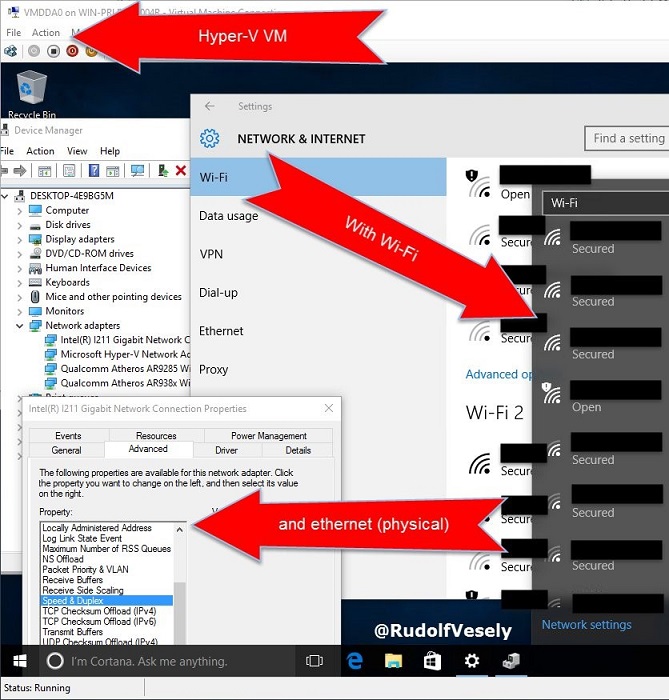
If you spend some time playing with DDA, you can finish, for example, with multiple Wi-Fi adapters and one physical like I did (all functional):
Restore configuration
That was fun! Now it’s time to return devices to the host.
# Remove all devices from a single VM
Remove-VMAssignableDevice -VMName VMDDA0 -Verbose
# Return all to host
Get-VMHostAssignableDevice | Mount-VmHostAssignableDevice -Verbose
# Enable it in devmgmt.msc
(Get-PnpDevice -PresentOnly).Where{ $_.InstanceId -match 'VEN_168C&DEV_002B' } |
Enable-PnpDevice -Confirm:$false -Verbose
Full code
$vmName = 'VMDDA0'
$instanceId = '*VEN_168C&DEV_002B*'
$ErrorActionPreference = 'Stop'
$vm = Get-VM -Name $vmName
$dev = (Get-PnpDevice -PresentOnly).Where{ $_.InstanceId -like $instanceId }
if (@($dev).Count -eq 1) {
Disable-PnpDevice -InstanceId $dev.InstanceId -Confirm:$false
$locationPath = (Get-PnpDeviceProperty -KeyName DEVPKEY_Device_LocationPaths -InstanceId $dev.InstanceId).Data[0]
Dismount-VmHostAssignableDevice -LocationPath $locationPath -Force -Verbose
Set-VM -VM $vm -DynamicMemory -MemoryMinimumBytes 1024MB -MemoryMaximumBytes 4096MB -MemoryStartupBytes 1024MB -AutomaticStopAction TurnOff
# If you want to play with GPUs:
# Set-VM -VM $vm -StaticMemory -MemoryStartupBytes 4096MB -AutomaticStopAction TurnOff
# Set-VM -VM $vm -GuestControlledCacheTypes $true -LowMemoryMappedIoSpace 2048MB -HighMemoryMappedIoSpace 4096MB -Verbose
Add-VMAssignableDevice -VM $vm -LocationPath $locationPath -Verbose
} else {
$dev | Sort-Object -Property Class | Format-Table -AutoSize
Write-Error -Message ('Number of devices: {0}' -f @($dev).Count)
Thank you for reading, and see you in the next article.
Rudolf
Thank you, Rudolf, for sharing your time and knowledge.
I invite you to follow me on Twitter and Facebook. If you have any questions, send email to me at scripter@microsoft.com, or post your questions on the Official Scripting Guys Forum. Also check out my Microsoft Operations Management Suite Blog. See you tomorrow. Until then, peace.
Ed Wilson, Microsoft Scripting Guy
 Light
Light Dark
Dark
2 comments
In the mount sub-section, $locationPath variable is missing $ sign.
I had some problems and it took me hours to find a solution. So I want to share it.
Dismounting the device from the host worked once, but I forgot to remove my VM from a cluster… So I had to undo my actions and start again and ended in “The required virtualization driver (pcip.sys) failed to load.”
Anyway here ist the solution:
You have to delete the device from the registry yourself.
1. “psexec -s -i regedit.exe”
2. You find your device as “Dismounted” under “HKEY_LOCAL_MACHINE\SYSTEM\ControlSet001\Enum\PCIP”
e.g. “PCI Express Graphics Processing Unit – Dismounted”
3. Delete the whole key with subkeys under PCIP.
4. Reboot and you can unmount it again from the host 🙂