
Create Azure Resource Manager virtual machines by using PowerShell – Part 3
Summary: Use the Azure Resource Manager cmdlets to create and attach a virtual network card to a virtual machine.
This blog post is part of a series about how to create Azure Resource Manager virtual machines by using PowerShell. To get the most out of this series, read the posts in order.
- Create Azure Resource Manager virtual machines by using PowerShell – Part 1
- Create Azure Resource Manager virtual machines by using PowerShell – Part 2
- Create Azure Resource Manager virtual machines by using PowerShell – Part 3
- Create Azure Resource Manager virtual machines by using PowerShell – Part 4
- Create Azure Resource Manager virtual machines by using PowerShell – Part 5
If you’re new to PowerShell, you might want to start with the two series that precede this series:
- Work with the Azure Resource Manager cmdlets
- Retrieve Azure Resource Manager virtual machine properties by using PowerShell
 I’m trying to find some guidance about how to use PowerShell to create a virtual network card. Would you be so kind as to lend me a hand?
 Honorary Scripting Guy, Sean Kearney, is here today continuing forth (not C++) on our quest to create a virtual machine (VM) with the Azure Resource Manager cmdlets. Today, we’re going to work on putting together a network card.
Let’s think back to a few weeks ago when we created some prerequisites for our environment, namely a virtual network and a network security group. These two pieces gave us the equivalent of:
- A VLAN or network wire system that we can attach to and communicate with (virtual network)
- A firewall or the ability to control traffic from said network (network security group)
What our VM will need is a network card (really a virtual one). A great improvement in Azure Resource Manager is that you can create and attach multiple network cards.
Each of these virtual NICs can be attached to a separate virtual network, too, just as if you had a system with one leg on the perimeter network and a separate card on a vendor network.
Last week, we discovered that it wasn’t tricky to get the network security group or the virtual network in use by a VM’s network cards.
We also need to be aware that we can ask Azure Resource Manager those questions as well. To obtain available network security groups, we can use the Get-AzureRMNetworkSecurityGroup cmdlet.
In our case, we know of the security group because we created one a few weeks ago. We also did a neat little trick last Friday to get the information from a VM that was already using one.
$NSG=’HSG-NetworkSecurityGroup’
The other piece that we will need, of course, is the virtual network that we should attach to. Again, we could just grab the settings from an existing VM. However, it’s far more useful to see what’s available for you to consume.
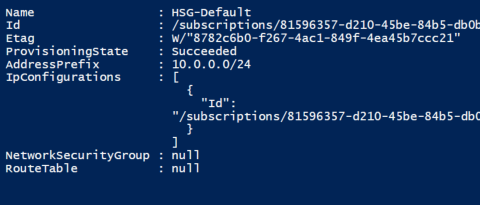
The Get-AzureRMVirtualNetwork cmdlet will dump all this onto the screen. Of course, the default output won’t be all that useful. You’ll find there are three properties that you’ll be interested in. They are Name, AddressSpace, and Subnets:
Get-AzureRMVirtualNetwork | Select-Object Name, AddressSpace, Subnets
![]()
AddressSpace will need to have its property expanded to show the really useful information, which is the network space (192.168.0.0 or 10.0.0.0 etc.) that it’s actually a part of. Subnets from this view will show you the name and little else. Here, we need to do a little magic with Select-Object.
Get-AzureRmVirtualNetwork | Select-Object Name, @{Name='AddressSpace'; Expression={ $_.AddressSpace.AddressPrefixes}}
This will pull out the value of AddressSpace so that we can read it properly:

We’ll also need to do some similar work to access the information from the Subnets property. If you take a quick look at the property, you’ll note that not only do we have the name, but we also have the value for each Subnet. An Id, which we’ll need to acquire, is also attached to each Subnet.
Accessing these will be similar to pulling out the extra information from the AddressSpace. There’s a little more “Expression” magic, of course, as we acquire the additional properties.
Get-AzureRmVirtualNetwork | Select-Object Name, @{Name='SubnetName'; Expression={ $_.Subnets.Name}},@{Name='SubnetAddressPrefix';Expression={$_.Subnets.AddressPrefix}}
After we have all the information, we can have an easier time visualizing the virtual networks that we’ll need to use and the Subnets to choose. We can tie it all together with the following line in PowerShell. We’re just tying up all three custom expressions into one:
Get-AzureRmVirtualNetwork | Select-Object Name, @{Name='AddressSpace'; Expression={ $_.AddressSpace.AddressPrefixes}}, @{Name='SubnetName'; Expression={ $_.Subnets.Name}},@{Name='SubnetAddressPrefix';Expression={$_.Subnets.AddressPrefix}}, @{Name='SubnetId';Expression={$_.Subnets.Id}}
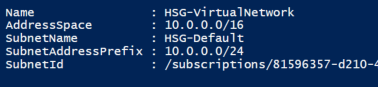
After we have identified the network and, more importantly, the Subnet that we need, we just need the Subnet ID. We can get this with the following bit of PowerShell:
$SubnetList=Get-AzureRmVirtualNetwork | Select-Object Name, @{Name='AddressSpace'; Expression={ $_.AddressSpace.AddressPrefixes}}, @{Name='SubnetName'; Expression={ $_.Subnets.Name}},@{Name='SubnetAddressPrefix';Expression={$_.Subnets.AddressPrefix}}, @{Name='SubnetId';Expression={$_.Subnets.Id}}
$SubnetID=($SubnetList | Where { $_.SubnetAddressPrefix –eq ’10.0.0.0/24’ }).SubnetID
Excellent. So, we now have a way to view the various network names and security groups. Now for the fun part: creating the network card for the VM.
For this, we will be using three cmdlets.
The first is New-AzureRMPublicIPAddress, which gives us a publicly accessible Internet IP that’s bound to our VM. If you need, you can remove it later after post configuration if the VM does not need direct remote access.
This object needs to be given a name, and the name has to be unique to the VM in question. For our examples, we will use the VM name that we selected from Monday as the identifying marker.
In addition, the public IP will need a label, and it must be in all lowercase. A tolower() method can be used for this:
$Nic=$VMName+’_Nic1’
$RGName=’HSG-AzureRG’
$Location=’eastus’
$PublicIP = New-AzureRmPublicIpAddress -ResourceGroupName $RGName -Name $Nic -Location $Location -AllocationMethod Dynamic -DomainNameLabel $VMName.ToLower()
Our next task is to attach a network card to this VM. This is done with a combination of two cmdlets. New-AzureRMNetworkInterface needs to be used to create the object for the VM.
# Add Network card
$NIC=New-AzureRMNetworkInterface –Force –Name $VMName –ResourceGroupName $RGName –Location $Location –SubnetID $Subnet.ID –PublicIPAddress $PublicIP.ID
Afterwards, we just add the newly created network object to the VM in Azure by using the Add-AzureRMVMNetworkInterface cmdlet.
$AzureVM = Add-AzureRmVMNetworkInterface -VM $AzureVM -Id $NIC.Id
Now, we’ve completed one of the most important pieces, the ability for our VM to communicate with other systems.
Tomorrow? We choose an operating system!
I invite you to follow the Scripting Guys on Twitter and Facebook. If you have any questions, send email to them at scripter@microsoft.com, or post your questions on the Official Scripting Guys Forum. See you tomorrow.
Until then always remember that with Great PowerShell comes Great Responsibility.
Sean Kearney Honorary Scripting Guy Cloud and Datacenter Management MVP
 Light
Light Dark
Dark
0 comments