
Work with the Azure Resource Manager cmdlets – Part 2
Summary: Authenticate to Azure with the AzureRM cmdlets.
This blog post is part of a series about how to work with the Azure Resource Manager cmdlets. To get the most out of this series, read the posts in order.
- Work with the Azure Resource Manager cmdlets – Part 1
- Work with the Azure Resource Manager cmdlets – Part 2
- Work with the Azure Resource Manager cmdlets – Part 3
- Work with the Azure Resource Manager cmdlets – Part 4
- Work with the Azure Resource Manager cmdlets – Part 5
After you finish this series, move on to the next two series to learn more about the Azure Resource Manager cmdlets.
- Retrieve Azure Resource Manager virtual machine properties by using PowerShell
- Create Azure Resource Manager virtual machines by using PowerShell
 I’ve got the new AzureRM cmdlets installed, but I’m just not sure where to start! Could you give me a nudge in the right direction?
 Honorary Scripting Guy, Sean Kearney, is here to help you out. The first real piece you need is to get authenticated to Azure Resource Manager before you can get anything fun done.
If you remember, we downloaded the AzureRM cmdlets for Azure Resource Manager yesterday. Just out of curiosity, did anybody look to see how many cmdlets were added? I did. I ran the following cmdlet to find out:
(Get-Command –module AzureRM*).count
It turns out that just over 1,000 cmdlets are available to manage Azure Resource Manager. Today we’re going to introduce you to the most important one, Add-AzureRMAccount.
If you execute this cmdlet directly or in a script with no other parameters, you’ll get the Microsoft Azure page to sign in.

After you enter your credentials, you’re in and can happily work away.
But wait a minute! Isn’t this Windows PowerShell? Isn’t this really all about automation?
True. We need to show you a bit about how to automate all of this so that your script can do all the work while you get paid to do it.
This is actually quite easy. To automate the connection of Add-AzureRMAccount, you’ll need three key pieces of information.
- UserID and password (your credentials)
- SubscriptionID
- TenantID
To obtain the SubscriptionID and the TenantID, you can capture the output produced from our authentication scenario.
$AzureRMInfo=Add-AzureRMAccount
If you look at $AzureRMInfo, you’ll note some interesting information that you’ll need to automate this. It’s the TenantID and SubscriptionID.

However, if you run this against Get-Member, the information won’t be in such an obvious place.
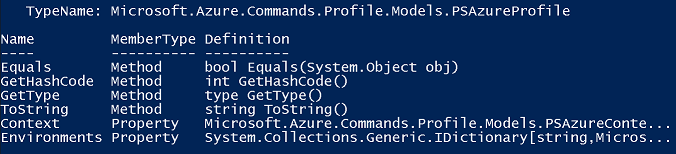
The information is actually a bit buried under the Context property. If you look to pull it up under Get-Member, you’ll spot two additional properties, Environment and Subscription.
If you’re like me, you immediately thought “AHA! I can just get the Subscription and be done! Muah ha ha ha!” That is until you look at the property. You’ll notice some “extra pieces tossed in.”

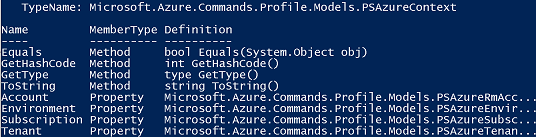
In actual fact, to get the SubscriptionID, which is what you really need, you need to access it like this:
$AzureRMInfo.Context.Subscription.SubscriptionID
Similarly, you’ll find the TenantID is buried in the same fashion. You’ll need to access it just under the Tenant property:
$AzureRMInfo.Context.Tenant.TenantID
Now that you’ve captured this data, you can now either store it away in a file to retrieve it later or just hard code it into our script. You can even just pipe the information to the CLIP.exe command to save some typing.
$AzureRMInfo.Context.Subscription.SubscriptionID : CLIP
To enter it into the script, assign a new object name, such as $SubscriptionID, and then use a friendly CTRL-V to paste it into the editor.
With all of this information, you can automate the connection to Azure Resource Manager. Building credentials is no different from any other Windows PowerShell scenario. You can one of two options.
- Prompt before script execution with Get-Credential:
$Credential=Get-Credential
- Build them out by using New-Object:
$UserID=‘SomeID@Hotmail.com’
$Password=‘P@ssw0rd’
$SecurePassword=Convertto-SecureString $Password –asplaintext -force
$Credential=New-Object System.Management.Automation.PSCredential ($UserID,$SecurePassword)
With all this information pulled together you can automate your connection.
$UserID=‘SomeID@Hotmail.com’
$Password=‘P@ssw0rd’
$SecurePassword=Convertto-SecureString $Password –asplaintext -force
$Credential=New-PsObject System.Management.Automation.PSCredential ($UserID,$SecurePassword)
$SubscriptionID=’ 11111111-a111-11aa-11a1-aa1aaaa11111’
$TenantID=’ 11111111-1111-1111-1111-111111111111’
Add-AzureRMAccount –Credential $Credential –tenantid $TenantID –subscriptionid $SubscriptionID
Pop in tomorrow to see how to view and create some of the needed pieces for next week when we’ll build out Azure virtual machines.
I invite you to follow the Scripting Guys on Twitter and Facebook. If you have any questions, send email to them at scripter@microsoft.com, or post your questions on the Official Scripting Guys Forum. See you tomorrow.
Until then always remember that with Great PowerShell comes Great Responsibility.
Sean Kearney Honorary Scripting Guy Cloud and Datacenter Management MVP
 Light
Light Dark
Dark
0 comments