How to contribute to PowerShell documentation
Summary: Learn how to contribute to Windows PowerShell documentation via various community initiatives.
Today’s guest blog post is by Microsoft premier field engineer, Ashley McGlone. He will be speaking at PowerShell Saturday, so come join us for a great day of PowerShell learning. For more information, see PowerShell Saturday in Tampa, FL, March 19, 2016. Follow Ashley through his TechNet blog, Goatee PFE, and Twitter. Here’s Ashley…
How many times have you found PowerShell documentation that was not up-to-date? Or maybe you could not even find the documentation you needed. Today I’ll be discussing ways that you can fill the gap.
PowerShell community
One of the things I have enjoyed over these years of doing PowerShell is the community. By community, I mean the people I meet online and offline, including Twitter, Facebook, LinkedIn, blogs, forums, user groups, events, and conferences. The PowerShell team at Microsoft has intentionally engaged the community in a way that sets a high bar for the other teams at Microsoft. The value of community has been proven over the last few releases of Windows Management Framework (WMF). PowerShell feedback from the community has guided the features and fixes the whole way.
Community documentation
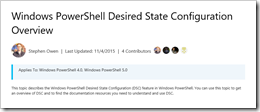
As announced last year (see The New Home of DSC Documentation), the documentation and release notes for PowerShell are now open source on GitHub. This means you (as part of the community) can personally contribute and correct PowerShell documentation. You will even get proper credit for your contributions by seeing your name listed in the articles you have written or updated.
Career booster
Many people do not like attention for themselves. The thought of your name in lights could be annoying. Most of us just want to see the community get accurate documentation. That is noble. But think about this:
When a potential employer sees your picture and name beside articles on a Microsoft web property, does that hurt or help your prospects?
I think it helps your career, and it gives you a sense of satisfaction at the end of the day. “I did that!”
Behind the scenes
The PowerShell documentation you find on MSDN begins its journey at GitHub.
What is GitHub?
GitHub is probably the largest open-source collaboration platform in the world. Trust me, you want to learn this. It is what all the cool kids are doing these days. I’m still learning.
This table summarizes the documentation parts:
|
The documentation |
you see here… |
is maintained here… |
|
PowerShell |
n/a |
|
|
WMF 5.0 Release Notes |
||
|
PowerShell DSC |
This table summarizes the code parts:
|
The code |
you see here… |
is maintained here… |
|
TechNet Script Gallery |
n/a |
|
|
PowerShell Gallery |
||
|
PackageManagement |
- To be clear, the community can contribute directly to the PowerShell Gallery, but the Microsoft open-source contributions are shared publicly on GitHub. To learn more, see Registration is Now Open to Publish on PowerShell Gallery.
When you compare the previous tables, do you notice a pattern? I am not making any announcements, and I don’t have too much insider information. But judging from public knowledge, the pattern seems to indicate that the documentation on TechNet is moving to the other platform over time.
How to contribute to documentation
The PowerShell team has created a guide called Contributing to PowerShell Documentation, which explains the process for contributing to documentation. Here is the general flow:
- Get a GitHub account.
- Read the brief contribution guide.
- Complete the Contribution License Agreement (CLA).
- Identify where you want to contribute or revise. This means checking current issues to see if others are working on it.
- If no one else is working on it, open an issue and start.
- If others have logged it, contribute to their effort.
- Create a fork in GitHub.
- Compose your content by using:
- Visual Studio Code (my editor of choice)
- Markdown syntax
- Create a pull request in GitHub.
At first this may seem like a lot of effort. However, once you get past the first setup steps, it is fairly easy.
For today’s post, I want to focus on how to write the content with Visual Studio Code and then how to create your first GitHub fork and pull request.
Writing Markdown content with Visual Studio Code
I am going to date myself with this statement. I remember word processing in the 1990s with Word Perfect for DOS. You had a view called reveal codes that showed the text formatting elements. This is a lot like that, or HTML, or any other markup language.
Let’s look at what you need to know to write PowerShell documentation with Visual Studio Code. It’s really not that hard, but it might take some practice.
Setting up Visual Studio Code
Here’s a walk-through to get started:
1. Download Visual Studio Code for free. Install it. Optionally, follow Visual Studio Code on Twitter.
2. Launch Visual Studio Code, and create a new file in the folder of your choosing. Save it with the .md extension.
3. Click the Split Editor and Open Preview buttons highlighted in the following screenshot. Now you can see your source and preview side-by-side.
4. Now start typing your content. Put line breaks after each sentence. This way it is easier to track changes later on GitHub.
Markdown syntax
PowerShell documentation is written in Markdown. It is easier than HTML, but not quite as powerful. You will find that markdown is very light-weight, user-friendly, and fast. There are several flavors of Markdown, and we will use the GitHub flavor that is cited in the contribution guide. In addition to the GitHub markdown reference, there are many popular sites online with tutorials.
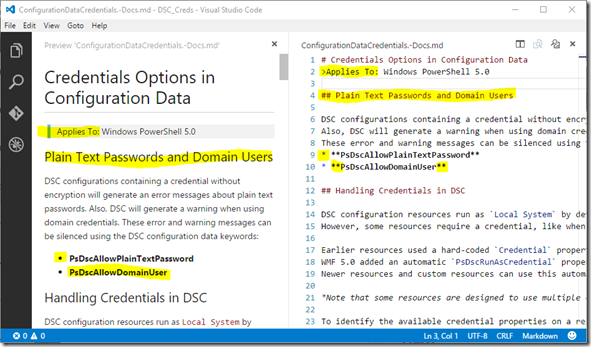
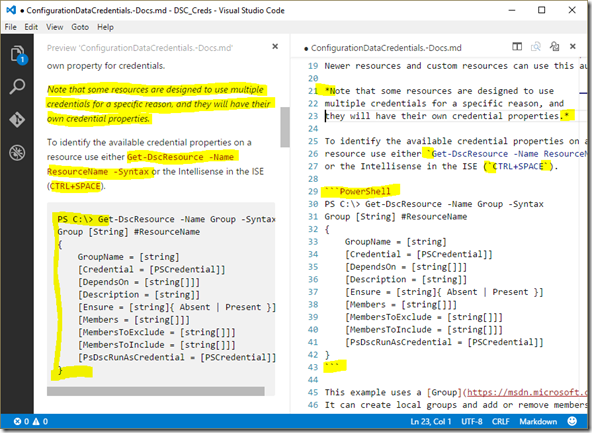
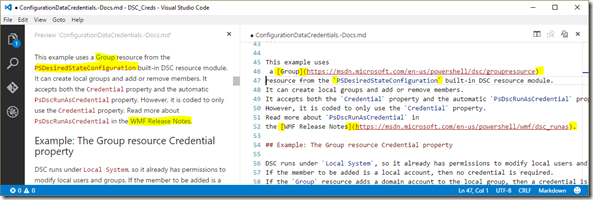
Following are a few screenshots that highlight some popular formatting options for writing PowerShell docs. These example come from my document, Credentials Options in Configuration Data. The GitHub source is here: Credentials Options in Configuration Data.
Here is a summary of the formatting used in these screenshots:
- Two carriage returns make a new paragraph.
- Greater than ( > ) indents a block quote.
- Asterisk at the beginning of a line makes a bullet.
- Single asterisk surrounding text makes italics.
- Double asterisk surrounding text makes bold.
- Single backticks ( ` **) surrounding text is for **code elements.
- Triple backticks before and after a block of lines turns it into code. Well-known code formatting is applied by naming it after the first set of backticks.
- To make links, surround the link text with square brackets and surround the link URL with round parentheses.
See the links in the screenshots for more formatting options. Remember that .md files are plain text with a few extra characters for formatting. It is actually quite easy and fun!
Publishing your documentation
Newb alert! I am not a trained GitHub professional. The following guidance is my own inefficient process. Please be kind to us OPS folks learning DEV stuff. I know you can do this better than me, so help me out in the comments section.
Now I have a text file that needs to get to GitHub. There are a number of ways to do this. GitHub pros will use any one of many command line (or GUI tools. See GitHub for Windows). I’m not there yet. I cheat and use the web interface.
If you are updating an existing article, you can simply copy and paste your changes from Visual Studio Code into the GitHub web interface where you have chosen to edit the documentation. Here are the steps:
- Browse to the GitHub file that contains the documentation you want to edit.
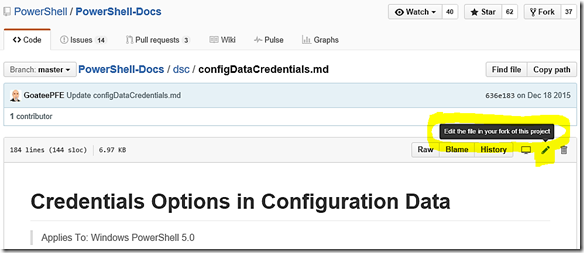
- On the top-right side of the article click the pencil to Edit the file in your fork of the project:
This makes a copy of the file in your own GitHub account, called a fork.
- Now you can edit the text in the web interface. This is where you want to copy/paste to/from Visual Studio Code and edit the Markdown.
- After you have completed your edits, you can create a pull request* *at the bottom.
- A pull request tells the owner of the original file that you want them to pull your changes into their copy for publishing.
- When you submit the pull request, give it a title and description for the change you are making. This helps the owner of the file understand what you are changing and why.
- Click the button to submit the pull request. Your change is given a number, and you will see a summary of your edits.
- When the owner approves your edits, you will get a notification in your GitHub account. If they have questions or do not approve, they will probably make notes on the request and ask for clarification or other edits.
Also worth noting is that the GitHub pros have already synced a local copy of the files from GitHub to their local machine, and that is what they open directly in Visual Studio Code. In that case, you can edit the file directly and post your changes with a pull request by using local GitHub tools instead of the web interface. I aspire to do this.
If you are submitting an entirely new file, you can create that in your own GitHub account. Then submit a pull request to the master branch of the documentation.
To learn more about GitHub, see this intro video: A Crash Course in Version Control and Git with Warren Frame (my buddy, aka PSCookieMonster).
The Scripting Guy is famous for closing his PowerShell posts by saying, “…and that’s all there is to doing x with PowerShell!” I am not so bold in this case. There is an art to using GitHub, and I am still an apprentice. Now you know what I know. I hope this helps you on your journey to making an impact in the PowerShell community. Give it a try. Boost your career and the community. Thanks in advance!
~Ashley
Thank you, Ashley. This is great.
I invite you to follow me on Twitter and Facebook. If you have any questions, send email to me at scripter@microsoft.com, or post your questions on the Official Scripting Guys Forum. Also check out my Microsoft Operations Management Suite Blog. See you tomorrow. Until then, peace.
Ed Wilson, Microsoft Scripting Guy




 Light
Light Dark
Dark
0 comments