Weekend Scripter: PowerShell Speed Improvement Techniques
Summary: Microsoft PFE, Dan Sheehan, talks about speeding up Windows PowerShell scripts.
Microsoft Scripting Guy, Ed Wilson, is here. Welcome back Dan Sheehan, who debuted yesterday as a new guest blogger with his post Best Practices for PowerShell Scripting in Shared Environment.
Dan recently joined Microsoft as a senior premiere field engineer in the U.S. Public Sector team. Previously he served as an Enterprise Messaging team lead, and was an Exchange Server consultant for many years. Dan has been programming and scripting off and on for 20 years, and he has been working with Windows PowerShell since the release of Exchange Server 2007. Overall Dan has over 15 years of experience working with Exchange Server in an enterprise environment, and he tries to keep his skillset sharp in the supporting areas of Exchange, such as Active Directory, Hyper-V, and all of the underlying Windows services.
Here's Dan…
In my last blog post, we established some best practices for organizing and streamlining our script so it is more useable by others and ourselves in the future. Now let me turn your attention to some speed improvement techniques I picked up at a my last job before joining Microsoft.
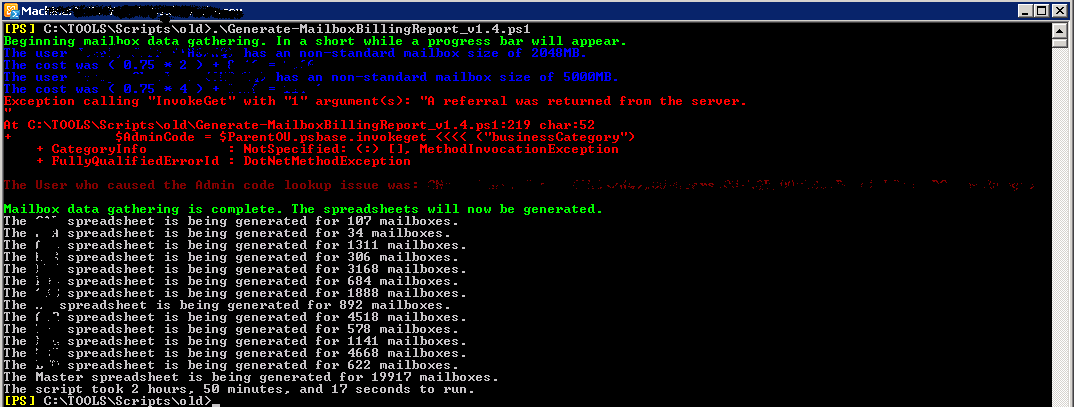
Years ago, I wrote the 1.X version of the Generate-MailboxBillingReport, which generated monthly billing reports in Excel for the customers for which my team provided messaging services. Although this process worked well and did everything we needed it to, it was taking over 2 hours and 45 minutes to complete, as you can see here:
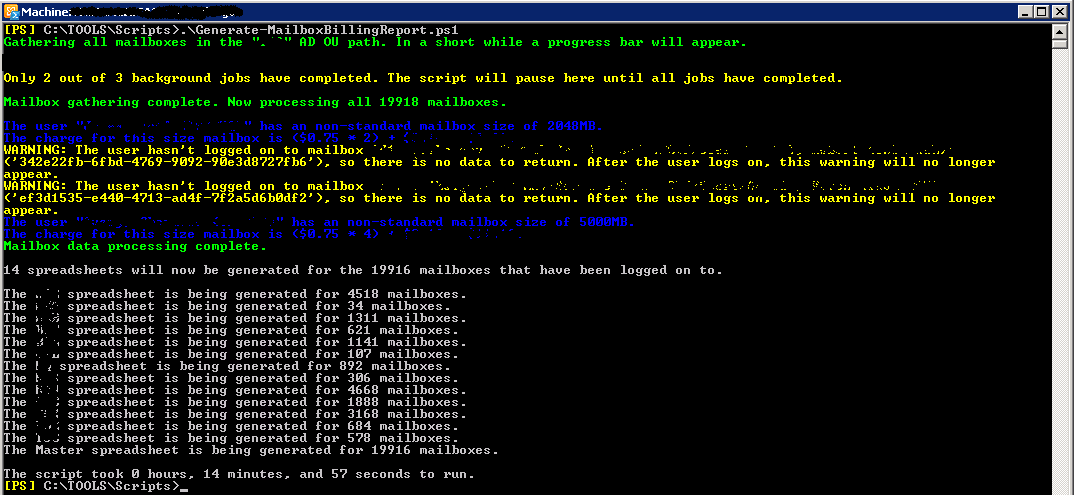
When I first started writing the script, I focused on the quality and detail of the output versus the speed. But after some jovial harassment by my coworkers to improve the speed, I sat down to see what I could do. I focused on the optimizations techniques covered in this post, and as a result of the script reconfiguration, I was able to come up with Exchange Mailbox Billing Report Generator v2.X, which reduced the execution time:
That’s right…I removed about two and a half hours of processing time from the script by implementing the speed improvement techniques I discuss in this post. I hope some of them also provide some benefit for you.
Get your script functional first
This may seem obvious, but before you try to optimize your script, you should first clean it up and make sure it’s fully functional. This is especially true if you have never used the optimization techniques discussed here, because you could end up making more work for yourself trying to implement something brand new at the same time you are trying to make your script functional.
Not to mention…you don’t want to waste time trying to optimize script that won’t work because that is just an effort in frustration. In other words don’t try to bite off more than you can chew. These recommendations can be big bites depending on your skill level.
Using my mailbox billing report generation script as an example, implementing the script optimization techniques discussed here would have been much harder and taken longer if I tried them in the beginning when I was also trying to get the script to produce the output we wanted.
Leverage Measure-Command to time sections of code
Learning how long certain parts of your script take to execute, such as a loop or even a part of a loop, will provide you valuable insight into where you need to focus your speed improvements. Windows PowerShell gives you a couple of ways to time how long a block of script takes to execute.
Until recently, I used the New-Object System.Diagnostics.Stopwatch command to track the amount of time taken in various parts of my scripts. Although I still prefer to use this method to track the overall execution time of the entire script because it doesn’t cause you to indent your script, it is awkward to use multiple times in the middle of a script.
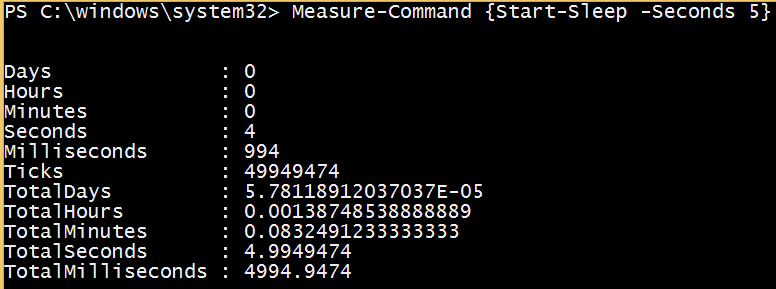
When I was looking for other ways to time small amounts of script, I learned about the Measure-Command {} cmdlet, which will measure the time it takes to complete everything listed within the curly braces, as shown here:
I used this cmdlet in my script to quickly learn where the majority of time was being spent in the big mailbox processing loop. I did this by using multiple instances of this cmdlet inside the loop, essentially dividing the loop into multiple sections, which showed me how long each part of that loop was taking. The results for each section varied in the reported milliseconds, but some stood out as taking more time, which allowed me to decide which sections to focus on.
I encourage you to use this cmdlet any time you want to quickly check how long part of your script is taking to execute. For more information, see Using the Measure-Command Cmdlet.
Query for multiple objects: Same time or individually?
One of the major time delays in my script was when it was gathering information for each mailbox from multiple locations, one mailbox at a time. In this case, after the script gathered all of the mailboxes in one large Get-Mailbox query, it would perform individual queries for each mailbox by using the Get-MailboxStatistics, Get-ActiveSyncDevice, and Get-CSUser (Lync) cmdlets.
Performing these multiple individual queries one mailbox object at a time was very costly in regards to execution time because individual data query sessions were being opened and closed serially (one at a time) per cmdlet per mailbox.
To put this in perspective, let’s say that you have 100 mailboxes you need to gather the mailbox statistics for, and using Get-MailboxStatistics takes one second per mailbox to query and return the information. One second may not sound like a long time for each individual mailbox, but doing that for all 100 mailboxes takes 1 minute 40 seconds. What if you could query all 100 mailboxes in a single query by using the Get-MailboxStatistics –Server switch, and this single query takes 30 seconds?
Now imagine if you had two more queries to perform for each mailbox (ActiveSync and Lync) that also take one second each per mailbox, or 30 seconds as bulk queries. As you can see the individual queries can add up both in the number of queries you have to run and the number of objects you have to run them for.
Therefore, the more time-efficient approach (if the cmdlet supports it and you can leverage the output in your script), is to gather as many objects as possible at the same time in a single cmdlet call. Going back to my example script, simply switching from using Get-MailboxStatistics to query one mailbox at a time to bulk querying all of the mailbox data on a per-server basis shaved off about 45 minutes in the script execution time.
In the 1.X version of my script, the mailbox statistics lookup was performed one mailbox at a time as a part of a large ForEach loop that processes each mailbox individually:
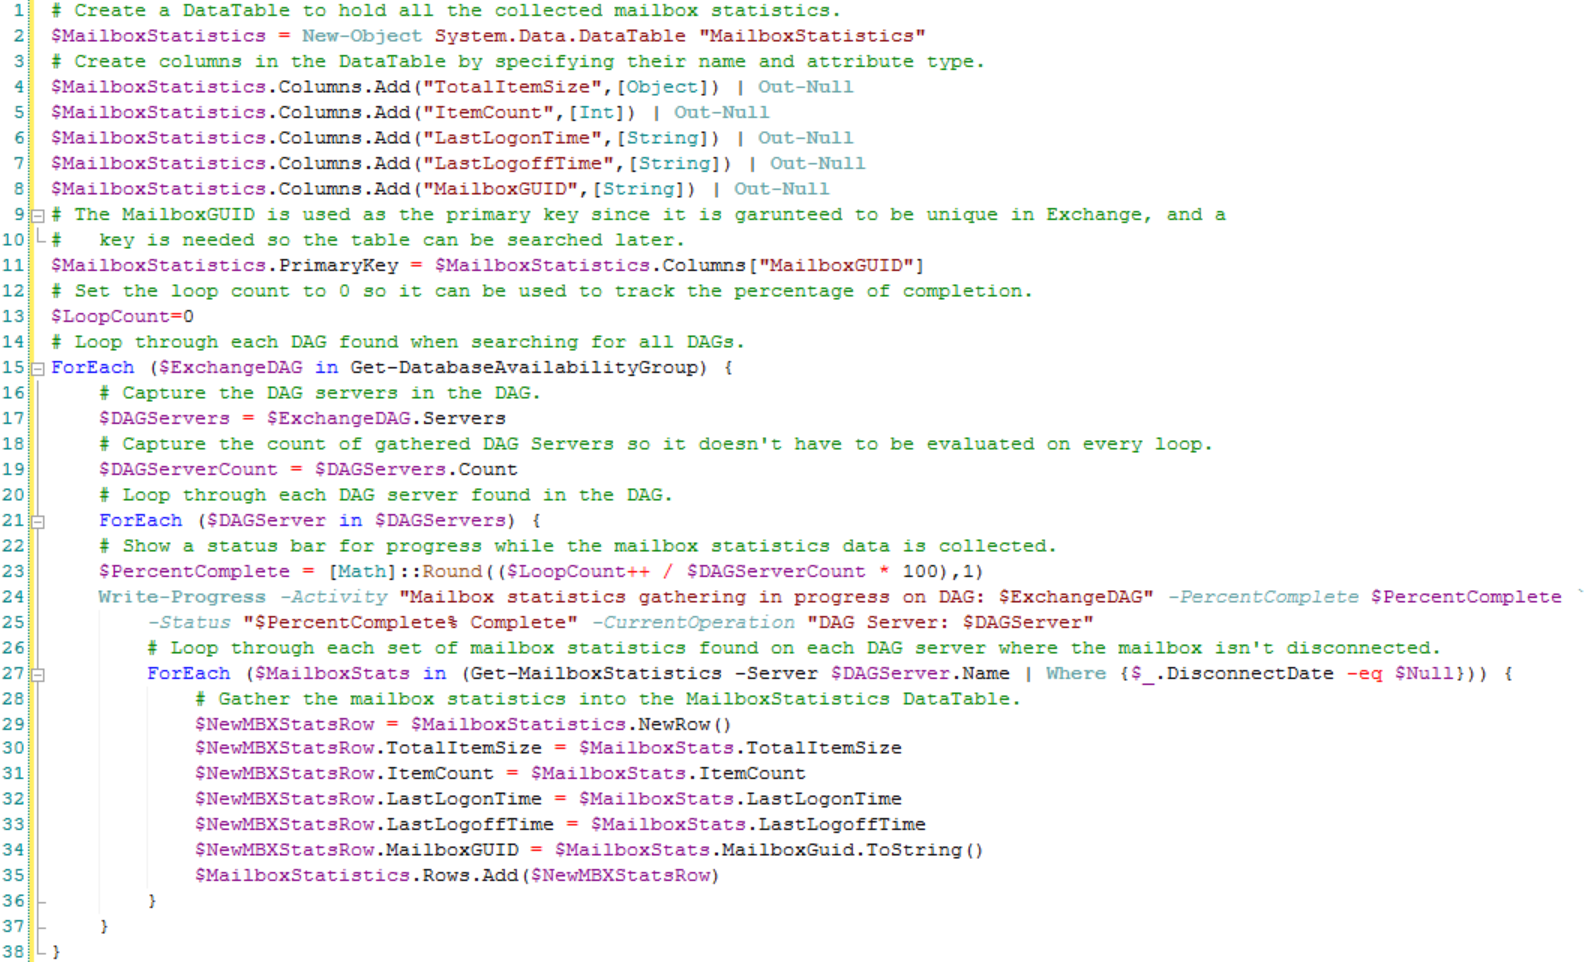
In the 2.X version of my script, the mailbox statistics lookup was performed for all non-disconnected mailboxes housed on all of the database availability group (DAG) Exchange servers, and temporarily stored in a data table:
And then back in the per mailbox ForEach loop, the individual mailbox data was pulled from the data table versus from individual Get-MailboxStatistics queries. As a safety measure, the Get-MailboxStatistics cmdlet was used only if the mailbox didn’t exist in the data table for whatever reason (such as it was moved to a temporary database):
Although this new method of querying the mailbox statistics requires a lot more script and requires that it is broken into two separate pieces (an initial data gathering and then a query against the gathered data), the speed increase of the script was well worth it. At least it got my old coworkers off my back.
Perform multiple queries at the same time
Performing multiple queries at the same time is also known as “multithreading” in Windows PowerShell. It essentially consists of running multiple actions (in our case, data queries) at the same time through multiple Windows PowerShell jobs. Each new job runs in its own Windows PowerShell.exe instance (session). Subsequently, the job obtains its own pool of memory and CPU threads, which makes for more efficient use of a computer’s memory and CPU resources.
Moving queries into separate jobs has two major areas that deserve special consideration. The first is that the data passed back into the main script from the job is “deserialized” through the Receive-Job cmdlet. This means the output of the job is passed back to variable you assign to the output by using XML as a temporary transport.
Passing the data through XML can cause the attributes of an object being passed to get altered from their current type to another data type, such as a string. If you aren’t prepared for this, it can wreak havoc on your existing functional code until you script around it. If you aren’t sure if an attribute has changed as a result of being passed through the Receive-Job cmdlet, you can always use the Get-Type cmdlet to check it. For more information, see How objects are sent to and from remote sessions.
The second area of consideration is that it is possible to run too many jobs in your script at the same time, subsequently overwhelming the computer running the script. This will slow everything down. You can handle this by making sure you limit or throttle the number of jobs executing at the same time. In my script, I only spawned three separate jobs, so this wasn’t a real concern for me. But if you plan to spawn tens or hundreds of jobs, you should read more about this scenario in Increase Performance by Slowing Down Your PowerShell Script.
Another method of multithreading is runspaces. I haven’t had a chance to try them yet, but testing by others has shown they are faster than jobs, and they can pass variables between the job and the main script (presumably bypassing the deserialization concern). If you are interested in this, you can read more about it in Multithreading Powershell Scripts.
Ultimately, whatever method you chose, being able to execute multiple data pulls at the same time will help reduce the overall execution time of the script because the script won’t be waiting to start one data collection until another one finishes.
Avoid extracting variable attributes multiple times
I previously thought that it was unnecessary to create a new variable based on the data extracted from an object’s “.” attribute (for example, $Mailbox.DisplayName). It appeared to waste script when the information was already in the object’s attribute. The only time I extracted that type of information out of an object was if I was worried it would change and I wanted to save a point-in-time copy, or if some other cmdlet or function didn’t like using the $Object.Attribute extraction method.
Through research I found that every time you ask Windows PowerShell to reference an object’s attribute (which forces a data extraction each time), it takes longer than if that information was saved to and referenced from a standard variable. For example, it will take Windows PowerShell longer to the reference the information in the $Mailbox.DisplayName string five times, than it will if you set $DisplayName = $Mailbox.DisplayName once and then reference the $DisplayName string variable five times.
You may not notice a speed difference if you are only saving yourself a couple of extractions in a script. However, this approach becomes extremely important in ForEach loops where there could be thousands of extra unnecessary object attribute enumerations, as evidenced by this really good post: Make Your PowerShell For Loops 4x Faster.
For example, I was using a loop to process 20,000+ mailboxes, and I was using the Write-Progress cmdlet that extracted the same $GatheredMailboxes.Count value every loop. I noticed a difference when I switched to extracting the mailbox count only once before the loop into a variable named $GatheredMailboxesCount, and then used that variable in my Write-Progress cmdlet.
Subsequently, I recommend that if you are going to reference an object’s attribute information more than once (loop or no loop), you should save the attribute information in a variable and reference the variable. This allows Windows PowerShell to extract the information only once, which can become exponentially important in the amount of time it takes to process a script.
Prioritize condition checks from most common to least
This may seem obvious, but the order in which multilevel If conditions are checked can have an impact on a script’s speed. This is based on how many condition checks you have and which condition is likely to occur the most often. Windows PowerShell will stop checking the remaining conditions when a condition is met. To take advantage of this processing logic, you want to try to first check the condition that is most likely to occur first so the rest of the condition checks never have to be considered.
For example, the following small script construct probably doesn’t look like there will be a performance difference one way or another in checking the condition of the $Colors variable:
But when the array $Colors is expanded in the example, and Yellow becomes the predominant color, the construct must then check and dismiss the first three conditions in the script before the condition is of Yellow met:
In this simple code block, swapping the position checks for Yellow and Green improved the output by only a few milliseconds. That might not seem like a big difference, but now imagine performing this check 10,000+ times. Next imagine that you are checking multiple conditions in each If statement with the -and and -or operators. Finally, imagine that you are extracting a different object’s attribute with each check (such as If $Mailbox.Displayname –like “HR”). All of these can add up to noticeable time delays, depending on how complex your script is.
All of this points to making sure that if you know a particular condition is going to be met most of the time (for example, most mailboxes are one default size), you should put that condition check first in a group of condition checks so Windows PowerShell doesn’t waste time checking conditions that are less likely to occur.
Likewise, if you know another condition is likely to occur second most often (such as most non-default mailbox sizes are a standard larger size), you should put that condition check second…and so on. Although you may not always see a speed improvement from this prioritization, it’s a good habit to get into for when it will make a difference.
Eliminate redundant checks for same condition
For those of us who think linearly (which is often the case with IT pros), often when we are writing script, we think about condition checks leading to outcomes for different purposes. Because each condition check causes Windows PowerShell to stop and make a decision, it is important for the sake of speed to eliminate multiple checks for the same condition.
For example, when I wrote the following two snippets, I was originally thinking about determining a bottom-line charge for a mailbox which depended on if the mailbox was also associated with a BlackBerry user. Later in the script, I was focused on whether the users’ BlackBerry PIN and separate charge should be listed in the report (if they were a BlackBerry user):
Then during a code review, I realized that I was checking the same condition twice, and I combined them into the following single check:
Like with prioritizing condition checks, these changes might not immediately show any increased speed in testing. But when you are processing 20,000+ objects and performing multiple redundant checks, it all adds up.
Use ForEach over ForEach-Object
The difference between the ForEach loop construct and ForEach-Object cmdlet is not well understood by those beginning to write Windows PowerShell scripts. This is because they initially appear to be the same. However, they are different in how they handle the loop object enumeration (among other things), and it is worth understanding the difference between the two—especially when you are trying to speed up your scripts.
The primary difference between them is how they process objects. The cmdlet uses pipelining and the loop construct does not. I could try to go into detail about the difference between the two, but there are individuals who understand these concepts much better than myself. The following blog post has some good information and additional links: Essential PowerShell: Understanding ForEach. I highly encourage you to spend some time reviewing the posts to better understand the differences.
My recommendation is that you only use the ForEach-Object cmdlet if you are concerned about saving memory as follows:
- While the loop is running (because only one of the evaluated objects is loaded into memory at one time).
- If you want to start seeing output from your loop faster (because the cmdlet starts the loop the second it has the first object in a collection versus waiting to gather them all like the ForEach construct).
You should use the ForEach loop construct in the following situations:
- If you want the loop to finish executing faster (notice I said finish faster and not start showing results faster).
- You want to Break/Continue out of the loop (because you can’t with the ForEach-Object cmdlet).
This is especially true if you already have the group of objects collected into a variable, such as large collection of mailboxes.
Like with all rules or recommendations, there are exceptions for when the ForEach-Object cmdlet might finish faster than the ForEach loop construct, but this is going to be under unique scenarios such as starting and pulling the results of multiple background jobs. If you think you might have one of these unique scenarios, you should test both methods by using the Measure-Command cmdlet to see which one is faster.
~Dan
Thank you, Dan, for a great post. I look forward to seeing your next contribution to the Hey, Scripting Guy! Blog. Join us tomorrow when I begin Windows PowerShell Profile Week.
I invite you to follow me on Twitter and Facebook. If you have any questions, send email to me at scripter@microsoft.com, or post your questions on the Official Scripting Guys Forum. See you tomorrow. Until then, peace.
Ed Wilson, Microsoft Scripting Guy


 Light
Light Dark
Dark
0 comments