Find All Word Documents that Contain a Specific Phrase
Summary: Microsoft Scripting Guy, Ed Wilson, discusses using Windows PowerShell to search a directory structure for Word documents that contain a specific phrase.
Microsoft Scripting Guy, Ed Wilson, is here. Exciting news—actually two pieces of exciting news. This month, I am starting a new series. I call it PowerTips, and each day, I will have an additional posting of a short Windows PowerShell tip, trick, or question and answer. The postings will appear midday Pacific Standard Time. I think you will enjoy them—I know I am having fun writing them.
Now for the second piece of exciting news. The registration site for Charlotte, North Carolina PowerShell Saturday is open. At this point, there are still plenty of tickets available, but the last PowerShell Saturday sold out in 13 days, so you will want to register quickly for this event to ensure you have a place. We are running three tracks (Beginner, Applied, and Advanced), so there is sure to be something there for everyone. I am making a couple of presentations, as are a couple of Microsoft premier field engineers, and even a Microsoft Windows PowerShell MVP. The lineup of speakers is stellar.
Finding guest blogger posts
It seems like I am not very good at anticipating future needs—at least exact needs. But because I use Windows PowerShell so much to do so many things, I am at least consistent. When your data is consistent, you have a fighting chance of solving a particular issue. I use Windows PowerShell to create all of my individual Microsoft Word documents, based on a template that my editor, Dia Reeves, created for me. Because of this, the structure of all my blog posts is relatively consistent.
When I first started the Hey, Scripting Guy! Blog, one of the first projects I spent a lot of time working on to describe the blog posts was Developing a Script Taxonomy. I carried over this taxonomy to the TechNet Script Center Script Repository. Therefore, I am pretty much assured that blog posts related to a specific topic will contain a specific set of words.
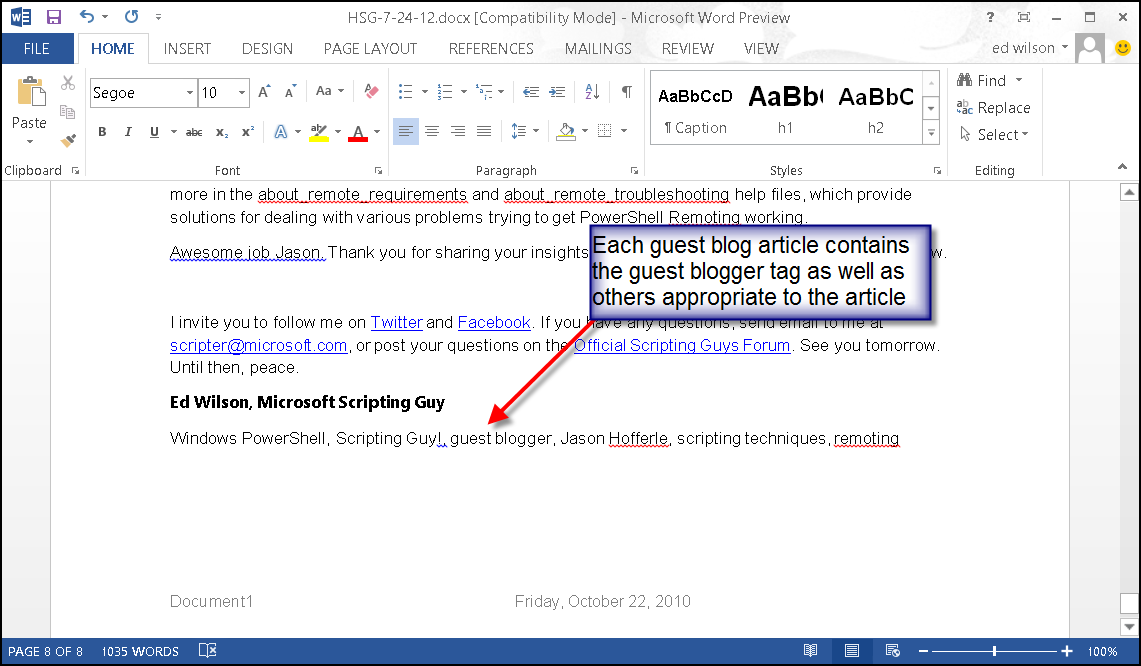
The Scripting Wife recommended that I create a blog tag called “guest blogger” for each of the guest blogs. The only thing we (meaning me) messed up was that the line in the template for the tags is Normal style. Microsoft Word uses the Normal style in a document for the bulk of the text. If I had of used a specific style (such as Heading 9), it would be easier to find a specific text string that uses a specific word style. The following image illustrates what my Microsoft Word document looks like after I have edited a guest blog.
Return guest blogs via script
I am running the beta version of Office 2013, and it works really well. The thing that is interesting is that, as far as I can tell (at least so far), the Microsoft Word automation model has not changed. Therefore, I do not need to reinvent the entire script. I based my script on a script I wrote in December 2009 for the Hey, Scripting Guy! Blog, How Can I Italicize Specific Words in a Microsoft Word Document.
Note Because much of today’s script came from the previous script, you should refer to that blog post for additional details about the script construction.
The script I use today does the following:
- It starts at a specific location in the directory hierarchy, and it selects Microsoft Word documents that begin with the letters HSG or WES (for Hey Scripting Guy or Weekend Scripter).
- These Word Documents were last written to between July 1, 2011 and June 30, 2012. For details about finding documents written within a certain time span, see yesterday’s blog post, Use PowerShell to Help Find All of your Images.
- It produces a total count of documents that contain the words “guest blogger” in the content of the document.
- It produces a total count of all words from all documents that contain the words “guest blogger.”
Items I would like my script to do, but I do not have time for right now:
- Return a custom object with the following:
- Title of the blog
- Author of the guest blog
- Summary of the blog
- Tags for the blog
- Name of the file
- Export to a CSV file.
First things first
There is only one parameter: the Path to the parent directory from where the search begins. I could have added at least three other parameters: BeginDate, EndDate, and SearchTerm but I did not. Those values are hardcoded in the script itself. But exposing these values as variables would be a GREAT first step towards writing a better script. After creating the initial parameter, I initialize the variables used for the Find.Execute method. By creating and initializing the variables with their values, the method signature is much more readable than if everything was hard-coded in. Here is the initial section of the script.
[cmdletBinding()]
Param(
$Path = “C:\data\ScriptingGuys”
) #end param
$matchCase = $false
$matchWholeWord = $true
$matchWildCards = $false
$matchSoundsLike = $false
$matchAllWordForms = $false
$forward = $true
$wrap = 1
Now create the objects
While creating the basic variables (there are a few remaining to create), it is also time to create the main object. Whether working with Word, Excel, PowerPoint, Outlook (and so on), the main object is always the application object. The Word.Application object is a COM object; therefore, I use New-Object –comobject to create the application object. I store the returned Word.Application object in the $application variable. I also set the Application.Visible property to $false to keep the Microsoft Word program from springing to life. However, if you accidently (or on purpose) open Microsoft Word while the script runs, you will be plummeted with multitudes of Microsoft Word windows opening and closing as the script progresses (at least that is what happened when I did that while using the beta version of Word 2013 and running the script). The code is shown here.
$application = New-Object -comobject word.application
$application.visible = $False
I use the Get-ChildItem cmdlets to find all the Word documents that begin with HSG or WES and that were last written to between July 1, 2011 and June 30, 2012. I store the matching FileInfo objects in the $docs variable. The command to do this is shown here.
$docs = Get-childitem -path $Path -Recurse -Include HSG*.docx,WES*.docx |
where {$_.LastWriteTime -gt [datetime]”7/1/11″ -AND $_.lastwritetime -le [datetime]”6/30/12″}
I now initialize and create a few more variables. The first variable is used to store the text for which to search. Next the $i variable is a counter that is used by the Write-Progress cmdlet to display the progress of the search operation. This takes a while, so using the Write-Progress cmdlet to display up-to-date progress and status information is a good idea. The $totalwords variable keeps track of how many guest blogger words are written, and the $totaldocs variable keeps track of the number of guest blogs. This portion of the script is shown here.
$findText = “guest blogger”
$i = 1
$totalwords = 0
$totaldocs = 0
Processing the documents
Now I begin to loop through the collection of documents by using the foreach statement. The Write-Progress cmdlet displays a progress bar to inform me about the percentage of completion. I use the FullName property from the FileInfo object (it contains the complete path to the Microsoft Word document) to open the document and store the returned Document object in the $document variable. This portion of the code is shown here.
Foreach ($doc in $docs)
{
Write-Progress -Activity “Processing files” -status “Processing $($doc.FullName)” -PercentComplete ($i /$docs.Count * 100)
$document = $application.documents.open($doc.FullName)
Note More information about the Write-Progress cmdlet appears on the Hey, Scripting Guy! Blog.
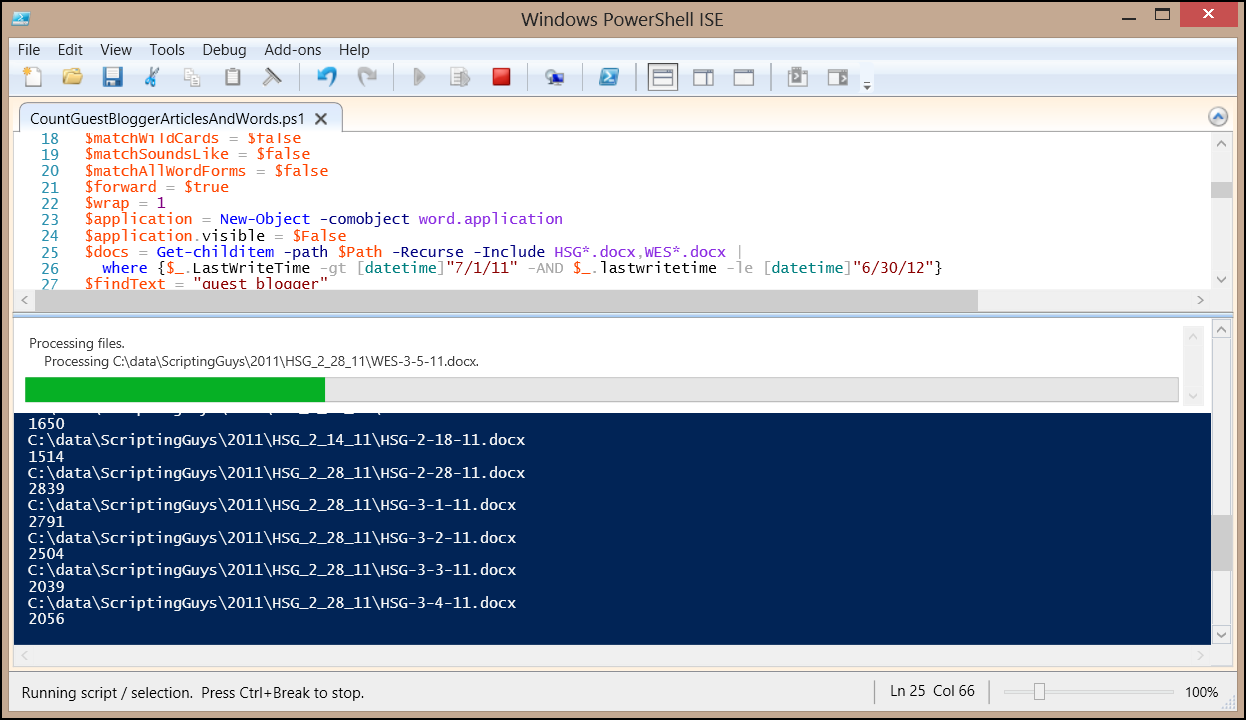
Because this process can take a long time, the progress bar is an import feature of the script. The following image shows the progress bar in the Windows PowerShell ISE for Windows PowerShell 3.0.
The following code creates a Range object from the Content property from the Document object. Then the Find.Execute method searches for the string “guest blogger.” The variable $wordfound contains a Boolean value that is used to detect if a match occurs.
$range = $document.content
$null = $range.movestart()
$wordFound = $range.find.execute($findText,$matchCase,
$matchWholeWord,$matchWildCards,$matchSoundsLike,
$matchAllWordForms,$forward,$wrap)
if($wordFound)
{
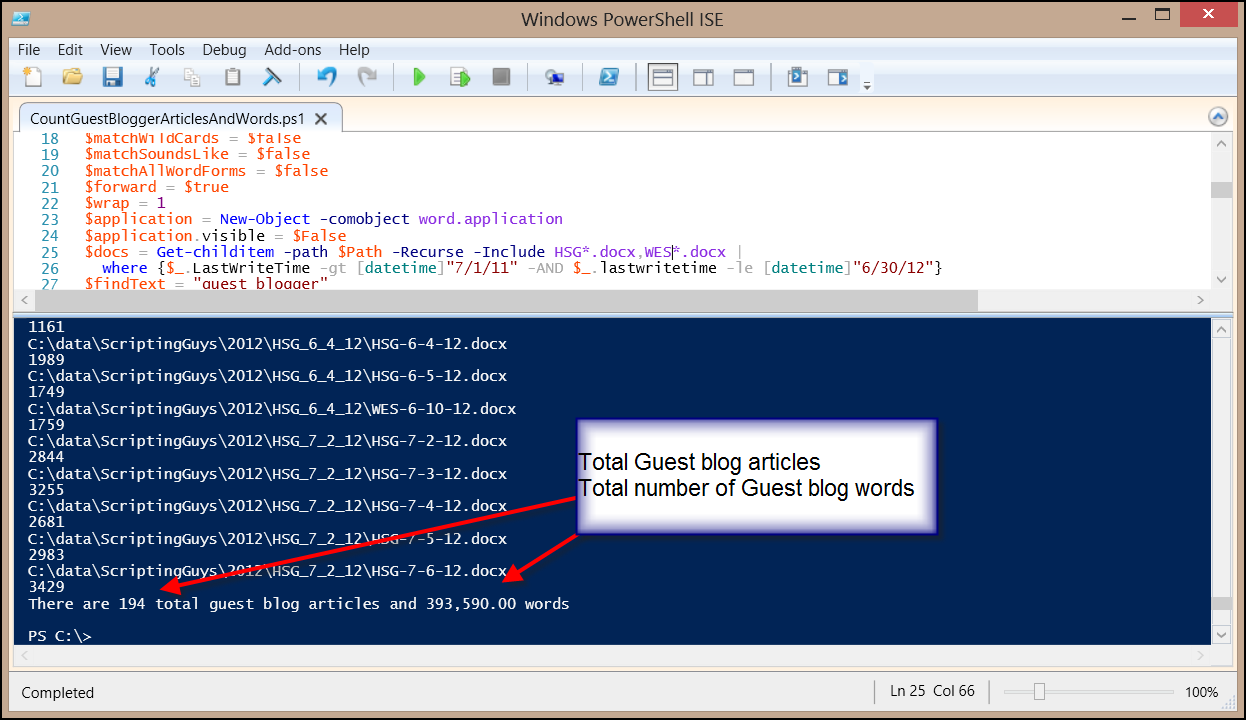
If a match occurs, the full name of the file and the word count display to the output window. I then gather the total words and the total number of documents to display later. The output from the script is shown here.
Basic cleanup
One reason for avoiding COM objects from within the .NET Framework (there are many such reasons, as detailed in my Windows PowerShell 2.0 Best Practices book from Microsoft Press) is the cleanup involved. Resources are not automatically released. Each object must be specifically released. I then call the garbage collection service and remove the Application variable. Here is my cleanup routine for this script.
#clean up stuff
[System.Runtime.InteropServices.Marshal]::ReleaseComObject($range) | Out-Null
[System.Runtime.InteropServices.Marshal]::ReleaseComObject($document) | Out-Null
[System.Runtime.InteropServices.Marshal]::ReleaseComObject($application) | Out-Null
Remove-Variable -Name application
[gc]::collect()
[gc]::WaitForPendingFinalizers()
This is a rather long and complicated script, but the point (other than being cool) is to illustrate an automation model for working with the Microsoft Word. I have uploaded the complete script to the Scripting Guys Script Repository.
Join me tomorrow when I will talk about working with Microsoft Word document metadata.
I invite you to follow me on Twitter and Facebook. If you have any questions, send email to me at scripter@microsoft.com, or post your questions on the Official Scripting Guys Forum. See you tomorrow. Until then, peace.
Ed Wilson, Microsoft Scripting Guy


 Light
Light Dark
Dark
2 comments
I am finding your script very useful. I am of course modifying it to my own use and have hit a bit of a snag. While parsing through documents I eventually hit some that have macros. At that point Word hits me with a pop up asking if I want to enable the macro. Specifically “Microsoft Office has identified a potential security concern.” I do not want to enable the macro. I can click the button and the script continues.
Is there a way to have the script answer this for me … perhaps something like $enableMacro = $false?
I am also getting this error “You are attempting to open a file type that is blocked by your File Block settings in the Trust Center”, I dont think there is a way around this one as I am not sure what file type it is trying to evaluate. I have verified the items in $docs variable are only .doc and .docx, and it does process through other documents.
I am also getting “This method or property is not available because the object refers to a protected area of the document.” which I believe is a password protected section of the document, again probably another area that we cannot easily filter out.
I just wanted to drop a line as I cannot find anything helpful via Google. I am mainly hoping for a solution to the macro thing as this requires user interaction, I am ok with some errors showing up in the PSterminal.
I found the solution to the macro issue. I added $application.AutomationSecurity = “msoAutomationSecurityForceDisable” right after $application.visible = $False and then to put AutomationSecurity back the way it was I added $application.AutomationSecurity = “msoAutomationSecurityByUI” just before $application.quit(). Files with macros get parsed for the search term without any popups.