Use PowerShell to Perform Offline Analysis of Security Logs
Summary: Microsoft Scripting Guy, Ed Wilson, discusses using Windows PowerShell to dump and to analyze event logs—including security logs.
 Hey, Scripting Guy! I often need to process Windows event logs when I am called to do a forensic investigation of a server. One of the problems with saving the event log so that I can look at it later is that I end up with a log that is pretty well useless because I do not have the required application DLLs installed on my computer. Is there a way that Windows PowerShell can help me do this without me having to install a bunch of admin tools on my laptop?
—RG
 Hello RG,
Microsoft Scripting Guy, Ed Wilson, is here. I have been preparing my presentations for the Atlanta TechStravaganza, which happens this Friday June 1, 2012 at the Microsoft Office in Alpharetta. The Scripting Wife is busy getting ready—she made an appointment at the spa for a pedicure, manicure, and massage. I think she is going to the spa with a group of her friends, and they may be going out for lunch and shopping afterwards. I am always a bit leery when shopping trips involve stopping for meals. For me a shopping trip generally involves about five minutes online (unless it is going to a computer super store…but that is different).
Note This is the second in a series of four Hey, Scripting Guy! blogs about using Windows PowerShell to facilitate security forensic analysis of a compromised computer system. The intent of the series is not to teach security forensics, but rather to illustrate how Windows PowerShell could be utilized to assist in such an inquiry. The first blog discussed using Windows PowerShell to capture and to analyze process and service information.
First, dump the event logs
The first thing to do if you plan to perform detailed analysis of the security logs, is to dump them into a format that facilitates later processing with Windows PowerShell.
Note If you save the event log as an EVTX type of file, when you open it back up in the Event Viewer utility tool, your machine may require certain DLL files to provide the replacement strings for the various events. These DLL files are typically installed with the various management utilities that come with certain applications.
To dump the event log, you can use the Get-EventLog and the Exportto-Clixml cmdlets if you are working with a traditional event log such as the Security, Application, or System event logs. If you need to work with one of the trace logs, use the Get-WinEvent and the ExportTo-Clixml cmdlets.
Note For more information about working with event logs, review this collection of blogs about using Windows PowerShell to work with event logs because there is some great information. Two great blogs to begin with are:
To dump all of the events in the Application log to an XML file that is stored on a network share, use the following syntax:
Get-EventLog -LogName application | Export-Clixml \\hyperv1\shared\Forensics\edApplog.xml
If you want to dump the System, Application, and Security logs into XML files on a network share, use the following syntax.
Note The % symbol is an alias for the Foreach-Object cmdlet. It is often used when working interactively from the Windows PowerShell console, although its use in a script would not necessarily be appropriate. For more information, read Best Practice for Using Aliases in PowerShell Scripts.
$logs = “system”,”application”,”security”
$logs | % { get-eventlog -LogName $_ | Export-Clixml “\\hyperv1\shared\Forensics\$_.xml” }
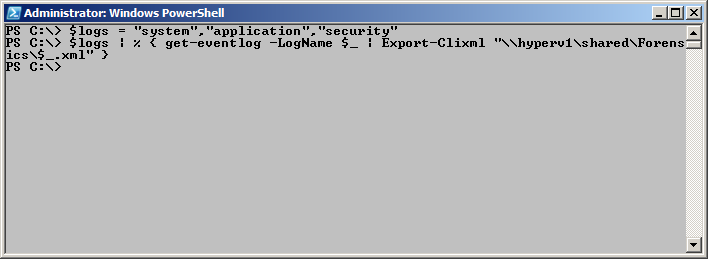
The previous commands, which retrieve the three classic event logs and export them in XML format to a network share, and the associated output (no output) are shown in the image that follows.
Second, import the event log of interest
To parse the event logs, use the Import-Clixml cmdlet to read the stored XML files from your shared network location. Store the results in a variable. Next, you can use any of the normal Windows PowerShell cmdlets you would use when parsing event logs (Where-Object, Group-Object, and Select-Object are three of the main cmdlets that I use). The following two commands first read the exported security log contents into a variable named $seclog, and then the five oldest entries are obtained.
$seclog = Import-Clixml \\hyperv1\shared\Forensics\security.xml
$seclog | select -Last 5
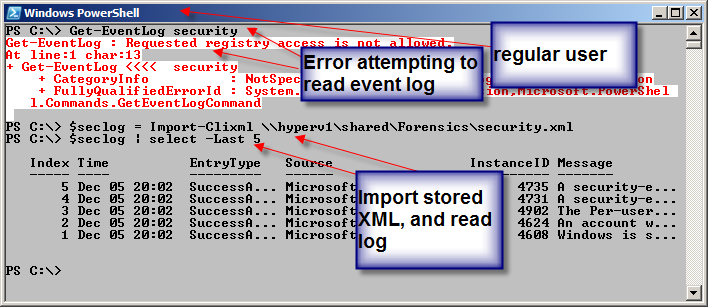
One thing you must keep in mind is that once you export the security log to XML, it is no longer protected by anything more than the NFTS and share permissions that are assigned to the location where you store everything. By default, an ordinary user does not have permission to read the security log. As seen in the previous image, when you start the Windows PowerShell console as an administrator, all event logs are dumpable.
The following image illustrates this situation. In a Windows PowerShell console launched as a normal non-elevated user, the command to read the Security event log fails with an access denied error message. The next command reads the security event log from the stored XML, stores the resulting event log into a variable, and then displays the five oldest entries from the log.
It is, therefore, imperative that the appropriate NTFS permissions and share permissions level protect the offline versions of these event logs.
Drill into a specific entry with Format-List
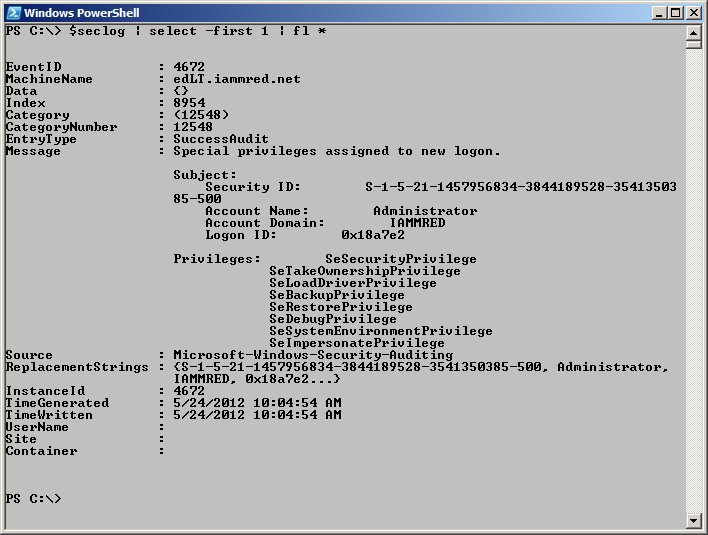
To view the entire contents of a specific event log entry, choose that entry, send the results to the Format-List cmdlet, and choose all of the properties. This technique is shown here.
$seclog | select -first 1 | fl *
The contents of a specific event log entry varies, depending on the provider. The following audit entry details the special privileges that are assigned to a new login. (Interestingly enough, this specific entry was the result of opening the Windows PowerShell console with administrative rights.)
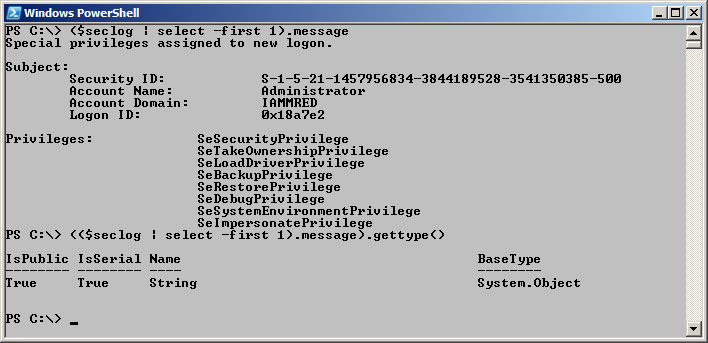
The message property contains the SID, account name, user domain, and privileges that are assigned for the new login. This property is a string, and therefore, it can be parsed by using normal string techniques. The image that follows illustrates obtaining only the message property from the newest event log entry, and using the gettype method to determine the exact data type. These are the two commands that I used:
($seclog | select -first 1).message
(($seclog | select -first 1).message).gettype()
The commands and the output associated with the commands are shown in the following image.
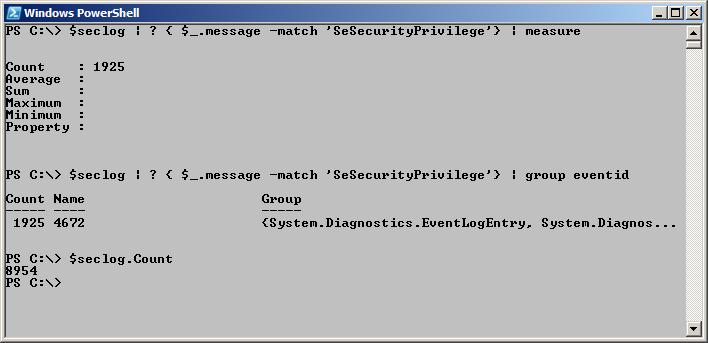
At times, you merely need to do a bit of analysis work: How often is the SeSecurityPrivilege privilege mentioned in the message property? To obtain this information, pipe the contents of the security log to a Where-Object to filter the events, and then send the results to the Measure-Object cmdlet to determine the number of events, as shown here:
$seclog | ? { $_.message -match ‘SeSecurityPrivilege’} | measure
If you want to ensure that only event log entries return that contain SeSecurityPrivilege in their text, use Group-Object to gather the matches by the EventID property. The command that does this is shown here:
$seclog | ? { $_.message -match ‘SeSecurityPrivilege’} | group eventid
Because importing the event log into a variable from the stored XML results in a collection of event log entries, it means that the count property is also present. Use the count property to determine the total number of entries in the event log as shown here.
$seclog.Count
The use of these three commands and the output associated is shown in the image that follows.
Dig into the logs with Windows PowerShell standard techniques
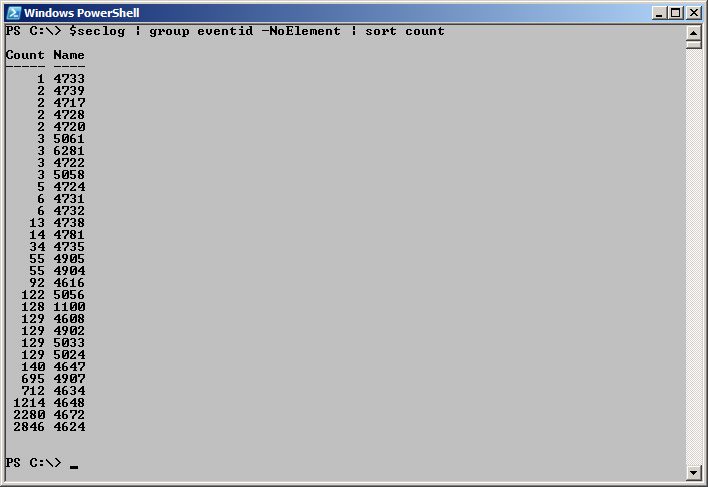
I like to examine an event log for event distribution. This answers the question, “What is causing all of these events?” And it provides a direction for further analysis. The easy way to do this is to use the Group-Object cmdlet and the Sort-Object cmdlet. The use of these two cmdlets is shown here (remember that the variable $seclog contains the offline security log that we dumped at the beginning of this blog, and after storing the log in XML format, we reconstituted it by using the Import-CliXml cmdlet). When I am merely attempting to get an idea of event distribution, I use the NoElement switch, which removes the grouping information from the output.
$seclog | group eventid -NoElement | sort count
The command to group the security events by event ID, and the results from the command are shown in the following image.
Interestingly enough, this image tells me that there are 2280 events with the event ID of 4672. But of those 2280 events, we know that only 1925 entries include SeSecurityPrivilege being granted. What does all this mean? Who knows, but at least with Windows PowerShell you have the tools at your fingertips to surface this information and you have your experience as an IT Pro to draw your own conclusions.
RG, that is all there is to using Windows PowerShell to dump event logs and to perform offline analysis. Security Week will continue tomorrow when I will talk about MD5 hash analysis of files and folders.
I invite you to follow me on Twitter and Facebook. If you have any questions, send email to me at scripter@microsoft.com, or post your questions on the Official Scripting Guys Forum. See you tomorrow. Until then, peace.
Ed Wilson, Microsoft Scripting Guy

 Light
Light Dark
Dark
0 comments