Customize the PowerShell Console for Increased Efficiency
Summary: Learn how to easily configure the Windows PowerShell console prompt for more efficiency and increased productivity.
Microsoft Scripting Guy, Ed Wilson, is here. Well, once again it is the weekend. The first ever Pittsburgh PowerShell Users Group meeting was a resounding, sold-out success. The Scripting Wife and I had a great time at the meeting, and we had the chance to see old friends, and to make new friends as well. I predict we will begin to make Pittsburgh one of our frequent haunts—it is a cool town, and the Windows PowerShell Users Group is awesome.
The problem with the PowerShell console
One problem that I have (because I have a dozen computers that I use on a regular basis) is keeping my Windows PowerShell console so that it appears the same. Because I might take screen shots to use in the Hey, Scripting Guy! blog or in a book I might be writing, it is important that the Windows PowerShell console be standardized. In addition, when I make a presentation or teach, the default red error message with the black background does not show up very well with some projectors—and it really does not show up well when printed in black and white.
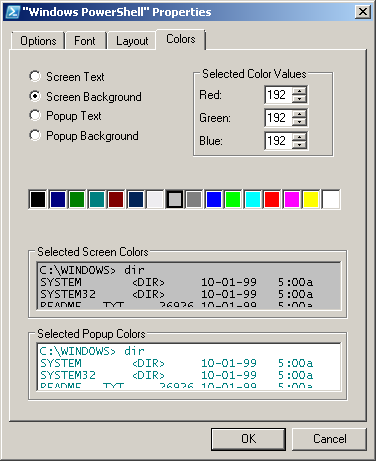
It is true, that the properties of the Windows PowerShell console are configurable via the application, but that is a manual process, and it is difficult to make it repeatable. The Windows PowerShell console properties box is shown in the image that follows.
Tackle the problem of repeatability
In addition to the lack of repeatability, not all of the things that I need to change are available via the Windows PowerShell console properties dialog box. I cannot, for example, configure the color of the error messages. To change items, such as the color of the error messages, requires accessing the Windows PowerShell console settings via Windows PowerShell itself.
For ease of use, I uploaded the Set-PSConsole function to the Scripting Guys Script Repository.
To configure the Windows PowerShell console, I like to access the settings via the $host variable. To get to the user interface portion, I use $host.ui.rawui which contains an instance of an instance of the InternalHostRawUserInterface object.
The foreground color and background color are straightforward value assignments. The two lines of code in my Set-PSConsole function that do this are shown here.
$host.ui.RawUI.ForegroundColor = “black”
$host.ui.RawUI.BackgroundColor = “gray”
Creating a BufferSize object
Next, I need to set the buffer size. The BufferSize property contains an object. The easiest way to obtain access to this object is to query the BufferSize property, and store the resulting object in a variable. It is then a simple matter of assigning new values for the Width and Height properties. When I have modified the properties of the BufferSize object, I need to call the Set_BufferSize method to write the properties back to the Windows PowerShell console. These four lines of code are shown here.
$buffer = $host.ui.RawUI.BufferSize
$buffer.width = 85
$buffer.height = 3000
$host.UI.RawUI.Set_BufferSize($buffer)
Determining the maximum windows size
Now I want to set the window size of the Windows PowerShell console. First, I need to check the maximum window size (based on the current Windows screen resolution). I use the Get_MaxWindowsSize method to obtain the maximum size of the Windows PowerShell console window. I then query the WindowSize property to return a WindowSize object.
Now, I need to perform a few checks. If the width of the maximum window size is greater than or equal to 85, I set the width to 85. If the maximum window size width is less than 85, that is the value I use. I use the same logic for the height. When I have assigned new values to the $ws variable that contains the WindowSize object, I call the Set_WindowSize method to write the values back to the console. These lines of code are shown here.
$maxWS = $host.UI.RawUI.Get_MaxWindowSize()
$ws = $host.ui.RawUI.WindowSize
IF($maxws.width -ge 85)
{ $ws.width = 85 }
ELSE { $ws.width = $maxws.width }
IF($maxws.height -ge 42)
{ $ws.height = 42 }
ELSE { $ws.height = $maxws.height }
$host.ui.RawUI.Set_WindowSize($ws)
Setting the remaining colors
The remaining six lines of code are simple value assignments. I set all of the background colors to white, and choose different foreground colors for the errors, warnings, and verbose messages. Here is the code that sets these six colors.
$host.PrivateData.ErrorBackgroundColor = “white”
$Host.PrivateData.WarningBackgroundColor = “white”
$Host.PrivateData.VerboseBackgroundColor = “white”
$host.PrivateData.ErrorForegroundColor = “red”
$host.PrivateData.WarningForegroundColor = “DarkGreen”
$host.PrivateData.VerboseForegroundColor = “DarkBlue”
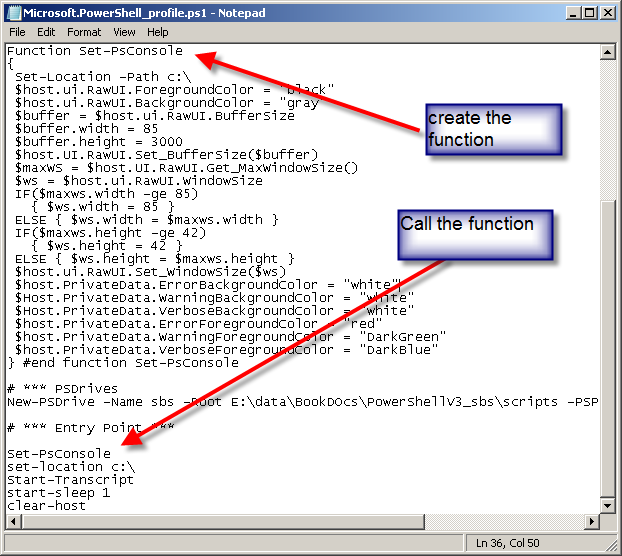
I add Set-PSConsole to my Windows PowerShell profile, and I call it at the entry point to my profile. This portion of my Windows PowerShell console profile is shown in the image that follows.
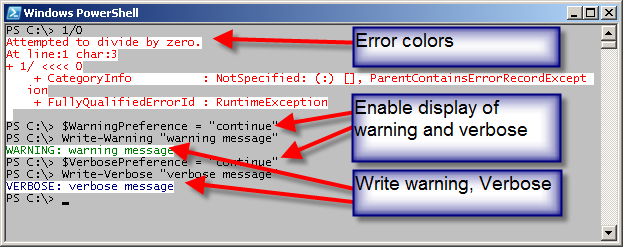
The new colors appear in the following image.
I like my new color configuration, but if you don’t, you are free to download Set-PSConsole and create your own color scheme. This is the beauty of Windows PowerShell—if you don’t like something, in general, you can change it.
I hope you have a great weekend. See you tomorrow when I will tackle a problem that I have with my music files and my Zune. The code solved an annoying problem for me—maybe it will help you too. See you then.
I invite you to follow me on Twitter and Facebook. If you have any questions, send email to me at scripter@microsoft.com, or post your questions on the Official Scripting Guys Forum. See you tomorrow. Until then, peace.
Ed Wilson, Microsoft Scripting Guy


 Light
Light Dark
Dark
0 comments