Copy Data from One Excel Spreadsheet to Another with PowerShell
Summary: The Microsoft Scripting Guys show you how to copy data from one Microsoft Excel spreadsheet to another one by using Windows PowerShell.
![]()
Hey, Scripting Guy! I have this monster Microsoft Excel spreadsheet that I need to make changes to. Frankly, it kind of scares me, because we use this spreadsheet for just about everything. It is a great example of shared information. The HR department, the Finance department, the IT department—we all use this spreadsheet. I know I can make a backup copy of the spreadsheet, but the problem is that after I do that, I need to copy the modified data back to the original spreadsheet so that we do not end up with multiple versions. In fact, a couple of years ago, that is exactly what happened. The HR department modified their copy, the Finance department modified their copy, and I was the one who was stuck with reconciling the three spreadsheets. So, what I would like to do is to copy data from one spreadsheet in the workbook and insert the data into columns
— MG
![]() Hello MG,
Hello MG,
Microsoft Scripting Guy Ed Wilson here. Well today we are celebrating. It is Hey, Scripting Guy! article number 1,500. The milestones, in terms of numbers, are coming quicker now than they used to do since we started publishing articles seven days a week. During the 2010 Scripting Games, we actually published 186 articles, but because many of those were status updates and the like, we decided to count them as one per day; therefore, I wrote Hey Scripting Guy! article 1,000 for January 1, 2009. That milestone actually snuck up on me, and unfortunately, I did not mention it as article 1,000. Oh, and repeat articles (such as when I was sick) do not count in the total.
MG, back to your question, there was a Hey Scripting Guy! article published five years ago called How Can I Copy Column C of One Worksheet to Column A of a Second Worksheet? Of course, back then the article was about using VBScript to perform the operation. I decided to adapt that script, and while I was at it, I decided to add some additional features to the script. The resultant script is called Set-ExcelUserData.ps1, but you can use this technique for any type of data that is stored in a Microsoft Excel workbook. The complete Set-ExcelUserData.ps1 script is shown here.
Set-ExcelUserData.ps1
$path = “C:\fso\ApprovedUsers.xlsx”
$Excel = New-Object -ComObject excel.application
$Excel.visible = $false
$Workbook = $excel.Workbooks.open($path)
$Worksheet = $Workbook.WorkSheets.item(“UserNames”)
$worksheet.activate()
$range = $WorkSheet.Range(“A1:B1”).EntireColumn
$range.Copy() | out-null
$Worksheet = $Workbook.Worksheets.item(2)
$Range = $Worksheet.Range(“G1”)
$Worksheet.Paste($range)
$workbook.Save()
$Excel.Quit()
Remove-Variable -Name excel
[gc]::collect()
[gc]::WaitForPendingFinalizers()
The first thing I do in the Set-ExcelUserData.ps1 script is set the path to the Microsoft Excel workbook. The path to the workbook is stored in the $path variable. Unfortunately, I did not abstract all information into variables. For example, the worksheet name is “UserNames”, the data is stored in range “A1:B1”, and the data is copied to worksheet number 2 and pasted into target range “G1.” A nice improvement to the script would be to add those items to a set of command-line parameters. In this way, the body of the script would be completely abstracted into variables, and it would then be reusable code. As it is, the major design consideration for this script was to illustrate a point, not to provide highly reusable code. The Set-ExcelUserDataParam.ps1 script, shown at the end of this article, illustrates abstracting all hard coded data from the script.
After the path to the Microsoft Excel workbook has been assigned, it is time to create the excel.application object and to make the application invisible. The reason for making the application invisible is to avoid having Microsoft Excel popping up and grabbing focus. Making the application invisible also speeds up the script. This is shown here:
$path = “C:\fso\ApprovedUsers.xlsx”
$Excel = New-Object -ComObject excel.application
$Excel.visible = $false
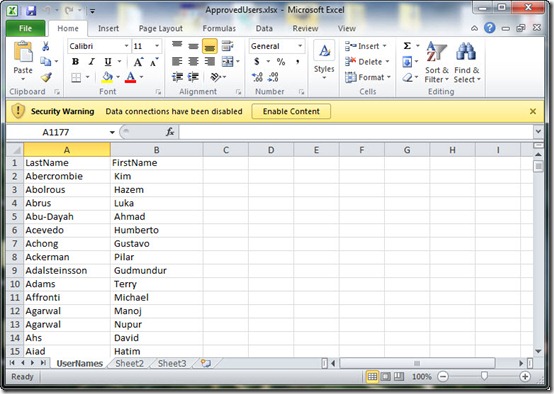
After the application object has been created, it is time to open the workbook and specify the active worksheet. Because the data we wish to copy and paste is on a named spreadsheet, it is necessary to specify the name of the sheet in order to make it the active sheet. The workbook containing the data is shown in the following image.
The name to use is the one that has been specified on the Spreadsheet tab. This portion of the code is shown here:
$Workbook = $excel.Workbooks.open($path)
$Worksheet = $Workbook.WorkSheets.item(“UserNames”)
$worksheet.activate()
The range object is used to tell Microsoft Excel where to find the source data. In our worksheet, the source data is in column A and column B. When creating range objects, you can specify the starting column/row value, and the ending column/row value, or you can simply tell Microsoft Excel to choose the entire column. This is what I do here because I am not certain of how many user names are contained in the spreadsheet. To tell the range object to use the entire column, use the entirecolumn property from the range object:
$range = $WorkSheet.Range(“A1:B1”).EntireColumn
Now I copy the selected range object to the clipboard by using the copy method. The copy method returns true if the copy is successful, and because I am not interested in seeing this, I pipe the returned information to the Out-Null cmdlet. The Out-Null cmdlet discards any information that is piped to it:
$range.Copy() | out-null
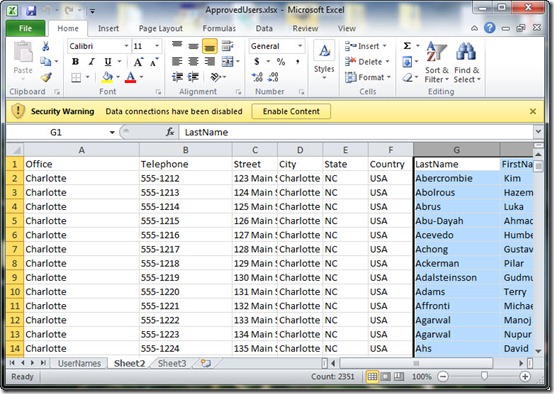
It is time to set up the destination. To do this, I recycle the previous variable names. I specify the worksheet by choosing worksheet 2 from the collection—this value corresponds to the default sheet2. The destination spreadsheet is shown in the following image.
I did this to show you how you can connect to spreadsheets that have either a custom name or a default name. The range is specified as column G, beginning with row 1. It is not necessary to specify range “G1:H1” because by default Microsoft Excel is smart enough to figure out that if you copy two columns of data, you want to paste two columns of data. However, if you do specify the range of “G1:H1”, it will work. This portion of the script is shown here:
$Worksheet = $Workbook.Worksheets.item(2)
$Range = $Worksheet.Range(“G1”)
After the target worksheet and range have been created, it is time to paste the previously copied data, save the worksheet, and quit the excel.application object, as shown here:
$Worksheet.Paste($range)
$workbook.Save()
$Excel.Quit()
To clean up after running the script, delete the $excel variable, and call the collect method from the .NET Framework garbage collection service while waiting for pending finalizers:
Remove-Variable -Name excel
[gc]::collect()
[gc]::WaitForPendingFinalizers()
When the script runs, the workbook contains the copied data that is shown in the following image.
A modified version of the script is Set-ExcelUserDataParam.ps1, which has all hard coded data moved out of the script body and into parameters. The script is shown here.
Set-ExcelUserDataParam.ps1
Param(
$path = “C:\fso\ApprovedUsers.xlsx”,
$worksheet1 = “UserNames”,
$range1 = “A1:B1”,
$worksheet2 = 2,
$range2 = “G1”
) #end param
$Excel = New-Object -ComObject excel.application
$Excel.visible = $false
$Workbook = $excel.Workbooks.open($path)
$Worksheet = $Workbook.WorkSheets.item($worksheet1)
$worksheet.activate()
$range = $WorkSheet.Range($range1).EntireColumn
$range.Copy() | out-null
$Worksheet = $Workbook.Worksheets.item($worksheet2)
$Range = $Worksheet.Range($range2)
$Worksheet.Paste($range)
$workbook.Save()
$Excel.Quit()
Remove-Variable -Name excel
[gc]::collect()
[gc]::WaitForPendingFinalizers()
MG, that is all there is to using Microsoft Excel to copy data from one spreadsheet to another. Microsoft Excel Week will continue tomorrow when we will talk about importing data from a CSV file into a new Microsoft Excel workbook.
We invite you to follow us on Twitter and Facebook. If you have any questions, send email to us at scripter@microsoft.com, or post your questions on the Official Scripting Guys Forum. See you tomorrow. Until then, peace.
Ed Wilson and Craig Liebendorfer, Scripting Guys


 Light
Light Dark
Dark
0 comments