Find Active Power Plan on Remote Servers by Using PowerShell
Summary: Find the active power plan on remote servers by using Windows PowerShell and WMI information. The Microsoft Scripting Guys show you how to do it.
![]() Hey, Scripting Guy! I have a real problem. It seems that both Windows 7 and Windows Server 2008 R2 install with the “balanced” power plan. A balanced power plan for a workstation is just fine and dandy, but I do not feel it is appropriate for our servers. In fact, some of our servers have blue screened, and when I look at them, they seem to be related to the CPU switching speeds. In addition, why in the world do I want to spend all the money on buying a fancy new powerful CPU only to have it lope along at 5 percent. It just does not make sense.
Hey, Scripting Guy! I have a real problem. It seems that both Windows 7 and Windows Server 2008 R2 install with the “balanced” power plan. A balanced power plan for a workstation is just fine and dandy, but I do not feel it is appropriate for our servers. In fact, some of our servers have blue screened, and when I look at them, they seem to be related to the CPU switching speeds. In addition, why in the world do I want to spend all the money on buying a fancy new powerful CPU only to have it lope along at 5 percent. It just does not make sense.
— BA
![]() Hello BA,
Hello BA,
Microsoft Scripting Guy Ed Wilson here. It was storming this morning as I headed downstairs for a cup of English Breakfast tea and a freshly baked organic blueberry scone. I headed out onto the front porch with my cup of tea in one hand and the scone balanced between my teeth. I gingerly unlocked the door and navigated to our porch swing and sat down to enjoy the rain and a moment of quiet repose before beginning a meeting laden day of planning and strategy sessions. I closed my eyes, and let the moisture-heavy breezes whip through my hair. It is as if summer is struggling to remain in control of our weather patterns. The wind and the rain are signs of the futility of this fight.
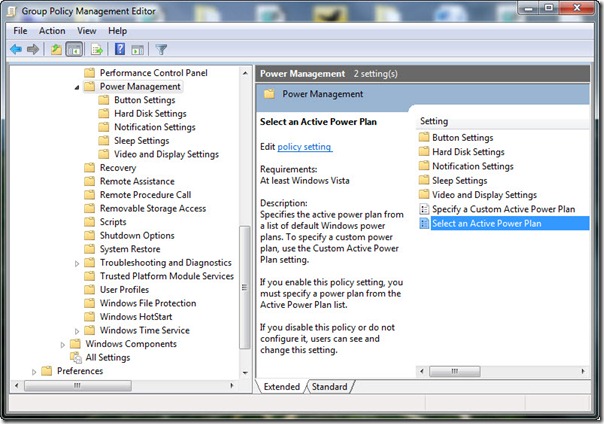
BA, I know it seems futile to struggle against default settings in Windows such as power plans, but that certainly is not the case. With very few exceptions, most defaults are adjustable. For example, the power management settings are configurable via Group Policy. The settings are located under Computer Configuration\Policies\Administrative Templates\System\Power Management and are shown in the following image.
The Ask the Directory Services Team blog has three good blog posts that go into more detail about using Group Policy to manage power settings.
If for some reason you cannot use Group Policy to manage the power settings, on Windows 7 and Windows Server 2008 R2 you can use the new power policy classes. The Get-ActivePowerPlans.ps1 script uses the Win32_PowerPlan WMI class to retrieve the active power plan from all computers that are listed in a text file. The output is displayed as a table that shows the name of the power plan and the name of the computer. On Windows operating systems before Windows 7, you can use the powercfg utility. I talked about the powercfg utility in a Quick-Hits Friday article last year. The complete Get-ActivePowerPlans.ps1 script is shown here.
Get-ActivePowerPlans.ps1
$computers = Get-Content -Path C:\fso\Computers.txt
Get-WmiObject -Class win32_powerplan -Namespace root\cimv2\power `
-CN $computers -Filter “isActive=’true'” -EA silentlyContinue|
Format-Table -Property elementName, __Server -AutoSize
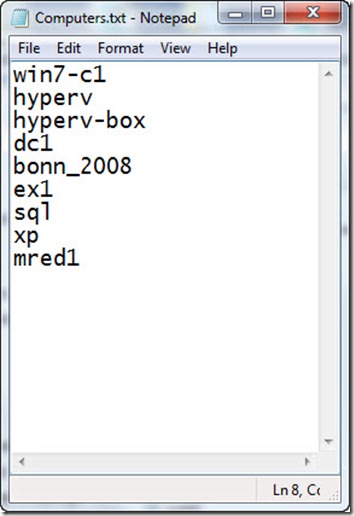
The Computers.txt file is simply a list of computer names. It is important that the file does not have any spaces in it, or blank lines. A sample computers.txt file is shown in the following image.
The Get-Content cmdlet is used to read the contents of the computers.txt file, and the contents of the file are stored as an array. This is shown here:
PS C:\> $computers = Get-Content C:\fso\Computers.txt
PS C:\> $computers
win7-c1
hyperv
hyperv-box
dc1
bonn_2008
ex1
sql
xp
mred1
PS C:\> $computers.gettype()IsPublic IsSerial Name BaseType
——– ——– —- ——–
True True Object[] System.ArrayPS C:\>
One of my favorite features of the Get-WmiObject Windows PowerShell cmdlet is that it accepts an array of computer names. This can easily be shown by performing a simple query to retrieve BIOS settings from two computers on my network. I use the Windows PowerShell alias gwmi instead of having to type the complete cmdlet name Get-WmiObject. I also leave out the class parameter because it is the default parameter for the Get-WmiObject cmdlet. I use the parameter alias CN instead of having to type the more lengthy computername parameter. Because the computername parameter accepts an array of strings, it is expecting strings for the input. Therefore, it is not necessary to supply quotation marks around each computer name. The command is shown here along with the BIOS information from the two remote computers:
PS C:\> gwmi win32_bios -cn hyperv,hyperv-boxSMBIOSBIOSVersion : 7LETB0WW (2.10 )
Manufacturer : LENOVO
Name : Ver 1.00PARTTBLx
SerialNumber : L3F8636
Version : LENOVO – 2100SMBIOSBIOSVersion : V1.6
Manufacturer : American Megatrends Inc.
Name : Default System BIOS
SerialNumber : To Be Filled By O.E.M.
Version : 7583MS – 20091228PS C:\>
The previous shortcut command is exactly the same as this command:
PS C:\> Get-WmiObject -Class win32_bios -ComputerName “hyperv”,”hyperv-box”SMBIOSBIOSVersion : 7LETB0WW (2.10 )
Manufacturer : LENOVO
Name : Ver 1.00PARTTBLx
SerialNumber : L3F8636
Version : LENOVO – 2100SMBIOSBIOSVersion : V1.6
Manufacturer : American Megatrends Inc.
Name : Default System BIOS
SerialNumber : To Be Filled By O.E.M.
Version : 7583MS – 20091228PS C:\>
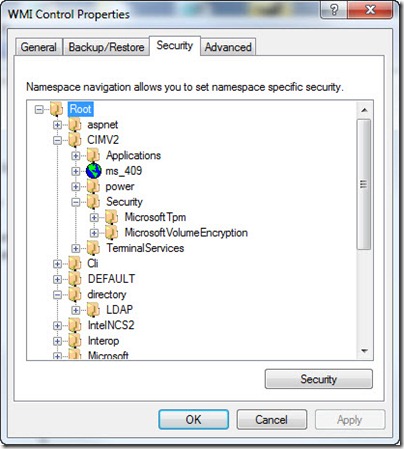
The new WMI power policy classes all reside in the root\cimv2\power WMI namespace. WMI namespaces can be viewed from inside the WMI control tool as shown in the following image.
If you are working with a WMI class that resides in the root\cimv2 namespace, it is not necessary to supply a value for the namespace parameter. This is because root\cimv2 is the default WMI namespace on all versions of Windows since Windows 2000. Back in the Windows NT4 days, the default WMI namespace was root\default. As seen in the code output shown here, it is not necessary to supply the namespace if the WMI class is in the root\cimv2 namespace:
PS C:\> gwmi win32_biosSMBIOSBIOSVersion : A06
Manufacturer : Dell Inc.
Name : Phoenix ROM BIOS PLUS Version 1.10 A06
SerialNumber : BDY91L1
Version : DELL – 15PS C:\> gwmi win32_bios -Namespace root\cimv2
SMBIOSBIOSVersion : A06
Manufacturer : Dell Inc.
Name : Phoenix ROM BIOS PLUS Version 1.10 A06
SerialNumber : BDY91L1
Version : DELL – 15PS C:\>
If you are not sure where a WMI class resides, you can check the MSDN documentation for the WMI class. You can also use the list parameter from the Get-WmiObject cmdlet as shown here:
PS C:\> Get-WmiObject -List win32_bios
NameSpace: ROOT\cimv2
Name Methods Properties
—- ——- ———-
Win32_BIOS {} {BiosCharacteristics, BI…PS C:\>
If a WMI class is not found in the selected namespace, nothing will be displayed. This is seen here.
PS C:\> Get-WmiObject -List win32_bios -Namespace root\cimv2\power
PS C:\>
Because the Win32_PowerPlan WMI class only exists on Windows 7 and Windows Server 2008 R2, an error will be generated if an attempt is made to query the class on a down-level operating system. This is shown here–dc1 is a Windows Server 2008 domain controller. Note that the first query returns invalid namespace, but the second WMI query for the Win32_bios succeeds:
PS C:\> gwmi win32_powerplan -Namespace root\cimv2\power -cn dc1
Get-WmiObject : Invalid namespace
At line:1 char:5
+ gwmi <<<< win32_powerplan -Namespace root\cimv2\power -cn dc1
+ CategoryInfo : InvalidOperation: (:) [Get-WmiObject], ManagementExce
ption
+ FullyQualifiedErrorId : GetWMIManagementException,Microsoft.PowerShell.Comman
ds.GetWmiObjectCommandPS C:\> gwmi win32_bios -cn dc1
SMBIOSBIOSVersion : A01
Manufacturer : Dell Computer Corporation
Name : Default System BIOS
SerialNumber : 9HQ1S21
Version : DELL – 6PS C:\>
The easiest way to deal with potential errors about the missing namespace is to use the silentlycontinue erroraction. The alias EA for the erroraction parameter can be used. To retrieve the active power plans, filter on the isactive parameter. The WMI command is shown here:
Get-WmiObject -Class win32_powerplan -Namespace root\cimv2\power ` -CN $computers -Filter “isActive=’true'” -EA silentlyContinue|
A nice table can be created by using the Format-Table cmdlet. By choosing the elementname property, the name of the power plan is selected. The system property __Server provides us with the name of the computer. The autosize parameter tightens up the columns of the table without removing any data. This command is shown here:
Format-Table -Property elementName, __Server -AutoSize
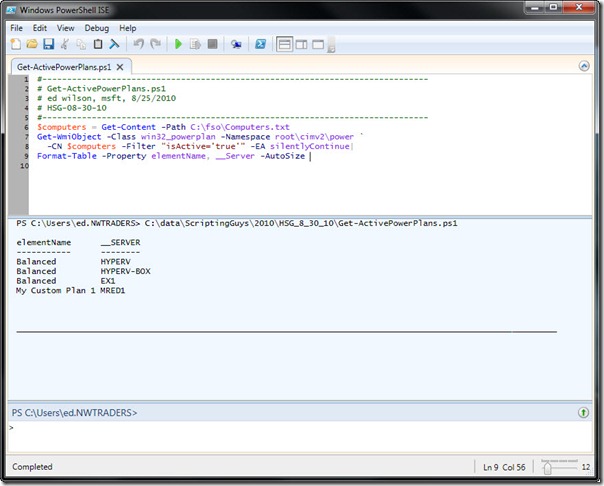
When the script runs, the table is displayed that is shown in the following image.
BA, that is all there is to using the WMI power classes to retrieve the active power plan on Windows Server 2008 R2 and Windows 7 servers. WMI Week will continue tomorrow when we will talk about retrieving the details of the active power plan.
We invite you to follow us on Twitter and Facebook. If you have any questions, send email to us at scripter@microsoft.com, or post your questions on the Official Scripting Guys Forum. See you tomorrow. Until then, peace.
Ed Wilson and Craig Liebendorfer, Scripting Guys


 Light
Light Dark
Dark
0 comments