Hey, Scripting Guy! How Can I Sign Windows PowerShell Scripts with an Enterprise Windows PKI? (Part 1 of 2)
![]() Hey, Scripting Guy! Would you please write an article that is a step-by-step guide about how to use an existing Windows PKI installation to sign Windows PowerShell scripts?
Hey, Scripting Guy! Would you please write an article that is a step-by-step guide about how to use an existing Windows PKI installation to sign Windows PowerShell scripts?
— HR
![]()
Hello HR,
Microsoft Scripting Guy Ed Wilson here. I am so glad you asked this because it gave me the opportunity to turn to one of our MVPs and let him share his knowledge:
Ragnar Harper lives in Norway with his wife, daughters, and dog. Ragnar works as chief technology officer at Crayon AS. His focus is around Microsoft technologies, and he has deep passion for everything security related. He is also a strong believer in Windows PowerShell and loves to use it whenever he can. He was awarded IT Pro of the Year at Norwegian Heroes Happen Here in 2008. At the same event, he was also awarded “demo hero” for the best demo of Windows Server 2008—showing Windows PowerShell!
You will find Ragnar at different conferences—often working at “ask-the-experts” booths helping find answers to people’s questions. He is author of the Norwegian Windows PowerShell book, “Bli kjent med Windows PowerShell,” soon to be available and updated for Windows PowerShell 2.0.
Therefore, without further ado I will turn the keyboard over to Ragnar Harper.
I’ve been delivering Windows PowerShell training, and I often get asked how to use an enterprise Public Key Infrastructure (PKI) to sign Windows PowerShell scripts. It seems like almost all the articles out there show how to use a self-signed certificate created with tools such as makecert.exe from the .NET Framework SDK.
In this article, I will show you how to make the code signing template available and how to use it. As a prerequisite, you need to have a certificate server available in your environment. My certificate server is Windows Server 2008, and my client for this article is running Windows 7.
My PKI root is called pki.harper.labs, and it is already trusted by my domain members, as shown in the following image.
I will follow these steps:
- Make the code signing certificate template available on my issuing certificate server.
- Request a code signing certificate for my user.
- Sign my Windows PowerShell script and run it.
- Deploy the code signing certificate as a trusted publisher through Active Directory.
Step 1: Make the code signing certificate template available on my issuing certificate server
Let’s start with making the code signing certificate available on the issuing certificate server so that our certificate server will issue code signing certificates. I do this at the issuing certificate server, and I start the Server Manager console and open the Active Directory Certificate Services node.
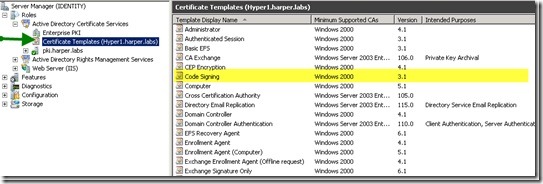
We will start with a look at the code signing certificate template. Find the template in the Certificate Templates node right under the Enterprise PKI node. This is called the Certificate Templates snap-in (and if you want you can open it up as a standalone snap-in in the Microsoft Management Console [mmc.exe]). This is shown in the following image.
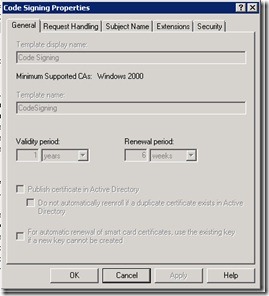
I will not discuss how to create copies of the template here, so I will just use the existing certificate template. If you double-click the code signing template, you will get a property sheet with a few tabs, as shown in the following image.
Because we are not creating a duplicate copy, we cannot change any of the values on the General tab. If we created a duplicate, we could change those. For example, how long should the certificate be valid? The same goes for Request Handling, Subject Name, and Extensions. If we wanted to change those, we would have to create a duplicate.
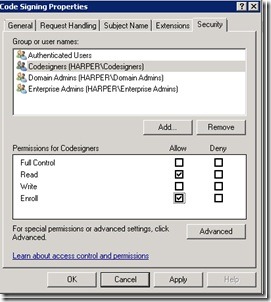
What we will look at is the Security tab. We are interested in the permission to enroll—who should be able to enroll for a code signing certificate? I create a group in Active Directory called Codesigners, and I grant the Read and Enroll permissions shown in the following image.
Then I make members of this group the users who should be able to get a code signing certificate. I click OK, and continue to the make the certificate template available on my issuing certificate server.
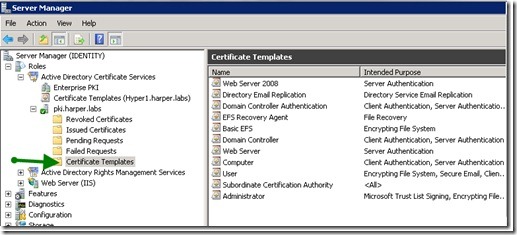
Next, I open the Certificate Authority console (the node is named pki.harper.labs in my environment, and is found under the Certificate Templates node in Server Manager, as shown in the next image). In the Certificate Authority console, you also see a Certificate Templates node. If you want to check if the code signing certificate template is available for enrollment, see if it is shown in the list. This is shown in the following image.
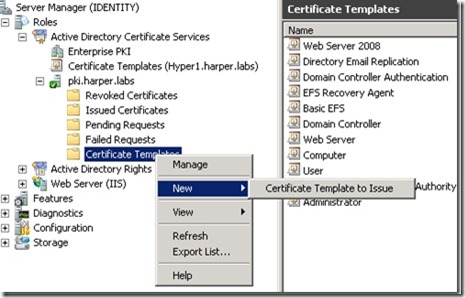
If the code signing template is not shown, we will add it. Right-click the Certificate Templates node, point to New, and then click Certificate Template to Issue, as shown in the following image.
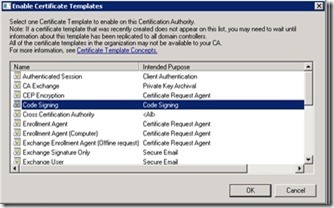
From the list that appears, such as is shown in the following image, select the code signing template, and then click OK. This list is read from Active Directory, and if you just created the template, you might have to wait until it is replicated to all domain controllers.
We are now able to request a code signing certificate, and enroll the users we gave Enroll permission on the template.
Step 2: Request a code signing certificate for my user
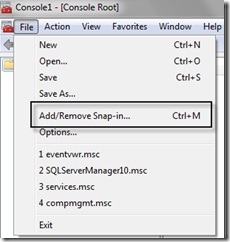
This step is done from my client computer, as a user that is member of the Codesigning group. I open the certificates snap-in through the Microsoft Management Console (mmc.exe). Then I add the Certificates snap-in by clicking File, and then clicking Add/Remove Snap-in. This is shown in the following image.
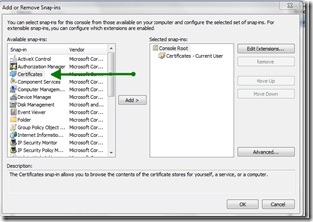
Click Certificates in the left pane, as shown in the following image. Click Add, and then click OK.
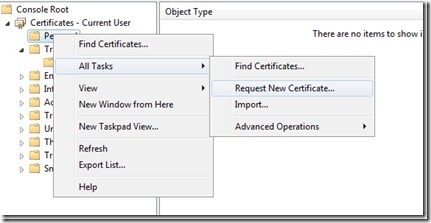
You want the snap-in to manage your user account, so click My user account. Now that you have loaded the snap-in, let’s request a code signing certificate. Right-click Personal, point to All Tasks, and then click Request New Certificate.
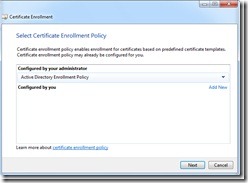
Just click Next in the first dialog box. Because we are requesting a certificate from our enterprise PKI, in the next dialog box, select the Active Directory Enrollment Policy, and then click Next, as is shown in the following image.
Because we made the code signing template available in step 1, you should see the template for code signing available for enrollment. You only see the certificates you have permissions for in the list, so if the code signing template does not show up, have a closer look at the permissions. Click the Code Signing certificate. If you look at the details, you will see the validity period of the certificate (the default template is one year or 365 days, as the details say).
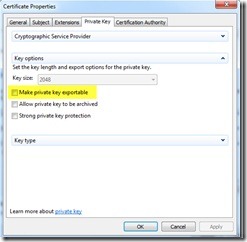
All the information that is needed to create the certificate is automatically configured, but if you want, you can change some of it if you click Properties. For example, if you want to make the private key exportable so that you can export/import the private keys to other computers, you can configure this by clicking Properties, and then clicking the Private Key tab, as shown in the following image. This is necessary if you want to use the same certificate on multiple computers.
When you are ready, click Enroll. Wait while the certificate is being generated and issued. Click Finish. You have now created a certificate for code signing!
Tomorrow, we will continue with firing up Windows PowerShell, and signing our script!
HR, this is the first of two parts in Ragnar Harper’s step-by-step guide about how to use an existing Windows PKI installation to sign Windows PowerShell scripts. Join us for part two tomorrow as Guest Blogger Week continues.
If you want, we would love for you to follow us on Twitter or Facebook. If you have any questions, send email to us at scripter@microsoft.com, or post your questions on the Official Scripting Guys Forum. See you tomorrow. Until then, peace.
Ed Wilson and Craig Liebendorfer, Scripting Guys




 Light
Light Dark
Dark
0 comments