WMI Queries the easy way, Item-level Targeting the much faster and easier way
Hey – this is Florian from the GP Team’s MVPs again. It seems like some of you would like set up WMI filters. Let me show you how to use a tool called Scriptomatic to make it easier. Or, skip to the end to see how much faster it is to do the same thing with Group Policy Preferences Item-Level Targeting.
To review, WMI filters filter the scope of a GPO. Only objects that evaluate the WMI filter as TRUE will actually apply the GPO behind it – other objects simply ignore the GPO.
Note: Windows 2000 always evaluates WMI filters to true – so WMI filtering GPOs won’t work on Windows 2000 targets as they simply apply the GPO no matter what you filter for.
You may have noticed that WMI filters look like SQL queries. In my last blog post, I included an example WMI filter that filters on different versions of Windows to only pick Windows Vista and above. Remember this?
SELECT Version, ProductType FROM Win32_OperatingSystem WHERE Version >= ‘6.0′ AND ProductType = ‘1′ .
Now, WMI Objects with Windows Vista or Windows 7 only (version number greater than or equal to 6.0 - Vista is 6.0, Windows 7 is 6.1 - and the ProductType 1) would apply the GPO that goes with the filter.
This doesn’t look easy, does it? If you’re familiar with SQL, you may dissect the query into its parts (the language is actually called WQL – WMI Query Language – cool, huh?).
The query does the following:
- Requests a specific WMI object (Win32_OperatingSystem) on the target
- Selects two attributes (Version, ProductType) of the object
- Compares the two attributes to values we specify.
- If the target matches our query, it is allowed to apply the GPO.
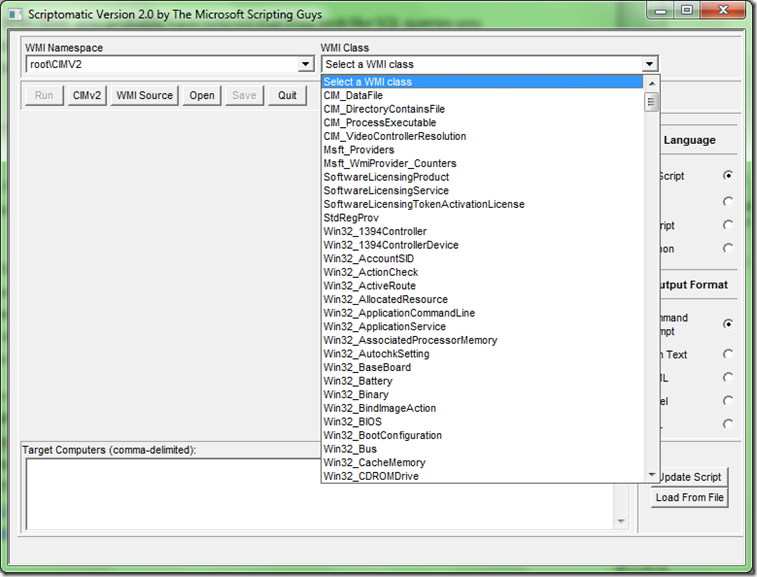
WMI filters all pretty much look the same. Not scared? Good. Where can you look up these objects and attributes to query for? Fortunately there’s a tool called “Scriptomatic” released by the Microsoft Scripting Guys. It helps us set up WMI filters by showing us the complete list of available WMI objects to query for. Go to https://www.microsoft.com/downloads/details.aspx?FamilyID=09dfc342-648b-4119-b7eb-783b0f7d1178&displaylang=en and get your copy of Scriptomatic V2. The tool looks like this:
Selecting a WMI class (what I referred to as “objects” before) from the dropdown list fills the “scripting window”. The tool builds a script in the selected language from the right that can be executed against a set of machines that you specify in the box at the bottom. It outputs all available attributes the WMI class has and fills them with the configuration of the targeted machines.
That helps us two-fold: we get to know what classes and attributes one can query for (and find the correct WMI filter for this) and we can use the script to test our attribute against a set of machines. This shows whether the attribute we want to filter for is used by all machines or just a subset of them. Note: You may need to disable running firewalls on remote machines if you’re using the script against on nonlocal machines.
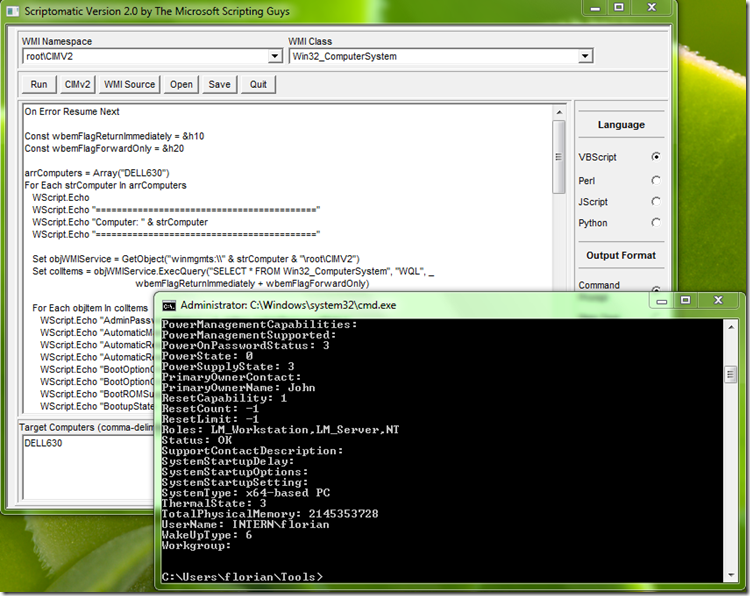
A real world example would be querying for total amount of RAM available on a system with “Win32_ComputerSystem”:
You can see in the CMD output that there’s an attribute called “TotalPhysicalMemory” that obviously holds the physical memory (in bytes) my machine has. So if we were to filter our GPO targets to machines only that have equal to or more than 2 GB of physical memory (RAM), our query would look like this:
SELECT TotalPhysicalMemory FROM Win32_ComputerSystem WHERE TotalPhysicalMemory >= 2000000000
If you’re unsure of how to make up the script, check the Scriptomatic’s script lines that go like
Set colItems = objWMIService.ExecQuery("SELECT * FROM Win32_ComputerSystem", "WQL", _
wbemFlagReturnImmediately + wbemFlagForwardOnly)
It already points the start of the filter out. You just need to replace the “all”-asterisk (*) with the attribute you’re using and specify the WHERE clause. That’s it.
The first step is done – now you’ll need to actually create and apply the filter to a GPO. The Directory Services Team at https://blogs.technet.com/askds/archive/2008/09/11/fun-with-wmi-filters-in-group-policy.aspx did a great job explaining this – so I won’t repeat the steps here. I couldn’t say it better anyway.
If you’re still unsure of whether the filter works or not, you can check Darren’s WMI filter validator tool: https://www.gpoguy.com/FreeTools/FreeToolsLibrary/tabid/67/agentType/View/PropertyID/93/Default.aspx
Oh wait – the title line says “item-level-targeting”. Where’s the part with ILT? You’re right, we need to get to that point already. I’ll show you really quickly how you’d set up a physical memory (RAM) filter with item-level-targeting (why quickly? well, there’s a BBQ I want to get to, but also because item-level-targeting really is easy and quick). Group Policy Preferences makes targeting a lot easier.
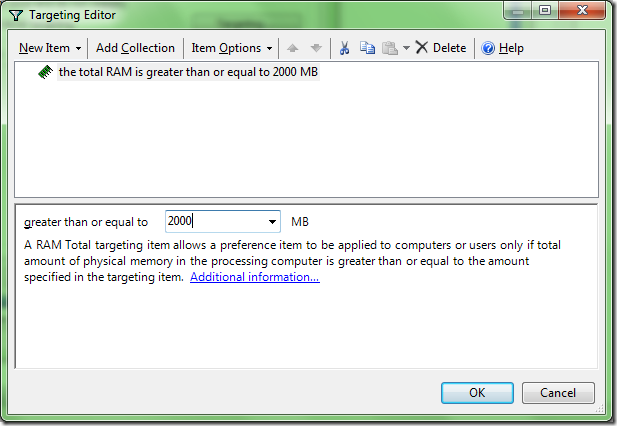
Select your GPPreference item and use the “Common” tab. Check the “Item-level targeting.” box and click the “Targeting” button. A filter editor opens up that we can use to define our filter. From the “New Item” drop down menu, we choose “RAM”. That adds a new filter line to our filter expression. The lower box lets us pick a number of minimum physical memory we want on the systems so that they apply the item. There are a few suggestions but you’re free to put any number in there you want:
Click “OK” and that’s it. Super-easy, isn’t it? Compared to the steps you’d need to prepare for WMI filters, item-level targeting should be your filtering choice #1 when it comes to GP Preferences.


