Creating a Custom Report for System Center 2012 R2 Configuration Manager – Part 2
Getting Started
Ensure you can browse to both the Reports (e.g. https://<ConfigMgr>/Reports) and ReportServer (e.g. https://<ConfigMgr>/ReportServer) web pages on your server hosting SQL Reporting services.
Launch Report Builder 3.0 elevated (“Run as Administrator”) using and an account that has admin credentials to both the SQL server and ConfigMgr. Although the account doesn’t need to be an administrator, for simplicity sake an admin account will be used in this demonstration.
Close the Getting Started screen. On the left hand pane there are 5 folders to get familiar with. If you don’t see the pane click the view tab then check Report Data.
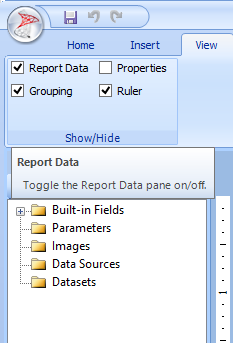
- The Built-in Fields won’t be used
- The Parameters are variables that will be passed to the Datasets
- The images will contain the system center logo
- The Data Sources is the connection to the ConfigMgr database
- The Datasets are the SQL queries
For more information view the Report Data Pane on Technet.
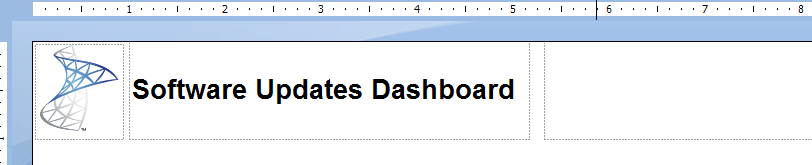
- Let’s start with the layout first. Select the View tab then check Properties. Click the center of the report then change the size in the Properties pane to 12.7in, 9.48in or your own custom size.
- Click the line in for the title text box. In the Properties pane change the Location to 1in, 0in and the Size to 4.15in, 1in. Click the Home tab then change the font to Calibri 20 Bold. Click inside the Textbox and enter Software Updates Dashboard.
- Click the Insert tab then click Text Box. Draw a textbox next to the Software Updates Dashboard textbox to the edge of the report. Click the border of the textbox and change the size to 7.37833in, 1in and the location to 5.32167in, 0in. You may need to adjust the width to ensure it isn’t off the report. When resizing the textbox it should snap to the edge.
- Within the Insert tab click Image. Draw the image in the upper left hand corner. When the Image Properties box appears, click the Import button then select an image.
- The top of your report should look like this:
- Scroll to the bottom of the report and delete the textbox with the Execution Time.
You should now have a basic layout for your dashboard and can change it to meet your needs.
To view what the report will look like press F5 or click the Run button in the Home tab.
Creating a Custom Report for System Center 2012 R2 Configuration Manager – Part 1
Creating a Custom Report for System Center 2012 R2 Configuration Manager – Part 2
Creating a Custom Report for System Center 2012 R2 Configuration Manager – Part 3
Creating a Custom Report for System Center 2012 R2 Configuration Manager – Part 4
Creating a Custom Report for System Center 2012 R2 Configuration Manager – Part 5