- Home
- Windows Server
- Storage at Microsoft
- Recovering your files in Windows 7
- Subscribe to RSS Feed
- Mark as New
- Mark as Read
- Bookmark
- Subscribe
- Printer Friendly Page
- Report Inappropriate Content
<This is the third post in a blog series on backup and recovery offerings in Windows 7. >
Many of us have experienced this panic moment when we realized some important files are missing or are accidentally modified, but Windows users who’ve configured Windows Backup (or even those who haven’t) don’t need to sweat, because their data is in good hands. In this post we’ll talk about how to recover a file from the local hard disk and from a backup. As an advanced topic we’ll also discuss how to extract files from a system image.
Default protection
We cannot emphasize enough the importance of having a backup of your data on an external storage location (e.g. external hard disks, network location) as that’s the only way to safeguard your important data against hardware failure on your PC. That being said, by default Windows will automatically create copies of your data on your OS drive to help ease other data loss situations such as accidental deletion and modifications. These copies of files are created on a best effort basis and may be short lived, so you should never rely solely on them as a replacement for a backup. Nonetheless they could be extremely useful if you’re unable to access a backup for any reason, such as when you’re on the go.
(Note that these automatic copies, also known as system protection, are turned off by default on non-OS drive. If you’re interested in learning more about this feature, remember to read our next post as we’ll discuss them in detail in conjuncture with the System Restore feature.)

To access an older version of a file, simply right click on the file and select “Restore previous versions”, where you will see all the available versions of the file. You can then choose to restore the file, or as a safer option copy the file to another location. Alternatively if the file has been deleted, you can select the same option on the folder that originally contained the deleted file, open the version that contains the deleted file and do the restore.
Restoring files from a backup on the same computer
If you’ve set up Windows Backup on your computer, you can also access the files in the backup through the same dialog above; except you’ll see from the location column that the file is in “Backup” rather than in a “Restore point”. This experience is optimized for quick restore of a single file, and does not work for restoring an entire folder or if you need to restore selected files from various folders. In these cases you can launch the file recovery wizard from the Backup and Restore control panel to access the complete list of file recovery options.

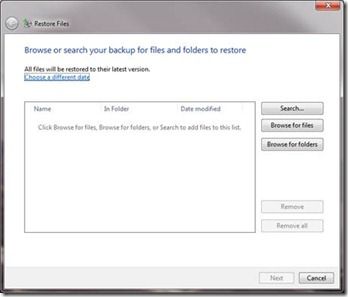
When you click on “Restore my files” from the control panel, you’ll be able to restore all the files that you have read access on that were backed up to the current backup target. If you want to restore other users’ files, choose the “Restore all users’ files” option instead, which would require you to have administrative privilege. This option would also allow you to restore files to locations that may require administrative access. To select files or folders for restore, you can either browse your backup content, or you can search for the file\folder by its name or using wild card searches. By default, the restore wizard will always show you the latest versions of all your files. If you need an older version of a file, select “Choose a different date”.


After selecting which file/folder to restore, you can then select where to restore the files to. To avoid potentially dealing with file name conflicts or accidentally overwriting your data, we would recommend restoring to an alternate location and then copying the files back only after verifying that those are truly the ones you want. Also, if you’re restoring applications or system files, you will not be able to directly restore them to original location since doing so might break existing applications (and in most cases simply replacing such files would not help repairing an application or system state. To revert your system or application to an earlier point in time, System Restore should be used. See our next post to learn more about this feature). Attempt to restore these files to original location will result in those files being skipped and reported in the log file. If you do need to restore such files, restore them to a different folder and then copy them to the desired location.
After the restore is completed, you can launch explorer from the restore wizard to view the restored files.
Restoring files to a new OS or after recovering from a system image
If you have reimaged your computer to an earlier point in time, or installed a new operating system, the recovered or new OS will not have record of the latest backups that you’ve made. In this case, you can use the “Select another backup to restore files from” option to specify where the backup is located. The wizard will automatically look for available backups on all devices currently connected to the computer, and you can also specify a network location to restore from. Once you’ve selected the backup, the rest of the steps to restore the files remain the same.
When restoring files from a different OS, it’s highly recommended that you restore the files to an alternative location since the users and folder structures on the new computer might have. Restoring to original location means that the restore wizard will restore your files by recreating the old folder paths, which might make it much harder locate the restored files afterwards.
Restoring backups from previous versions of Windows
You can restore backup made from Windows Vista following the same steps above as restoring a Windows 7 backup to another computer. If you’ve created a backup using the NTBackup utility in XP, at the time of this blog post you can download a free tool here to restore the .BKF files on Windows Vista. The ability to restore .BKF files on Windows 7 will be supported in the near future and more details will be provided at that time.
Extracting files from a system image (advanced)
As discussed in previous blog posts, system image is a snapshot of your computer created at the block level, with the latest image stored in a Virtual Hard Disk format (.vhd file). Even though a system image is meant to be used only for rebuilding your computer, due to its storage format it’s possible to mount the image as a virtual volume on your computer to browse or extract its content. This has been made a lot easier in Windows 7 due to the new set of VHD features available from the disk management console.

To access this option, simply go to Computer Management (Right click Computer->manage) and select the Disk Management option. Right click and you’ll get an option to attach a VHD. By selecting the system image VHD and mounting it, you will now be able to browse the latest system image of your computer. Make sure you do not modify the content of this virtual drive or you’ll risk losing important backed up data. Also, you should detach the VHD (also from the management console) after you are done browsing otherwise the next backup cannot be run.
Sometimes bad things do happen to good people, but hopefully this post has provided you with all the information you need to know about recovering your valuable data. Coming up in the next few posts, we’ll cover how to manage space for backup, and then move onto system recovery related topics.
-- Windows Backup team
You must be a registered user to add a comment. If you've already registered, sign in. Otherwise, register and sign in.