- Home
- Windows Server
- Storage at Microsoft
- Deploying DFS Replication on a Windows Failover Cluster – Part I
- Subscribe to RSS Feed
- Mark as New
- Mark as Read
- Bookmark
- Subscribe
- Printer Friendly Page
- Report Inappropriate Content
First published on TECHNET on Jun 29, 2009
On Windows Server 2008 R2, a Windows Failover cluster can be configured to be a member of a DFSR replication group. This feature can be used to configure highly available replication services. In this three part blog series, let us examine how to configure a Windows Failover cluster as a DFS Replication member server. For a quick recap of the new features in DFS Replication on Windows Server 2008 R2, head here .
The first step is to validate the available hardware that will be used for clustering and to create a Windows Failover Cluster. The next post in this series covers the steps required to configure high availability for the DFS Replication service. The third and final post in this series covers the steps required to add the failover cluster to a replication group.
Deployment Scenario
Before we start, let us examine the deployment scenario for which we are creating this failover cluster. In order to implement a highly available replication infrastructure, Contoso plans to deploy a 2-node failover cluster at it's datacenter site/main office. This failover cluster is part of a DFSR replication group. DFS Replication is used to consolidate data to the datacenter server from multiple branch office file servers for centralized backup using backup software such as Microsoft System Center Data Protection Manager. 
In this series of blog posts, let’s explore the steps required to configure and set up such a failover cluster, configure DFS Replication for high availability on that cluster and then finally add the failover cluster to a replication group.
Creating a Windows Failover cluster for Contoso
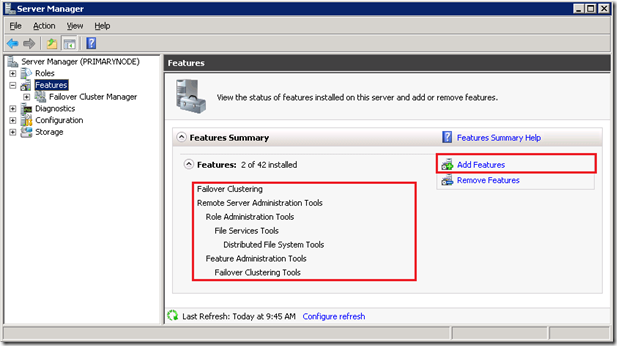
Before we begin, make sure that Windows Failover Clustering is installed on all nodes of the failover cluster. This can be done by adding the ‘Failover Clustering’ feature in Server Manager. Also, add the ‘Remote Server Administration Tools’ feature. This feature provides administration tools such as ‘Failover Cluster Manager’ MMC snap-in as well as the DFS Management MMC snap-in which are useful in configuring Failover Clustering and DFS Replication respectively. The below screenshot shows a server with both ‘Failover Clustering’ and ‘Remote Server Administration Tools’ features installed. It is also recommended at this stage to install the ‘File Server Role’ along with the ‘DFS Replication’ role service – details are provided in the third blog post in this series.
On one of the nodes that will be part of the failover cluster (say ‘PrimaryNode’ in this example), launch the ‘Failover Cluster Manager’ MMC snap-in either from the ‘Administrative Tools’ menu or by typing ‘cluadmin.msc’ at the command prompt. This MMC snap-in is used for configuring and managing Windows Failover clusters.

The below screenshot illustrates the look and feel of the MMC snap-in on a server running Windows Server 2008 R2. The start page contains a list of helpful documentation links as well as a list of common cluster management tasks. Note that since this machine is not yet part of a Windows Failover cluster, the left hand side pane is pretty much empty.

NOTE: Before configuring a fresh Windows Failover cluster, it is recommended to validate the configuration. Please review your hardware configuration and check to see that it meets Microsoft’s recommendations in order to get the most out of your Windows Failover cluster.
More information about this process is available in the Failover Cluster step-by-step guide on TechNet .

Clicking on the ‘Validate a Configuration…’ link in Failover Cluster Manager snap-in brings up the ‘Validate a Configuration Wizard’ .

Follow the instructions in this wizard and enter the names of all the servers which will be members of this Windows Failover cluster in the wizard. Note that we’ve selected both servers which we intend to be nodes of the new failover cluster (‘PrimaryNode’ as well as ‘SecondaryNode’). These are the servers which will be validated by the wizard.

The ‘Testing Options’ wizard page that follows enable an administrator to select what tests are to be run in order to validate the configuration. It is recommended to run all the available tests. Once the tests have completed running, a report is generated. Check the report to ensure that the hardware configuration is suitable for clustering.

After the cluster’s hardware configuration has been validated, it is now time to create a new Windows Failover cluster to host Contoso’s datacenter file server. The following steps describe how to create a Windows Failover Cluster.
To begin, in the Failover Cluster Manager MMC snap-in, select ‘Create a Cluster…’ from the ‘ Actions’ pane on the right.

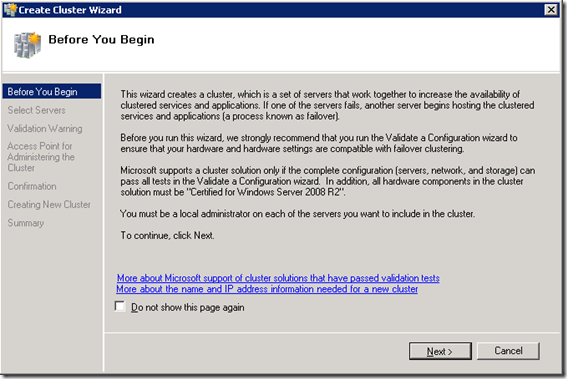
This launches the ‘Create Cluster Wizard’ . This wizard can be used to create a Windows Failover Cluster.
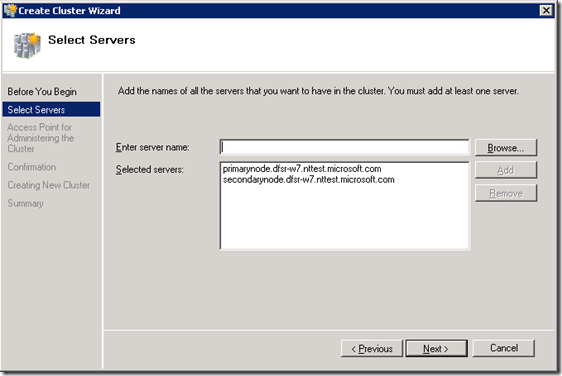
In the ‘Select Servers’ wizard page that follows, select the servers which will be part of this failover cluster. As discussed above, we are going to create a new failover cluster for Contoso. This failover cluster will be a 2-node cluster consisting of the servers ‘PrimaryNode’ and ‘SecondaryNode’ and shared storage.
In the ‘Access Point for Administering the Cluster’ wizard page that follows, provide a name for the failover cluster. This name is used when administering the failover cluster. We’ve provided the name ‘ContosoCluster’ for this failover cluster.

Thereafter, click ‘Next’ at the Confirmation screen that follows and the new failover cluster is created. A ‘Summary’ page at the end of the wizard displays the status of the cluster creation task.

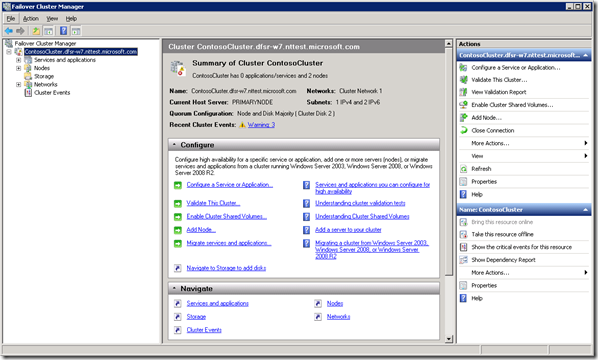
That’s it! We have now configured a two-node Windows Failover cluster. We can now proceed to configure this as a highly available file server and thereafter set it up as a DFS Replication member server. Notice that a new cluster called ‘ContosoCluster’ is now visible in the Failover Cluster Manager MMC snap-in on the left hand side column. This cluster has not yet been configured to run any highly available application workload as yet, which is what we will do next.
The next blog post in this series explains how to configure DFS Replication for high availability . Once that step is complete, the failover cluster can be added to a replication group.
All posts in this series:
-
Deploying DFS Replication on a Windows Failover Cluster – Part I: Explains how to create a new Windows Server 2008 R2 failover cluster.
-
Deploying DFS Replication on a Windows Failover Cluster – Part II: Explains how to configure DFS Replication service for high availability on the failover cluster.
-
Deploying DFS Replication on a Windows Failover Cluster – Part III: Explains how to add the failover cluster as a member server in a DFS replication group.
-------
You must be a registered user to add a comment. If you've already registered, sign in. Otherwise, register and sign in.