Deploy an ADLDS lab with replication and sync in less than an hour.
Abstract
This article helps you creating an ADLDS lab in less than an hour. If you follow the article as it is, you will have an AD forest with an Enterprise Certificate Authority and 4 servers not joined to the domain. These 4 servers will hold an ADLDS instances that syncs some data from the AD forest. LDAPS is enabled for the ADLDS instance.
Of course, the lab can be made simpler and you can skip parts of the deployment process.
Audience
If you are an ADLDS expert and want to save time, this deployment script makes creating a lab much easier. If you are not an ADLDS expert, you can also save a lot of time and find a step by step instruction how to setup ADLDS fully automated.
Requirements
To install the lab, you need
- A Hyper-V host running Windows 10 or Windows Server 2012 R2 or 2016 or an Azure subscription
- The latest version of AutomatedLab
Expected Result
- One domain controller for the contoso.com forest. The forest will have around 6.000 user accounts.
- One Enterprise Certificate Authority in the contoso.com forest. The CA is used to issue certificates to the ADLDS instances to allow LDAPS communication.
- 4 servers that will host and replicate one ADLDS instance.
- ADLDS syncs about 500 user accounts from AD.
The Deployment
VMs and basic services
To keep the deployment as simple as possible, AutomatedLab is used to deploy the virtual machines and the required services. Then some cmdlets of the AutomatedLab framework are used to deploy and configure ADLDS.
Note: AutomatedLab allows you to have all the code on your host computer and invoke the it on the VMs. It uses PowerShell remoting and adds more comfort to this standard feature. There is no need to care about credentials or double hope authentication issues.
[code lang="PowerShell"]
$labName = 'ADLDS1'
New-LabDefinition -Name $labName -DefaultVirtualizationEngine HyperV
#defining default parameter values, as these ones are the same for all the machines
$PSDefaultParameterValues = @{
'Add-LabMachineDefinition:Memory' = 1GB
'Add-LabMachineDefinition:OperatingSystem' = 'Windows Server 2016 SERVERDATACENTER'
'Add-LabMachineDefinition:Network' = "$labName"
}
Add-LabVirtualNetworkDefinition -Name $labName -AddressSpace 192.168.40.0/24
$postInstallActivity = @()
$postInstallActivity += Get-LabPostInstallationActivity -ScriptFileName PrepareRootDomain.ps1 -DependencyFolder $labSources\PostInstallationActivities\PrepareRootDomain
$postInstallActivity += Get-LabPostInstallationActivity -ScriptFileName 'New-ADLabAccounts 2.0.ps1' -DependencyFolder $labSources\PostInstallationActivities\PrepareFirstChildDomain
Add-LabMachineDefinition -Name aDC1 -Roles RootDC -DomainName contoso.com -PostInstallationActivity $postInstallActivity
Add-LabMachineDefinition -Name aCA1 -Roles CaRoot -DomainName contoso.com
Add-LabMachineDefinition -Name aLDS01
Add-LabMachineDefinition -Name aLDS02
Add-LabMachineDefinition -Name aLDS03
Add-LabMachineDefinition -Name aLDS04
Install-Lab
$machines = Get-LabVM
Install-LabWindowsFeature -ComputerName $machines -FeatureName RSAT-AD-Tools -AsJob
Install-LabSoftwarePackage -ComputerName $machines -Path $labSources\SoftwarePackages\Notepad++.exe -CommandLine /S -AsJob
Install-LabSoftwarePackage -ComputerName $machines -Path $labSources\SoftwarePackages\winrar.exe -CommandLine /S -AsJob
Get-Job -Name 'Installation of*' | Wait-Job | Out-Null
$machines = Get-LabVM | Where-Object Name -Like *lds*
Install-LabWindowsFeature -ComputerName $machines -FeatureName ADLDS
Checkpoint-LabVM -All -SnapshotName 1
Show-LabDeploymentSummary -Detailed
After having run this code block, all the machines, the AD domain and enterprise CA are ready. The ADLDS feature is installed on all future ADLDS servers and a snapshot was created of the whole lab. The cmdlet Show-LabDeploymentSummary prints out a detailed summary about what has been deployed.
ADLDS Definitions
The next couple of lines are definitions that will be used later. You can modify names and ports if required.
[code lang="PowerShell"]
$allAdldsServers = Get-LabVM | Where-Object Name -Like *lds*
$firstAdldsServer = $allAdldsServers | Select-Object -First 1
$otherAdldsServer = $allAdldsServers | Select-Object -Skip 1
$instanceName = 'LDS1'
$instancePartitionName = "dc=$instanceName,dc=com"
$instanceLdapPort = 5000
$instanceLdapsPort = 5001
$adamServiceUserName = 'AdldsService'
$adamServiceUserPassword = 'Password1'
$adamSyncUserName = 'AdamSync'
$adamSyncUserPassword = 'Password1'
$domainName = (Get-LabVM -Role RootDC).DomainName
$domainDefaultNamingContext = Invoke-LabCommand -ComputerName (Get-LabVM -Role RootDC) -ScriptBlock { (Get-ADRootDSE).DefaultNamingContext } -PassThru
$netBiosDomainName = $domainName.Split('.')[0]
$sslCertificateSubject = "*.$domainName"
Requirements like DNS and Service Accounts
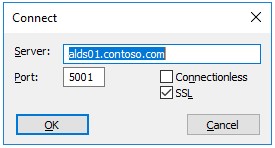
Part of the lab is also enabling LDAPS for the ADLDS instance. This requires accessing the ADLDS instance by the same DNS name used to issue the LDAPS certificate. This step creates the DNS entries on the domain controller so you can reach the ADLDS instance by alds01.contoso.com to alds04.contoso.com.
[code lang="PowerShell"]
Invoke-LabCommand -ActivityName 'Add DNS record for ADLDS Server' -ComputerName (Get-LabVM -Role RootDC) -ScriptBlock {
$zone = Get-DnsServerZone -Name $env:USERDNSDOMAIN
foreach ($adldsServer in $allAdldsServers)
{
Add-DnsServerResourceRecordA -Name $adldsServer.Name -IPv4Address $adldsServer.IpV4Address -ZoneName $zone.ZoneName
}
} -Variable (Get-Variable allAdldsServers)
ADLDS will be configured to use a local service account. This service account must be created on all computers that will host the ADLDS instance. Username and password are used as defined previously.
The service account does not have to be a local administrator. However, if the service user is not an administrator and want to use LDAPS, you have to assign read permissions to the service account on the certificate's private key stored in C:\Users\All Users\Application Data\Microsoft\Crypto\RSA\MachineKeys.
[code lang="PowerShell"]
Invoke-LabCommand -ActivityName 'Create Service User' -ComputerName $allAdldsServers -ScriptBlock {
$password = $adamServiceUserPassword | ConvertTo-SecureString -AsPlainText -Force
$user = New-LocalUser -Name $adamServiceUserName -Password $password
Add-LocalGroupMember -Group Administrators -Member $user
} -Variable (Get-Variable -Name adamServiceUserName, adamServiceUserPassword)
Installing ADLDS
The next code block installs the first ADLDS instance (InstallType=unique).
Before starting the ADLDS installation an additional schema file is added to the ADAM directory. The schema file connects the auxiliary class 'msDS-BindableObject' to the user class to allow users authenticating against the ADLDS instance using LDAP simple bind.
As the additional schema file is in the ADAM directory, it can be imported as part of the ADLDS installation.
[code lang="PowerShell"]
Invoke-LabCommand -ActivityName InstallADLDS -ComputerName $firstAdldsServer -ScriptBlock {
$ldf = @'
dn: CN=User,CN=Schema,CN=Configuration,DC=X
changetype: Modify
add: auxiliaryClass
auxiliaryClass: msDS-BindableObject
-
dn:
changetype: modify
add: schemaUpdateNow
schemaUpdateNow: 1
-
'@ | Out-File -FilePath C:\Windows\ADAM\MS-adamschemaBindableObject.LDF
<# The following text file defines the ADLDS installation. It is later used to adaminstall.exe as a parameter input file. This process is documented in [Perform an Unattended Install of an AD LDS Instance https://technet.microsoft.com/en-us/library/cc816774(v=ws.10).aspx\] #>
@"
[ADAMInstall]
InstallType=Unique
InstanceName=$instanceName
LocalLDAPPortToListenOn=$instanceLdapPort
LocalSSLPortToListenOn=$instanceLdapsPort
NewApplicationPartitionToCreate="$instancePartitionName"
DataFilesPath=C:\Program Files\Microsoft ADAM\$instanceName\data
LogFilesPath=C:\Program Files\Microsoft ADAM\$instanceName\data
ImportLDIFFiles="MS-AdamSyncMetadata.ldf" "MS-adamschemaw2k8.LDF" "MS-User.ldf" "MS-adamschemaBindableObject.LDF"
AddPermissionsToServiceAccount=Yes
ServiceAccount=$adamServiceUserName
ServicePassword=$adamServiceUserPassword
"@ | Out-File -FilePath C:\adldsInstall.txt
C:\Windows\ADAM\adaminstall.exe /answer:C:\adldsInstall.txt
} -Variable (Get-Variable -Name instanceName, instancePartitionName ,instanceLdapPort, instanceLdapsPort, adamServiceUserName, adamServiceUserPassword) -PassThru
Then the replicas can be installed using also the definitions made above.
[code lang="PowerShell"]
Invoke-LabCommand -ActivityName InstallADLDS -ComputerName $otherAdldsServer -ScriptBlock {
<# The following text file defines the ADLDS installation. It is later used to adaminstall.exe as a parameter input file. This process is documented in [Perform an Unattended Install of an AD LDS Instance https://technet.microsoft.com/en-us/library/cc816774(v=ws.10).aspx\] #>
@"
[ADAMInstall]
InstallType=Replica
InstanceName=$instanceName
LocalLDAPPortToListenOn=$instanceLdapPort
LocalSSLPortToListenOn=$instanceLdapsPort
ApplicationPartitionsToReplicate="$instancePartitionName"
SourceServer=$firstAdldsServer
SourceLDAPPort=$instanceLdapPort
DataFilesPath=C:\Program Files\Microsoft ADAM\$instanceName\data
LogFilesPath=C:\Program Files\Microsoft ADAM\$instanceName\data
AddPermissionsToServiceAccount=Yes
ServiceAccount=$adamServiceUserName
ServicePassword=$adamServiceUserPassword
"@ | Out-File -FilePath C:\adldsInstall.txt
C:\Windows\ADAM\adaminstall.exe /answer:C:\adldsInstall.txt
} -Variable (Get-Variable -Name instanceName, instancePartitionName, instanceLdapPort, instanceLdapsPort, firstAdldsServer, adamServiceUserName, adamServiceUserPassword) -PassThru
Setting up LDAPS
Next step is to request an SSL certificate and put onto all ADLDS servers. The certificate must be in the ADLDS service account’s personal certificate store.
[code lang="PowerShell"]
$ca = Get-LabIssuingCA
#the ADLDS VMs are not domain-joined so they cannot request certificates from the Enterprise CA. The LDAPS certificate
#is requested on the CA itself...
$cert = Request-LabCertificate -Subject "CN=$sslCertificateSubject" -OnlineCA $ca -TemplateName 'WebServer' -ComputerName $ca -PassThru
#and then copied to the ASLDS servers
Get-LabCertificate -ComputerName $ca -SearchString $sslCertificateSubject -FindType FindBySubjectName |
Add-LabCertificate -ComputerName $allAdldsServers -ServiceName "ADAM_$instanceName" -Location CERT_SYSTEM_STORE_SERVICES
To allow someone to connect to the ADLDS instance, a user is required. This code block creates an OU first, then creates a user account and adds this account to the Readers role. LDAP Simple Bind requires SSL, as the option 'RequireSecureSimpleBind' will be set to '1' in this code block as well.
[code lang="PowerShell"]
Invoke-LabCommand -ActivityName 'Create a user to bind to ADLDS' -ComputerName $firstAdldsServer -ScriptBlock {
$PSDefaultParameterValues = @{
'*-AD*:Server' = "localhost:$instanceLdapPort"
}
$path = "DC=$instanceName,DC=com"
$rootDse = Get-ADRootDSE
Set-ADObject -Identity "CN=Directory Service,CN=Windows NT,CN=Services,$($rootDse.configurationNamingContext)" -Remove @{ 'msDS-Other-Settings' = 'RequireSecureSimpleBind=0' }
Set-ADObject -Identity "CN=Directory Service,CN=Windows NT,CN=Services,$($rootDse.configurationNamingContext)" -Add @{ 'msDS-Other-Settings' = 'RequireSecureSimpleBind=1' }
$ou = New-ADOrganizationalUnit -Name Users -Path $path -PassThru -ProtectedFromAccidentalDeletion $false
$pass = 'Somepass1' | ConvertTo-SecureString -AsPlainText -Force
$user = New-ADUser -Name BindTest -AccountPassword $pass -Enabled $true -Path $ou -PassThru
$group = Get-ADGroup -Identity "CN=Readers,CN=Roles,$path"
$group | Add-ADGroupMember -Members $user
Write-Host "LDAP Simple Bind test user account is: '$($user.DistinguishedName)'"
} -Variable (Get-Variable -Name instanceName) -PassThru
Now ADLDS is deployed and ready to use. You can connect to the instance using LDAP and LDAPS, but a simple bind works only over LDAPS. Replications should work between all instances. You can get a list of all replicas and about the replication state using the following commands:
[code lang="PowerShell"]
dsmgmt "partition management" "connection" "connect to server localhost:5000" quit 'list nc replicas "dc=lds1,dc=com"' quit quit
repadmin /replsum alds01:5000
LDP.exe is quite useful to test the connectivity, authentication and to take a look at the naming contexts and their content. You can use port 5000 to connect via LDAP or 5001 using LDAPS.
The previously created user BindTest can be used to authenticate against the ADLDS instance using a LDAP simple bind. 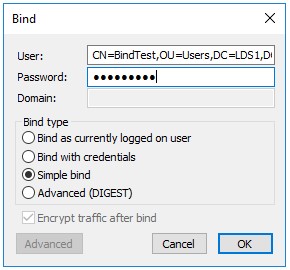
The result will be like this:
[code]
res = ldap_simple_bind_s(ld, 'CN=BindTest,OU=Users,DC=LDS1,DC=com', <unavailable>); // v.3
Authenticated as: 'CN=BindTest,OU=Users,DC=LDS1,DC=com'.
If you try this over an LDAP connection instead of LDAPS, you will get the following error:
[code]
res = ldap_simple_bind_s(ld, 'CN=BindTest,OU=Users,DC=LDS1,DC=com', <unavailable>); // v.3
Error <49>: ldap_simple_bind_s() failed: Invalid Credentials
Server error: 8009030C: LdapErr: DSID-0C0903D3, comment: AcceptSecurityContext error, data 202d, v3839
Error 0x8009030C The logon attempt failed
Setting up ADAMSync
The next section of this post enables ADAMSync. ADAMSync will be configured to sync all accounts that have the email address *.test.com.
This code block takes some 500 random users from the AD domain and changes their email address to the domain test.com. Only these accounts will be synced as defined by the sync LDAP filter in the next step.
[code lang="PowerShell"]
Invoke-LabCommand -ActivityName 'Add test email address' -ComputerName (Get-LabVM -Role RootDC) -ScriptBlock {
$rootDse = Get-ADRootDSE
$users = Get-ADUser -Filter * -SearchBase "OU=Lab Accounts,$($rootDse.defaultNamingContext)"
1..500 | ForEach-Object {
$u = $users | Get-Random
$u | Set-ADObject -Replace @{ mail = "$($u.GivenName).$($u.SurName)@test.com" }
}
}
ADAMSync needs to authenticate against the AD domain, hence a user account in AD is required. The username and password is taken from the definitions done previously.
[code lang="PowerShell"]
Invoke-LabCommand -ActivityName 'Create user for ADAMSync' -ComputerName (Get-LabVM -Role RootDC) -ScriptBlock {
$password = $adamSyncUserPassword | ConvertTo-SecureString -AsPlainText -Force
New-ADUser -Name $adamSyncUserName -AccountPassword $password -Enabled $true
} -Variable (Get-Variable adamSyncUserName, adamSyncUserPassword)
This XML document defines how the ADLDS sync should work. This definition is later stored in the partition to sync using 'adamsync.exe /install'. You can view the sync configuration stored in the property 'configurationFile' on the partition root defined in the sync ('target-dn'). This property can be viewed with ldp.exe or adsiedit.msc.
The XML document contains the source and target information, logon information and an LDAP filter to select which objects should be synced.
NOTE: XML does not allow the usage of all characters. This can be an issue with the field object-filter 'adamsync.exe /install' does not trigger the sync, it does only define it.
[code lang="PowerShell"]
Invoke-LabCommand -ComputerName $firstAdldsServer -ScriptBlock {
@"
<?xml version="1.0"?>
<doc>
<configuration>
<description>Sync for $instanceName</description>
<security-mode>object</security-mode>
<source-ad-name>$domainName</source-ad-name>
<source-ad-partition>$domainDefaultNamingContext</source-ad-partition>
<source-ad-account>$adamSyncUserName</source-ad-account>
<account-domain>$netBiosDomainName</account-domain>
<target-dn>DC=$instanceName,DC=com</target-dn>
<query>
<base-dn>$domainDefaultNamingContext</base-dn>
<object-filter>(&(|(objectClass=user)(objectClass=group)(objectClass=publicFolder))(mail=*@test.com))</object-filter>
<attributes>
<include>surname</include>
<include>givenName</include>
<include>mail</include>
<include>displayName</include>
<include>name</include>
</attributes>
</query>
<schedule>
<aging>
<frequency>5</frequency>
<num-objects>0</num-objects>
</aging>
<schtasks-cmd></schtasks-cmd>
</schedule>
</configuration>
<synchronizer-state>
<dirsync-cookie></dirsync-cookie>
<status></status>
<authoritative-adam-instance></authoritative-adam-instance>
<configuration-file-guid></configuration-file-guid>
<last-sync-attempt-time></last-sync-attempt-time>
<last-sync-success-time></last-sync-success-time>
<last-sync-error-time></last-sync-error-time>
<last-sync-error-string></last-sync-error-string>
<consecutive-sync-failures></consecutive-sync-failures>
<user-credentials></user-credentials>
<runs-since-last-object-update></runs-since-last-object-update>
<runs-since-last-full-sync></runs-since-last-full-sync>
</synchronizer-state>
</doc>
"@ | Out-File -FilePath C:\MS-AdamSyncConf.xml
"C:\Windows\ADAM\adamsync.exe /install localhost:$instanceLdapPort C:\MS-AdamSyncConf.xml /passPrompt" | Out-File -FilePath C:\InstallAdamSync.bat -Encoding ascii
$cmd = "C:\Windows\ADAM\adamsync.exe /sync localhost:$instanceLdapPort '$instancePartitionName' /log C:\ADAMSyncLog{0:yyMMdd_hhmmss}.log" -f (Get-Date)
$cmd = [scriptblock]::Create($cmd)
$t = New-JobTrigger -RepetitionInterval (New-TimeSpan -Hours 1) -RepeatIndefinitely $true -At (Get-Date).AddMinutes(1)
Register-ScheduledJob -Name AdldsSync -ScriptBlock $cmd -Trigger $t | Out-Null
} -Variable (Get-Variable -Name domainName, instanceName, domainDefaultNamingContext, adamSyncUserName, netBiosDomainName, instanceLdapPort) -PassThru
NOTE: 'adamsync.exe /install' must be called manually, as the password prompt does not work within a script. This seems to be a shortcoming of ADAMSync.exe. The code block puts the install command into a batch file that you can call on the VM hosting the first ADLDS instance using PowerShell (do not use the ISE).

After ADAMSync is installed, you can start the sync by calling 'adamsync.exe /sync'. A scheduled task was created on the firest ADLDS instance that runs the sync every 1 hour. If you want to run it right after installing ADAMSync, you can use the following command to invoke it manually.
[code lang="PowerShell"]
Get-ScheduledJob -Name AdldsSync | Set-ScheduledJob -RunNow
The scheduled task calling ADAMSync writes a log in C:\ that contains info about all synced objects.