AutomatedLab Introduction Part 3 – Working with Predefined Server Roles
Summary
The last blog article explained how to create a small lab environment using AutomatedLab. This article covers how to extend the lab created in the previous article by predefined server roles and switch the operating system to Windows 10 Technical Preview.
Installation
If you have a pre-2.5 version of AutomatedLab installed, please uninstall it and install the latest version from https://gallery.technet.microsoft.com/AutomatedLab-026d81f9.
The installation process of AutomatedLab is covered in the article AutomatedLab Introduction - Part 2.
Prerequisites for extending the lab
The steps described in Part 2 of this blog series have to be completed.
Adding operating systems and products requires the respective ISO images being available on the Hyper-V host.
First, the following ISO images need to be downloaded and put into the \LabSources\ISOs folder
Windows Server Technical Preview (x64) - DVD (English)
Exchange Server 2013 with Service Pack 1 (x64)
SQL Server 2012 R2
Later the operating system for all the machines in the lab needs to be changed to have AutomatedLab install Windows 10 Technical Preview. However what is the correct operation system name?
As described in the last article, you can get a list of available operating systems using the cmdlet Get-LabAvailableOperatingSystems and just point to the LabSources folder. The cmdlet will mount each ISO found in the folder hierarchy and return the available operating Systems.
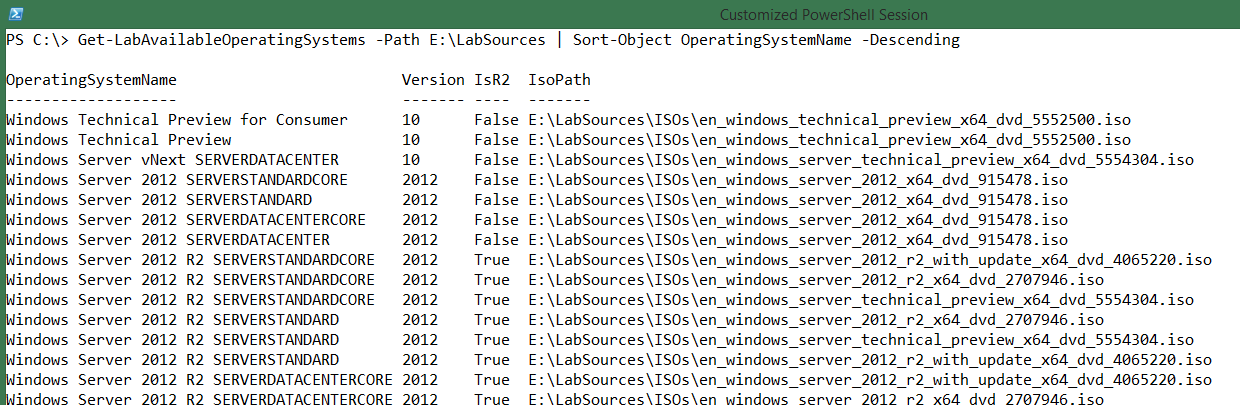
The output shows that the operating system name you are going to use later will be 'Windows Server vNext SERVERDATACENTER'
Remove the previous lab
If the lab created in the previous article exists on the Hyper-V host, it needs to be removed first. This is required as the domain controller should run on Windows 10 and the whole Active Directory Forest has to be recreated.
To remove the existing lab, start an elevated PowerShell and run the following command:
Remove-Lab –Path <LabPath>\Lab.xml
Warning: This command removed the Hyper-V virtual machines, the VHDs and the virtual network switch. There is no way to undo this change.
The cmdlet Remove-Lab is also quite helpful if you have to do tests multiple times and do not want to use checkpoints. Creating a lab over and over again just required calling the lab build scrip. Removing a large lab with many VMs can be a quite boring task and fault-prone (forgetting to remove a machine or VHD). The more you use AutomatedLab, the more you get accustomed to remove an entire lab as the rebuild just takes minutes.
Setting up the new lab
Add the required ISOs to the lab
AutomatedLab needs to know about the Windows 10 server ISO. The cmdlet Add-LabIsoImageDefinition adds the definition to the lab. It is important to flag the image as “IsOperatingSystem”. The name of the image does not matter but need to be unique.
Add-LabIsoImageDefinition -Name Win10 -Path $labSources\ISOs\en_windows_server_technical_preview_x64_dvd_5554304.iso –IsOperatingSystem
The next ISOs that need to be added is the Exchange Server 2013 and the SQL Server 2012 image:
Add-LabIsoImageDefinition -Name Exchange2013 -Path $labSources\ISOs\mu_exchange_server_2013_with_sp1_x64_dvd_4059293.iso
Add-LabIsoImageDefinition -Name SQLServer2012 -Path $labSources\ISOs\en_sql_server_2012_standard_edition_with_sp1_x64_dvd_1228198.iso
Changing the operating system
The lab created in the last article (the full script is at the bottom) contains two machines, S1DC1 and S1Server1. First thing is to change the operating system of the two machines in the existing lab. This is a simple Find & Replace operation: Replace the string 'Windows Server 2012 R2 SERVERDATACENTER' by 'Windows Server vNext SERVERDATACENTER'.
The definition of the domain controller looks like this:
$role = Get-LabMachineRoleDefinition -Role RootDC -Properties @{ DomainFunctionalLevel = 'Win2012R2'; ForestFunctionalLevel = 'Win2012R2' }
Add-LabMachineDefinition -Name S1DC1 `
-MemoryInMb 512 `
-Network $labName `
-IpAddress 192.168.81.10 `
-DnsServer1 192.168.81.10 `
-DomainName test1.net `
-IsDomainJoined `
-Roles $role `
-InstallationUserCredential $installationCredential `
-ToolsPath $labSources\Tools `
-OperatingSystem 'Windows Server vNext SERVERDATACENTER'
Exchange Machine Role
The easiest way to configure machines in AutomatedLab is using roles. Assigning a role to a machine is not mandatory tough. You can also configure things manually. A list of available roles is in the previous article.
To add an Exchange 2013 server to the current lab the respective role needs to be selected. Use the cmdlet Get-LabMachineRoleDefinition for that by providing the role and additional information as a hash table.
A basic Exchange 2013 installation needs some additional information
OrganizationName: The name assigned to the new Exchange Organization
DependencySourceFolder: Exchange 2013 has some prerequisites that need to be installed first. AutomatedLab needs to know where to find these files
If you forget to specify these values, the AutomatedLab validator will create an error and the installation will not start.
To name the organization “TestOrg” and point to the SoftwarePackages folder in LabSources (the folder that contains all AutomatedLab resources), use the following command:
$role = Get-LabMachineRoleDefinition -Role Exchange -Properties @{ OrganizationName = 'TestOrg'; DependencySourceFolder = "$labSources\SoftwarePackages" }
Exchange Server Definition
Having the role stored in a variable the next task is to define the new machine that is going to be the exchange server. This is more or less a copy and paste of an existing machine. Copy one of the servers to the clipboard and paste the machine below the S1Server1. Do not forget to give the new machine a new name and IP address. It is also recommended to give the Exchange server more RAM. Finally the previously created role needs to be assigned to the machine.
That is the full Exchange 2013 server definition running on Windows 10 Technical Preview.
Add-LabMachineDefinition -Name S1Ex1 `
-MemoryInMb 4096 `
-Network $labName `
-IpAddress 192.168.81.21 `
-DnsServer1 192.168.81.10 `
-DomainName test1.net `
-IsDomainJoined `
-Role $role `
-InstallationUserCredential $installationCredential `
-ToolsPath $labSources\Tools `
-OperatingSystem 'Windows Server vNext SERVERDATACENTER'
SQL2012 Role and Server Definition
AutomatedLab does a standard installation for SQL Server 2012. There are no customizations supported yet. Therefor defining the role for SQL Server 2012 is easier and does not take additional parameters.
Defining the SQL Server is also a mere copy and paste:
$role = Get-LabMachineRoleDefinition -Role SQLServer2012
Add-LabMachineDefinition -Name S1Sql1 `
-MemoryInMb 4096 `
-Network $labName `
-IpAddress 192.168.81.22 `
-DnsServer1 192.168.81.10 `
-DomainName test1.net `
-IsDomainJoined `
-Role $role `
-InstallationUserCredential $installationCredential `
-ToolsPath $labSources\Tools `
-OperatingSystem 'Windows Server vNext SERVERDATACENTER'
Note: There is a predefined PostInstallationActivity for SQL Server that installs the common sample databases Northwind and Pubs.
Exporting the lab
After configuring all lab definitions, you can export the lab configuration using the cmdlet Export-LabDefinition. This cmdlet creates two XML files in the directory ‘D:\FirstLab’. These files will contain the configuration of the lab, making them persistent.
Export-LabDefinition –Force

The Force switch overwrites existing files without asking for permission.
Installing process
All lab definitions have been done. The install of the lab gets triggered with the cmdlet Install-Lab. But first the lab that has been exported to XML needs to be imported. When importing a lab definition it runs through a bunch of validators that are making sure it is consistent and “installable”.
The next four lines are doing the actual hard work:
Import-Lab -Path (Get-LabDefinition).LabFilePath
Install-Lab -NetworkSwitches -BaseImages -VMs
#This sets up all Domains / Domain Controllers
Install-Lab -Domains
#Start the SQL Server 2012 Installation
Install-Lab –SQLServer2012
#Start the Exchange 2013 Installation
Install-Lab -Exchange2013
#Start all machines which have not yet been started
Install-Lab -StartRemainingMachines
Removing the lab
If in need of removing a lab, removing the small lab described in this article, is quite easy. However, if a lab of 10+ machines needs to be removed, the task becomes tedious. AutomatedLab also contains a cmdlet which can help cleanup all machines used in a lab. The cmdlet Remove-Lab first removes all the VMs used in a lab, then the disks and finally the network adapter. This way, if required, it is possible to install the lab, test what needs to be tested, and remove the lab again. This enables you to sequentially perform lab installations first, then perform tests in the lab, remove the lab, install a new lab, perform tests etc. Of course, checkpoints are also available enabling you to revert to these. One of the next articles will show how you can take advantage of this functionality.
Further Available Roles
There are other roles available:
RootDC |
Root domain controller for a domain |
FirstChildDC |
First child domain controller for a domain |
DC |
Additional domain controller for a domain |
DHCP |
DHCP server role |
FileServer |
File server role |
WebServer |
Web server role (all web role services) |
SQLServer2012 |
SQL server 2012 with default instance |
Exchange2013 |
Exchange Server 2013 |
Orchestrator |
System Center Orchestrator 2012 |
CaRoot |
Enterprise or Standalone Root Certificate Authority (Windows 2012 or 2012R2) |
CaSubordinate |
Enterprise or Standalone Subordinate Certificate Authority (Windows 2012 or 2012R2) |
Office2013 |
Microsoft Office 2013 |
DevTools |
Visual Studio 2012/2013
|
For details about the roles and the installation process, refer to the previous two articles of this series.
Creating Checkpoints of the Whole Lab Environment
AutomatedLab comes with an easy solution to manage checkpoint for multiple machines. There is no need of handling checkpoints using the Hyper-V GUI or creating your own PowerShell loops.
The cmdlet Checkpoint-LabVM can take checkpoints of a single machine or multiple machines (like the Hyper-V cmdlet) and also of the whole lab. The last task is realized by the switch parameter “All”.
Checkpoint-LabVM -All -SnapshotName 'InstallationDone'
To restore from the checkpoint simply call
Restore-LabVMSnapshot -All -SnapshotName 'InstallationDone'
You can also restore specific checkpoint from all machines using the cmdlet Restore-LabVMSnapshot.
Restore-LabVMSnapshot -All -SnapshotName '<SomeName>'
Note: When you call Checkpoint-LabVM, all VMs of the lab are paused before taking the checkpoints. This makes sure that all machines are on the same page which is important for Active Directory Replication for instance. However there can be a small gap of one or two seconds so this feature may not be suitable for all products or scenarios.
What’s next?
The next article describes, how AutomatedLab can be used to setup a PKI
The Full Script
This is how the full script should look like after putting all the pieces together.
$start = Get-Date
$labSources = 'E:\LabSources' #here are the lab sources
$vmDrive = 'D:' #this is the drive where to create the VMs
$labName = 'FirstLab' #the name of the lab, VM folder and network Switch
#create the folder path for the lab using Join-Path
$labPath = Join-Path -Path $vmDrive -ChildPath $labName
#create the target directory if it does not exist
if (-not (Test-Path $labPath)) { New-Item $labPath -ItemType Directory | Out-Null }
New-LabDefinition -Path $labPath -VmPath $labPath -Name $labName -ReferenceDiskSizeInGB 60
Add-LabVirtualNetworkDefinition -Name $labName -IpAddress 192.168.81.1 -PrefixLength 24
Add-LabDomainDefinition -Name test1.net -AdminUser administrator -AdminPassword Password1
Add-LabIsoImageDefinition -Name Win10 -Path $labSources\ISOs\en_windows_server_technical_preview_x64_dvd_5554304.iso –IsOperatingSystem
Add-LabIsoImageDefinition -Name Exchange2013 -Path $labSources\ISOs\mu_exchange_server_2013_with_sp1_x64_dvd_4059293.iso
Add-LabIsoImageDefinition -Name SQLServer2012 -Path $labSources\ISOs\en_sql_server_2012_standard_edition_with_sp1_x64_dvd_1228198.iso
$installationCredential = New-Object PSCredential('Administrator', ('Password1' | ConvertTo-SecureString -AsPlainText -Force))
$role = Get-LabMachineRoleDefinition -Role RootDC -Properties @{ DomainFunctionalLevel = 'Win2012R2'; ForestFunctionalLevel = 'Win2012R2' }
Add-LabMachineDefinition -Name S1DC1 `
-MemoryInMb 512 `
-Network $labName `
-IpAddress 192.168.81.10 `
-DnsServer1 192.168.81.10 `
-DomainName test1.net `
-IsDomainJoined `
-Roles $role `
-InstallationUserCredential $installationCredential `
-ToolsPath $labSources\Tools `
-OperatingSystem 'Windows Server vNext SERVERDATACENTER'
Add-LabMachineDefinition -Name S1Server1 `
-MemoryInMb 512 `
-Network $labName `
-IpAddress 192.168.81.20 `
-DnsServer1 192.168.81.10 `
-DomainName test1.net `
-IsDomainJoined `
-InstallationUserCredential $installationCredential `
-ToolsPath $labSources\Tools `
-OperatingSystem 'Windows Server vNext SERVERDATACENTER'
$role = Get-LabMachineRoleDefinition -Role Exchange -Properties @{ OrganizationName = 'TestOrg'; DependencySourceFolder = "$labSources\SoftwarePackages" }
Add-LabMachineDefinition -Name S1Ex1 `
-MemoryInMb 4096 `
-Network $labName `
-IpAddress 192.168.81.21 `
-DnsServer1 192.168.81.10 `
-DomainName test1.net `
-IsDomainJoined `
-Role $role `
-InstallationUserCredential $installationCredential `
-ToolsPath $labSources\Tools `
-OperatingSystem 'Windows Server vNext SERVERDATACENTER'
$role = Get-LabMachineRoleDefinition -Role SQLServer2012
Add-LabMachineDefinition -Name S1Sql1 `
-MemoryInMb 4096 `
-Network $labName `
-IpAddress 192.168.81.22 `
-DnsServer1 192.168.81.10 `
-DomainName test1.net `
-IsDomainJoined `
-Role $role `
-InstallationUserCredential $installationCredential `
-ToolsPath $labSources\Tools `
-OperatingSystem 'Windows Server vNext SERVERDATACENTER'
Export-LabDefinition -ExportDefaultUnattendedXml –Force
Import-Lab -Path (Get-LabDefinition).LabFilePath
Install-Lab -NetworkSwitches -BaseImages -VMs
#This sets up all Domains / Domain Controllers
Install-Lab -Domains
#Start the SQL Server 2012 Installation
Install-Lab –SQLServer2012
#Start the Exchange 2013 Installation
Install-Lab -Exchange2013
#Start all machines which have not yet been started
Install-Lab –StartRemainingMachines
$end = Get-Date
Write-Host "Setting up the lab took $($end - $start)"