Restricting Search permissions in SCC Portal
This blog post was written by an Exchange PFE, friend of us in FTC. Tiago Souza is a Security & Compliance expert based in Brazil. Enjoy it!
Most of you know that starting July 1st, 2017, you won't be able to use the EAC to create searches in Exchange Online. Instead, you will use the Content Search in the Security & Compliance Center.
If you access the in-place eDiscovery & hold page in EAC today, you are going to see the message below:

We have some customers using Exchange Online to restrict searches in EAC, as explained in the article Using RBAC to restrict Discovery Searches. I worked with one of them last week to move this logic into the new SCC Portal to use the Content Search.
We already have a support article talking about this configuration. However, what I want to do here is to condense the information as a “how-to”.
What would my customers like to achieve?
They would like to be able to restrict searches based on a role group and using a Distribution Group as the scope to limit the search.
For example:
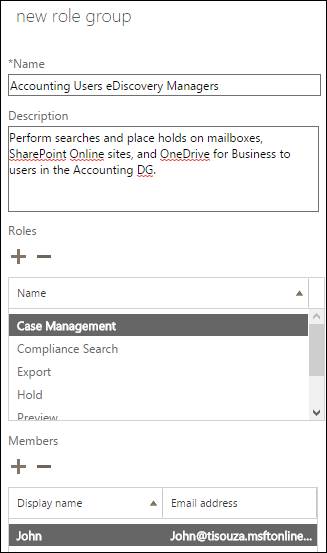
Role Group – Accounting Users eDiscovery Managers (I will use “John” as the eDiscovery Manager)
- Members of this role group can perform Content Searches, exports, etc., and will be used in the SCC filter.
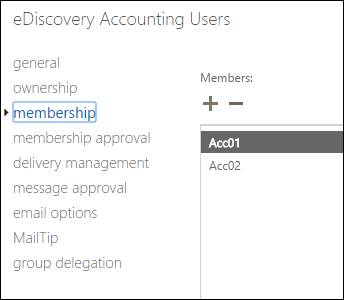
Distribution group – eDiscovery Accounting Users (I will use “Acc01” and “Acc02” in the example bellow)
- Members of this distribution group will be the scope of the search.
How to do it
Connect to the Security & Compliance Center and Exchange Online in a single remote PowerShell session.
$UserCredential = Get-Credential $Session = New-PSSession -ConfigurationName Microsoft.Exchange -ConnectionUri https://ps.outlook.com/powershell-liveid -Credential $UserCredential -Authentication Basic -AllowRedirection Import-PSSession $Session -DisableNameChecking $Session = New-PSSession -ConfigurationName Microsoft.Exchange -ConnectionUri https://ps.compliance.protection.outlook.com/powershell-liveid -Credential $UserCredential -Authentication Basic -AllowRedirection Import-PSSession $Session -AllowClobber -DisableNameChecking $Host.UI.RawUI.WindowTitle = $UserCredential.UserName + " (Exchange Online + Compliance Center)" Save and execute the command above as .\ConnectEXO-CC.ps1
Note: To run the script, check the pre-requisites in this link.
Create the Role Group in SCC Portal.
- Open the https://protection.office.com with the appropriated permissions
- Go to Permissions
- Select eDiscovery Manager and click in Copy (This will inherit the built-in eDiscovery Manager roles)
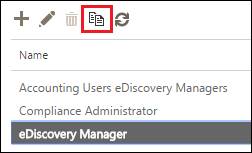
- Rename the Role Group and add the members allowed to execute searches.
- Click Save
Create the Distribution Group and hide it in the GAL.
Connect to EXO, or use the script described earlier.
Create a distribution group with the users in the scope of the searches.
New-DistributionGroup -Name "eDiscovery Accounting Users" -Alias "ediscoveryaccounting" -MemberJoinRestriction closed -MemberDepartRestriction closed -ModerationEnabled $true Get-DistributionGroup "eDiscovery Accounting Users" | Set-DistributionGroup -HiddenFromAddressListsEnabled $true Now add the users to the distribution group.
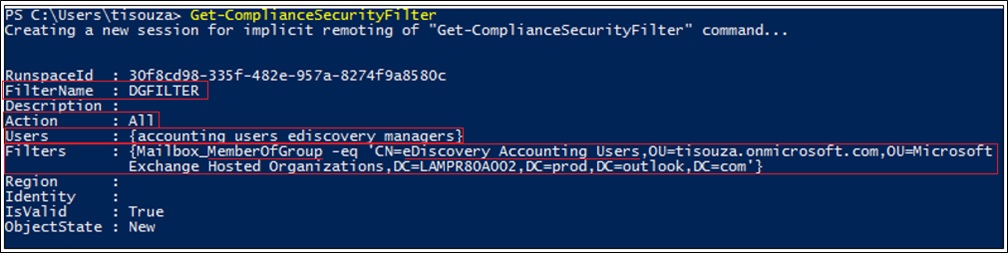
Create the Compliance Security Filter in SCC PowerShell:
$DG = Get-DistributionGroup "eDiscovery Accounting Users" New-ComplianceSecurityFilter -FilterName DGFilter -Users "Accounting Users eDiscovery Managers" -Filters "Mailbox_MemberOfGroup -eq '$($DG.DistinguishedName)'" -Action All
It's important to understand the parameters in this command to correctly configure the scope:- FilterName: Just the name used to identity a filter when using the Get-ComplianceSecurityFilter, Set-ComplianceSecurityFilter, and Remove-ComplianceSecurityFilter cmdlets.
- Users: This is important because it specifies the users who get this filter applied to their Content Searches. In our case, we are using the Role Group created earlier that contains people allowed to run the search. Important: You can't specify distribution groups with this parameter.
- Filters: Here we can specify the search criteria for the compliance security filter. In our example (Mailbox_MemberOfGroup -eq '$($DG.DistinguishedName)) we are using the MemberOfGroup, that means we are getting members from the DG we've created earlier. We can use other filters as explained here and here.
- Action: The possible Content Search actions are:
- Export – The filter is applied when exporting search results.
- Preview – The filter is applied when previewing search results.
- Purge – The filter is applied when purging search results.
- Search – The filter is applied when running a search.
- All – The filter is applied to all search actions.
Check the filter running Get-ComplianceSecurityFilter cmdlet.
Testing the solution
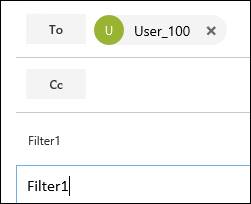
First, I will send an e-mail message to three users: Two of them are members of the distribution group in the scope of the search. But the third recipient is not a member of the distribution group, so it is out of the scope when running the search. I am using the same words in those e-mails the I can use a single keyword query when creating the Content Search. Just to keep the test simple.
User Acc01 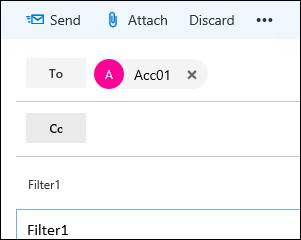
User Acc02 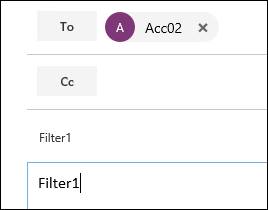
User “User_100” (out of scope – cannot be returned in the query)
Creating the Content Search
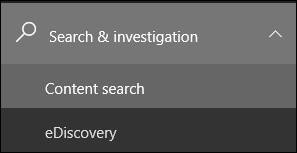
When you are logged in with the John user, you should see the Search & investigation option in the SCC Portal.
Select Content search and click in the +
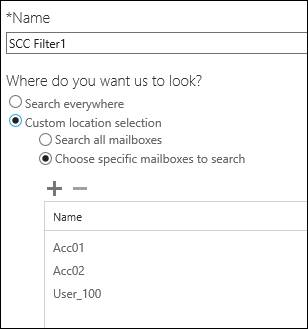
Give the search a name and select the accounts you want to add.
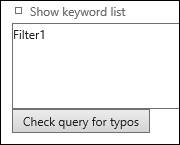
Look for Filter1 in next screen and click Search.
Wait for the search to finish (you can see in the right panel when it's finished)
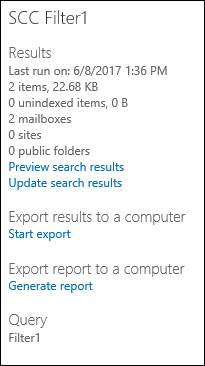
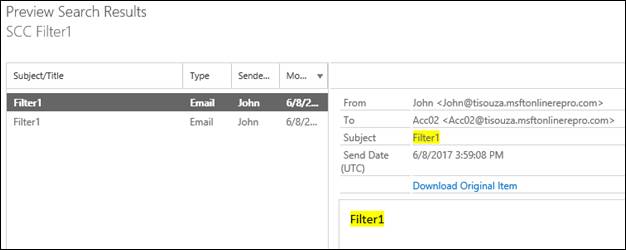
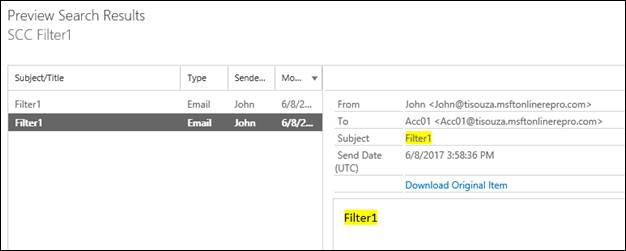
Let's see the Preview Search Results option and check what was found.
Content Search versus eDiscovery
You may have realized that I was using the Content Search feature in the example above. We have different experiences using content search vs eDiscovery Search. Using the content search, you can view all searches created, even if it was created by other users. That might not be your intention and in those cases, you should use eDiscovery instead. In eDiscovery you can only see cases that you created or the cases that you have been added as a case member.
To limit the potential display of content searches you can check this script that Aaron Guilmette has created.
Last words
Using Content Search and eDiscovery requires planning and practice. We recommend you configuring all the required holds and searches as soon as possible. That way you will always have the data you need. Of course, you may never need it, but if you do not tell Office 365 to hold the data for analysis, you might not have it when you need it.
Thank you note: I’d like to thank my colleagues from Microsoft, Helen Agard (Sr. Partner Tech Advisor) and Aaron Guilmette (Tech Solutions Professional), that helped me out with this content.